htmx는 작은 JavaScript 라이브러리입니다. 해당 사이트에는 "속성을 사용하여 HTML에서 직접 AJAX, CSS 전환, WebSocket 및 서버 전송 이벤트에 대한 액세스를 제공합니다"라고 나와 있습니다.
실제로 버튼에 hx-get="/hello"를 작성하면 htmx는 클릭 시 해당 요청을 보내고 페이지에 다시 나타나는 HTML을 넣습니다. JavaScript를 작성하지 않습니다.
먼저 시도해 보세요. 버튼을 클릭하세요. htmx가 요청을 하고 응답을 상자로 바꿉니다.
<!doctype html>
<html lang="en">
<head>
<meta charset="utf-8">
<meta name="viewport" content="width=device-width, initial-scale=1">
<title>htmx in one HTML file</title>
<style>
  body { margin: 0; padding: 20px; font-family: system-ui, sans-serif; background: #f4f5f7; }
  button {
    font: inherit; padding: 9px 16px; border: 0; border-radius: 8px;
    background: #3d72d7; color: #fff; cursor: pointer;
  }
  #out {
    margin-top: 14px; padding: 14px 16px; border-radius: 10px; min-height: 22px;
    background: #fff; box-shadow: 0 4px 14px rgba(0, 0, 0, .1);
  }
  #out p { margin: 0; }
  .note { color: #666; font-size: 13px; margin-top: 12px; }
</style>
</head>
<body>

<!-- htmx reads these attributes: GET /hello on click, put the reply in #out -->
<button hx-get="/hello" hx-target="#out">Say hello</button>
<div id="out">Nothing loaded yet.</div>
<p class="note">No JavaScript of your own runs on the click. htmx does it.</p>

<script src="https://cdn.jsdelivr.net/npm/htmx.org@2.0.11/dist/htmx.min.js"></script>

<script>
// Pretend server, so this file works with no server behind it.
// On a real site, delete this script: your server answers the same URLs with HTML.
let hellos = 0;
const routes = {
  'GET /hello': () => '<p>Hello #' + (++hellos) + '. This HTML was swapped in at ' +
    new Date().toLocaleTimeString() + '.</p>'
};
document.addEventListener('htmx:configRequest', (e) => {
  const d = e.detail;
  const route = routes[d.verb.toUpperCase() + ' ' + d.path];
  if (!route) return;
  e.preventDefault(); // answer here instead of over the network
  const swap = (d.elt.closest('[hx-swap]')?.getAttribute('hx-swap') || 'innerHTML').split(' ')[0];
  setTimeout(() => htmx.swap(d.target, route(d.parameters), { swapStyle: swap }), 200);
});
</script>
</body>
</html>
미리 알아야 할 한 가지: htmx는 서버가 요청에 응답할 것으로 기대합니다. 이 단일 파일에는 아무 것도 없으므로 마지막 스크립트는 페이지 내부에서 응답하는 작은 가상 서버입니다. 실제 사이트에서는 삭제합니다.
가장 작은 작업 페이지
모든 htmx 페이지에는 동일한 부분이 있습니다.
- htmx 스크립트 태그. 라이브러리를 로드합니다. htmx.org의 빠른 시작에서는 고정된 버전의 jsDelivr을 사용합니다.
- 요청 속성이 있는 요소.
hx-get,hx-post,hx-put,hx-patch또는hx-delete뒤에 URL이 옵니다. - 답변을 넣을 위치입니다.
hx-target는 CSS 선택기를 사용합니다. 이것이 없으면 htmx는 요청을 보낸 요소를 업데이트합니다.
<button hx-get="/hello" hx-target="#out">Say hello</button>
<div id="out"></div>

<script src="https://cdn.jsdelivr.net/npm/htmx.org@2.0.11/dist/htmx.min.js"></script>
이것이 전체 클라이언트 측입니다. 버튼을 클릭하면 htmx는 GET /hello를 보내고 응답을 #out에 넣습니다.
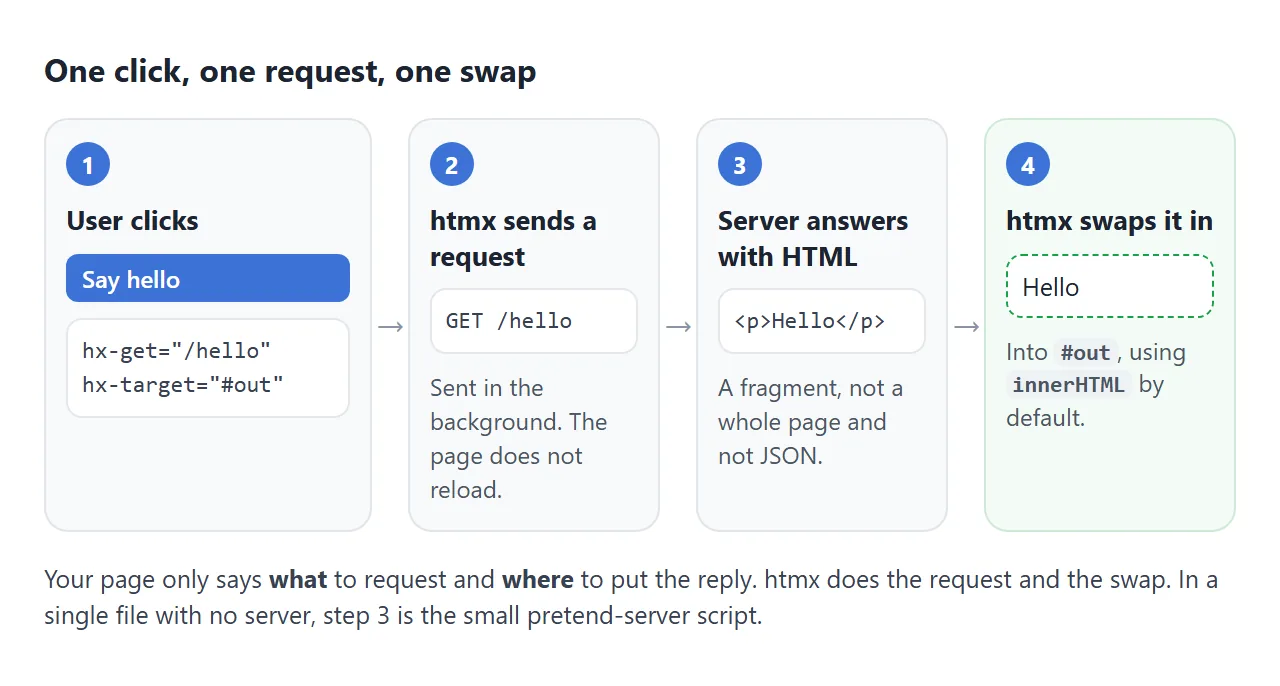
htmx는 언제 요청을 보내나요?
이벤트를 직접 연결하지 않습니다. htmx 문서에는 각 요소에 대한 "자연" 이벤트라는 기본값이 나열되어 있습니다.
| 요소 | 요청을 보냅니다. |
|---|---|
input, textarea, select |
change |
form |
submit |
| 그 밖의 모든 것 | click |
다른 이벤트를 사용하려면 hx-trigger를 추가하세요. 또한 changed(값이 변경된 경우에만) 및 delay(사용자가 일시 중지할 때까지 대기)와 같은 수정자를 사용합니다. 아래의 검색 예에서는 두 가지를 모두 사용합니다.
hx-swap: 응답이 도착하는 곳
기본적으로 htmx는 innerHTML인 대상 내부를 대체합니다. hx-swap는 다른 지점을 선택합니다. 아래의 각 버튼을 클릭하고 점선 상자를 살펴보세요.
<!doctype html>
<html lang="en">
<head>
<meta charset="utf-8">
<meta name="viewport" content="width=device-width, initial-scale=1">
<title>hx-swap compared</title>
<style>
  body { margin: 0; padding: 14px; font-family: system-ui, sans-serif; background: #f4f5f7; font-size: 14px; }
  .row { display: flex; flex-wrap: wrap; gap: 6px; margin-bottom: 12px; }
  button {
    font: inherit; padding: 8px 10px; border: 0; border-radius: 8px;
    background: #3d72d7; color: #fff; cursor: pointer;
  }
  button.reset { background: #6b7280; }
  code { font-size: 12px; background: #eef1f5; padding: 1px 4px; border-radius: 4px; }
  #box {
    padding: 12px; border: 2px dashed #3d72d7; border-radius: 10px; background: #fff; min-height: 30px;
  }
  .chip {
    display: inline-block; margin: 3px; padding: 4px 9px; border-radius: 99px;
    background: #d4f5dc; color: #14532d;
  }
  .label { color: #555; margin: 0 0 6px; }
</style>
</head>
<body>

<div id="stage">
  <div class="row">
    <button hx-get="/chip" hx-target="#box" hx-swap="innerHTML">innerHTML</button>
    <button hx-get="/chip" hx-target="#box" hx-swap="beforeend">beforeend</button>
    <button hx-get="/chip" hx-target="#box" hx-swap="afterend">afterend</button>
    <button hx-get="/chip" hx-swap="outerHTML">outerHTML (this button)</button>
  </div>
  <p class="label">Target: <code>#box</code> (dashed border)</p>
  <div id="box"><span class="chip">start</span></div>
</div>
<p><button class="reset" hx-get="/reset" hx-target="#stage" hx-swap="outerHTML">Reset</button></p>

<script src="https://cdn.jsdelivr.net/npm/htmx.org@2.0.11/dist/htmx.min.js"></script>

<script>
// Pretend server, so this file works with no server behind it.
// On a real site, delete this script: your server answers the same URLs with HTML.
const start = document.getElementById('stage').outerHTML;
let n = 0;
const routes = {
  'GET /chip': () => '<span class="chip">reply ' + (++n) + '</span>',
  'GET /reset': () => { n = 0; return start; }
};
document.addEventListener('htmx:configRequest', (e) => {
  const d = e.detail;
  const route = routes[d.verb.toUpperCase() + ' ' + d.path];
  if (!route) return;
  e.preventDefault(); // answer here instead of over the network
  const swap = (d.elt.closest('[hx-swap]')?.getAttribute('hx-swap') || 'innerHTML').split(' ')[0];
  setTimeout(() => htmx.swap(d.target, route(d.parameters), { swapStyle: swap }), 150);
});
</script>
</body>
</html>
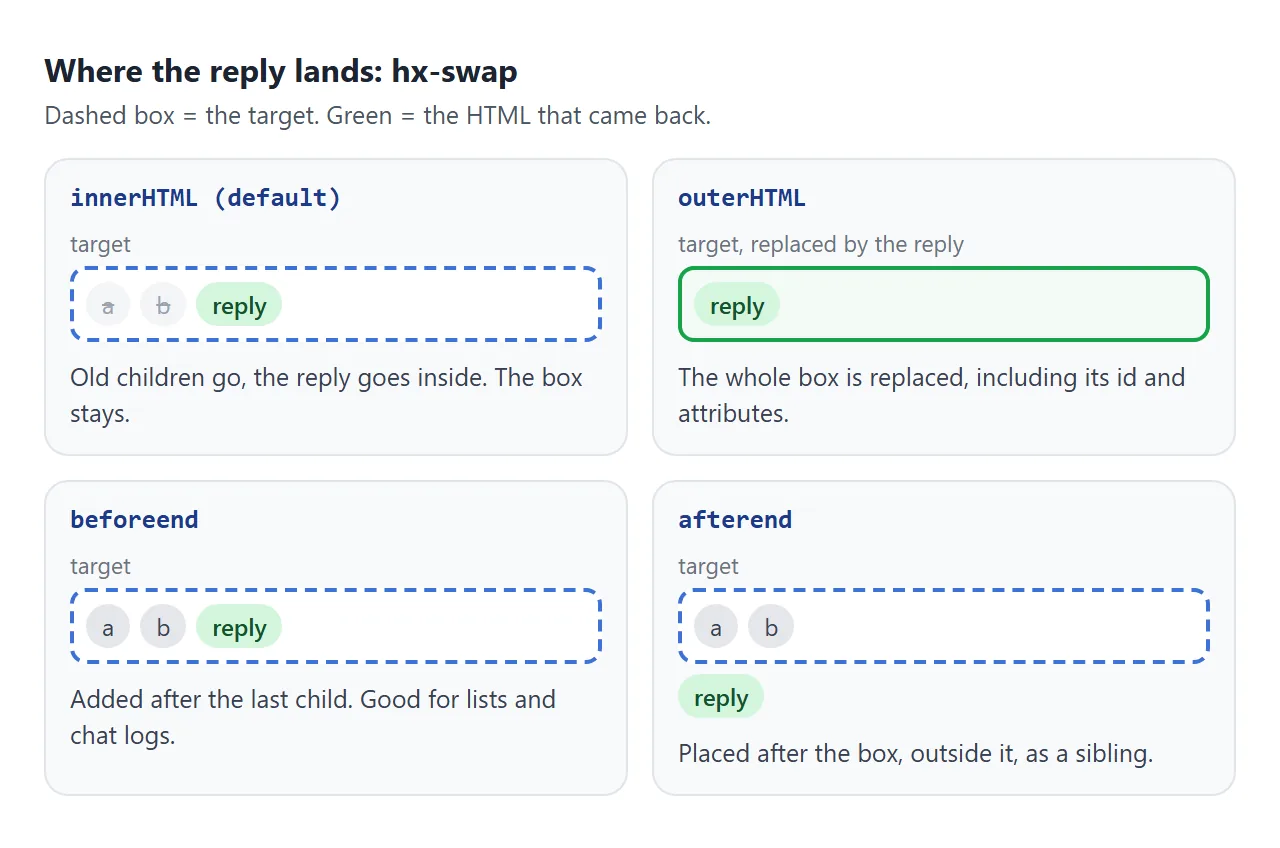
hx-swap 참조에는 다음 값이 나열되어 있습니다.
| 가치 | 기능 |
|---|---|
innerHTML |
대상의 내부 HTML을 대체합니다(기본값) |
outerHTML |
전체 대상 요소를 대체합니다. |
afterbegin |
대상의 첫 번째 하위 항목 앞에 삽입합니다. |
beforeend |
대상의 마지막 하위 항목 뒤에 삽입합니다. |
beforebegin |
대상 요소 앞에 삽입 |
afterend |
대상 요소 뒤에 삽입 |
delete |
응답이 무엇이든 대상을 삭제합니다. |
none |
페이지에 답글을 추가하지 않습니다. |
outerHTML로 조심하세요. id가 포함된 대상은 교체 후에 사라집니다. 이후 요청이 여전히 해당 id를 가리키는 경우 응답에는 동일한 id가 있는 요소가 포함되어야 합니다.
서버가 JSON이 아닌 HTML을 보냅니다.
htmx 문서에서는 "서버 측에서는 일반적으로 JSON이 아닌 HTML로 응답합니다."라고 간단하게 설명합니다. htmx는 데이터에서 마크업을 작성하지 않습니다. 응답을 받아 삽입합니다.
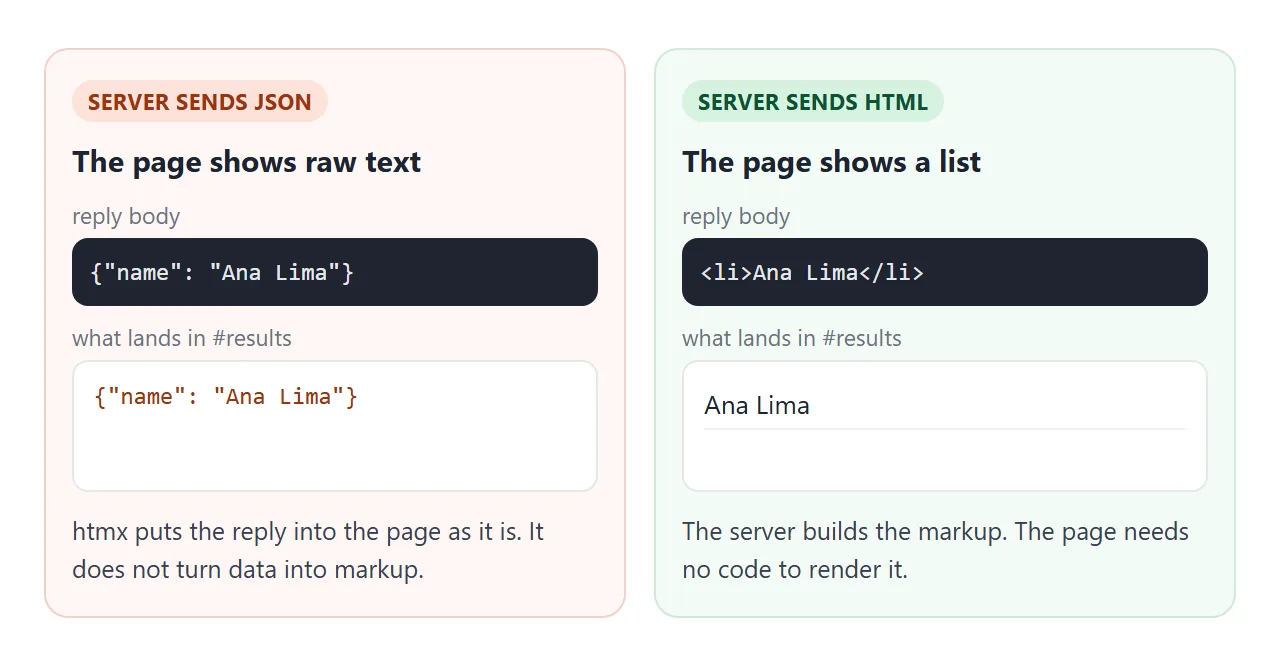
따라서 검색 엔드포인트는 배열이 아닌 목록 항목을 반환합니다.
<li><b>Ana Lima</b><span>Designer</span></li>
<li><b>Farah Khan</b><span>Designer</span></li>
사용자가 해당 HTML로 다시 입력한 내용은 먼저 이스케이프되어야 합니다. 그렇지 않으면 <b>x와 같은 쿼리가 마크업이 됩니다. 다음 예의 esc() 함수가 이를 수행합니다.
가상 서버의 작동 방식
단일 HTML 파일 뒤에는 서버가 없습니다. 파일을 더블클릭하면 주소가 file://로 시작하고 /hello에 대한 요청은 갈 곳이 없습니다. Chromium에서 htmx는 htmx:sendError를 실행하고 화면에는 아무 변화도 없습니다.
여기의 예에서는 하나의 리스너로 이 문제를 해결합니다. htmx는 요청을 보내기 전에 e.detail의 동사, 경로, 매개변수 및 대상과 함께 htmx:configRequest를 실행합니다. 스크립트:
GET /hello와 같은 경로를 찾습니다.e.preventDefault()를 사용하여 실제 요청을 취소합니다.- 대상, 빌드된 HTML 및 스왑 스타일을 사용하여
htmx.swap()를 호출합니다.
htmx.swap()는 htmx API의 일부입니다. "HTML 콘텐츠의 교환(및 정착)을 수행합니다". 새로운 콘텐츠도 htmx를 통과하므로 위의 재설정 버튼이 작동 버튼을 다시 가져옵니다.
실제 서버로 이동할 때에는 가상 서버를 삭제하고 HTML을 그대로 유지합니다. 속성은 동일하게 유지됩니다.
완성된 예: 활성 검색
이 디렉토리는 사용자가 입력하는 대로 검색합니다. 기다리는 동안에는 "검색 중..."이라는 라벨이 표시되고, 카운터에는 나간 요청 수가 표시됩니다.
<!doctype html>
<html lang="en">
<head>
<meta charset="utf-8">
<meta name="viewport" content="width=device-width, initial-scale=1">
<title>Active search with htmx</title>
<style>
  body { margin: 0; padding: 16px; font-family: system-ui, sans-serif; background: #eceef1; }
  .app {
    max-width: 460px; margin: 0 auto; background: #fff; border-radius: 12px;
    padding: 16px; box-shadow: 0 4px 16px rgba(0, 0, 0, .1);
  }
  h2 { margin: 0 0 12px; font-size: 18px; }
  input {
    box-sizing: border-box; width: 100%; font: inherit; padding: 9px 10px;
    border: 1px solid #cfd4dc; border-radius: 8px;
  }
  .meta { display: flex; justify-content: space-between; color: #666; font-size: 13px; margin: 8px 0; }
  ul { list-style: none; padding: 0; margin: 0; }
  li { padding: 8px 10px; border-bottom: 1px solid #eef0f3; display: flex; justify-content: space-between; gap: 8px; }
  li span { color: #666; font-size: 13px; }
  .empty { color: #888; padding: 8px 10px; }
</style>
</head>
<body>
<div class="app">
  <h2>Team directory</h2>

  <!-- Ask the server after typing stops for 300 ms, show "Searching" meanwhile -->
  <input type="search" name="q" placeholder="Type a name or a role"
         hx-get="/search"
         hx-trigger="input changed delay:300ms"
         hx-target="#results"
         hx-indicator="#spin">

  <div class="meta">
    <span id="spin" class="htmx-indicator">Searching...</span>
    <span>Requests sent: <b id="count">0</b></span>
  </div>

  <ul id="results"><li class="empty">Start typing to search 12 people.</li></ul>
</div>

<script src="https://cdn.jsdelivr.net/npm/htmx.org@2.0.11/dist/htmx.min.js"></script>

<script>
// Pretend server, so this file works with no server behind it.
// On a real site, delete this script: your server answers the same URLs with HTML.
const people = [
  ['Ana Lima', 'Designer'], ['Ben Okafor', 'Developer'], ['Chen Wei', 'Developer'],
  ['Dana Cohen', 'Product manager'], ['Eli Novak', 'Support'], ['Farah Khan', 'Designer'],
  ['Gus Moreau', 'Sales'], ['Hana Sato', 'Developer'], ['Ivan Petrov', 'Support'],
  ['Jade Brooks', 'Marketing'], ['Kofi Mensah', 'Sales'], ['Lena Fischer', 'Developer']
];
const esc = (s) => s.replace(/[&<>"']/g, (c) => '&#' + c.charCodeAt(0) + ';');
const routes = {
  'GET /search': (params) => {
    const q = (params.q || '').trim().toLowerCase();
    if (!q) return '<li class="empty">Start typing to search 12 people.</li>';
    const hits = people.filter(([name, role]) => (name + ' ' + role).toLowerCase().includes(q));
    if (!hits.length) return '<li class="empty">No one matches "' + esc(q) + '".</li>';
    return hits.map(([name, role]) => '<li><b>' + esc(name) + '</b><span>' + esc(role) + '</span></li>').join('');
  }
};
let count = 0;
document.addEventListener('htmx:configRequest', (e) => {
  const d = e.detail;
  const route = routes[d.verb.toUpperCase() + ' ' + d.path];
  if (!route) return;
  e.preventDefault(); // answer here instead of over the network
  document.getElementById('count').textContent = ++count;
  const ind = document.querySelector(d.elt.getAttribute('hx-indicator') || 'none');
  ind?.classList.add('htmx-request');
  setTimeout(() => {
    ind?.classList.remove('htmx-request');
    htmx.swap(d.target, route(d.parameters), { swapStyle: 'innerHTML' });
  }, 400);
});
</script>
</body>
</html>
입력에는 다음 네 가지 속성이 있습니다.
<input type="search" name="q"
       hx-get="/search"
       hx-trigger="input changed delay:300ms"
       hx-target="#results"
       hx-indicator="#spin">
- **
hx-get**는GET /search?q=...를 보냅니다. 입력의name가 매개변수가 됩니다. - **
hx-trigger**는 300ms 동안 입력이 멈출 때까지 기다렸다가 값이 변경된 경우에만 실행됩니다. - **
hx-indicator**는 "검색 중..." 레이블을 가리킵니다. htmx 문서는htmx-indicator클래스에 불투명도 0을 제공하며 요청이 실행되는 동안 표시됩니다.
실제 서버는 가상 서버와 마찬가지로 q를 읽고 일치하는 <li> 항목을 다시 보냅니다. 더 멋진 대기 상태에 대해서는 CSS 로딩 스피너를 참조하세요.
작동하지 않을 때
| 당신이 보는 것 | 원인 | 수정 |
|---|---|---|
| 클릭해도 아무 작업도 수행되지 않고 오류도 발생하지 않습니다. | htmx가 로드되지 않았습니다(잘못된 URL 또는 오타). | 스크립트 URL을 확인하세요. 콘솔의 typeof htmx는 undefined가 아니어야 합니다. |
| 두 번 클릭한 파일에서는 아무 일도 일어나지 않습니다 | file:// 뒤에는 서버가 없습니다. htmx가 htmx:sendError를 실행합니다. |
서버 실행 또는 가상 서버 스크립트 추가 |
원시 {"name": ...} 텍스트가 나타납니다. |
서버가 JSON으로 응답했습니다. | HTML 조각으로 답장하기 |
| 404 또는 500 응답은 아무것도 변경하지 않습니다. | 문서: 4xx 및 5xx 응답은 기본적으로 교체되지 않습니다. | htmx:responseError를 듣고 메시지를 표시합니다. |
자체 JavaScript로 추가된 버튼은 hx-get를 무시합니다. |
htmx는 새로운 요소를 보지 못했습니다 | 삽입 후 htmx.process(element)를 호출하세요. |
| 다른 도메인에 대한 요청이 거부되었습니다. | selfRequestsOnly의 기본값은 true입니다. |
자신의 도메인에 요청 유지 |
| 키를 누를 때마다 요청이 실행됩니다. | hx-trigger에 delay가 없습니다. |
changed delay:300ms 추가 |
스크립트 태그가 잘못된 위치에 있는 등 htmx에만 해당되지 않는 문제에 대해서는 HTML JavaScript가 작동하지 않음을 참조하세요.
링크로 공유하세요
htmx 페이지는 설명하는 것보다 보여주는 것이 더 쉽습니다. 스크린샷을 클릭할 수 없으며 .html 첨부 파일이 전화기에서 일반 코드로 열릴 수 있습니다.
작업 버전을 보내려면 페이지를 NOS 문서에 붙여넣고 공유 링크 만들기를 선택하세요. 링크할 HTML이 이를 안내합니다.
페이지는 작성된 대로 렌더링되고, htmx는 jsDelivr에서 로드되고 해당 스크립트가 실행되므로 페이지를 보내는 사람들은 클릭하여 스스로 검색할 수 있습니다. 나중에 코드를 변경하면 동일한 링크에 새 버전이 표시됩니다.
공유 페이지에는 자체 서버가 없으며 다른 사이트에 대한 요청이 차단됩니다. 공유하는 파일에 가상 서버를 유지하세요. 하나의 파일에서 실행되는 더 많은 페이지를 보려면 단일 HTML 파일 앱을 참조하세요.