Vue는 사용자 인터페이스 구축을 위한 JavaScript 프레임워크입니다. 해당 문서에는 이를 사용하는 한 가지 방법으로 "빌드 단계 없이 정적 HTML 향상"이 나열되어 있습니다.
이것이 단일 HTML 파일에 필요한 모든 것입니다. Vue를 로드하는 스크립트 태그 하나, HTML로 작성된 템플릿, 앱을 시작하는 몇 줄입니다.
먼저 시도해 보세요. 이름을 입력하고 버튼을 클릭하세요.
<!doctype html>
<html lang="en">
<head>
<meta charset="utf-8">
<meta name="viewport" content="width=device-width, initial-scale=1">
<title>Vue in one HTML file</title>
<style>
  body { margin: 0; padding: 20px; font-family: system-ui, sans-serif; background: #f4f6f5; color: #1d2330; }
  [v-cloak] { display: none; }  /* hide {{ }} until Vue has mounted */
  .card { max-width: 420px; padding: 16px 18px; border-radius: 12px; background: #fff; box-shadow: 0 4px 14px rgba(0,0,0,.1); }
  input { font: inherit; padding: 8px 10px; border: 1px solid #c9d2cd; border-radius: 8px; width: 100%; box-sizing: border-box; }
  button { font: inherit; margin-top: 12px; padding: 9px 16px; border: 0; border-radius: 8px; background: #42b883; color: #fff; cursor: pointer; }
  h2 { margin: 12px 0 0; font-size: 20px; }
</style>
</head>
<body>
<!-- Everything inside #app is the template -->
<div id="app" class="card" v-cloak>
  <label>Your name <input v-model="name" placeholder="Type here"></label>
  <h2 id="greeting">Hello, {{ name || 'stranger' }}!</h2>
  <button id="count" @click="count++">Clicked {{ count }} {{ count === 1 ? 'time' : 'times' }}</button>
</div>

<!-- 1. Load Vue (pinned version, production build) -->
<script src="https://unpkg.com/vue@3.5.43/dist/vue.global.prod.js"></script>
<!-- 2. Then create the app and mount it -->
<script>
  const { createApp } = Vue;

  createApp({
    data() {
      return { name: '', count: 0 };   // the page re-renders when these change
    }
  }).mount('#app');
</script>
</body>
</html>
여기에는 npm, Node.js 및 빌드 도구가 없습니다. 브라우저는 unpkg에서 Vue를 다운로드한 다음 두 번째 스크립트가 데이터를 전달합니다.
페이지 작동 방식: 로드, 생성, 마운트
모든 단일 파일 Vue 페이지는 동일한 세 단계를 따릅니다.
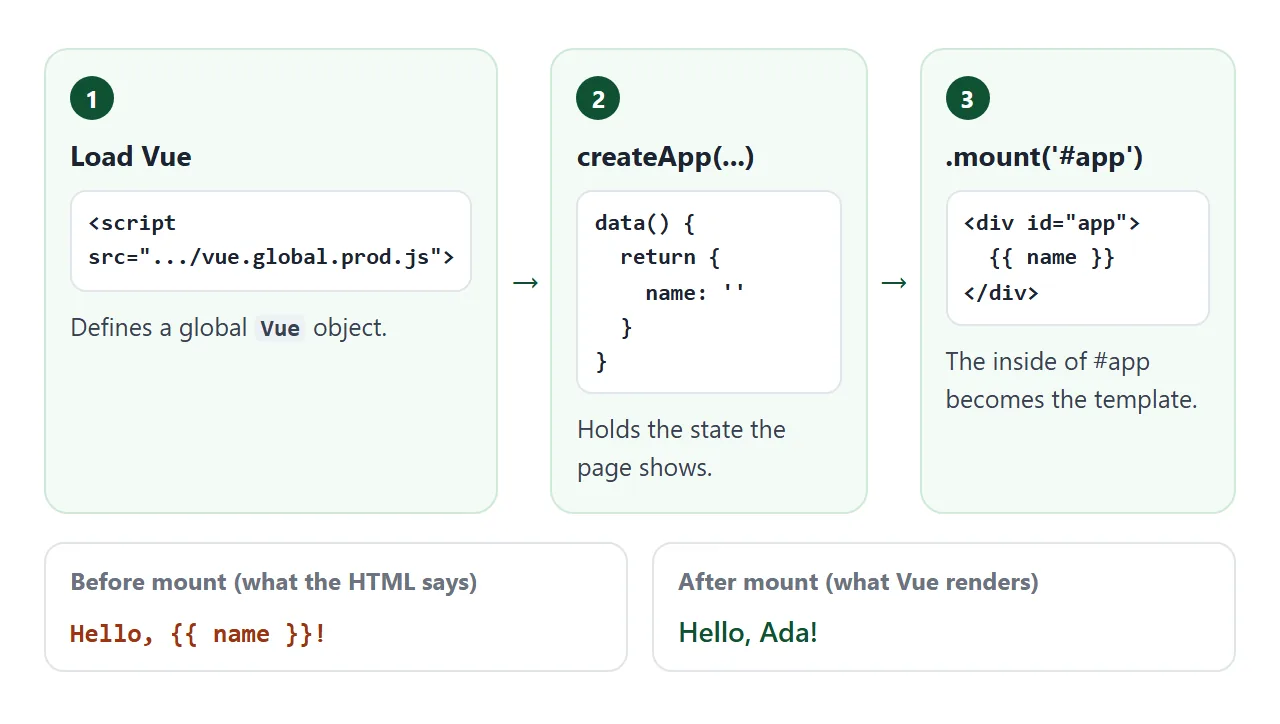
- Load Vue. 글로벌 빌드는 모든 API를 보유하는 하나의 글로벌 객체인
Vue를 정의합니다. - 앱을 만듭니다.
Vue.createApp()는 루트 구성 요소를 사용합니다.data()함수는 페이지에 표시된 상태를 반환합니다. - 마운트하세요.
.mount('#app')는 CSS 선택기 또는 요소를 사용합니다. 루트 구성 요소에template옵션이 없으면 Vue는 요소의 내용을 템플릿으로 사용합니다.
그때부터 Vue는 데이터를 추적합니다. name 또는 count가 변경되면 Vue는 일치하도록 페이지를 업데이트합니다.
v-cloak 속성과 CSS 규칙 [v-cloak] { display: none; }는 컨테이너가 마운트될 때까지 컨테이너를 숨깁니다. 이러한 정보가 없으면 연결 속도가 느려지면 원시 {{ name }} 텍스트가 잠시 동안 표시될 수 있습니다.
로드할 Vue 파일
Vue 패키지는 여러 브라우저 파일을 제공합니다. HTML로 작성된 템플릿이 있는 페이지에는 두 가지만 적합합니다.
| 파일 | 그것은 무엇입니까 | 다음 용도로 사용하세요. |
|---|---|---|
vue.global.js |
일반적인 실수에 대한 경고가 포함된 전체 빌드 | 작성 및 디버깅 |
vue.global.prod.js |
동일하고 축소되었으며 개발 검사가 제거됨 | 공유하는 페이지 |
vue.runtime.global.prod.js |
템플릿 컴파일러 없음 | 인페이지 템플릿용이 아님 |
vue.esm-browser.prod.js |
ES 모듈 버전 | 모듈 스크립트의 import |
Vue가 업데이트를 출시할 때 페이지가 변경되지 않도록 URL에 정확한 버전을 입력하세요. 오늘 npm의 현재 릴리스는 3.5.43입니다.
<script src="https://unpkg.com/vue@3.5.43/dist/vue.global.prod.js"></script>
Vue 문서 이름은 unpkg, jsDelivr 및 cdnjs입니다. 세 가지 모두 테스트에서 이 버전을 제공했습니다. 런타임 전용 파일은 오류 없이 컨테이너를 비워 두었습니다.
데이터, 이벤트, 목록: 5가지 속성
Vue의 템플릿 구문은 몇 가지 추가 속성이 있는 HTML입니다. 다음 5개는 대부분의 단일 페이지 도구를 다룹니다.
| 속성 | 기능 | 예 |
|---|---|---|
v-model |
양식 입력에 대한 양방향 바인딩 | v-model="name" |
@click |
v-on:click의 약자, 청취자를 연결합니다. |
@click="count++" |
:class |
v-bind:class의 약어이며 속성을 바인딩합니다. |
:class="{ done: item.done }" |
v-if |
값이 true인 경우에만 요소를 렌더링합니다. | v-if="items.length === 0" |
v-for |
각 항목에 대해 요소를 반복합니다. | v-for="item in items" |
{{ }} 내부의 값은 HTML이 아닌 텍스트로 삽입됩니다. <b>를 입력하는 사용자에게는 굵은 텍스트가 아닌 문자가 표시됩니다.
각 v-for 행에 고유 ID가 있는 :key를 제공합니다. Vue 문서에서는 가능할 때마다 키를 권장합니다. 행에 입력이나 구성 요소가 들어 있는 경우가 가장 중요합니다. 각 행의 상태를 올바른 항목으로 유지하기 때문입니다.
In-DOM 템플릿: 세 가지 HTML 규칙이 여전히 적용됩니다.
템플릿은 HTML에 있기 때문에 Vue가 보기 전에 브라우저가 이를 구문 분석합니다. 세 가지 HTML 규칙은 Vue가 수신하는 것을 변경합니다.
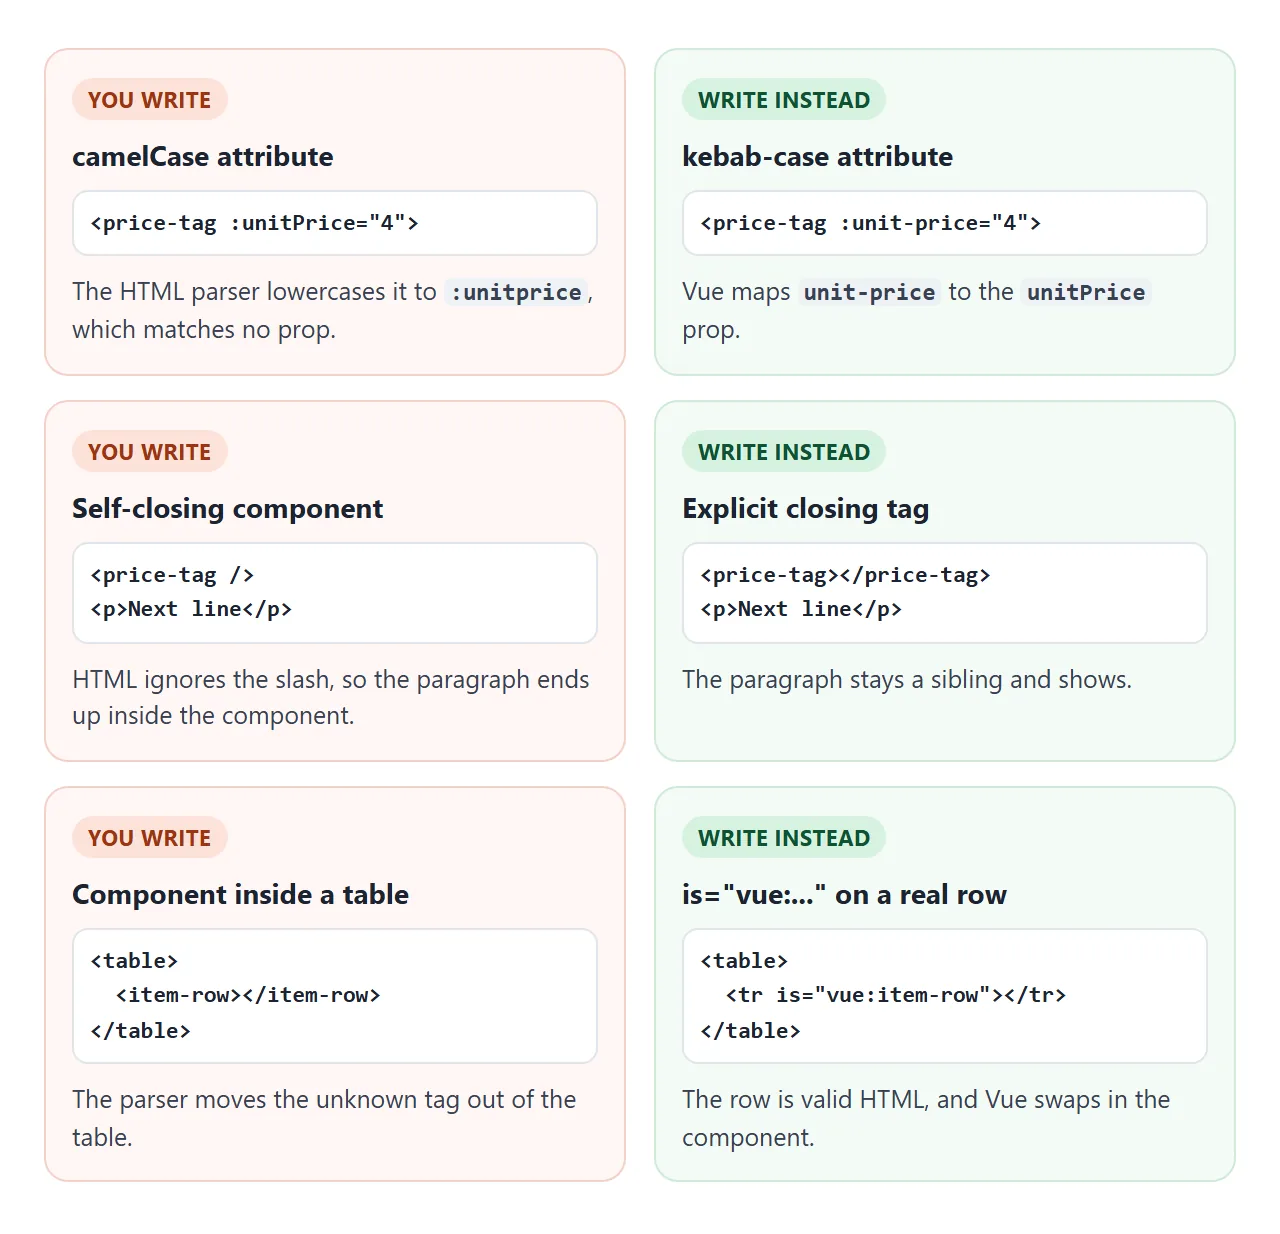
- 대소문자. HTML 속성 이름은 대소문자를 구분하지 않으므로 브라우저에서는
:unitPrice를 소문자로 표시합니다.:unit-price를 작성하면 Vue가 이를unitPriceprop과 일치시킵니다. - 자체 닫는 태그. HTML은
<price-tag />의 슬래시를 무시하므로 다음 요소는 구성 요소 내부에 배치됩니다. 항상<price-tag></price-tag>를 작성하세요. - 배치.
<table>,<ul>,<ol>및<select>는 특정 어린이만 허용합니다. 실제<tr>또는<li>를is="vue:item-row"와 함께 사용하세요.
처음 두 개가 나란히 있습니다. 구성 요소는 동일합니다. HTML만 다릅니다.
<!doctype html>
<html lang="en">
<head>
<meta charset="utf-8">
<meta name="viewport" content="width=device-width, initial-scale=1">
<title>In-DOM template rules</title>
<style>
body { margin: 0; padding: 16px; font-family: system-ui, sans-serif; background: #f4f6f5; color: #1d2330; }
.row { display: grid; grid-template-columns: 1fr 1fr; gap: 12px; }
@media (max-width: 520px) { .row { grid-template-columns: 1fr; } }
.box { padding: 12px 14px; border-radius: 10px; background: #fff; border: 1px solid #e1e4ea; }
.bad { background: #fff7f5; border-color: #f3d1c8; }
.good { background: #f4fbf6; border-color: #cfe9d7; }
h3 { margin: 0 0 8px; font-size: 14px; }
code { font-size: 12px; background: #eef1f5; padding: 1px 4px; border-radius: 4px; }
.tag { display: inline-block; margin: 4px 0; padding: 4px 10px; border-radius: 99px; background: #e8f6ef; color: #0f5132; font-weight: 600; }
.note { margin: 6px 0 0; font-size: 13px; color: #555; }
</style>
</head>
<body>
<div id="app" class="row">
<div class="box bad" id="bad">
<h3>camelCase prop, self-closing tag</h3>
<code><price-tag :unitPrice="4" /></code><br>
<price-tag :unitPrice="4" />
<p class="note">This line is swallowed into the tag above.</p>
</div>
<div class="box good" id="good">
<h3>kebab-case prop, closing tag</h3>
<code><price-tag :unit-price="4"></price-tag></code><br>
<price-tag :unit-price="4"></price-tag>
<p class="note">This line shows, because the tag was closed.</p>
</div>
</div>
<script src="https://unpkg.com/vue@3.5.43/dist/vue.global.prod.js"></script>
<script>
const app = Vue.createApp({});
// A tiny component. In JavaScript the prop is camelCase: unitPrice
app.component('price-tag', {
props: ['unitPrice'],
template: '<span class="tag">Price: {{ unitPrice === undefined ? "missing" : "$" + unitPrice }}</span>'
});
app.mount('#app'); // register components first, then mount
</script>
</body>
</html>
이러한 규칙은 페이지의 템플릿에만 적용됩니다. app.component() 내부의 template 문자열은 /> 및 camelCase를 허용하는 Vue의 자체 파서에서 읽혀집니다.
완성된 예: 쇼핑 목록
이 버전은 Composition API를 사용합니다. setup()는 data() 개체 대신 ref 값과 computed 값을 반환합니다.
<!doctype html>
<html lang="en">
<head>
<meta charset="utf-8">
<meta name="viewport" content="width=device-width, initial-scale=1">
<title>Vue shopping list</title>
<style>
  body { margin: 0; padding: 18px; font-family: system-ui, sans-serif; background: #f4f6f5; color: #1d2330; }
  [v-cloak] { display: none; }
  .card { max-width: 460px; padding: 16px 18px; border-radius: 12px; background: #fff; box-shadow: 0 4px 14px rgba(0,0,0,.1); }
  h1 { margin: 0 0 10px; font-size: 20px; }
  form { display: flex; gap: 8px; }
  input[type=text] { flex: 1; min-width: 0; font: inherit; padding: 8px 10px; border: 1px solid #c9d2cd; border-radius: 8px; }
  button { font: inherit; padding: 8px 14px; border: 0; border-radius: 8px; background: #42b883; color: #fff; cursor: pointer; }
  ul { list-style: none; margin: 12px 0; padding: 0; }
  li { display: flex; align-items: center; gap: 10px; padding: 8px 4px; border-bottom: 1px solid #eef0f2; }
  li.done span { text-decoration: line-through; color: #9aa3ad; }
  li span { flex: 1; }
  .del { background: none; color: #b42318; padding: 2px 8px; }
  .bar { display: flex; flex-wrap: wrap; gap: 6px; align-items: center; font-size: 14px; color: #555; }
  .bar button { background: #eef1f5; color: #1d2330; padding: 5px 10px; }
  .bar button.on { background: #1d2330; color: #fff; }
  .left { margin-right: auto; }
</style>
</head>
<body>
<div id="app" class="card" v-cloak>
  <h1>Shopping list</h1>
  <!-- .prevent stops the form from reloading the page -->
  <form @submit.prevent="add">
    <input type="text" v-model.trim="draft" placeholder="Add an item" aria-label="New item">
    <button>Add</button>
  </form>

  <ul>
    <!-- key tells Vue which row is which when the list changes -->
    <li v-for="item in shown" :key="item.id" :class="{ done: item.done }">
      <input type="checkbox" v-model="item.done" :aria-label="'Got ' + item.text">
      <span>{{ item.text }}</span>
      <button class="del" @click="remove(item.id)" aria-label="Remove">✕</button>
    </li>
  </ul>
  <p v-if="shown.length === 0">Nothing here.</p>

  <div class="bar">
    <span class="left" id="left">{{ left }} left of {{ items.length }}</span>
    <button v-for="f in ['all', 'todo', 'done']" :key="f" :class="{ on: filter === f }" @click="filter = f">{{ f }}</button>
  </div>
</div>

<script src="https://unpkg.com/vue@3.5.43/dist/vue.global.prod.js"></script>
<script>
  const { createApp, ref, computed } = Vue;

  createApp({
    setup() {
      let nextId = 3;
      const items = ref([
        { id: 1, text: 'Bread', done: true },
        { id: 2, text: 'Coffee', done: false }
      ]);
      const draft = ref('');
      const filter = ref('all');

      // computed values update by themselves when items or filter change
      const left = computed(() => items.value.filter(i => !i.done).length);
      const shown = computed(() => items.value.filter(i =>
        filter.value === 'all' || (filter.value === 'done') === i.done));

      function add() {
        if (!draft.value) return;
        items.value.push({ id: nextId++, text: draft.value, done: false });
        draft.value = '';
      }
      function remove(id) {
        items.value = items.value.filter(i => i.id !== id);
      }

      // everything returned here can be used in the template
      return { items, draft, filter, left, shown, add, remove };
    }
  }).mount('#app');
</script>
</body>
</html>
- 참조.
ref([])는 Vue가 추적할 수 있도록 값을 래핑합니다. JavaScript에서는items.value를 읽고 변경합니다. 템플릿에items를 작성합니다. - 계산됨.
left및shown는items또는filter가 변경될 때마다 다시 계산됩니다. - 반납하세요.
setup()가 반환하는 내용만 템플릿에 표시됩니다. 일반let변수는 첫 번째 값을 표시하고 업데이트되지 않습니다. - 양식.
@submit.prevent는 페이지 다시 로드를 중지하므로 양식이 페이지 내부에 유지됩니다.
둘을 비교하려는 경우 프레임워크가 없는 동일한 목록이 일반 HTML의 할 일 목록에 있습니다.
빌드 단계가 필요한 것
일부 Vue 기능은 Node.js로 빌드된 프로젝트에만 존재합니다. Vue 문서에서는 빌드 단계 없이는 단일 파일 구성 요소 구문을 사용할 수 없다고 말합니다.
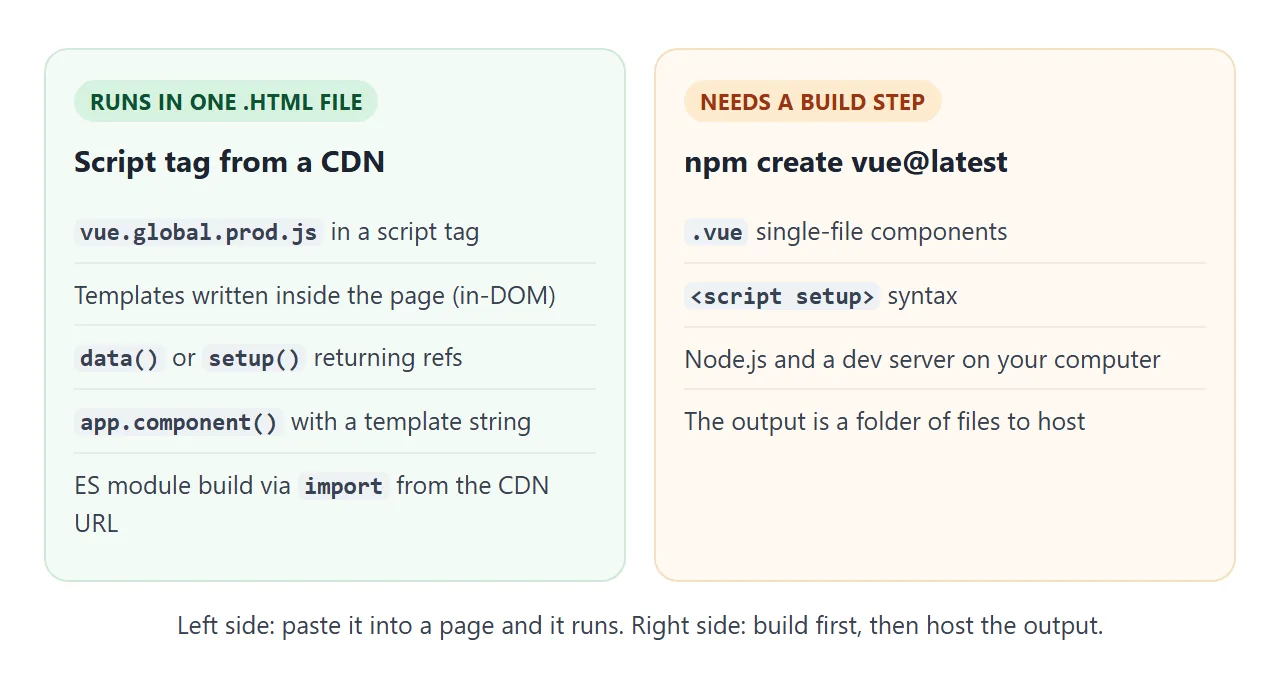
.vue 파일과 <script setup> 파일은 브라우저가 보기 전에 컴파일됩니다. 공식적인 시작점은 create-vue를 실행하고 Vite 프로젝트를 설정하는 npm create vue@latest입니다.
npm create vue@latest     # needs Node.js ^22.18.0 or >=24.12.0
cd my-app
npm install
npm run dev               # development server
npm run build             # production files in ./dist
해당 ./dist 폴더는 한 페이지가 아닌 여러 파일입니다. ES 모듈 빌드만 필요한 경우 CDN에서 단일 파일로 직접 가져올 수 있습니다.
<div id="app">{{ msg }}</div>
<script type="module">
  import { createApp } from 'https://unpkg.com/vue@3.5.43/dist/vue.esm-browser.prod.js'
  createApp({ data: () => ({ msg: 'Hello' }) }).mount('#app')
</script>
디스크에서 열면 테스트에서 작동했습니다. 자신의 코드를 .js 모듈 파일로 분할해도 Chromium은 Vue 문서에서 경고한 대로 file://에서 해당 코드를 차단했습니다. 모든 항목을 하나의 파일에 보관하거나 file:// 페이지가 다르게 작동하는 이유를 확인하세요.
작동하지 않을 때
| 당신이 보는 것 | 원인 | 수정 |
|---|---|---|
콘솔의 Vue is not defined |
스크립트가 Vue 태그 이전에 실행되거나 URL이 잘못되었습니다. | Vue 태그를 먼저 넣고 URL을 확인해보세요 |
원시 {{ name }}가 페이지에 유지됩니다. |
요소가 존재하기 전에 스크립트가 실행되었습니다. | 컨테이너 뒤에 스크립트를 넣습니다. |
| 컨테이너가 비어 있습니다. | 런타임 전용 빌드 | vue.global.prod.js 로드 |
| 소품은 항상 정의되지 않습니다. | HTML의 camelCase 속성 | 케밥 케이스에 적어보세요 |
| 구성 요소가 사라진 후의 콘텐츠 | 자동 닫힘 구성요소 태그 | 명시적인 닫는 태그 추가 |
| 값은 화면에서 업데이트되지 않습니다. | setup()에서 반환된 일반 변수 |
ref()로 포장하세요 |
| 제출 시 페이지가 다시 로드됩니다. | 양식에 .prevent가 없습니다. |
@submit.prevent 사용 |
Vue와 관련된 오류가 아닌 경우에는 HTML 및 JavaScript가 작동하지 않음 일반 점검을 거칩니다.
링크로 공유하세요
Vue 페이지는 클릭하도록 되어 있습니다. 스크린샷을 입력할 수 없으며 .html 첨부 파일이 전화기에서 일반 코드로 열릴 수 있습니다.
작업 버전을 보내려면 페이지를 NOS 문서에 붙여넣고 공유 링크 만들기를 선택하세요. 링크할 HTML이 이를 안내합니다.
페이지는 작성된 대로 렌더링되고, 스크립트가 실행되며, Vue가 CDN에서 로드되므로 페이지를 받는 사람들은 계정 없이 앱을 사용할 수 있습니다. 나중에 코드를 변경하면 동일한 링크에 새 버전이 표시됩니다.