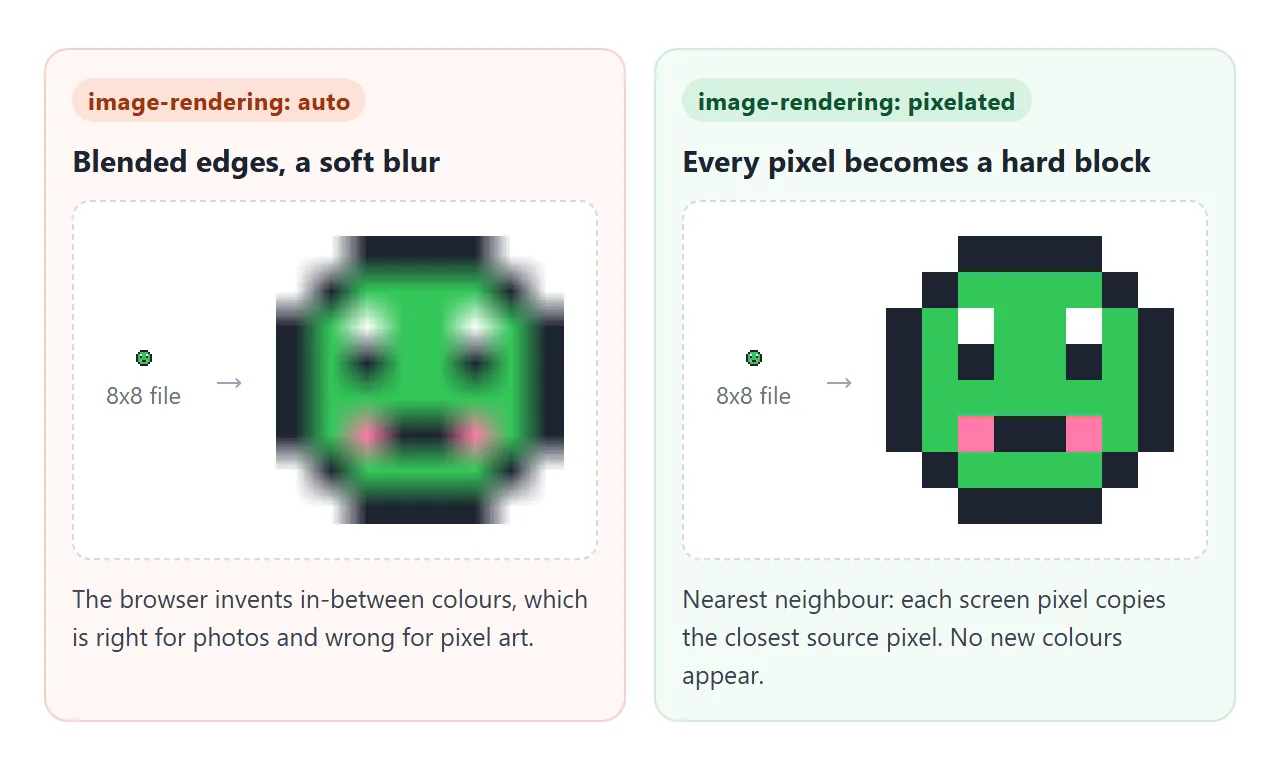
A tiny image shown at ten times its size looks blurry because the browser smooths it on purpose. To keep hard square pixels, add image-rendering: pixelated to the element that shows the image. It works on <img>, on <canvas> and on background images.
img.sprite {
  width: 160px;               /* a 16x16 file shown 10x bigger */
  image-rendering: pixelated; /* hard edges, no blending */
}
Try the three values side by side. Move the slider, and switch to the QR-like grid.
<!doctype html>
<html lang="en">
<head>
<meta charset="utf-8">
<meta name="viewport" content="width=device-width, initial-scale=1">
<title>image-rendering: auto vs pixelated vs crisp-edges</title>
<style>
  body { margin: 0; padding: 14px; font-family: system-ui, sans-serif; background: #f4f5f7; color: #1d2330; }
  .bar { display: flex; flex-wrap: wrap; gap: 8px 18px; align-items: center; font-size: 14px; margin-bottom: 12px; }
  .bar input[type=range] { width: 150px; vertical-align: middle; }
  .row { display: flex; gap: 12px; overflow-x: auto; padding-bottom: 6px; }
  figure { margin: 0; flex: none; background: #fff; border-radius: 10px; padding: 10px; box-shadow: 0 2px 8px rgba(0, 0, 0, .08); }
  figcaption { font: 600 13px ui-monospace, Consolas, monospace; margin-bottom: 8px; }
  img { display: block; background: #e9ecf1; }

  /* the only thing that differs between the three images */
  .auto      { image-rendering: auto; }
  .pixelated { image-rendering: pixelated; }
  .crisp     { image-rendering: crisp-edges; }

  #note { font-size: 13.5px; line-height: 1.5; margin: 10px 0 0; }
  .ok { color: #0f5132; } .warn { color: #9a3412; }
</style>
</head>
<body>
<div class="bar">
  <label>Scale <input type="range" id="scale" min="1" max="12" step="0.5" value="10">
    <output id="out">10x</output></label>
  <label><input type="radio" name="pic" value="sprite" checked> Sprite 16x16</label>
  <label><input type="radio" name="pic" value="qr"> QR-like grid 21x21</label>
</div>

<div class="row">
  <figure><figcaption>auto</figcaption><img class="auto" alt="Sprite, smooth scaling"></figure>
  <figure><figcaption>pixelated</figcaption><img class="pixelated" alt="Sprite, nearest-neighbour scaling"></figure>
  <figure><figcaption>crisp-edges</figcaption><img class="crisp" alt="Sprite, crisp-edges scaling"></figure>
</div>
<p id="note"></p>

<script>
  // 1. Draw a tiny image on a canvas, one fillRect per pixel, and turn it into a data URL
  const SPRITE = [
    '................', '.....KKKKKK.....', '...KKGGGGGGKK...', '..KGGGGGGGGGGK..',
    '..KGGWWGGWWGGK..', '.KGGGWKGGWKGGGK.', '.KGGGWKGGWKGGGK.', '.KGGGGGGGGGGGGK.',
    '.KGGPGGGGGGPGGK.', '.KGGGGKKKKGGGGK.', '.KGGGGGGGGGGGGK.', '..KGGGGGGGGGGK..',
    '..KDDGGGGGGDDK..', '...KKDDDDDDKK...', '.....KKKKKK.....', '................',
  ];
  const COLORS = { K: '#1d2330', G: '#34c759', D: '#1f8a3b', W: '#ffffff', P: '#ff7aa8' };

  function toDataURL(rows) {
    const c = document.createElement('canvas');
    c.width = rows[0].length; c.height = rows.length;
    const ctx = c.getContext('2d');
    rows.forEach((row, y) => [...row].forEach((ch, x) => {
      if (COLORS[ch]) { ctx.fillStyle = COLORS[ch]; ctx.fillRect(x, y, 1, 1); }
    }));
    return c.toDataURL('image/png');
  }

  // A QR-like pattern: three corner squares plus fixed pseudo-random cells (not scannable)
  function qrRows(n = 21) {
    let seed = 7;
    const rnd = () => (seed = (seed * 1103515245 + 12345) % 2147483648) / 2147483648;
    const rows = [];
    for (let y = 0; y < n; y++) {
      let row = '';
      for (let x = 0; x < n; x++) {
        const fx = x < 7 ? x : x >= n - 7 ? x - (n - 7) : -1;
        const fy = y < 7 ? y : y >= n - 7 ? y - (n - 7) : -1;
        const inFinder = fx >= 0 && fy >= 0 && !(x >= n - 7 && y >= n - 7);
        if (inFinder) {
          const ring = Math.min(fx, fy, 6 - fx, 6 - fy);
          row += ring === 1 ? 'W' : 'K';
        } else if (x < 8 && y < 8 || x >= n - 8 && y < 8 || x < 8 && y >= n - 8) {
          row += 'W';  // quiet line around the corner squares
        } else {
          row += rnd() < 0.5 ? 'K' : 'W';
        }
      }
      rows.push(row);
    }
    return rows;
  }

  const PICS = {
    sprite: { url: toDataURL(SPRITE), size: 16 },
    qr: { url: toDataURL(qrRows()), size: 21 },
  };

  // 2. Size the three images from the slider
  const imgs = document.querySelectorAll('img');
  const scale = document.getElementById('scale');
  const out = document.getElementById('out');
  const note = document.getElementById('note');
  const crispOK = CSS.supports('image-rendering', 'crisp-edges');

  function render() {
    const pic = PICS[document.querySelector('input[name=pic]:checked').value];
    const s = Number(scale.value);
    out.textContent = s + 'x';
    imgs.forEach((img) => {
      img.src = pic.url;
      img.style.width = pic.size * s + 'px';  // scaled by CSS, the file stays 16x16 or 21x21
    });
    const device = s * devicePixelRatio;       // screen pixels per source pixel
    const whole = Number.isInteger(device);
    note.innerHTML =
      (whole
        ? '<span class="ok">Each source pixel covers ' + device + ' screen pixels, a whole number, so every block is the same size.</span>'
        : '<span class="warn">Each source pixel covers ' + device.toFixed(2) + ' screen pixels. Look closely at pixelated: some blocks are one pixel wider.</span>') +
      '<br>crisp-edges in this browser: ' +
      (crispOK ? '<span class="ok">supported</span>' : '<span class="warn">not supported, so it falls back to auto</span>');
  }

  scale.addEventListener('input', render);
  document.querySelectorAll('input[name=pic]').forEach((r) => r.addEventListener('change', render));
  render();
</script>
</body>
</html>
What auto, pixelated and crisp-edges mean
image-rendering only matters when an image is drawn at a different size from its file. At 1:1 all three values look the same.
| Value | What the browser does | Use it for |
|---|---|---|
auto |
Its default scaling, which smooths and blends | Photos, screenshots, illustrations |
pixelated |
Nearest neighbour or similar: each pixel becomes a solid block | Pixel art, QR codes, tiny icons, heat maps |
crisp-edges |
Keeps edges and contrast, no smoothing; the exact method is up to the browser | Line art where you want no blur |
auto is the default. It is the right choice whenever the picture was not made pixel by pixel.
crisp-edges: check the browser you use
The spec leaves the method behind crisp-edges to the browser, and support has not been the same everywhere. Check support in the other browsers your readers use.
In our tests, current Chrome and Edge drew it with hard edges like pixelated, while an older Chromium build did not recognise the value at all.
When a browser does not recognise a value, it drops the whole declaration. The image then falls back to auto and stays smooth. The first example prints what your browser reports:
CSS.supports('image-rendering', 'crisp-edges') // true or false
For pixel art, pixelated is the value to reach for. It describes exactly the look you want.
Scale by whole numbers
pixelated gives hard edges at any size, but only a whole-number scale gives even blocks.
At 3x, every source pixel gets 3 screen pixels. At 2.5x, the browser has to share 12 or 13 screen pixels among 5 source pixels, so some blocks come out one pixel wider.
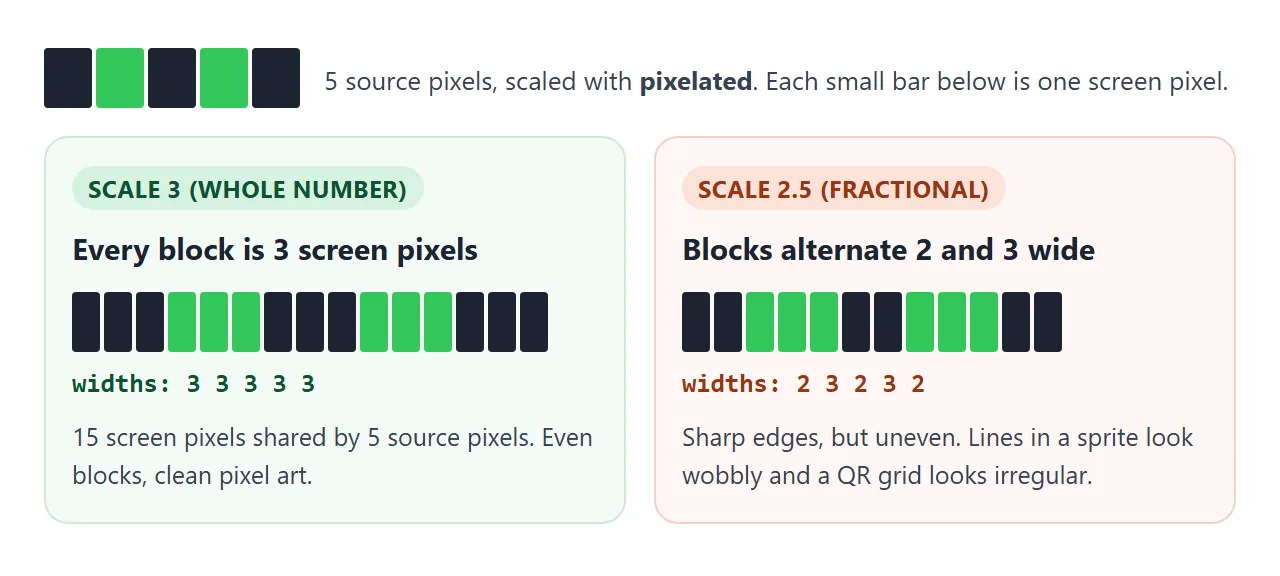
Uneven blocks make the lines of a sprite wobble and a QR grid look irregular. Set the displayed size to the file size times 2, 3, 4 and so on.
The screen matters too. On a display with a devicePixelRatio of 1.25, a 4x CSS scale is 5 screen pixels, but 3x is 3.75. The first example shows the real number for your screen.
Pixel art on a canvas: imageSmoothingEnabled
CSS scales the finished element. When you scale an image inside a canvas with drawImage, the canvas blends it with its own setting, imageSmoothingEnabled. It is true by default.
<!doctype html>
<html lang="en">
<head>
<meta charset="utf-8">
<meta name="viewport" content="width=device-width, initial-scale=1">
<title>Canvas imageSmoothingEnabled</title>
<style>
  body { margin: 0; padding: 14px; font-family: system-ui, sans-serif; background: #f4f5f7; color: #1d2330; }
  .bar { display: flex; flex-wrap: wrap; gap: 8px 18px; align-items: center; font-size: 14px; margin-bottom: 12px; }
  .bar input[type=range] { width: 150px; vertical-align: middle; }
  canvas {
    display: block; width: 320px; max-width: 100%; background: #fff; border-radius: 10px;
    box-shadow: 0 2px 8px rgba(0, 0, 0, .08);
    /* the browser also scales the canvas box on high-DPI screens; keep that step sharp too */
    image-rendering: pixelated;
  }
  #report { font-size: 13.5px; line-height: 1.55; margin: 10px 0 0; }
  code { font: 12.5px ui-monospace, Consolas, monospace; background: #e9ecf1; border-radius: 4px; padding: 0 3px; }
  .ok { color: #0f5132; } .warn { color: #9a3412; }
</style>
</head>
<body>
<div class="bar">
  <label><input type="checkbox" id="smooth" checked> <code>imageSmoothingEnabled</code></label>
  <label>Scale <input type="range" id="scale" min="2" max="8" step="0.1" value="5">
    <output id="out">5x</output></label>
</div>
<canvas id="view" width="320" height="200"></canvas>
<p id="report"></p>

<script>
  // Source: a 16x16 sprite drawn on an off-screen canvas
  const SPRITE = [
    '................', '.....KKKKKK.....', '...KKGGGGGGKK...', '..KGGGGGGGGGGK..',
    '..KGGWWGGWWGGK..', '.KGGGWKGGWKGGGK.', '.KGGGWKGGWKGGGK.', '.KGGGGGGGGGGGGK.',
    '.KGGPGGGGGGPGGK.', '.KGGGGKKKKGGGGK.', '.KGGGGGGGGGGGGK.', '..KGGGGGGGGGGK..',
    '..KDDGGGGGGDDK..', '...KKDDDDDDKK...', '.....KKKKKK.....', '................',
  ];
  const COLORS = { K: '#1d2330', G: '#34c759', D: '#1f8a3b', W: '#ffffff', P: '#ff7aa8' };
  const src = document.createElement('canvas');
  src.width = src.height = 16;
  const sctx = src.getContext('2d');
  SPRITE.forEach((row, y) => [...row].forEach((ch, x) => {
    if (COLORS[ch]) { sctx.fillStyle = COLORS[ch]; sctx.fillRect(x, y, 1, 1); }
  }));

  // A 12x1 test strip of black and white columns, to measure how wide each column comes out
  const strip = document.createElement('canvas');
  strip.width = 12; strip.height = 1;
  const tctx = strip.getContext('2d');
  for (let x = 0; x < 12; x++) { tctx.fillStyle = x % 2 ? '#fff' : '#000'; tctx.fillRect(x, 0, 1, 1); }

  const view = document.getElementById('view');
  const ctx = view.getContext('2d');
  const smooth = document.getElementById('smooth');
  const scale = document.getElementById('scale');
  const out = document.getElementById('out');
  const report = document.getElementById('report');

  function draw() {
    const s = Number(scale.value);
    out.textContent = s + 'x';
    ctx.clearRect(0, 0, view.width, view.height);
    ctx.imageSmoothingEnabled = smooth.checked;  // set it before every drawImage
    ctx.drawImage(src, 10, 10, 16 * s, 16 * s);
    ctx.drawImage(strip, 150, 20, 12 * s, 24);
    ctx.fillStyle = '#6b7280'; ctx.font = '12px system-ui, sans-serif';
    ctx.fillText('test strip, 12 columns', 150, 62);
    measure(s);
  }

  // Read back one row of the strip and count how many pixels each column got
  function measure(s) {
    const w = Math.ceil(12 * s);
    const px = ctx.getImageData(150, 32, w, 1).data;
    const runs = [];
    let grey = 0, last = null;
    for (let i = 0; i < w; i++) {
      const v = px[i * 4];
      if (v > 20 && v < 235) { grey++; last = null; continue; }  // a blended pixel
      const tone = v < 128 ? 'k' : 'w';
      if (tone === last) runs[runs.length - 1]++; else runs.push(1);
      last = tone;
    }
    if (grey) {
      report.innerHTML = '<span class="warn">Smoothing on: ' + grey +
        ' grey pixels were blended between the black and white columns.</span>';
      return;
    }
    const inner = runs.slice(0, 11);  // the last column can be cut by rounding
    const even = inner.every((n) => n === inner[0]);
    report.innerHTML = 'Column widths: ' + inner.join(' ') + '<br>' + (even
      ? '<span class="ok">Every column is ' + inner[0] + ' pixels wide. Hard edges, even blocks.</span>'
      : '<span class="warn">Hard edges, but the widths are uneven. ' + s + ' is not a whole number.</span>');
  }

  smooth.addEventListener('change', draw);
  scale.addEventListener('input', draw);
  draw();
</script>
</body>
</html>
const ctx = canvas.getContext('2d');
ctx.imageSmoothingEnabled = false;          // hard edges
ctx.drawImage(sprite, 0, 0, 16 * 8, 16 * 8); // 16x16 drawn 8x
- Set it on the context, not in CSS. CSS
image-renderingon the canvas element does not change whatdrawImagewrites into the buffer. - Set it again after changing
canvas.widthorcanvas.height. Resizing resets the context settings to their defaults. - Keep the scale whole here too. The strip in the example shows 4 and 5 pixel columns mixed at 4.5x.
For drawing shapes and text on a canvas in the first place, see drawing on an HTML canvas.
A blurry canvas is often a different problem
If everything on a canvas is soft, including lines and text you drew with code, smoothing is not the cause. The canvas buffer is smaller than the box it fills on a high-DPI screen, and the browser stretches it.
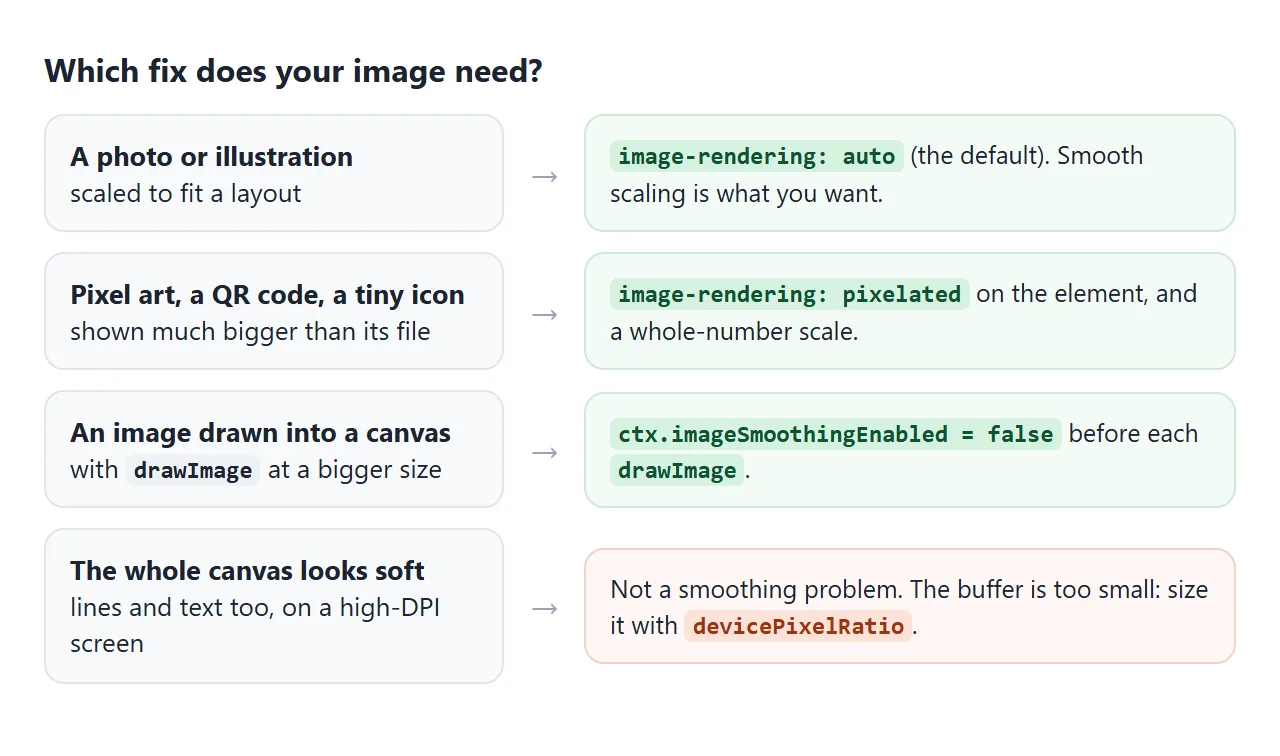
That is fixed by sizing the buffer with devicePixelRatio, covered in HTML canvas blurry. image-rendering: pixelated on such a canvas turns the blur into jagged edges, which is not what a chart needs.
Background images and other elements
The property belongs on the element that paints the image. For a background, that is the element with background-image:
.tile {
  background: url(tile-8x8.png) 0 0 / 32px 32px; /* 8px tile shown 4x */
  image-rendering: pixelated;
}
image-rendering is inherited, so putting it on a wrapper also reaches the images inside. That is handy for a gallery of sprites, and a trap if the same wrapper also holds photos.
For how an image fills its box, which is a separate question from how it is scaled, see object-fit in CSS. For width, height and alt on the tag itself, see the img tag.
A finished example: a pixel-art avatar editor
This editor keeps the avatar as 144 pixels in an array. Click or drag across the grid to paint. The preview is a 12x12 canvas scaled 8x with pixelated, and the download draws it again at 16x.
<!doctype html>
<html lang="en">
<head>
<meta charset="utf-8">
<meta name="viewport" content="width=device-width, initial-scale=1">
<title>Pixel-art avatar editor</title>
<style>
  body { margin: 0; padding: 14px; font-family: system-ui, sans-serif; background: #f4f5f7; color: #1d2330; }
  .wrap { display: flex; flex-wrap: wrap; gap: 16px; align-items: flex-start; }
  .grid {
    display: grid; grid-template-columns: repeat(12, 22px); gap: 1px;
    background: #d5d9e0; border: 1px solid #d5d9e0; width: max-content;
    touch-action: none; user-select: none;  /* a finger paints instead of scrolling */
  }
  .cell { width: 22px; height: 22px; background: #fff; }
  .palette { display: flex; flex-wrap: wrap; gap: 6px; margin: 10px 0 0; max-width: 300px; }
  .swatch { width: 28px; height: 28px; border-radius: 6px; border: 2px solid #fff; box-shadow: 0 0 0 1px #c3c8d1; cursor: pointer; padding: 0; }
  .swatch[aria-pressed=true] { box-shadow: 0 0 0 3px #2563eb; }
  .swatch.eraser { background: linear-gradient(135deg, #fff 45%, #e11d48 45% 55%, #fff 55%); }
  .side { font-size: 13.5px; }
  .side h3 { font-size: 14px; margin: 0 0 8px; }
  .previews { display: flex; gap: 12px; align-items: flex-end; }
  #preview {
    width: 96px; height: 96px;           /* 12 px canvas shown 8x bigger */
    image-rendering: pixelated;          /* hard edges when the browser scales it */
    background: repeating-conic-gradient(#eef0f3 0 25%, #fff 0 50%) 0 0 / 12px 12px;
    border-radius: 8px; border: 1px solid #d5d9e0;
  }
  #tiny { width: 24px; height: 24px; image-rendering: pixelated; border: 1px solid #d5d9e0; }
  .side button.act { margin-top: 12px; font: inherit; padding: 8px 14px; border-radius: 8px; border: 0; background: #1d2330; color: #fff; cursor: pointer; }
  .side button.act.light { background: #e5e7eb; color: #1d2330; }
  #msg { margin: 8px 0 0; color: #0f5132; min-height: 1.4em; }
</style>
</head>
<body>
<div class="wrap">
  <div>
    <div class="grid" id="grid" aria-label="12 by 12 drawing grid"></div>
    <div class="palette" id="palette"></div>
  </div>
  <div class="side">
    <h3>Preview</h3>
    <div class="previews">
      <canvas id="preview" width="12" height="12"></canvas>
      <canvas id="tiny" width="12" height="12"></canvas>
    </div>
    <div>
      <button class="act" id="download">Download PNG (192x192)</button>
      <button class="act light" id="clear">Clear</button>
    </div>
    <p id="msg"></p>
  </div>
</div>

<script>
  const N = 12;                  // the avatar is 12x12 pixels
  const EXPORT_SCALE = 16;       // whole number, so every pixel becomes a 16x16 block
  const COLORS = ['#1d2330', '#ffffff', '#f2c9a0', '#8b5a2b', '#e11d48', '#f59e0b', '#34c759', '#2563eb', '#a855f7'];
  const pixels = Array(N * N).fill(null);   // null = transparent
  let color = COLORS[0];

  // Start with a simple face so there is something to see
  const START = ['............', '...000000...', '..03333330..', '.0322222230.', '.0220220220.', '.0222222220.',
                 '.0222442220.', '.0222222220.', '..02444420..', '...022220...', '..77777777..', '.7777777777.'];
  START.forEach((row, y) => [...row].forEach((ch, x) => {
    if (ch !== '.') pixels[y * N + x] = ch === '0' ? COLORS[0] : ch === '3' ? COLORS[3] : ch === '2' ? COLORS[2] : ch === '4' ? COLORS[4] : COLORS[7];
  }));

  // Grid of cells
  const grid = document.getElementById('grid');
  for (let i = 0; i < N * N; i++) {
    const cell = document.createElement('div');
    cell.className = 'cell'; cell.dataset.i = i;
    grid.append(cell);
  }

  // Palette: colours plus an eraser
  const palette = document.getElementById('palette');
  [...COLORS, null].forEach((c) => {
    const b = document.createElement('button');
    b.className = 'swatch' + (c ? '' : ' eraser');
    if (c) b.style.background = c;
    b.setAttribute('aria-label', c ? 'Colour ' + c : 'Eraser');
    b.setAttribute('aria-pressed', c === color);
    b.addEventListener('click', () => {
      color = c;
      palette.querySelectorAll('.swatch').forEach((s) => s.setAttribute('aria-pressed', s === b));
    });
    palette.append(b);
  });

  // Paint: press, then drag across cells (mouse or finger)
  let painting = false;
  function paintAt(x, y) {
    const cell = document.elementFromPoint(x, y);
    if (!cell || !cell.dataset.i) return;
    pixels[cell.dataset.i] = color;
    render();
  }
  grid.addEventListener('pointerdown', (e) => { painting = true; paintAt(e.clientX, e.clientY); });
  window.addEventListener('pointermove', (e) => { if (painting) paintAt(e.clientX, e.clientY); });
  window.addEventListener('pointerup', () => { painting = false; });
  window.addEventListener('pointercancel', () => { painting = false; });

  // Draw the pixels onto any canvas at a given whole-number scale
  function drawTo(canvas, scale) {
    const ctx = canvas.getContext('2d');
    ctx.clearRect(0, 0, canvas.width, canvas.height);
    pixels.forEach((c, i) => {
      if (!c) return;
      ctx.fillStyle = c;
      ctx.fillRect((i % N) * scale, Math.floor(i / N) * scale, scale, scale);
    });
  }

  const cells = grid.children;
  function render() {
    pixels.forEach((c, i) => { cells[i].style.background = c || '#fff'; });
    drawTo(document.getElementById('preview'), 1);  // 12x12 canvas, CSS scales it up
    drawTo(document.getElementById('tiny'), 1);
  }

  // Download: draw at 16x into a bigger canvas, then save it as a PNG file
  document.getElementById('download').addEventListener('click', () => {
    const big = document.createElement('canvas');
    big.width = big.height = N * EXPORT_SCALE;
    drawTo(big, EXPORT_SCALE);
    big.toBlob((blob) => {
      const url = URL.createObjectURL(blob);
      const a = document.createElement('a');
      a.href = url; a.download = 'avatar.png';
      a.click();
      setTimeout(() => URL.revokeObjectURL(url), 1000);
      document.getElementById('msg').textContent = 'Saved avatar.png, ' + big.width + 'x' + big.height + ', ' + blob.size + ' bytes.';
    }, 'image/png');
  });

  document.getElementById('clear').addEventListener('click', () => { pixels.fill(null); render(); });

  render();
</script>
</body>
</html>
- Preview: the canvas buffer stays 12x12. CSS makes it 96px wide, and
image-rendering: pixelatedkeeps the blocks sharp. - Export: a new canvas of 192x192 gets one 16x16
fillRectper pixel. No scaling happens, so no smoothing either. - Download:
toBlobmakes the PNG,URL.createObjectURLgives it an address, and a link withdownloadsaves it.
big.toBlob((blob) => {
  const a = document.createElement('a');
  a.href = URL.createObjectURL(blob);
  a.download = 'avatar.png';
  a.click();
});
When it does not work
| What you see | Cause | Fix |
|---|---|---|
| Still blurry | The property is on a different element from the one that paints the image | Put it on the img, the canvas or the element with background-image |
| Sharp but uneven blocks | The scale is not a whole number, on screen pixels | Use 2x, 3x, 4x of the file size and check devicePixelRatio |
| Image drawn in a canvas is soft | imageSmoothingEnabled is still true |
Set it to false before drawImage, again after any resize |
| The whole canvas is soft, text too | Buffer smaller than the box on a high-DPI screen | Size the buffer with devicePixelRatio |
crisp-edges stays smooth |
This browser does not recognise the value | Use pixelated |
| Background pattern is soft | The property is on another element | Add it to the element that has the background |
| Photos look blocky | pixelated is set on a wrapper and inherited |
Set image-rendering: auto on the photos |
Share it as a link
Pixel art is hard to judge from a screenshot, because the screenshot itself gets scaled and smoothed. An .html attachment may open as plain code on a phone.
To send the working version, paste the page into a NOS document and choose Create share link. HTML to link walks through it.
The page renders as written and its scripts run, so the people you send it to can move the slider or paint their own avatar. If you change the code later, the same link shows the new version.