A lightbox in HTML is a thumbnail that opens a large version of the photo over a darkened page. The shortest reliable build is a <button> around the thumbnail and a <dialog> holding the large image, opened with showModal().
Click the photo, then close it with Esc, the × button or a click on the dark area.
<!doctype html>
<html lang="en">
<head>
<meta charset="utf-8">
<meta name="viewport" content="width=device-width, initial-scale=1">
<title>Dialog lightbox</title>
<style>
body { margin: 0; padding: 20px; font-family: system-ui, sans-serif; background: #f4f5f7; }
.thumb { padding: 0; border: 0; background: none; cursor: zoom-in; border-radius: 8px; }
.thumb img { display: block; width: 220px; max-width: 100%; height: auto; border-radius: 8px; }
.thumb:focus-visible { outline: 3px solid #2563eb; outline-offset: 3px; }
/* the lightbox */
#lightbox { padding: 0; border: 0; background: none; overflow: visible; }
#lightbox::backdrop { background: rgba(10, 12, 20, .85); }
#lightbox img {
display: block;
max-width: 90vw; max-height: 80vh; /* never larger than the screen */
width: auto; height: auto; border-radius: 6px;
}
#lightbox p { margin: 8px 0 0; color: #fff; text-align: center; }
.close {
position: absolute; top: -14px; right: -14px; width: 36px; height: 36px;
border: 0; border-radius: 50%; background: #fff; font-size: 20px; cursor: pointer;
}
</style>
</head>
<body>
<p>Click the photo. Close with Esc, the × button, or a click on the dark area.</p>
<button class="thumb" id="thumb" aria-label="Enlarge: Violet hills at dusk">
<img src="data:image/svg+xml,%3Csvg xmlns='http://www.w3.org/2000/svg' width='800' height='600' viewBox='0 0 40 30'%3E%3Crect width='40' height='30' fill='%23fbbf77'/%3E%3Ccircle cx='28' cy='9' r='4' fill='%23fde68a'/%3E%3Cpath d='M0 22 L9 12 L19 20 L28 11 L40 20 V30 H0Z' fill='%237c3aed'/%3E%3C/svg%3E" alt="Violet hills at dusk">
</button>
<dialog id="lightbox" aria-label="Violet hills at dusk">
<img src="data:image/svg+xml,%3Csvg xmlns='http://www.w3.org/2000/svg' width='800' height='600' viewBox='0 0 40 30'%3E%3Crect width='40' height='30' fill='%23fbbf77'/%3E%3Ccircle cx='28' cy='9' r='4' fill='%23fde68a'/%3E%3Cpath d='M0 22 L9 12 L19 20 L28 11 L40 20 V30 H0Z' fill='%237c3aed'/%3E%3C/svg%3E" alt="Violet hills at dusk">
<p>Violet hills at dusk</p>
<button class="close" aria-label="Close">×</button>
</dialog>
<script>
const box = document.getElementById('lightbox');
document.getElementById('thumb').addEventListener('click', () => box.showModal());
box.querySelector('.close').addEventListener('click', () => box.close());
// A click on the backdrop reports the dialog itself as its target.
// A click on the image or caption does not, so those stay open.
box.addEventListener('click', (e) => {
if (e.target === box) box.close();
});
// Esc needs no code: showModal() closes on Esc by itself.
</script>
</body>
</html>
The whole script is three listeners:
thumb.addEventListener('click', () => box.showModal());
closeButton.addEventListener('click', () => box.close());
box.addEventListener('click', (e) => {
  if (e.target === box) box.close();  // the dark area, not the photo
});
If you only need click to enlarge a single image, zooming an image on click compares that with a plain link and a CSS-only toggle. This guide goes further, to a gallery you can page through.
What showModal() does for you
showModal() puts the dialog in the browser's top layer, above everything on the page, so no z-index is needed. It adds a ::backdrop pseudo-element you can darken.
Esc closes it. The rest of the page becomes inert: it cannot be clicked, and Tab skips it.
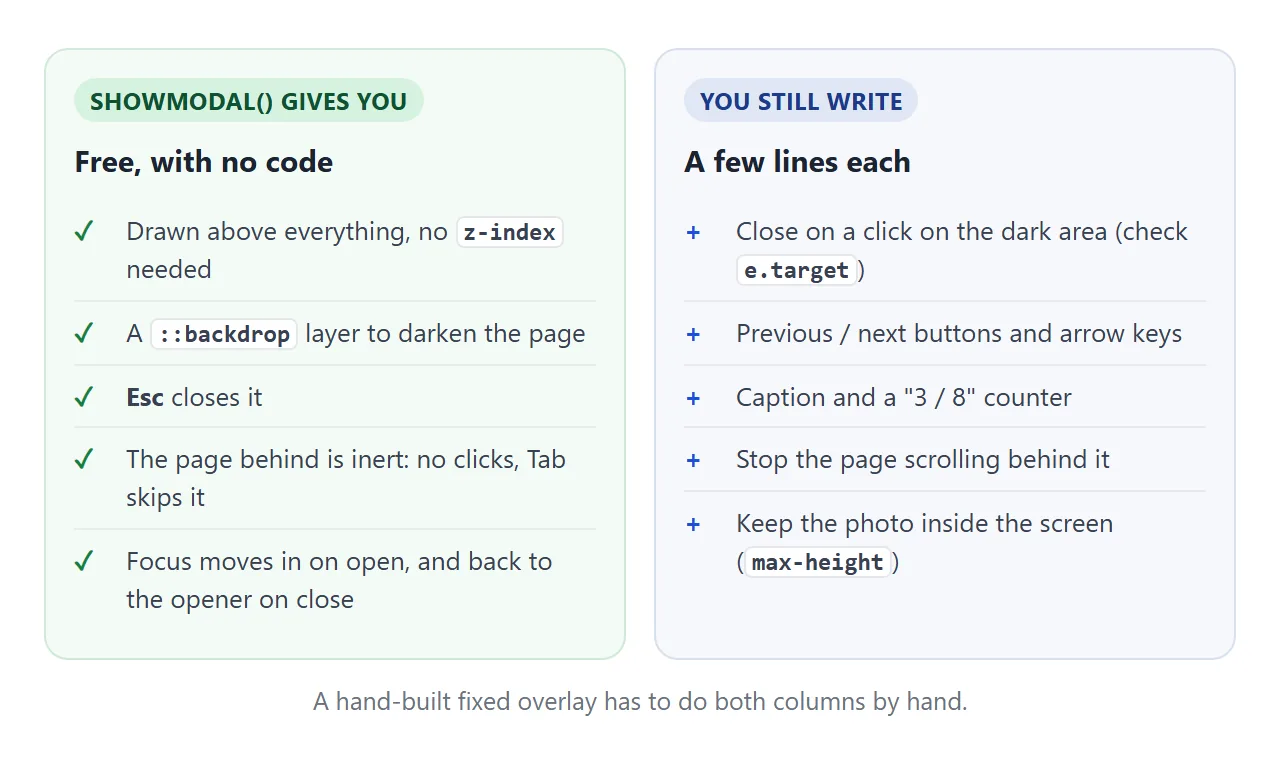
Focus also moves into the dialog when it opens. When it closes, the browser returns focus to the element that was focused before. In the example above, press Tab to reach the photo, press Enter, then Esc: the focus ring is back on the photo.
A hand-built overlay, a <div> with position: fixed, gets none of this. Each item on the left of the picture becomes code you write and test. The HTML CSS modal guide compares the two approaches for modals in general.
Closing on a click on the dark area
A click on ::backdrop is reported with the dialog itself as e.target. A click on the photo or the caption has that element as its target instead. So one comparison tells them apart, and the photo does not close when you click it.
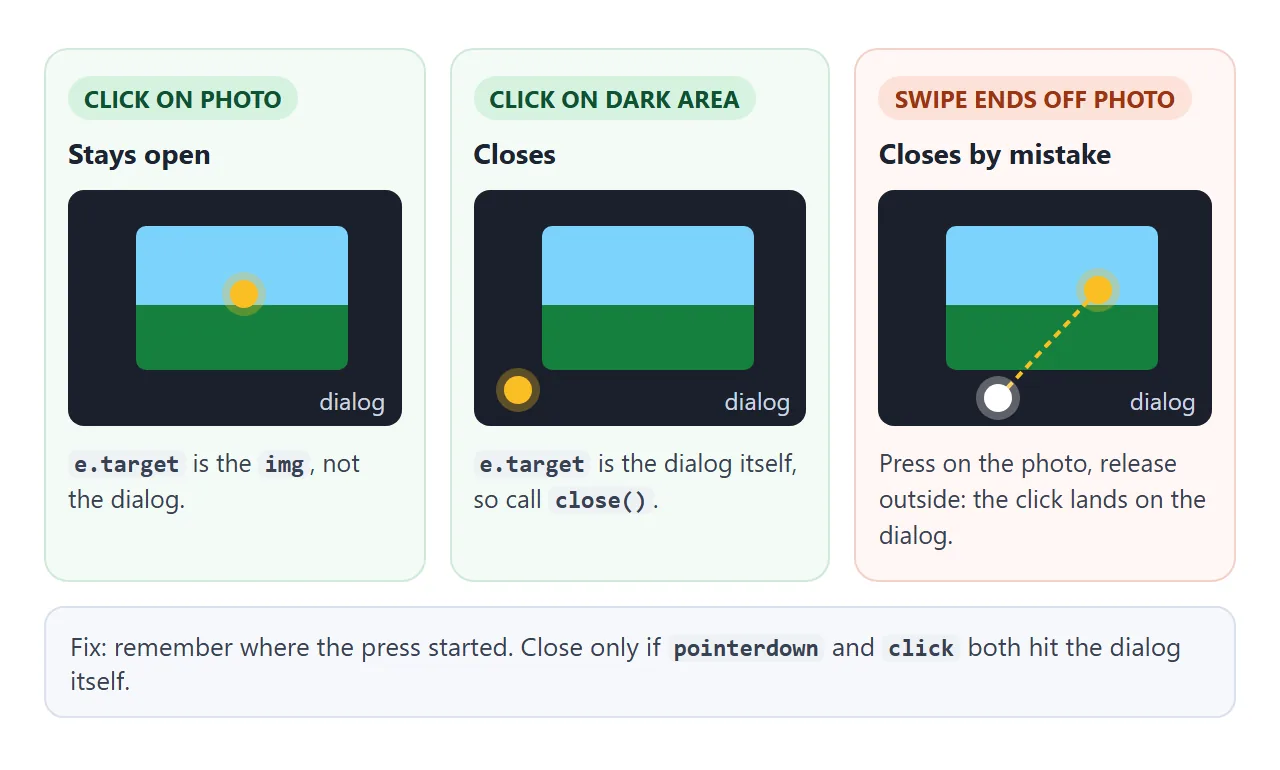
There is one trap. A click event goes to the nearest element that contains both the press and the release.
Press on the photo, drag, and release on the dark area, and that element is the dialog. The lightbox closes in the middle of a swipe.
The fix is to remember where the press started:
let pressedOnBackdrop = false;
lb.addEventListener('pointerdown', (e) => { pressedOnBackdrop = e.target === lb; });
lb.addEventListener('click', (e) => {
  if (e.target === lb && pressedOnBackdrop) lb.close();
});
The same check stops the lightbox closing when someone selects caption text and lets go outside it.
The CSS-only lightbox with :target, and its costs
A lightbox can work with no script at all. Each thumbnail is a link to an id, and the :target selector shows the overlay whose id is in the address:
<a href="#photo-1"><img src="valley-small.jpg" alt="Green valley"></a>

<div class="overlay" id="photo-1">
  <img src="valley.jpg" alt="Green valley, large">
  <a href="#closed">Close</a>
</div>
.overlay { display: none; position: fixed; inset: 0; background: rgba(0, 0, 0, .85); }
.overlay:target { display: grid; place-items: center; }
Try both side by side. The status line shows the part of the address after # and which element has focus.
<!doctype html>
<html lang="en">
<head>
<meta charset="utf-8">
<meta name="viewport" content="width=device-width, initial-scale=1">
<title>:target vs dialog</title>
<style>
body { margin: 0; padding: 16px; font-family: system-ui, sans-serif; background: #f4f5f7; font-size: 14px; }
.cols { display: grid; grid-template-columns: 1fr 1fr; gap: 12px; }
.col { background: #fff; border-radius: 10px; padding: 12px; }
.col h2 { font-size: 15px; margin: 0 0 8px; }
.col img { display: block; width: 100%; height: auto; border-radius: 6px; }
.thumb { display: block; padding: 0; border: 0; background: none; width: 100%; cursor: zoom-in; }
.status { margin-top: 12px; background: #1d2330; color: #e5e7eb; border-radius: 8px; padding: 10px 12px; font: 13px/1.6 ui-monospace, Consolas, monospace; }
.status b { color: #fde68a; font-weight: 600; }
/* CSS-only: the overlay exists all the time and shows when its id is in the URL */
.overlay {
position: fixed; inset: 0; display: none;
place-items: center; background: rgba(10, 12, 20, .85);
}
.overlay:target { display: grid; }
.overlay img { max-width: 90vw; max-height: 75vh; width: auto; }
.overlay a { color: #fff; }
/* dialog version */
dialog { padding: 0; border: 0; background: none; text-align: center; }
dialog::backdrop { background: rgba(10, 12, 20, .85); }
dialog img { display: block; max-width: 90vw; max-height: 75vh; }
dialog button { margin-top: 8px; }
</style>
</head>
<body>
<div class="cols">
<div class="col">
<h2>CSS only (:target)</h2>
<a href="#photo-a" id="open-a"><img src="data:image/svg+xml,%3Csvg xmlns='http://www.w3.org/2000/svg' width='800' height='600' viewBox='0 0 40 30'%3E%3Crect width='40' height='30' fill='%237dd3fc'/%3E%3Ccircle cx='26' cy='10' r='4' fill='%23fef9c3'/%3E%3Cpath d='M0 22 L10 13 L19 20 L27 11 L40 20 V30 H0Z' fill='%2315803d'/%3E%3C/svg%3E" alt="Green valley, CSS version"></a>
</div>
<div class="col">
<h2><dialog></h2>
<button class="thumb" id="open-b"><img src="data:image/svg+xml,%3Csvg xmlns='http://www.w3.org/2000/svg' width='800' height='600' viewBox='0 0 40 30'%3E%3Crect width='40' height='30' fill='%2399f6e4'/%3E%3Ccircle cx='20' cy='10' r='4' fill='%23fde047'/%3E%3Cpath d='M0 22 L13 12 L19 20 L27 11 L40 20 V30 H0Z' fill='%230e7490'/%3E%3C/svg%3E" alt="Teal lake, dialog version"></button>
</div>
</div>
<div class="status">
URL hash: <b id="hash">(none)</b><br>
Focus: <b id="focus">body</b>
</div>
<!-- :target overlay: the close link changes the hash again -->
<div class="overlay" id="photo-a">
<div>
<img src="data:image/svg+xml,%3Csvg xmlns='http://www.w3.org/2000/svg' width='800' height='600' viewBox='0 0 40 30'%3E%3Crect width='40' height='30' fill='%237dd3fc'/%3E%3Ccircle cx='26' cy='10' r='4' fill='%23fef9c3'/%3E%3Cpath d='M0 22 L10 13 L19 20 L27 11 L40 20 V30 H0Z' fill='%2315803d'/%3E%3C/svg%3E" alt="Green valley, large">
<p><a href="#closed">Close</a> · Esc does nothing here</p>
</div>
</div>
<dialog id="dlg">
<img src="data:image/svg+xml,%3Csvg xmlns='http://www.w3.org/2000/svg' width='800' height='600' viewBox='0 0 40 30'%3E%3Crect width='40' height='30' fill='%2399f6e4'/%3E%3Ccircle cx='20' cy='10' r='4' fill='%23fde047'/%3E%3Cpath d='M0 22 L13 12 L19 20 L27 11 L40 20 V30 H0Z' fill='%230e7490'/%3E%3C/svg%3E" alt="Teal lake, large">
<button id="close-b">Close</button> <span style="color:#fff">or press Esc</span>
</dialog>
<script>
// dialog version
const dlg = document.getElementById('dlg');
document.getElementById('open-b').addEventListener('click', () => dlg.showModal());
document.getElementById('close-b').addEventListener('click', () => dlg.close());
// status panel: shows what each version does to the URL and to focus
const show = () => {
document.getElementById('hash').textContent = location.hash || '(none)';
const el = document.activeElement;
document.getElementById('focus').textContent =
el === document.body ? 'body' : el.tagName.toLowerCase() + (el.id ? '#' + el.id : '');
};
addEventListener('hashchange', show);
document.addEventListener('focusin', show);
document.addEventListener('focusout', () => setTimeout(show));
dlg.addEventListener('close', show);
</script>
</body>
</html>
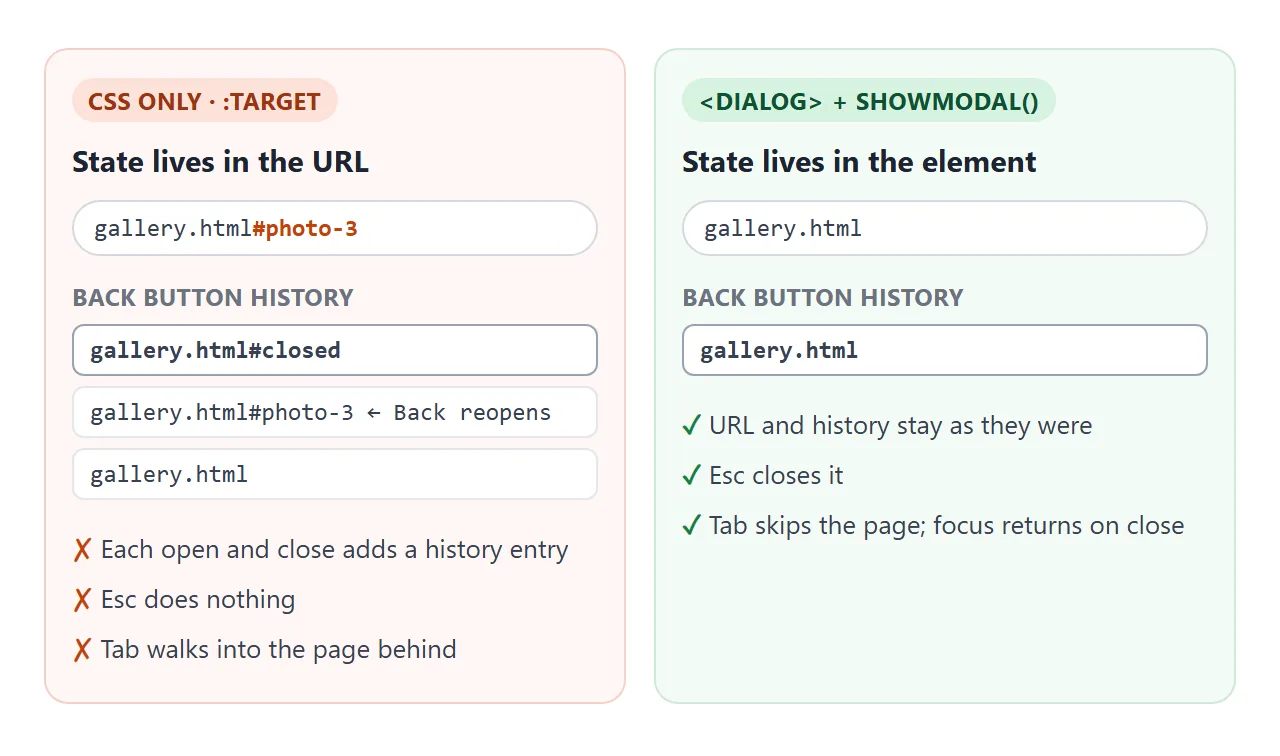
Three differences show up:
- History. Opening sets
#photo-1and closing sets#closed. Each is a new history entry, so the Back button reopens photos the reader already closed. - Keyboard. Esc does nothing. Focus does not move into the overlay, so Tab keeps walking through the page behind it.
- The address. Copy the address while a photo is open and the link opens with that photo showing. That can be useful, but it is rarely expected.
:target overlay |
<dialog> + showModal() |
|
|---|---|---|
| JavaScript | None | A few lines |
| Esc closes | No | Yes, built in |
| Page behind | Still reachable with Tab | Inert |
| Back button | Steps through opened photos | Unchanged |
| Address | Changes to #photo-1 |
Unchanged |
| Page scroll behind | Scrolls | Scrolls, until you lock it |
Use :target only where scripts cannot run. The HTML image gallery guide shows it in a static grid.
A finished gallery lightbox
The gallery keeps one dialog for all photos. A show(n) function sets the large image, the caption and the counter. The buttons, the arrow keys and swipes all call it.
<!doctype html>
<html lang="en">
<head>
<meta charset="utf-8">
<meta name="viewport" content="width=device-width, initial-scale=1">
<title>Gallery lightbox</title>
<style>
body { margin: 0; padding: 16px; font-family: system-ui, sans-serif; background: #f4f5f7; color: #1d2330; }
h1 { font-size: 18px; margin: 0 0 12px; }
.grid { list-style: none; margin: 0; padding: 0; display: grid; gap: 8px;
grid-template-columns: repeat(auto-fill, minmax(110px, 1fr)); }
.thumb { display: block; width: 100%; padding: 0; border: 0; background: none; cursor: zoom-in; border-radius: 8px; }
.thumb img { display: block; width: 100%; aspect-ratio: 4 / 3; object-fit: cover; border-radius: 8px; }
.thumb:focus-visible { outline: 3px solid #2563eb; outline-offset: 2px; }
/* no page scrolling behind an open lightbox */
html:has(#lb[open]) { overflow: hidden; }
/* the dialog fills the screen; its empty area acts as the backdrop */
#lb { width: 100%; height: 100%; max-width: none; max-height: none;
margin: 0; padding: 0; border: 0; background: rgba(10, 12, 20, .9); color: #fff; }
#lb[open] { display: grid; place-items: center; }
#lb::backdrop { background: transparent; }
figure { margin: 0; text-align: center; touch-action: pan-y; user-select: none; }
figure img { display: block; max-width: 86vw; max-height: 72vh; width: auto; height: auto; border-radius: 6px; }
figcaption { margin-top: 10px; font-size: 15px; }
.count { opacity: .7; margin-left: 8px; font-variant-numeric: tabular-nums; }
#lb button { position: absolute; border: 0; border-radius: 50%; width: 44px; height: 44px;
background: rgba(255, 255, 255, .92); color: #111; font-size: 24px; cursor: pointer; }
.prev { left: 10px; top: calc(50% - 22px); }
.next { right: 10px; top: calc(50% - 22px); }
.close { right: 10px; top: 10px; }
</style>
</head>
<body>
<h1>Trip photos</h1>
<!-- Each src here is an inline SVG stand-in. Use your own files, and put a larger one in data-full. -->
<ul class="grid">
<li><button class="thumb" data-caption="Violet hills at dusk"><img src="data:image/svg+xml,%3Csvg xmlns='http://www.w3.org/2000/svg' width='800' height='600' viewBox='0 0 40 30'%3E%3Crect width='40' height='30' fill='%23fbbf77'/%3E%3Ccircle cx='28' cy='9' r='4' fill='%23fde68a'/%3E%3Cpath d='M0 22 L9 12 L19 20 L28 11 L40 20 V30 H0Z' fill='%237c3aed'/%3E%3C/svg%3E" alt="Purple hills under an orange sky"></button></li>
<li><button class="thumb" data-caption="Morning in the valley"><img src="data:image/svg+xml,%3Csvg xmlns='http://www.w3.org/2000/svg' width='800' height='600' viewBox='0 0 40 30'%3E%3Crect width='40' height='30' fill='%237dd3fc'/%3E%3Ccircle cx='26' cy='10' r='4' fill='%23fef9c3'/%3E%3Cpath d='M0 22 L10 13 L19 20 L27 11 L40 20 V30 H0Z' fill='%2315803d'/%3E%3C/svg%3E" alt="Green hills under a pale blue sky"></button></li>
<li><button class="thumb" data-caption="Night climb"><img src="data:image/svg+xml,%3Csvg xmlns='http://www.w3.org/2000/svg' width='800' height='600' viewBox='0 0 40 30'%3E%3Crect width='40' height='30' fill='%231e3a8a'/%3E%3Ccircle cx='24' cy='11' r='4' fill='%23f8fafc'/%3E%3Cpath d='M0 22 L11 14 L19 20 L26 11 L40 20 V30 H0Z' fill='%23334155'/%3E%3C/svg%3E" alt="Grey peaks under a dark blue night sky"></button></li>
<li><button class="thumb" data-caption="Desert ridge"><img src="data:image/svg+xml,%3Csvg xmlns='http://www.w3.org/2000/svg' width='800' height='600' viewBox='0 0 40 30'%3E%3Crect width='40' height='30' fill='%23fda4af'/%3E%3Ccircle cx='22' cy='9' r='4' fill='%23fff7ed'/%3E%3Cpath d='M0 22 L12 15 L19 20 L28 11 L40 20 V30 H0Z' fill='%23b45309'/%3E%3C/svg%3E" alt="Brown ridge under a pink sky"></button></li>
<li><button class="thumb" data-caption="Lake shore"><img src="data:image/svg+xml,%3Csvg xmlns='http://www.w3.org/2000/svg' width='800' height='600' viewBox='0 0 40 30'%3E%3Crect width='40' height='30' fill='%2399f6e4'/%3E%3Ccircle cx='20' cy='10' r='4' fill='%23fde047'/%3E%3Cpath d='M0 22 L13 12 L19 20 L27 11 L40 20 V30 H0Z' fill='%230e7490'/%3E%3C/svg%3E" alt="Teal hills under a mint sky with a yellow sun"></button></li>
<li><button class="thumb" data-caption="Pink pass"><img src="data:image/svg+xml,%3Csvg xmlns='http://www.w3.org/2000/svg' width='800' height='600' viewBox='0 0 40 30'%3E%3Crect width='40' height='30' fill='%23c4b5fd'/%3E%3Ccircle cx='18' cy='11' r='4' fill='%23fef08a'/%3E%3Cpath d='M0 22 L14 13 L19 20 L26 11 L40 20 V30 H0Z' fill='%23be185d'/%3E%3C/svg%3E" alt="Magenta hills under a lilac sky"></button></li>
<li><button class="thumb" data-caption="Last light"><img src="data:image/svg+xml,%3Csvg xmlns='http://www.w3.org/2000/svg' width='800' height='600' viewBox='0 0 40 30'%3E%3Crect width='40' height='30' fill='%23fed7aa'/%3E%3Ccircle cx='16' cy='9' r='4' fill='%23f97316'/%3E%3Cpath d='M0 22 L15 14 L19 20 L28 11 L40 20 V30 H0Z' fill='%2357534e'/%3E%3C/svg%3E" alt="Dark grey hills and an orange sun"></button></li>
<li><button class="thumb" data-caption="Snow line"><img src="data:image/svg+xml,%3Csvg xmlns='http://www.w3.org/2000/svg' width='800' height='600' viewBox='0 0 40 30'%3E%3Crect width='40' height='30' fill='%23bae6fd'/%3E%3Ccircle cx='14' cy='10' r='4' fill='%23ffffff'/%3E%3Cpath d='M0 22 L16 15 L19 20 L27 11 L40 20 V30 H0Z' fill='%2364748b'/%3E%3C/svg%3E" alt="Slate hills under a light blue sky"></button></li>
</ul>
<p>Open a photo, then use the arrows, the arrow keys or a swipe. Esc or a click on the dark area closes it, and focus goes back to the photo you ended on.</p>
<dialog id="lb" aria-label="Photo viewer">
<figure>
<img id="lb-img" alt="" draggable="false">
<figcaption><span id="lb-cap"></span><span class="count" id="lb-count"></span></figcaption>
</figure>
<button class="prev" aria-label="Previous photo">‹</button>
<button class="next" aria-label="Next photo">›</button>
<button class="close" aria-label="Close">×</button>
</dialog>
<script>
const lb = document.getElementById('lb');
const big = document.getElementById('lb-img');
const thumbs = [...document.querySelectorAll('.thumb')];
let current = 0;
function show(n) {
current = (n + thumbs.length) % thumbs.length; // wrap 8 -> 1 and 1 -> 8
const img = thumbs[current].querySelector('img');
big.src = img.dataset.full || img.src;
big.alt = img.alt;
document.getElementById('lb-cap').textContent = thumbs[current].dataset.caption;
document.getElementById('lb-count').textContent = (current + 1) + ' / ' + thumbs.length;
}
thumbs.forEach((t, n) => t.addEventListener('click', () => { show(n); lb.showModal(); }));
lb.querySelector('.prev').addEventListener('click', () => show(current - 1));
lb.querySelector('.next').addEventListener('click', () => show(current + 1));
lb.querySelector('.close').addEventListener('click', () => lb.close());
// Arrow keys. Esc is built in.
lb.addEventListener('keydown', (e) => {
if (e.key === 'ArrowLeft') show(current - 1);
if (e.key === 'ArrowRight') show(current + 1);
});
// Close on the dark area only if the press also started there,
// so a swipe that ends off the photo does not close it.
let pressedOnBackdrop = false;
lb.addEventListener('pointerdown', (e) => { pressedOnBackdrop = e.target === lb; });
lb.addEventListener('click', (e) => {
if (e.target === lb && pressedOnBackdrop) lb.close();
});
// Swipe: compare where the pointer went down and came up.
const fig = lb.querySelector('figure');
let startX = null;
fig.addEventListener('pointerdown', (e) => { startX = e.clientX; fig.setPointerCapture(e.pointerId); });
fig.addEventListener('pointerup', (e) => {
if (startX === null) return;
const dx = e.clientX - startX;
startX = null;
if (dx < -40) show(current + 1); // swiped left
if (dx > 40) show(current - 1); // swiped right
});
// Put focus back on the thumbnail of the photo now showing.
lb.addEventListener('close', () => thumbs[current].focus());
</script>
</body>
</html>
- Thumbnails are buttons. A
<button>is reachable with Tab and opens with Enter or Space. A bare<img>with a click listener is not. - One show function.
(n + length) % lengthwraps from the last photo to the first and back. - Captions come from the thumbnail. Each button carries
data-caption, and the image keeps its ownalt. A caption is for everyone, while alt text describes the picture for people who cannot see it. - Arrow keys. One
keydownlistener on the dialog handles ArrowLeft and ArrowRight. Esc is already handled. - Swipe. Store
clientXonpointerdown, compare onpointerup, and move one photo when the difference is over 40 pixels. Pointer events cover mouse, pen and finger with the same code. - Focus return. In the dialog's
closeevent, focus the thumbnail of the photo now showing.
lb.addEventListener('close', () => thumbs[current].focus());
The browser would return focus to the thumbnail that opened the lightbox. After paging to another photo, the one now showing is the better place to land. The close event fires after the browser's own focus step, so this line wins.
Keeping the photo inside the screen
A large photo at its natural size can be taller than the window, and the bottom half is then out of reach. Limit both sides and leave the other size automatic:
#lb img {
  max-width: 86vw;
  max-height: 72vh;
  width: auto;
  height: auto;  /* the ratio stays right */
}
If your layout sets a fixed width and height on the image instead, add object-fit: contain. The whole photo then fits inside that box without stretching.
For the thumbnails, the opposite is usually wanted. aspect-ratio: 4 / 3 with object-fit: cover crops every photo to the same shape, so the grid lines up.
Stopping the page from scrolling behind it
An open modal dialog does not lock page scrolling by itself. The wheel or a finger on the dark area can still scroll the page underneath. One CSS rule stops it while the lightbox is open:
html:has(#lb[open]) { overflow: hidden; }
:has() matches the html element whenever the dialog carries the open attribute, which showModal() adds and close() removes. No JavaScript is needed to undo it.
When the scrollbar disappears, the page can shift sideways by its width. scrollbar-gutter: stable on html keeps that space reserved.
When it does not work
| What you see | Cause | Fix |
|---|---|---|
| The page scrolls behind the lightbox | A modal dialog does not lock scrolling | html:has(dialog[open]) { overflow: hidden; } |
| Tab moves to links on the page behind | A fixed <div> overlay, or show() instead of showModal() |
Use <dialog> and open it with showModal() |
| Esc does nothing | A custom overlay with no key handler | Use showModal(), or listen for keydown and check e.key === 'Escape' |
| The photo is cut off at the bottom | The image is shown at natural size | max-width and max-height with width: auto; height: auto |
| The photo looks squashed | Fixed width and height on the image |
Add object-fit: contain |
| Clicking the photo closes the lightbox | The click handler does not check the target | Close only when e.target is the dialog |
| A swipe closes the lightbox | The release landed on the dark area | Also require pointerdown on the dialog |
| The dark area never closes it | A wrapper element fills the dialog, so it is the click target | Let the dialog itself be the empty area, or compare against the wrapper |
| The Back button reopens photos | The :target version changes the address |
Use the dialog version |
Share it as a link
A lightbox is something to click, not to look at in a screenshot. An .html file sent as an attachment may open as plain code on a phone, and the inline photos in these examples need the page to render.
To send the working version, paste the page into a NOS document and choose Create share link. HTML to link walks through it.
The page renders as written and its scripts run, so the people you send it to can open the photos, swipe and press the arrow keys themselves. If you change the code later, the same link shows the new version.