HTML 페이지에서 WebGPU를 사용하려면 navigator.gpu를 확인하고 어댑터와 장치를 요청한 후 <canvas>를 해당 장치에 연결하세요. WGSL에 셰이더를 작성하고, 파이프라인을 구축하고, 렌더 패스를 기록하고 이를 GPU 대기열에 제출합니다.
라이브러리나 빌드 단계가 필요하지 않습니다. 다음은 각 모서리에 색상이 있는 삼각형을 그리는 파일입니다.
<!doctype html>
<html lang="en">
<head>
<meta charset="utf-8">
<meta name="viewport" content="width=device-width, initial-scale=1">
<title>WebGPU triangle</title>
<style>
  body { margin: 0; padding: 12px; font-family: system-ui, sans-serif; background: #f4f5f7; }
  canvas { display: block; width: 100%; height: 230px; border-radius: 10px; background: #111827; }
  .bar { display: flex; gap: 8px; align-items: center; margin-top: 10px; }
  button { font: inherit; font-size: 14px; padding: 7px 12px; border-radius: 8px; border: 1px solid #c9cdd4; background: #fff; cursor: pointer; }
  pre { margin: 8px 0 0; font-size: 12px; white-space: pre-wrap; color: #374151; }
  .warn { color: #9a3412; }
</style>
</head>
<body>
<canvas id="c"></canvas>
<div class="bar"><button id="bad">Compile a broken shader</button></div>
<pre id="log"></pre>

<script>
  const canvas = document.getElementById('c');
  const log = document.getElementById('log');

  // One WGSL module holds both shaders
  const shaderCode = `
struct VOut {
  @builtin(position) pos : vec4f,
  @location(0) color : vec3f,
}

@vertex
fn vs(@location(0) pos : vec2f, @location(1) color : vec3f) -> VOut {
  var out : VOut;
  out.pos = vec4f(pos, 0.0, 1.0);
  out.color = color;
  return out;
}

@fragment
fn fs(v : VOut) -> @location(0) vec4f {
  return vec4f(v.color, 1.0);
}`;

  // x, y, r, g, b for each corner. x and y run from -1 to 1.
  const corners = new Float32Array([
     0.0,  0.8,   1.0, 0.3, 0.3,
    -0.8, -0.7,   0.3, 1.0, 0.4,
     0.8, -0.7,   0.3, 0.5, 1.0,
  ]);

  let device = null;

  async function start() {
    // 1. Is WebGPU here at all?
    if (!navigator.gpu) return fallback('navigator.gpu is undefined');
    let adapter = null;
    try { adapter = await navigator.gpu.requestAdapter(); } catch (err) { return fallback(err.message); }
    if (!adapter) return fallback('requestAdapter() returned null');
    device = await adapter.requestDevice();

    // 2. Connect the canvas to the device
    canvas.width = Math.round(canvas.clientWidth * devicePixelRatio);
    canvas.height = Math.round(canvas.clientHeight * devicePixelRatio);
    const context = canvas.getContext('webgpu');
    const format = navigator.gpu.getPreferredCanvasFormat();
    context.configure({ device, format });

    // 3. Copy the corners into a GPU buffer
    const buffer = device.createBuffer({
      size: corners.byteLength,
      usage: GPUBufferUsage.VERTEX | GPUBufferUsage.COPY_DST,
    });
    device.queue.writeBuffer(buffer, 0, corners);

    // 4. The pipeline: shaders + how to read the buffer
    const module = device.createShaderModule({ code: shaderCode });
    const pipeline = device.createRenderPipeline({
      layout: 'auto',
      vertex: {
        module, entryPoint: 'vs',
        buffers: [{
          arrayStride: 5 * 4,  // 5 floats of 4 bytes per corner
          attributes: [
            { shaderLocation: 0, offset: 0, format: 'float32x2' },
            { shaderLocation: 1, offset: 2 * 4, format: 'float32x3' },
          ],
        }],
      },
      fragment: { module, entryPoint: 'fs', targets: [{ format }] },
      primitive: { topology: 'triangle-list' },
    });

    // 5. Record the commands, then submit them
    const encoder = device.createCommandEncoder();
    const pass = encoder.beginRenderPass({
      colorAttachments: [{
        view: context.getCurrentTexture().createView(),
        clearValue: { r: 0.07, g: 0.09, b: 0.15, a: 1 },
        loadOp: 'clear',
        storeOp: 'store',
      }],
    });
    pass.setPipeline(pipeline);
    pass.setVertexBuffer(0, buffer);
    pass.draw(3);
    pass.end();
    device.queue.submit([encoder.finish()]);
    log.textContent = 'Drawn with WebGPU. Canvas format: ' + format;
  }

  // No WebGPU: draw the same triangle with canvas 2D and say why
  function fallback(reason) {
    canvas.width = canvas.clientWidth;
    canvas.height = canvas.clientHeight;
    const ctx = canvas.getContext('2d');
    const w = canvas.width, h = canvas.height;
    const px = (x, y) => [(x + 1) / 2 * w, (1 - y) / 2 * h];
    ctx.beginPath();
    ctx.moveTo(...px(0, 0.8)); ctx.lineTo(...px(-0.8, -0.7)); ctx.lineTo(...px(0.8, -0.7));
    ctx.fillStyle = '#6b7280';
    ctx.fill();
    log.className = 'warn';
    log.textContent = 'WebGPU is not available here (' + reason + ').\nFallback: the grey triangle is drawn with canvas 2D.';
  }

  start();

  // A missing ")" in the vertex shader. createShaderModule does not throw.
  document.getElementById('bad').addEventListener('click', async () => {
    if (!device) return;
    const broken = device.createShaderModule({ code: shaderCode.replace('color : vec3f) ->', 'color : vec3f ->') });
    const info = await broken.getCompilationInfo();
    log.textContent = info.messages.map(m => m.type + ' at line ' + m.lineNum + ':' + m.linePos + '\n' + m.message).join('\n');
  });
</script>
</body>
</html>
전체 레시피는 5단계로 구성됩니다.
- WebGPU를 확인하세요.
navigator.gpu가undefined인 경우 대체를 표시합니다. - 어댑터와 장치를 가져옵니다.
requestAdapter()를 기다렸다가 결과가null가 아닌지 확인한 다음requestDevice()를 기다립니다. - 캔버스를 구성합니다.
canvas.getContext('webgpu')를 호출하고 장치 및getPreferredCanvasFormat()를configure에 전달합니다. - 파이프라인을 구축합니다.
createShaderModule에 WGSL 코드를 넣은 다음createRenderPipeline에 셰이더와 버퍼 레이아웃을 설명합니다. - 기록 및 제출.
getCurrentTexture()에서 렌더 패스를 시작하고, 파이프라인을 설정하고, 패스를 그리고 종료하고 제출합니다.
WebGPU를 실행하는 브라우저
WebGPU 사양과 해당 셰이딩 언어인 WGSL은 모두 W3C 후보 권장 사항 초안입니다. 지원은 여전히 브라우저와 운영 체제에 따라 다르므로 가정하기보다는 코드에서 확인하세요.
MDN의 호환성 데이터 목록은 다음 브라우저에서 지원됩니다.
| 브라우저 | MDN의 데이터가 말하는 것 |
|---|---|
| 크롬, 엣지, 오페라 | 지원됩니다. Linux의 Chrome은 특정 Intel GPU로 제한됩니다. |
| 안드로이드용 크롬, 삼성 인터넷 | 지원됨 |
| Mac, iPhone, iPad의 Safari | 지원됨 |
| 파이어폭스 | 부분: Linux가 아닌 Windows 및 Apple-silicon Mac |
| 안드로이드용 파이어폭스 | 지원되지 않음 |
이 페이지에 대해 테스트된 내용: Windows의 Chrome 및 Edge는 데스크톱 및 휴대폰 너비에서 세 가지 예를 모두 실행했습니다. GPU 액세스가 없는 Chromium 빌드는 requestAdapter()에서 null를 반환했으며 모든 예에서는 대체 메시지를 표시했습니다.
WebGPU에는 보안 컨텍스트도 필요합니다. https, localhost의 페이지 및 파일에서 열린 페이지가 적합합니다. 네트워크 주소의 일반 http를 통해 제공되는 동일한 파일에는 Chrome에 navigator.gpu가 전혀 없습니다.
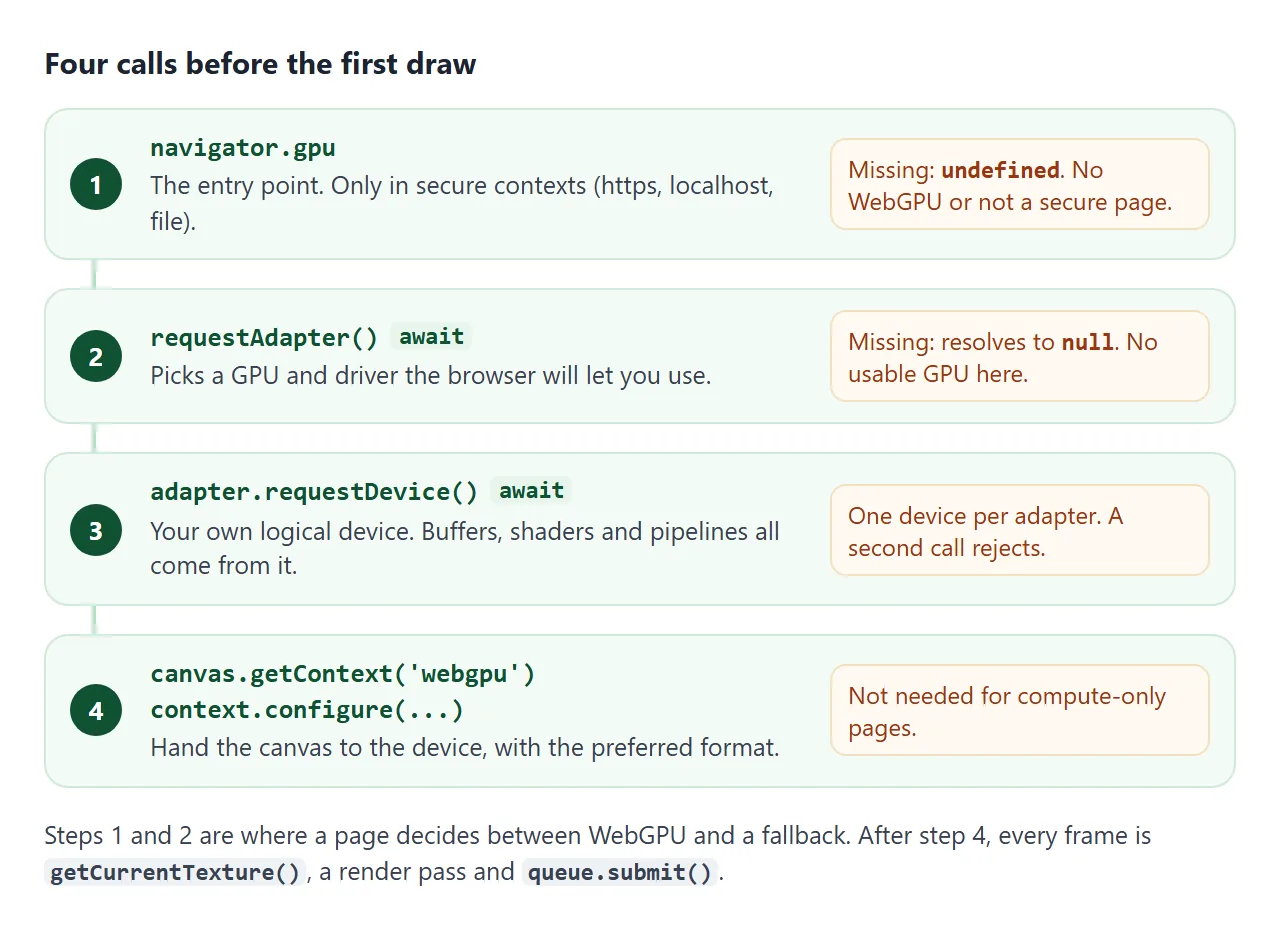
첫 번째 추첨 전 4번의 콜
WebGL은 컨텍스트를 즉시 제공합니다. WebGPU를 사용하면 하드웨어를 먼저 요청하고 호출 중 두 개가 약속을 반환합니다.
if (!navigator.gpu) return fallback('no navigator.gpu');
const adapter = await navigator.gpu.requestAdapter();
if (!adapter) return fallback('no adapter');
const device = await adapter.requestDevice();

const context = canvas.getContext('webgpu');
const format = navigator.gpu.getPreferredCanvasFormat();
context.configure({ device, format });
- 어댑터는 물리적 GPU와 해당 드라이버를 나타냅니다. 적합한 항목을 사용할 수 없는 경우
requestAdapter()는null로 확인됩니다. - 장치는 해당 GPU에 대한 페이지의 자체 논리적 보기입니다. 모든 버퍼, 셰이더 및 파이프라인이 여기에서 생성됩니다.
- 어댑터는 하나의 장치를 전달합니다.
requestDevice()를 두 번째로 호출하면OperationError로 거부됩니다.
getPreferredCanvasFormat()는 화면에 적합한 형식(bgra8unorm 또는 rgba8unorm)을 반환합니다. 여기에 사용된 Windows 시스템에서는 bgra8unorm였습니다.
캔버스는 CSS 크기에 관계없이 300 x 150픽셀에서 시작합니다. clientWidth 및 clientHeight와 devicePixelRatio를 곱하여 canvas.width 및 canvas.height를 설정하지 않으면 도면이 부드러워 보입니다. HTML 캔버스 흐릿함은 크기 불일치를 다루고 있습니다.
WGSL 모듈 1개, 셰이더 2개
WebGPU 셰이더는 WebGPU 셰이딩 언어인 WGSL로 작성되었습니다. 하나의 모듈은 @vertex 및 @fragment로 표시된 정점 셰이더와 조각 셰이더를 모두 보유할 수 있습니다.
struct VOut {
  @builtin(position) pos : vec4f,
  @location(0) color : vec3f,
}

@vertex
fn vs(@location(0) pos : vec2f, @location(1) color : vec3f) -> VOut {
  var out : VOut;
  out.pos = vec4f(pos, 0.0, 1.0);
  out.color = color;
  return out;
}

@fragment
fn fs(v : VOut) -> @location(0) vec4f {
  return vec4f(v.color, 1.0);
}
정점 셰이더는 모서리마다 한 번씩 실행되고 해당 위치를 반환합니다. 프래그먼트 셰이더는 적용되는 픽셀당 한 번씩 실행되고 해당 색상을 반환합니다. 입력의 @location(0)는 아래 버퍼 레이아웃의 shaderLocation: 0와 일치합니다.
컴파일 오류는 조용합니다. createShaderModule는 오타를 일으키지 않습니다. 모듈에 메시지를 요청하세요.
const info = await module.getCompilationInfo();
for (const m of info.messages) {
  console.log(m.type, m.lineNum, m.linePos, m.message);
}
첫 번째 예의 버튼은 ) 하나를 제거하고 Chrome이 반환하는 내용을 인쇄합니다. )가 예상되었다는 내용의 8행 오류입니다.
명령을 기록한 후 제출
코너 데이터는 GPU 버퍼로 들어가고 파이프라인은 이를 읽는 방법을 설명합니다. 여기의 각 모서리는 5개의 4바이트 부동 소수점이므로 보폭은 20바이트이고 색상은 8바이트에서 시작됩니다.
const buffer = device.createBuffer({
  size: corners.byteLength,
  usage: GPUBufferUsage.VERTEX | GPUBufferUsage.COPY_DST,
});
device.queue.writeBuffer(buffer, 0, corners);

const pipeline = device.createRenderPipeline({
  layout: 'auto',
  vertex: { module, entryPoint: 'vs', buffers: [{
    arrayStride: 20,
    attributes: [
      { shaderLocation: 0, offset: 0, format: 'float32x2' },
      { shaderLocation: 1, offset: 8, format: 'float32x3' },
    ],
  }] },
  fragment: { module, entryPoint: 'fs', targets: [{ format }] },
});
그리기는 두 단계로 이루어집니다. 먼저 명령을 인코더에 기록합니다. 완성된 명령 버퍼를 device.queue에 제출할 때까지는 아무 것도 GPU에 도달하지 않습니다.
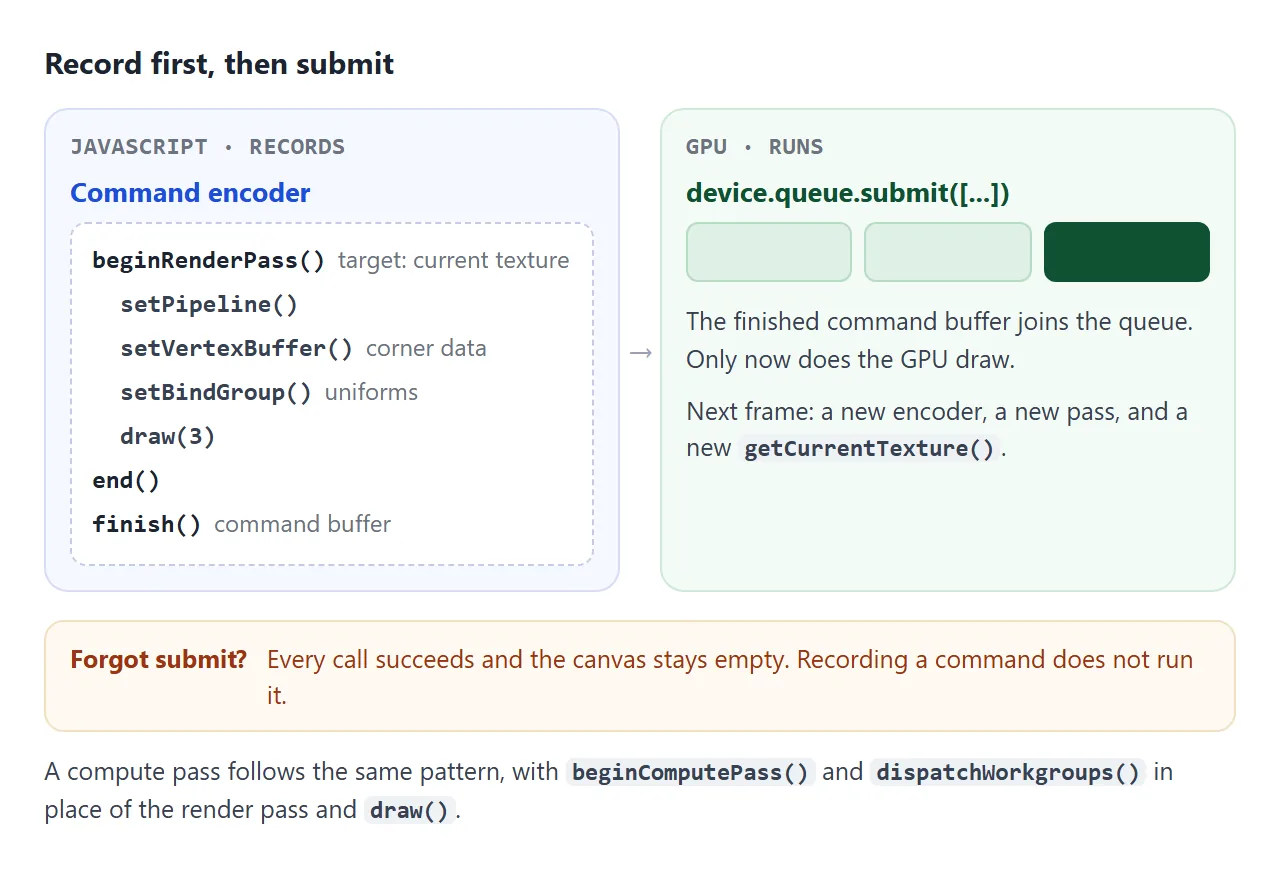
const encoder = device.createCommandEncoder();
const pass = encoder.beginRenderPass({
  colorAttachments: [{
    view: context.getCurrentTexture().createView(),
    clearValue: { r: 0.07, g: 0.09, b: 0.15, a: 1 },
    loadOp: 'clear',
    storeOp: 'store',
  }],
});
pass.setPipeline(pipeline);
pass.setVertexBuffer(0, buffer);
pass.draw(3);
pass.end();
device.queue.submit([encoder.finish()]);
마지막 줄을 생략하면 모든 호출이 계속 성공하지만 캔버스는 비어 있습니다. 테스트에서 빨간색으로 지워지고 제출되지 않은 패스는 캔버스를 완전히 투명하게 유지했습니다.
균일한 버퍼로 애니메이션화
유니폼은 그리기의 모든 모서리와 픽셀이 읽을 수 있는 값으로, JavaScript에서 설정됩니다. WebGPU에서는 버퍼에 위치하며 바인드 그룹은 사용할 버퍼를 파이프라인에 알려줍니다.
<!doctype html>
<html lang="en">
<head>
<meta charset="utf-8">
<meta name="viewport" content="width=device-width, initial-scale=1">
<title>WebGPU uniform buffer</title>
<style>
  body { margin: 0; padding: 12px; font-family: system-ui, sans-serif; background: #f4f5f7; }
  canvas { display: block; width: 100%; height: 250px; border-radius: 10px; background: #111827; }
  .bar { display: flex; flex-wrap: wrap; gap: 14px; align-items: center; margin-top: 10px; font-size: 14px; }
  label { display: flex; gap: 6px; align-items: center; }
  input[type=range] { width: 120px; }
  p { margin: 8px 0 0; font-size: 12px; color: #9a3412; }
</style>
</head>
<body>
<canvas id="c"></canvas>
<div class="bar">
  <label>Color <input type="color" id="color" value="#f59e0b"></label>
  <label>Speed <input type="range" id="speed" min="0" max="4" step="0.1" value="1"></label>
</div>
<p id="msg"></p>

<script>
  const canvas = document.getElementById('c');
  const colorInput = document.getElementById('color');
  const speedInput = document.getElementById('speed');

  const shaderCode = `
struct Params {
  angleAspect : vec4f,  // x = angle, y = width / height
  color : vec4f,
}
@group(0) @binding(0) var<uniform> u : Params;

@vertex
fn vs(@builtin(vertex_index) i : u32) -> @builtin(position) vec4f {
  // Three corners written in the shader, no vertex buffer needed
  var p = array<vec2f, 3>(vec2f(0.0, 0.7), vec2f(-0.6, -0.45), vec2f(0.6, -0.45));
  let a = u.angleAspect.x;
  let r = vec2f(p[i].x * cos(a) - p[i].y * sin(a), p[i].x * sin(a) + p[i].y * cos(a));
  return vec4f(r.x / u.angleAspect.y, r.y, 0.0, 1.0);
}

@fragment
fn fs() -> @location(0) vec4f {
  return u.color;
}`;

  async function start() {
    const adapter = navigator.gpu && await navigator.gpu.requestAdapter().catch(() => null);
    if (!adapter) {
      document.getElementById('msg').textContent = 'WebGPU is not available in this browser, so nothing is drawn. Try a browser listed in the article.';
      return;
    }
    const device = await adapter.requestDevice();
    const context = canvas.getContext('webgpu');
    const format = navigator.gpu.getPreferredCanvasFormat();
    context.configure({ device, format });

    // 8 floats = 32 bytes: two vec4f
    const params = new Float32Array(8);
    const uniformBuffer = device.createBuffer({
      size: params.byteLength,
      usage: GPUBufferUsage.UNIFORM | GPUBufferUsage.COPY_DST,
    });

    const module = device.createShaderModule({ code: shaderCode });
    const pipeline = device.createRenderPipeline({
      layout: 'auto',
      vertex: { module, entryPoint: 'vs' },
      fragment: { module, entryPoint: 'fs', targets: [{ format }] },
    });

    // Tells the pipeline which buffer is @group(0) @binding(0)
    const bindGroup = device.createBindGroup({
      layout: pipeline.getBindGroupLayout(0),
      entries: [{ binding: 0, resource: { buffer: uniformBuffer } }],
    });

    let angle = 0, last = performance.now();

    function frame(now) {
      // Keep the drawing buffer the same size as the element
      const w = Math.round(canvas.clientWidth * devicePixelRatio);
      const h = Math.round(canvas.clientHeight * devicePixelRatio);
      if (canvas.width !== w || canvas.height !== h) { canvas.width = w; canvas.height = h; }

      angle += (now - last) / 1000 * Number(speedInput.value);
      last = now;
      const hex = colorInput.value;
      params.set([angle, w / h, 0, 0,
        parseInt(hex.slice(1, 3), 16) / 255, parseInt(hex.slice(3, 5), 16) / 255, parseInt(hex.slice(5, 7), 16) / 255, 1]);
      device.queue.writeBuffer(uniformBuffer, 0, params);  // new values every frame

      const encoder = device.createCommandEncoder();
      const pass = encoder.beginRenderPass({
        colorAttachments: [{
          view: context.getCurrentTexture().createView(),  // a fresh texture each frame
          clearValue: { r: 0.07, g: 0.09, b: 0.15, a: 1 },
          loadOp: 'clear', storeOp: 'store',
        }],
      });
      pass.setPipeline(pipeline);
      pass.setBindGroup(0, bindGroup);
      pass.draw(3);
      pass.end();
      device.queue.submit([encoder.finish()]);
      requestAnimationFrame(frame);
    }
    requestAnimationFrame(frame);
  }

  start();
</script>
</body>
</html>
struct Params {
  angleAspect : vec4f,  // x = angle, y = width / height
  color : vec4f,
}
@group(0) @binding(0) var<uniform> u : Params;
const uniformBuffer = device.createBuffer({
  size: 32,  // two vec4f
  usage: GPUBufferUsage.UNIFORM | GPUBufferUsage.COPY_DST,
});
const bindGroup = device.createBindGroup({
  layout: pipeline.getBindGroupLayout(0),
  entries: [{ binding: 0, resource: { buffer: uniformBuffer } }],
});

function frame(now) {
  device.queue.writeBuffer(uniformBuffer, 0, params);
  // ...begin a pass on a fresh getCurrentTexture()...
  pass.setBindGroup(0, bindGroup);
  requestAnimationFrame(frame);
}
layout: 'auto'를 사용하면 파이프라인은 셰이더의 @group 및 @binding 라인에서 바인드 그룹 레이아웃을 구축하고 getBindGroupLayout(0)는 이를 다시 전달합니다.
getCurrentTexture()는 캔버스에 표시될 다음 텍스처를 반환하므로 처음에 한 번 호출하는 것이 아니라 프레임 함수 내에서 호출합니다. 루프 자체는 일반적인 requestAnimationFrame입니다.
이 예제에는 정점 버퍼가 전혀 없습니다. 세 모서리가 셰이더에 기록되고 @builtin(vertex_index)는 어느 모서리가 처리되고 있는지 알려줍니다.
컴퓨팅: GPU를 계산기로 사용
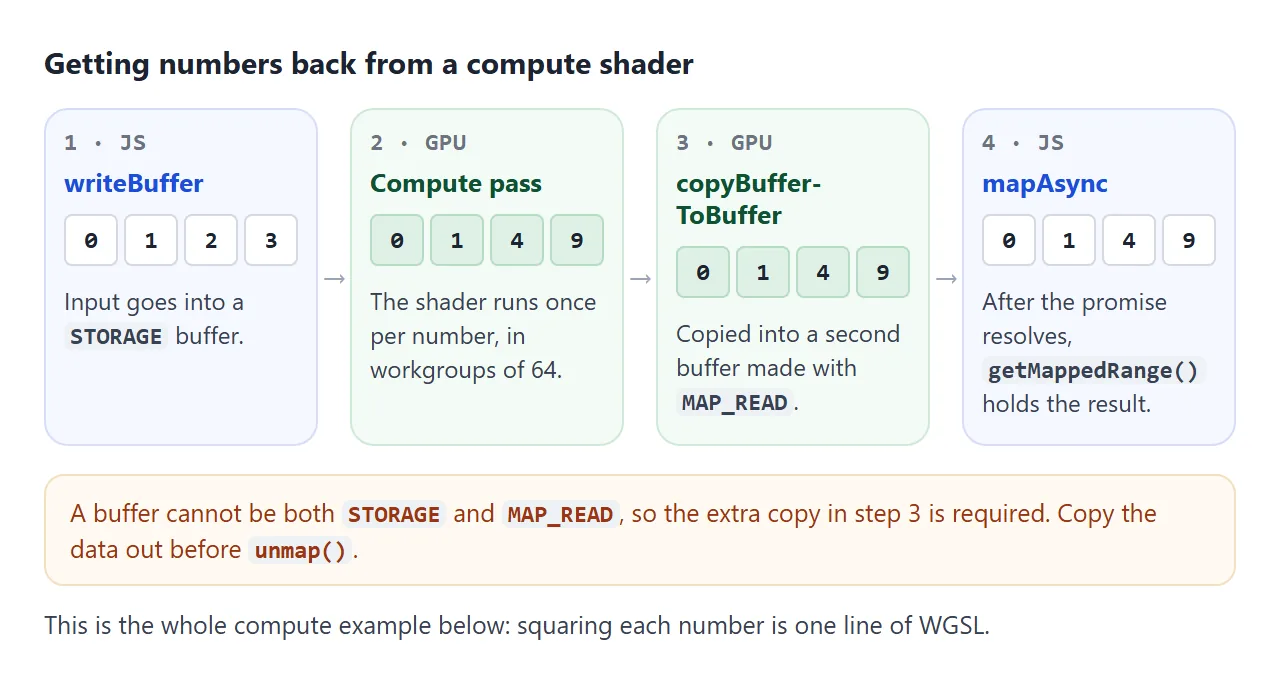
WebGPU에는 아무것도 그리지 않는 두 번째 종류의 파이프라인이 있습니다. 컴퓨팅 셰이더는 버퍼를 읽고 쓰며, 많은 복사본이 병렬로 실행됩니다.
@group(0) @binding(0) var<storage, read_write> data : array<f32>;

@compute @workgroup_size(64)
fn main(@builtin(global_invocation_id) id : vec3u) {
  if (id.x >= arrayLength(&data)) { return; }
  data[id.x] = data[id.x] * data[id.x];
}
각 작업 그룹은 64개 번호를 다루므로 페이지는 Math.ceil(n / 64) 작업 그룹을 발송합니다. 마지막 그룹은 배열의 끝을 지나 도달할 수 있으므로 셰이더는 인덱스를 먼저 확인합니다.
<!doctype html>
<html lang="en">
<head>
<meta charset="utf-8">
<meta name="viewport" content="width=device-width, initial-scale=1">
<title>WebGPU compute shader</title>
<style>
  body { margin: 0; padding: 12px; font-family: system-ui, sans-serif; background: #f4f5f7; color: #1d2330; }
  .bar { display: flex; flex-wrap: wrap; gap: 10px; align-items: center; font-size: 14px; }
  select, button { font: inherit; font-size: 14px; padding: 7px 10px; border-radius: 8px; border: 1px solid #c9cdd4; background: #fff; }
  button { cursor: pointer; }
  .out { margin-top: 12px; padding: 12px; border-radius: 10px; background: #fff; border: 1px solid #e1e4ea; min-height: 150px; }
  .out b { display: block; font-size: 13px; margin-bottom: 6px; }
  .nums { font: 13px/1.6 ui-monospace, Consolas, monospace; word-break: break-all; color: #374151; }
  .ok { color: #0f5132; font-size: 13px; margin-top: 8px; }
  .warn { color: #9a3412; font-size: 13px; }
</style>
</head>
<body>
<div class="bar">
  <label>Numbers
    <select id="count">
      <option value="1000">1,000</option>
      <option value="100000" selected>100,000</option>
      <option value="1000000">1,000,000</option>
    </select>
  </label>
  <button id="run">Square them on the GPU</button>
</div>
<div class="out" id="out"><span class="nums">Press the button.</span></div>

<script>
  const out = document.getElementById('out');

  // One compute shader: each invocation squares one number
  const shaderCode = `
@group(0) @binding(0) var<storage, read_write> data : array<f32>;

@compute @workgroup_size(64)
fn main(@builtin(global_invocation_id) id : vec3u) {
  if (id.x >= arrayLength(&data)) { return; }
  data[id.x] = data[id.x] * data[id.x];
}`;

  let device = null, pipeline = null;

  async function setup() {
    const adapter = navigator.gpu && await navigator.gpu.requestAdapter().catch(() => null);
    if (!adapter) return false;
    device = await adapter.requestDevice();
    pipeline = device.createComputePipeline({
      layout: 'auto',
      compute: { module: device.createShaderModule({ code: shaderCode }), entryPoint: 'main' },
    });
    return true;
  }

  async function run() {
    if (!device && !(await setup())) {
      out.innerHTML = '<span class="warn">WebGPU is not available in this browser, so the shader cannot run here.</span>';
      return;
    }
    const n = Number(document.getElementById('count').value);
    const input = new Float32Array(n).map((_, i) => i);

    // The GPU works on a storage buffer...
    const work = device.createBuffer({
      size: input.byteLength,
      usage: GPUBufferUsage.STORAGE | GPUBufferUsage.COPY_SRC | GPUBufferUsage.COPY_DST,
    });
    device.queue.writeBuffer(work, 0, input);
    // ...and JavaScript can only read a MAP_READ buffer
    const readback = device.createBuffer({
      size: input.byteLength,
      usage: GPUBufferUsage.MAP_READ | GPUBufferUsage.COPY_DST,
    });

    const bindGroup = device.createBindGroup({
      layout: pipeline.getBindGroupLayout(0),
      entries: [{ binding: 0, resource: { buffer: work } }],
    });

    const encoder = device.createCommandEncoder();
    const pass = encoder.beginComputePass();
    pass.setPipeline(pipeline);
    pass.setBindGroup(0, bindGroup);
    pass.dispatchWorkgroups(Math.ceil(n / 64));  // 64 numbers per workgroup
    pass.end();
    encoder.copyBufferToBuffer(work, 0, readback, 0, input.byteLength);
    device.queue.submit([encoder.finish()]);

    // Wait until the GPU is done, then copy the result out
    await readback.mapAsync(GPUMapMode.READ);
    const result = new Float32Array(readback.getMappedRange().slice(0));
    readback.unmap();
    work.destroy(); readback.destroy();

    // Check every value against plain JavaScript
    let wrong = 0;
    for (let i = 0; i < n; i++) if (result[i] !== Math.fround(i * i)) wrong++;
    out.innerHTML = '<b>First 10 results</b><div class="nums">' + Array.from(result.slice(0, 10)).join(', ') +
      '</div><b style="margin-top:8px">Last result</b><div class="nums">' + (n - 1) + '² = ' + result[n - 1] +
      '</div><div class="ok">' + (wrong ? wrong + ' values differ from JavaScript' : 'All ' + n.toLocaleString('en') + ' values match JavaScript.') + '</div>';
  }

  document.getElementById('run').addEventListener('click', run);
</script>
</body>
</html>
결과를 다시 읽으려면 다음 세 단계를 거쳐야 합니다.
MAP_READ | COPY_DST로 만든 버퍼에 스토리지 버퍼를 복사합니다.MAP_READ가 있는 버퍼는COPY_DST외에는 다른 용도로 사용할 수 없으므로 스토리지 버퍼 자체가 될 수 없습니다.mapAsync(GPUMapMode.READ)를 기다리세요.unmap()를 호출하기 전에getMappedRange()에서 데이터를 복사하세요.unmap()이후에는 해당ArrayBuffer가 분리되고 길이는 0입니다.
긴 컴퓨팅 작업은 navigator.gpu도 사용할 수 있는 웹 작업자에서 실행할 수도 있습니다.
WebGPU 또는 WebGL
둘 다 GPU를 사용하여 <canvas>를 사용하며 라이브러리가 필요하지 않습니다. HTML의 WebGL은 WebGL의 동일한 삼각형을 통과합니다.
| WebGL | 웹GPU | |
|---|---|---|
| 시작하기 | getContext('webgl2')는 컨텍스트를 한 번에 반환합니다. |
어댑터와 장치를 기다린 후 캔버스를 구성하세요. |
| 셰이더 언어 | GLSL | WGSL |
| 셰이더 | 프로그램에 연결된 별도의 정점 및 조각 소스 | 하나의 모듈이 두 진입점을 모두 보유할 수 있습니다. |
| 일반 계산 | 그것을 위해 설계되지 않았습니다 | 컴퓨팅 파이프라인 |
| 오류 | GPU를 기다리는 getError() |
약속을 해결하는 오류 범위 |
특정 호출에서 유효성 검사 오류를 포착하려면 이를 device.pushErrorScope('validation')로 래핑하고 device.popErrorScope()를 기다립니다. Promise는 범위의 첫 번째 오류 또는 null를 해결합니다.
작동하지 않을 때
| 당신이 보는 것 | 원인 | 수정 |
|---|---|---|
navigator.gpu는 undefined입니다. |
이 브라우저에 WebGPU가 없거나 페이지가 보안 컨텍스트가 아닙니다. | https 또는 localhost를 통해 서비스하고 폴백을 표시합니다. |
requestAdapter()는 null를 제공합니다. |
페이지에 사용 가능한 GPU 어댑터가 없습니다. | 대체 표시 |
| 캔버스가 비어 있고 오류가 없습니다. | 명령 버퍼가 제출되지 않았습니다. | encoder.finish()를 queue.submit()에 전달하세요. |
getCurrentTexture()의 InvalidStateError |
컨텍스트가 아직 구성되지 않았습니다. | 먼저 context.configure에 전화하세요 |
| 셰이더 편집 후 아무 것도 그려지지 않음 | WGSL 컴파일 오류 및 createShaderModule가 발생하지 않습니다. |
getCompilationInfo()를 기다리고 메시지를 인쇄하세요. |
requestDevice()의 OperationError |
동일한 어댑터의 두 번째 장치 | 먼저 새 어댑터를 요청하세요. |
getContext('2d')는 null를 반환합니다. |
캔버스에는 이미 webgpu 컨텍스트가 있습니다. |
캔버스당 하나의 컨텍스트 유형 사용 |
createBuffer의 유효성 검사 오류 |
MAP_READ와 STORAGE 결합 |
별도의 다시 읽기 버퍼 사용 |
| 결과 배열의 길이는 0입니다. | unmap() 이후에 읽혔습니다. |
매핑을 해제하기 전에 slice()로 복사하세요. |
| 부드럽거나 늘어난 드로잉 | 캔버스는 여전히 300 x 150입니다. | 요소 크기에서 너비와 높이 설정 |
링크로 공유하세요
WebGPU 페이지는 스크린샷에 표시하기 어렵습니다. 삼각형이 회전을 멈추고 뷰어는 속도 슬라이더를 끌거나 자체 GPU에서 컴퓨팅 셰이더를 실행할 수 없습니다.
.html 첨부 파일은 전화기에서 일반 코드로 열릴 수 있습니다. 휴대전화에서 HTML 파일 열기가 그 이유를 설명합니다.
작업 버전을 보내려면 페이지를 NOS 문서에 붙여넣고 공유 링크 만들기를 선택하세요. 링크할 HTML이 이를 안내합니다.
페이지는 작성된 대로 렌더링되고 해당 스크립트가 실행되므로 페이지를 보내는 사람들은 모양이 움직이는 것을 보고 버튼을 직접 누를 수 있습니다.
WebGPU가 없는 브라우저를 사용하는 사람은 대신 대체 메시지를 보게 됩니다. 나중에 코드를 변경하면 동일한 링크에 새 버전이 표시됩니다.
NOS 내부에서는 페이지가 다른 사이트의 이미지, 프레임 또는 데이터를 로드할 수 없으므로 모든 것을 하나의 파일에 보관합니다. 여기의 셰이더는 스크립트의 일반 문자열이며 모든 숫자는 페이지에 생성됩니다.