Alpine.js is a small JavaScript framework for adding behaviour straight into HTML. Its site calls it "your new, lightweight, JavaScript framework".
You load it with one script tag, add an x-data attribute, and the elements inside can count clicks, show and hide, and follow form inputs.
There is no build step and no npm. Click the buttons below, then type a name.
<!doctype html>
<html lang="en">
<head>
<meta charset="utf-8">
<meta name="viewport" content="width=device-width, initial-scale=1">
<title>Alpine.js in one HTML file</title>
<!-- Load Alpine with defer, pinned to one version -->
<script defer src="https://cdn.jsdelivr.net/npm/alpinejs@3.17.4/dist/cdn.min.js"></script>
<style>
  [x-cloak] { display: none !important; }  /* hide until Alpine is ready */
  body { margin: 0; padding: 20px; font-family: system-ui, sans-serif; background: #f4f5f7; }
  .box {
    max-width: 380px; padding: 16px 18px; border-radius: 12px;
    background: #fff; box-shadow: 0 4px 14px rgba(0, 0, 0, .1);
  }
  button {
    font: inherit; padding: 8px 14px; border: 0; border-radius: 8px;
    background: #2f7d6d; color: #fff; cursor: pointer;
  }
  input { font: inherit; padding: 7px 9px; border: 1px solid #cfd4dc; border-radius: 8px; width: 100%; box-sizing: border-box; }
  p { margin: 12px 0 0; }
</style>
</head>
<body>

<!-- x-data makes this div a component and holds its state -->
<div class="box" x-data="{ count: 0, open: false, name: '' }">
  <button @click="count++">Clicked <span x-text="count"></span> times</button>
  <button @click="open = !open" x-text="open ? 'Hide' : 'Show'"></button>

  <p x-show="open" x-cloak>
    <input x-model="name" placeholder="Type your name">
    <span x-text="name ? 'Hello, ' + name + '!' : 'Waiting for a name...'"></span>
  </p>
</div>

</body>
</html>
There is no <script> with click handlers in that page. The x-data object holds the state, and the attributes read and change it.
The smallest working page
Every Alpine page has the same three parts:
- The script tag, with
defer. The Alpine installation page puts it in the<head>. The docs remind you not to forgetdefer. - An
x-dataelement. It turns that chunk of HTML into a component and holds its data as a JavaScript object. - Directives inside it.
@clickruns an expression on click, andx-textsets the text from an expression.
<script defer src="https://cdn.jsdelivr.net/npm/alpinejs@3.17.4/dist/cdn.min.js"></script>

<div x-data="{ count: 0 }">
  <button @click="count++">Add one</button>
  <span x-text="count"></span>
</div>
The docs show the link with @3.x.x, which pulls the latest version 3 release. For stability they recommend writing the exact version, as above.
How Alpine updates the page
You do not look up elements or set textContent. You change the data, and every directive that reads it updates.
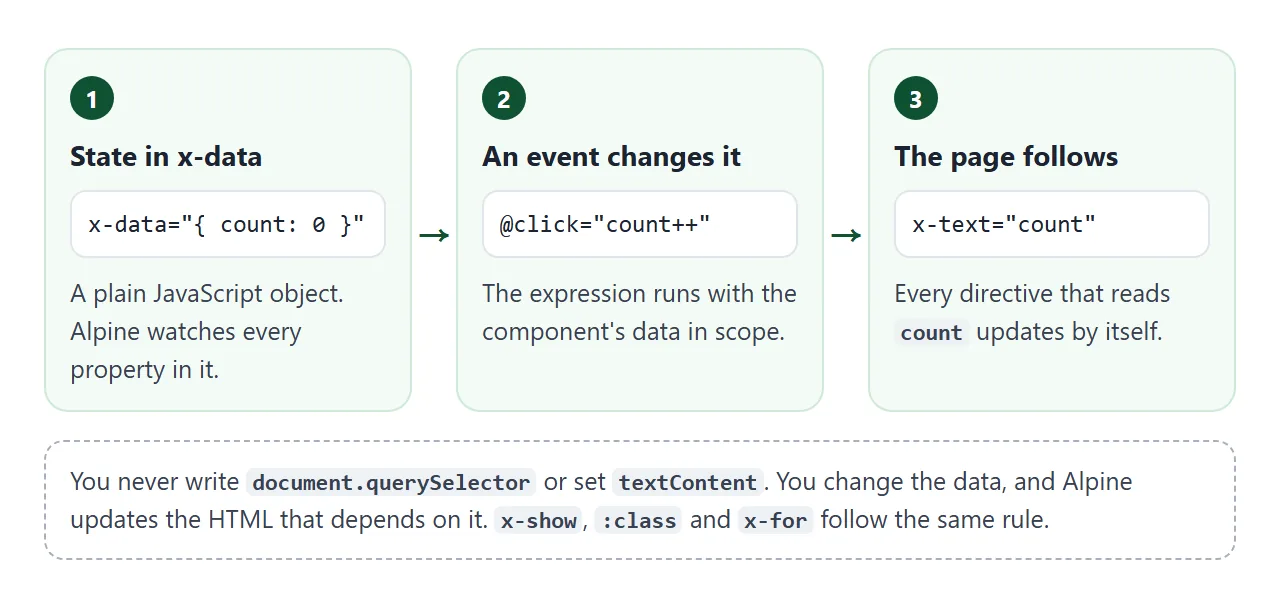
These are the directives you will use most. Each one takes a plain JavaScript expression.
| Directive | What it does |
|---|---|
x-data |
Makes the element a component and declares its data |
x-on:click or @click |
Runs an expression when the event fires |
x-text |
Sets the element's text to the result of an expression |
x-show |
Shows or hides the element |
x-bind:class or :class |
Sets an attribute, such as a class, from data |
x-model |
Binds an input's value to data, both ways |
x-for |
Repeats a <template> once per item in a list |
x-cloak |
Hides the element until Alpine has set it up |
@ is the docs' shorthand for x-on:, and : is short for x-bind:. Both forms work the same.
A variant: tabs with x-show and :class
Tabs need one piece of state: which tab is open. Each button sets it, each panel shows when it matches, and :class underlines the current button.
<!doctype html>
<html lang="en">
<head>
<meta charset="utf-8">
<meta name="viewport" content="width=device-width, initial-scale=1">
<title>Tabs with Alpine.js</title>
<script defer src="https://cdn.jsdelivr.net/npm/alpinejs@3.17.4/dist/cdn.min.js"></script>
<style>
  [x-cloak] { display: none !important; }
  body { margin: 0; padding: 20px; font-family: system-ui, sans-serif; background: #f4f5f7; }
  .tabs { max-width: 420px; background: #fff; border-radius: 12px; box-shadow: 0 4px 14px rgba(0, 0, 0, .1); overflow: hidden; }
  .bar { display: flex; border-bottom: 1px solid #e3e6eb; }
  .bar button {
    flex: 1; font: inherit; padding: 11px 6px; border: 0; background: none;
    cursor: pointer; color: #555; border-bottom: 3px solid transparent;
  }
  .bar button.on { color: #2f7d6d; border-bottom-color: #2f7d6d; font-weight: 600; }
  .panel { padding: 16px 18px; line-height: 1.5; }
  .panel h3 { margin: 0 0 6px; font-size: 16px; }
  .panel p { margin: 0; }
</style>
</head>
<body>

<div class="tabs" x-data="{ tab: 'plan' }">
  <div class="bar">
    <!-- :class adds "on" when this tab is the current one -->
    <button @click="tab = 'plan'"  :class="{ on: tab === 'plan' }">Plan</button>
    <button @click="tab = 'build'" :class="{ on: tab === 'build' }">Build</button>
    <button @click="tab = 'ship'"  :class="{ on: tab === 'ship' }">Ship</button>
  </div>

  <!-- x-show hides a panel with display: none -->
  <div class="panel" x-show="tab === 'plan'">
    <h3>Plan</h3><p>Write down what the page must do. One sentence per feature.</p>
  </div>
  <div class="panel" x-show="tab === 'build'" x-cloak>
    <h3>Build</h3><p>Add x-data, then one directive at a time. Reload after each.</p>
  </div>
  <div class="panel" x-show="tab === 'ship'" x-cloak>
    <h3>Ship</h3><p>Paste the file into a document and share it as a link.</p>
  </div>
</div>

</body>
</html>
<div x-data="{ tab: 'plan' }">
  <button @click="tab = 'plan'" :class="{ on: tab === 'plan' }">Plan</button>
  <div x-show="tab === 'plan'">...</div>
</div>
x-show hides an element with an inline display: none, so the panels stay in the page. To compare, tabs without JavaScript builds the same thing with radio buttons and CSS.
Directives must sit inside x-data
The most common silent failure: a directive placed outside every x-data element. Alpine does not process it and prints no error. The element keeps whatever text was in the HTML.
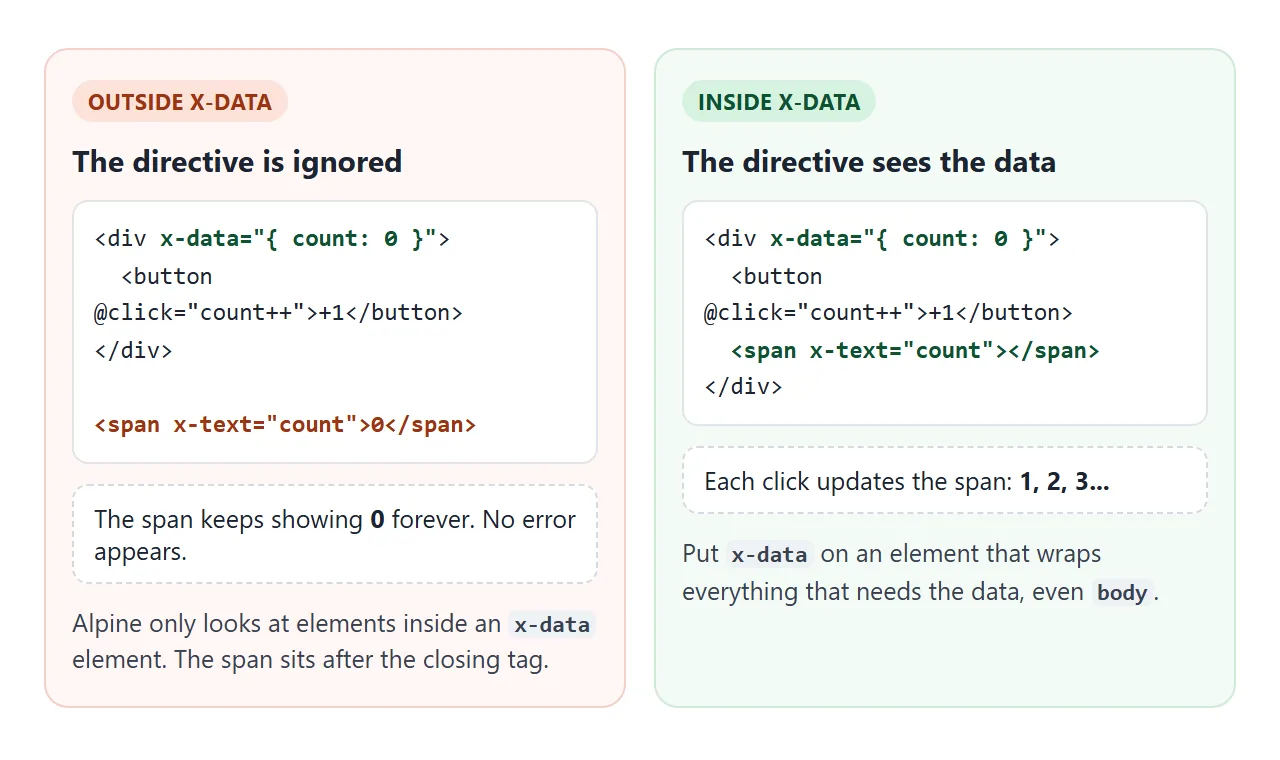
The x-data docs say properties are available to all child elements, nested components included. So put x-data high enough to wrap everything that needs the data. On a one-file page, <body x-data="..."> is fine.
Moving the data into a script: Alpine.data
When the object in x-data grows, move it into a <script> with Alpine.data(). Then x-data="todos" refers to it by name. The catch is timing.
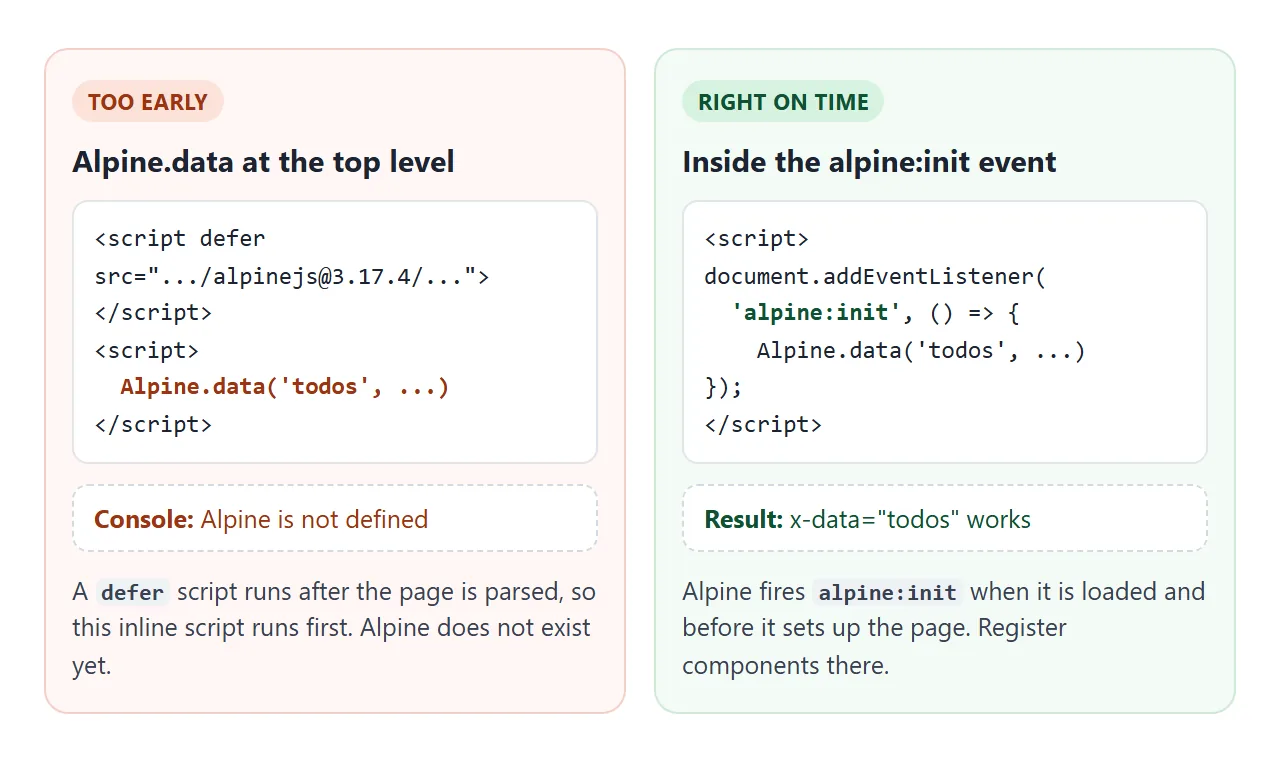
The script tag has defer, so Alpine runs after the page is parsed. An inline script that calls Alpine.data directly runs earlier. In our test, the console showed "Alpine is not defined" and the component stayed empty.
The docs register components inside the alpine:init event instead. Alpine fires it after it has loaded, but before it initializes itself on the page:
document.addEventListener('alpine:init', () => {
  Alpine.data('todos', () => ({
    items: [],
    add() { /* ... */ },
  }));
});
A finished example: a to-do list
This list uses Alpine.data, x-model on the text box and the checkboxes, x-for with a key, and two getters for the filter and the counter.
<!doctype html>
<html lang="en">
<head>
<meta charset="utf-8">
<meta name="viewport" content="width=device-width, initial-scale=1">
<title>To-do list with Alpine.js</title>
<script defer src="https://cdn.jsdelivr.net/npm/alpinejs@3.17.4/dist/cdn.min.js"></script>
<script>
  // Register the component before Alpine starts
  document.addEventListener('alpine:init', () => {
    Alpine.data('todos', () => ({
      text: '',
      filter: 'all',
      nextId: 4,
      items: [
        { id: 1, label: 'Load Alpine with defer', done: true },
        { id: 2, label: 'Add x-data', done: false },
        { id: 3, label: 'Share the page', done: false },
      ],
      add() {
        if (!this.text.trim()) return;
        this.items.push({ id: this.nextId++, label: this.text.trim(), done: false });
        this.text = '';
      },
      remove(id) { this.items = this.items.filter(i => i.id !== id); },
      // Getters recalculate whenever items or filter change
      get shown() {
        if (this.filter === 'open') return this.items.filter(i => !i.done);
        if (this.filter === 'done') return this.items.filter(i => i.done);
        return this.items;
      },
      get left() { return this.items.filter(i => !i.done).length; },
    }));
  });
</script>
<style>
  [x-cloak] { display: none !important; }
  body { margin: 0; padding: 16px; font-family: system-ui, sans-serif; background: #eceef1; }
  .app { max-width: 440px; margin: 0 auto; background: #fff; border-radius: 12px; padding: 16px; box-shadow: 0 4px 16px rgba(0, 0, 0, .1); }
  h2 { margin: 0 0 12px; font-size: 18px; }
  form { display: flex; gap: 8px; }
  input[type=text] { flex: 1; min-width: 0; font: inherit; padding: 8px 10px; border: 1px solid #cfd4dc; border-radius: 8px; }
  button { font: inherit; padding: 8px 12px; border: 0; border-radius: 8px; background: #2f7d6d; color: #fff; cursor: pointer; }
  ul { list-style: none; padding: 0; margin: 12px 0; }
  li { display: flex; align-items: center; gap: 10px; padding: 8px 4px; border-bottom: 1px solid #eef0f3; }
  li span { flex: 1; }
  li.done span { text-decoration: line-through; color: #999; }
  li button { background: none; color: #b0413e; padding: 2px 8px; }
  .foot { display: flex; justify-content: space-between; align-items: center; gap: 8px; font-size: 13px; color: #666; flex-wrap: wrap; }
  .foot button { background: #eef0f3; color: #333; padding: 5px 10px; }
  .foot button.on { background: #2f7d6d; color: #fff; }
</style>
</head>
<body>

<div class="app" x-data="todos" x-cloak>
  <h2>To-do list</h2>

  <!-- .prevent stops the form from reloading the page -->
  <form @submit.prevent="add()">
    <input type="text" x-model="text" placeholder="New task" aria-label="New task">
    <button>Add</button>
  </form>

  <ul>
    <!-- x-for goes on a template with one root element; :key keeps rows stable -->
    <template x-for="item in shown" :key="item.id">
      <li :class="{ done: item.done }">
        <input type="checkbox" x-model="item.done" :aria-label="item.label">
        <span x-text="item.label"></span>
        <button @click="remove(item.id)" aria-label="Delete">✕</button>
      </li>
    </template>
  </ul>

  <div class="foot">
    <span x-text="left + (left === 1 ? ' task' : ' tasks') + ' left'"></span>
    <div>
      <button @click="filter = 'all'"  :class="{ on: filter === 'all' }">All</button>
      <button @click="filter = 'open'" :class="{ on: filter === 'open' }">Open</button>
      <button @click="filter = 'done'" :class="{ on: filter === 'done' }">Done</button>
    </div>
  </div>
</div>

</body>
</html>
@submit.preventcallsadd()and stops the form from reloading the page.x-formust sit on a<template>with one root element.:key="item.id"lets Alpine keep the right rows when the list changes.- Getters such as
get left()recalculate from the current data. The docs note they are not cached. x-cloakon the app hides the raw template until Alpine has rendered it.
For the same app in plain JavaScript, see a simple HTML to-do list.
When it does not work
| What you see | Cause | Fix |
|---|---|---|
| Nothing reacts, no error in the console | The elements are outside every x-data |
Move x-data up to a wrapping element |
| Console: "Unable to initialize ... Did you forget to add defer" | The script tag in <head> has no defer |
Add defer |
| Console: "Alpine is not defined" | Alpine.data runs before Alpine loads |
Wrap it in an alpine:init listener |
| Hidden content flashes on load | x-show only applies once Alpine runs |
Add x-cloak and the [x-cloak] CSS rule |
x-for shows nothing and logs an error |
It is on an <li>, not a <template> |
Put it on a <template> around the <li> |
Only the first element of each x-for row appears |
The <template> has two root elements |
Wrap them in one element |
The input's value attribute is ignored |
x-model sets the input from the data |
Put the starting value in x-data |
An x-show element will not hide |
A CSS rule sets display with !important |
Use x-show.important |
For problems that are not Alpine-specific, such as a wrong script URL, see HTML JavaScript not working.
Share it as a link
An Alpine page is easier to show than to describe. A screenshot cannot be clicked, and an .html attachment may open as plain code on a phone.
To send the working version, paste the page into a NOS document and choose Create share link. HTML to link walks through it.
The page renders as written, Alpine loads from jsDelivr and its scripts run, so the people you send it to can click, type and tick items themselves, without an account. If you change the code later, the same link shows the new version.
Keep the data in the page. Forms handled inside the page work, as the to-do list does, but sending a form to a server and fetching from other sites are blocked. For more pages built from one file, see single HTML file apps.