Yes. ChatGPT can write an interactive quiz as a single HTML page: questions, answer buttons, instant feedback and a score. Making the quiz is the easy half.
The hard half is getting it to students. They should not need an account, an install or a downloaded file just to answer five questions.
Here is the kind of page ChatGPT can produce. Try it as a student would, then press Start again.
<!doctype html>
<html lang="en">
<head>
<meta charset="utf-8">
<meta name="viewport" content="width=device-width, initial-scale=1">
<title>States of Matter Quiz</title>
<style>
  * { box-sizing: border-box; }
  body {
    margin: 0; padding: 16px; font-family: system-ui, sans-serif;
    background: #f4f5f7; color: #1d2330; line-height: 1.45;
  }
  .wrap { max-width: 640px; margin: 0 auto; }
  h1 { font-size: 1.35rem; margin: 0 0 4px; }
  .sub { margin: 0 0 14px; color: #5b6472; font-size: .95rem; }
  .q { background: #fff; border: 1px solid #e1e4ea; border-radius: 12px; padding: 14px 16px; margin-bottom: 12px; }
  .q h2 { font-size: 1rem; margin: 0 0 8px; }
  .opt { display: inline-flex; gap: 8px; align-items: center; padding: 7px 12px 7px 8px; margin: 0 6px 4px 0; border-radius: 8px; cursor: pointer; border: 1px solid #e5e7eb; }
  .opt:hover { background: #f1f5f9; }
  .opt input { width: 18px; height: 18px; margin: 0; }
  .q.right { border-color: #16a34a; background: #f0fdf4; }
  .q.wrong { border-color: #ea580c; background: #fff7ed; }
  .fb { margin: 8px 0 0; font-size: .92rem; display: none; }
  .q.right .fb, .q.wrong .fb { display: block; }
  .btns { display: flex; gap: 10px; flex-wrap: wrap; align-items: center; }
  button {
    font: inherit; font-weight: 600; padding: 10px 18px; border: 0; border-radius: 8px;
    background: #2563eb; color: #fff; cursor: pointer;
  }
  button.ghost { background: #e5e7eb; color: #1d2330; }
  #score { font-weight: 700; font-size: 1.05rem; }
</style>
</head>
<body>
<div class="wrap">
  <h1>States of Matter: Quick Check</h1>
  <p class="sub">Year 7 science. Pick one answer per question, then press Check answers.</p>

  <form id="quiz"></form>

  <div class="btns">
    <button type="button" id="check">Check answers</button>
    <button type="button" id="again" class="ghost">Start again</button>
    <span id="score" aria-live="polite"></span>
  </div>
</div>

<script>
  // Edit this list to change the quiz. "answer" is the index of the right option (0 = first).
  const questions = [
    { q: 'What happens to the particles in a solid when it is heated?',
      options: ['They vibrate more', 'They stop moving', 'They disappear'],
      answer: 0, why: 'Heat gives particles more energy, so they vibrate more.' },
    { q: 'Which change turns a liquid into a gas?',
      options: ['Melting', 'Evaporation', 'Freezing'],
      answer: 1, why: 'Evaporation is liquid turning into gas.' },
    { q: 'Which state of matter has a fixed shape?',
      options: ['Gas', 'Liquid', 'Solid'],
      answer: 2, why: 'The particles in a solid are held in fixed positions.' },
    { q: 'Ice turning into water is called:',
      options: ['Condensation', 'Melting', 'Boiling'],
      answer: 1, why: 'Melting is solid turning into liquid.' },
    { q: 'Which of these can be squashed into a smaller space most easily?',
      options: ['A gas', 'A liquid', 'A solid'],
      answer: 0, why: 'Gas particles are far apart, so there is room to push them closer.' }
  ];

  const form = document.getElementById('quiz');
  const scoreEl = document.getElementById('score');

  function build() {
    form.innerHTML = '';
    questions.forEach((item, i) => {
      const box = document.createElement('div');
      box.className = 'q';
      box.id = 'q' + i;
      let html = '<h2>' + (i + 1) + '. ' + item.q + '</h2>';
      item.options.forEach((text, j) => {
        html += '<label class="opt"><input type="radio" name="q' + i + '" value="' + j + '"> ' + text + '</label>';
      });
      html += '<p class="fb"></p>';
      box.innerHTML = html;
      form.appendChild(box);
    });
    scoreEl.textContent = '';
  }

  document.getElementById('check').addEventListener('click', () => {
    let correct = 0, unanswered = 0;
    questions.forEach((item, i) => {
      const box = document.getElementById('q' + i);
      const picked = form.querySelector('input[name="q' + i + '"]:checked');
      box.classList.remove('right', 'wrong');
      if (!picked) { unanswered++; return; }
      const ok = Number(picked.value) === item.answer;
      if (ok) correct++;
      box.classList.add(ok ? 'right' : 'wrong');
      box.querySelector('.fb').textContent = ok ? 'Correct. ' + item.why : 'Not quite. ' + item.why;
    });
    scoreEl.textContent = unanswered
      ? unanswered + ' question(s) still unanswered.'
      : 'Score: ' + correct + ' / ' + questions.length;
  });

  document.getElementById('again').addEventListener('click', build);
  build();
</script>
</body>
</html>
Make it with AI
In ChatGPT, code blocks have a Preview option for supported code, including HTML pages, and the preview opens inside ChatGPT (as of October 2026). That preview is for you. Students need something they can open on their own.
Paste this into ChatGPT and fill in the brackets. You can paste the same prompt into Claude or Gemini if you prefer.
Make an interactive quiz as ONE self-contained HTML file.
Topic: [topic] for [age group or year].
- [5] multiple-choice questions, 3 options each, one correct.
- A Check answers button. After it is pressed, mark each
  question green or orange and show a one-sentence
  explanation.
- Show the score as "Score: 4 / 5" and a Start again button.
- Plain HTML, CSS and JavaScript only. No external
  libraries, images or fonts.
- Include the viewport meta tag so it works on a phone.
- Keep all questions and answers in one list at the top
  of the script so I can edit them.
Return only the code, in one code block.
Then check the result before it goes anywhere:
- Answer key. Click every question yourself. Make sure the option marked correct really is correct.
- Feedback. Read each explanation. A wrong explanation teaches the wrong thing.
- Reset. Press Start again and confirm nothing stays selected.
- Phone. Open it on a phone, or narrow the browser window, and check that nothing is cut off.
Want a different style? Ask for one question at a time with a progress bar and a typed-answer question. This is the same idea with a different layout:
<!doctype html>
<html lang="en">
<head>
<meta charset="utf-8">
<meta name="viewport" content="width=device-width, initial-scale=1">
<title>Spanish Vocabulary Practice</title>
<style>
  * { box-sizing: border-box; }
  body {
    margin: 0; padding: 16px; font-family: system-ui, sans-serif;
    background: #f4f5f7; color: #1d2330; line-height: 1.45;
  }
  .card { max-width: 520px; margin: 0 auto; background: #fff; border: 1px solid #e1e4ea; border-radius: 14px; padding: 18px; }
  h1 { font-size: 1.25rem; margin: 0 0 10px; }
  .bar { height: 8px; background: #e5e7eb; border-radius: 99px; overflow: hidden; margin-bottom: 14px; }
  .bar i { display: block; height: 100%; width: 0; background: #2563eb; transition: width .25s; }
  .step { color: #5b6472; font-size: .9rem; margin: 0 0 4px; }
  .prompt { font-size: 1.15rem; font-weight: 700; margin: 0 0 12px; }
  .choices { display: grid; gap: 8px; }
  button.choice {
    font: inherit; text-align: left; padding: 11px 14px; border-radius: 10px;
    border: 1px solid #cfd4dc; background: #fff; cursor: pointer;
  }
  button.choice:hover:not(:disabled) { background: #f1f5f9; }
  button.choice.right { border-color: #16a34a; background: #f0fdf4; }
  button.choice.wrong { border-color: #ea580c; background: #fff7ed; }
  .row { display: flex; gap: 8px; }
  input[type=text] { flex: 1; min-width: 0; font: inherit; padding: 10px 12px; border: 1px solid #cfd4dc; border-radius: 10px; }
  button.go {
    font: inherit; font-weight: 600; padding: 10px 16px; border: 0; border-radius: 10px;
    background: #2563eb; color: #fff; cursor: pointer;
  }
  .msg { min-height: 1.5em; margin: 12px 0 0; font-weight: 600; }
  .msg.ok { color: #15803d; }
  .msg.no { color: #c2410c; }
  .done { text-align: center; }
  .done .big { font-size: 2rem; font-weight: 800; margin: 6px 0; }
</style>
</head>
<body>
<div class="card">
  <h1>Spanish Vocabulary: Food</h1>
  <div class="bar"><i id="bar"></i></div>
  <div id="stage"></div>
</div>

<script>
  // type "choice" shows buttons, type "text" shows an input. Answers are not case sensitive.
  const items = [
    { type: 'choice', prompt: 'What does "manzana" mean?', options: ['apple', 'bread', 'milk'], answer: 'apple' },
    { type: 'text',   prompt: 'Type the Spanish word for "water".', answer: 'agua' },
    { type: 'choice', prompt: 'What does "queso" mean?', options: ['rice', 'cheese', 'fish'], answer: 'cheese' },
    { type: 'text',   prompt: 'Type the Spanish word for "bread".', answer: 'pan' },
    { type: 'choice', prompt: 'Which word means "milk"?', options: ['leche', 'huevo', 'sopa'], answer: 'leche' }
  ];

  const stage = document.getElementById('stage');
  const bar = document.getElementById('bar');
  let index = 0, score = 0, locked = false;

  function show() {
    locked = false;
    if (index >= items.length) return finish();
    bar.style.width = (index / items.length * 100) + '%';
    const it = items[index];
    let html = '<p class="step">Question ' + (index + 1) + ' of ' + items.length + '</p>';
    html += '<p class="prompt">' + it.prompt + '</p>';
    if (it.type === 'choice') {
      html += '<div class="choices">' + it.options.map(o => '<button class="choice" type="button">' + o + '</button>').join('') + '</div>';
    } else {
      html += '<div class="row"><input type="text" id="t" autocomplete="off" aria-label="Your answer"><button class="go" type="button" id="send">Check</button></div>';
    }
    html += '<p class="msg" id="msg" aria-live="polite"></p>';
    stage.innerHTML = html;

    if (it.type === 'choice') {
      stage.querySelectorAll('.choice').forEach(b => b.addEventListener('click', () => grade(b.textContent, b)));
    } else {
      const input = document.getElementById('t');
      document.getElementById('send').addEventListener('click', () => grade(input.value));
      input.addEventListener('keydown', e => { if (e.key === 'Enter') grade(input.value); });
    }
  }

  function grade(value, button) {
    if (locked) return;
    const it = items[index];
    if (it.type === 'text' && !value.trim()) return;
    locked = true;
    const ok = value.trim().toLowerCase() === it.answer.toLowerCase();
    if (ok) score++;
    const msg = document.getElementById('msg');
    msg.className = 'msg ' + (ok ? 'ok' : 'no');
    msg.textContent = ok ? 'Correct!' : 'The answer is: ' + it.answer;
    if (button) button.classList.add(ok ? 'right' : 'wrong');
    stage.querySelectorAll('button').forEach(b => b.disabled = true);
    setTimeout(() => { index++; show(); }, 1100);
  }

  function finish() {
    bar.style.width = '100%';
    stage.innerHTML = '<div class="done"><p class="step">Finished</p><p class="big">' + score + ' / ' + items.length +
      '</p><p>Press the button to try again.</p><button class="go" type="button" id="again">Start again</button></div>';
    document.getElementById('again').addEventListener('click', () => { index = 0; score = 0; show(); });
  }

  show();
</script>
</body>
</html>
Send it as a link
With a quiz file, the student has to save it, find it again and choose a browser to open it.
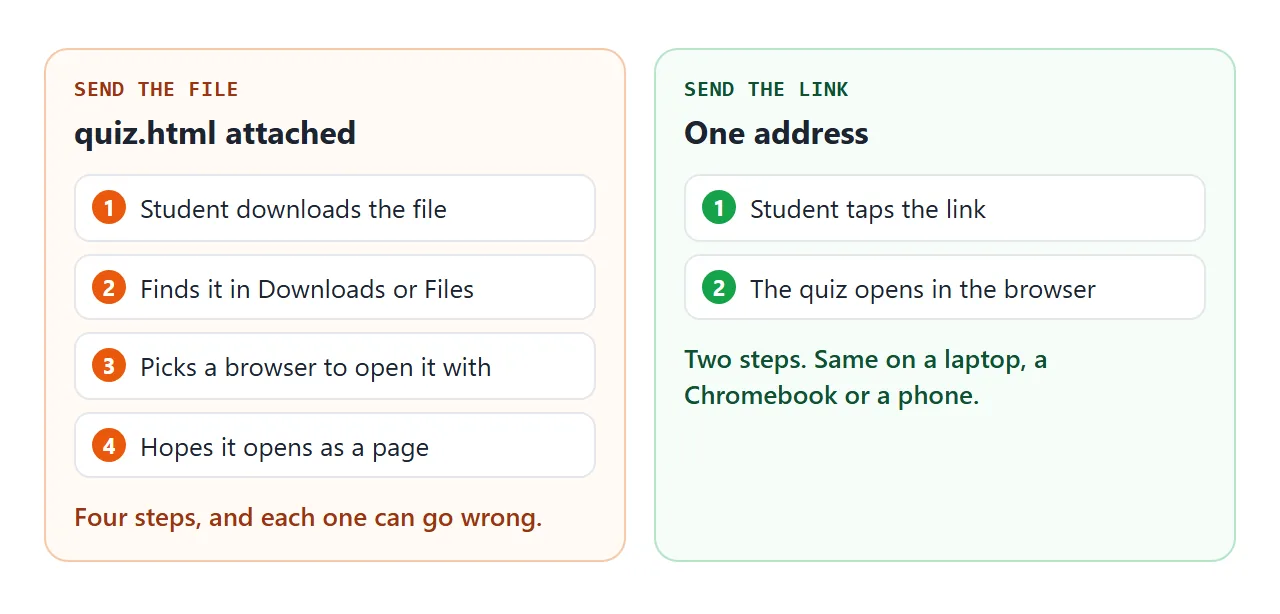
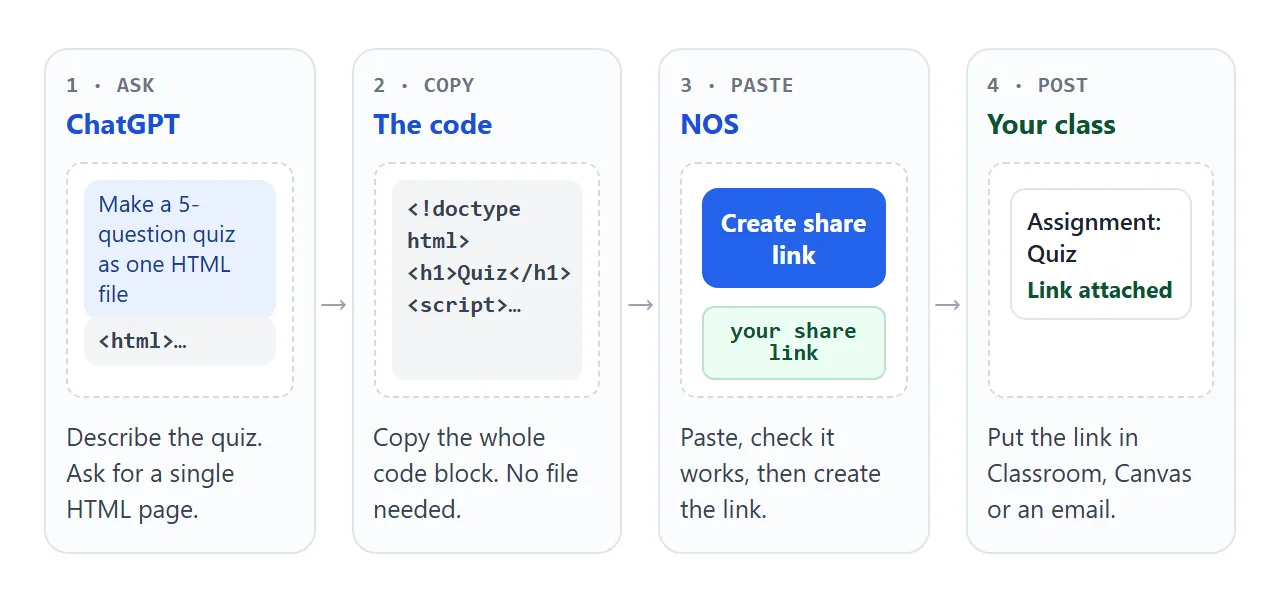
With NOS there is no file to send:
- Copy the whole code block from the chat.
- Paste it into a NOS document. The quiz renders as written and its scripts run, so you can test it right there.
- Choose Create share link.
- Send the link.
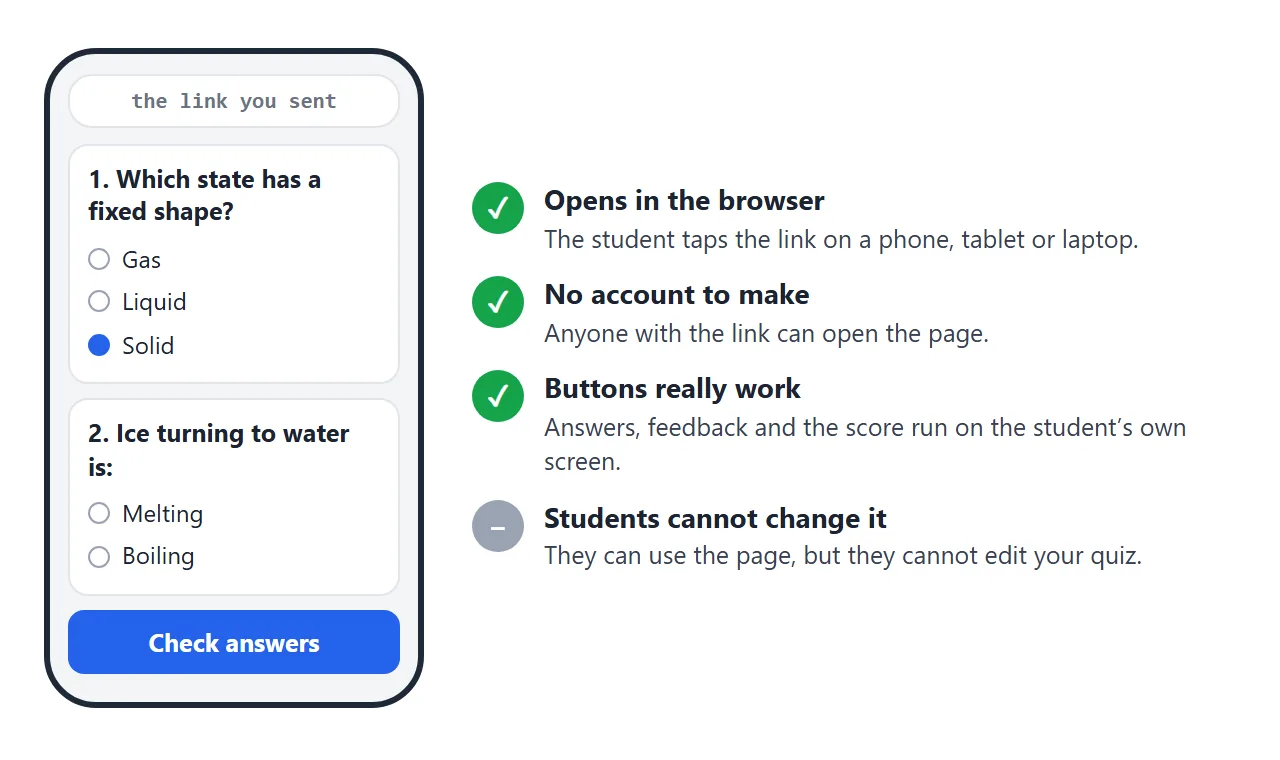
Whoever has the link can open the quiz in a browser, a phone included, with no account. They can use it but cannot edit it. If you fix a question later, change the code and the same link shows the new version.
The step-by-step is in HTML to link. For what can break between the chat and the page, see hosting ChatGPT HTML output.
Put the link where students already look
Students do not need to learn a new place. Put the link in the tool your class already uses.
- Google Classroom. When you create an assignment, the attach options include Link. Add the quiz address there (Classroom Help, as of October 2026).
- Canvas. Add an External URL as a module item. The dialog has a Load in a new tab checkbox, which shows the page to students outside Canvas (Instructure Community guide, as of October 2026).
- Email or a class chat. Paste the address into the message. A link needs no attachment.
Menus and wording change, so check your own school's version. Where your school account limits links or outside sites, ask your administrator.
Ways to share a quiz compared
| Way | What the student does | Worth knowing |
|---|---|---|
| Send the .html file | Saves it, finds it, opens it in a browser | Four steps for the student |
| NOS share link | Taps the link | No account; students cannot edit it; same link after edits |
| ChatGPT Sites | Opens the site address | Public beta for workspace, Plus and Pro accounts (as of October 2026). Anyone-on-the-internet access only when public publishing is enabled |
| Link in Classroom | Opens it from the assignment | You attach it with the Link option |
| Link in a Canvas module | Opens it from the module | Choose Load in a new tab |
If you already have a plan with ChatGPT Sites, it is another route. If you are working from plain HTML you copied out of a chat, a link is the shortest one.
What a shared quiz cannot do
Be clear about the limits before you rely on it.
- It does not report scores to you. The score appears on the student's screen. Sending form data to a server is blocked, so ask students to show their score.
- Answers are in the code. A browser can show the page's code, so a curious student can find the key. Treat it as practice.
- Nothing is remembered. Each visit starts fresh. Changes a visitor makes are not saved.
Need every answer collected? A form tool is the better fit. For a deeper look at what a one-file quiz can and cannot enforce, read HTML quiz and the scored quiz example.
When it does not work
| What you see | Cause | Fix |
|---|---|---|
| Buttons do nothing | The code was cut off when you copied it | Copy the whole code block again and paste over the old one |
| The wrong option is marked correct | The answer key in the list is wrong | Fix the correct answer in the list at the top |
| A picture is missing | The page uses an image from another site, which is blocked | Ask for shapes drawn in CSS or SVG instead |
| The page looks tiny on a phone | The viewport meta tag is missing | Ask ChatGPT to add it |
| Students cannot open the quiz | They were sent the file, not the link | Send the share link |
| A class platform will not open it | The platform or school account limits links | Check the platform settings with your administrator |
Opening an HTML file on a phone explains what happens when students are sent the file instead.