The CSS cursor property sets the mouse pointer shown over an element. Write cursor: pointer for the hand, cursor: grab for something you can drag, cursor: not-allowed for an action that is blocked. There are 36 keyword values, plus url() for your own image.
Hover the tiles below with a mouse to see each one. On a phone you will only see the names, because a touch screen has no cursor.
<!doctype html>
<html lang="en">
<head>
<meta charset="utf-8">
<meta name="viewport" content="width=device-width, initial-scale=1">
<title>CSS cursor keywords</title>
<style>
  body { margin: 0; padding: 12px; font-family: system-ui, sans-serif; background: #f4f5f7; color: #1d2330; }
  .note { margin: 0 0 10px; font-size: 14px; }
  .touch-note { display: none; }
  /* no mouse (phones, tablets): there is no cursor to show */
  @media (hover: none) {
    .touch-note { display: inline; }
    .mouse-note { display: none; }
  }
  .grid {
    display: grid; gap: 6px;
    grid-template-columns: repeat(auto-fill, minmax(104px, 1fr));
  }
  .tile {
    padding: 9px 4px; border-radius: 8px; text-align: center;
    background: #fff; border: 1px solid #e1e4ea;
    font: 13px ui-monospace, Consolas, monospace;
  }
  .tile:hover { border-color: #2563eb; background: #eef4ff; }
</style>
</head>
<body>
<p class="note">
  <span class="mouse-note">Hover a tile to see its cursor.</span>
  <span class="touch-note">A touch screen has no cursor, so here you only see the names.</span>
</p>
<div class="grid" id="grid"></div>

<script>
  const names = [
    'auto', 'default', 'none', 'pointer', 'text', 'vertical-text',
    'help', 'context-menu', 'wait', 'progress', 'crosshair', 'cell',
    'grab', 'grabbing', 'move', 'all-scroll', 'copy', 'alias',
    'no-drop', 'not-allowed', 'zoom-in', 'zoom-out',
    'col-resize', 'row-resize', 'ew-resize', 'ns-resize',
    'nesw-resize', 'nwse-resize', 'n-resize', 'e-resize',
    's-resize', 'w-resize', 'ne-resize', 'nw-resize', 'se-resize', 'sw-resize'
  ];
  const grid = document.getElementById('grid');
  for (const name of names) {
    const tile = document.createElement('div');
    tile.className = 'tile';
    tile.textContent = name;
    tile.style.cursor = name;  // the whole trick: one CSS property
    grid.appendChild(tile);
  }
</script>
</body>
</html>
The exact drawing of each cursor comes from the operating system, so wait is a spinning wheel on one system and an hourglass on another. The meaning stays the same.
The cursor values and when to use each
Most pages need five or six of these. The rest exist for editors, tables and drawing tools.
| Value | What it tells the user | Use it on |
|---|---|---|
auto |
Let the browser decide | The default. Text gets the I-beam, links get the hand |
default |
Nothing special here | Resetting an element that inherited another cursor |
pointer |
A click does something | Buttons, clickable cards, custom controls |
text |
Text can be selected | Custom editable areas |
grab / grabbing |
Can drag / dragging now | Sliders, sortable items, pannable maps |
move |
This can be moved | Windows or shapes you move, where grab feels wrong |
not-allowed |
This action is blocked | Disabled controls, locked areas |
wait / progress |
Busy | wait blocks input, progress still lets you act |
help |
More information is here | Terms with a tooltip or definition |
crosshair |
Precise point selection | Drawing, colour picking, cropping |
zoom-in / zoom-out |
A click zooms | Image thumbnails and lightboxes |
*-resize |
This edge resizes | Panel dividers (col-resize, row-resize), box corners |
none |
No cursor at all | Games, video, a custom drawn cursor |
The resize family names directions: ew-resize is left and right, ns-resize is up and down, and the single-direction ones such as e-resize point at one edge.
Set it once, and children inherit it
cursor is an inherited property. Put it on a card and every child inside the card shows the same cursor, with no extra rule.
.card { cursor: pointer; }
.card .price { cursor: text; }  /* the child's own rule wins */
A child that sets its own cursor keeps it, whatever the parent says. That is also why a link inside a cursor: default area still shows the hand: the browser's default styles give links their own cursor rule.
To undo an inherited cursor on one child, set it back to auto, which restores the browser's choice.
pointer means "click me", and nothing else
The hand is the most common cursor people add, and the easiest to misuse. Users read it as a promise that a click will work.
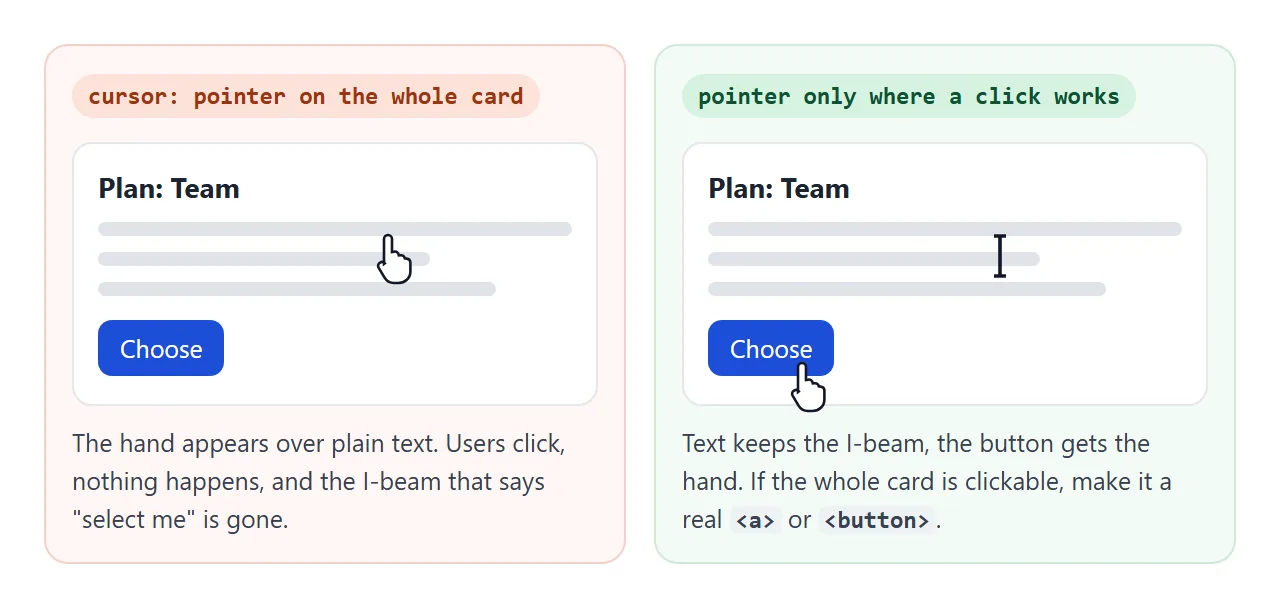
- Put it on things that respond to a click: buttons, clickable cards, toggle switches, custom controls.
- Keep it off plain text and labels: the hand replaces the I-beam, so the text looks clickable and no longer signals that it can be selected.
- Make clickable things real controls:
cursor: pointerchanges only the look. A<div>with the hand is still not reachable by keyboard. Use<a>or<button>.
If a button shows the hand but a click does nothing, the cause is usually something else lying over it. HTML button not clickable covers that case.
Custom cursor images with url()
For your own cursor, point url() at an image, optionally give a hotspot, and end with a keyword:
.canvas {
  cursor: url("pen.svg") 4 28, crosshair;
}
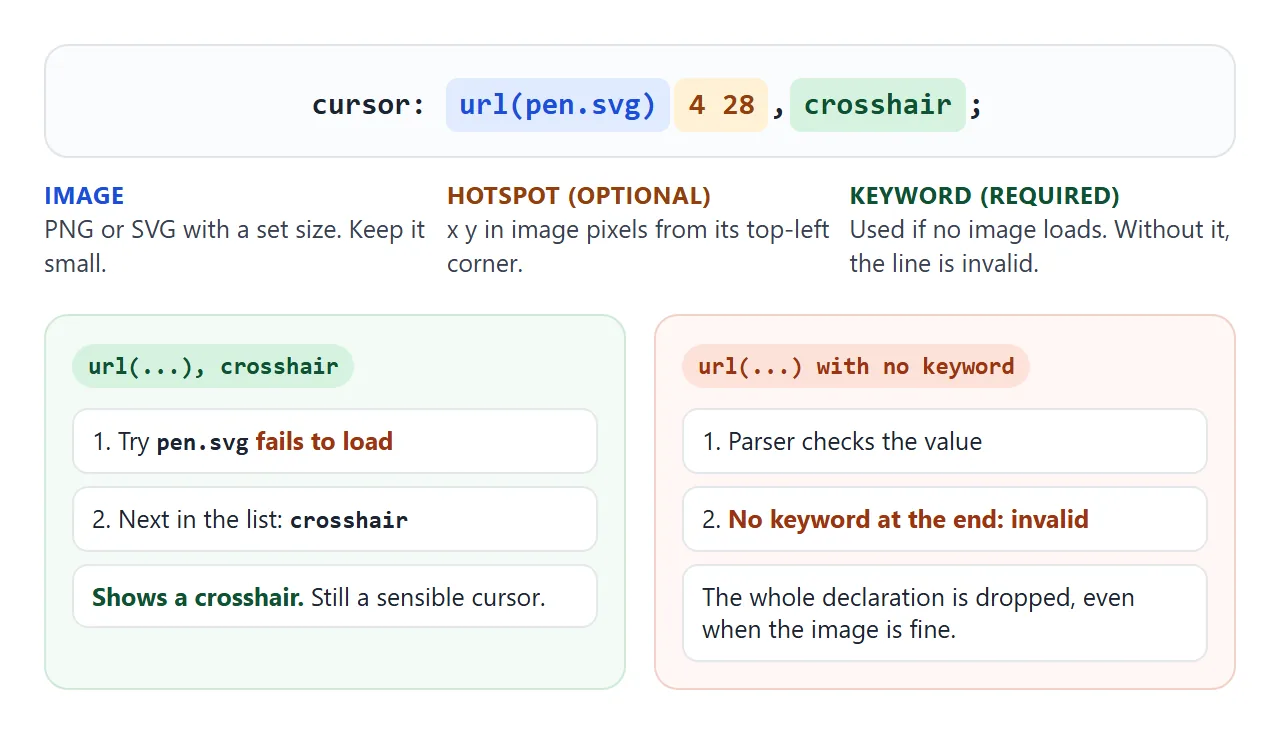
- The keyword at the end is required. It is the fallback if no image loads. Without it the value is invalid, so the browser drops the whole declaration and shows the inherited cursor, even when the image is fine.
- The hotspot is two numbers, x and y, in image pixels from the image's top-left corner. It marks the pixel that actually clicks. Without it the browser uses a hotspot stored in the file, if the format has one, or else the top-left corner.
- Formats: browsers support PNG and SVG. An SVG needs
widthandheightset on its root element so it has a natural size. - Size: keep it small. MDN recommends 32 by 32 pixels and notes that Firefox and Chromium ignore cursor images larger than 128 by 128 by default.
Try all four cases here. Click each box and the red dot shows where the click really landed.
<!doctype html>
<html lang="en">
<head>
<meta charset="utf-8">
<meta name="viewport" content="width=device-width, initial-scale=1">
<title>Custom cursor image</title>
<style>
  body { margin: 0; padding: 12px; font-family: system-ui, sans-serif; background: #f4f5f7; color: #1d2330; }
  .note { margin: 0 0 10px; font-size: 14px; }
  .touch-note { display: none; }
  @media (hover: none) { .touch-note { display: block; } }
  .grid { display: grid; gap: 10px; grid-template-columns: repeat(auto-fit, minmax(160px, 1fr)); }
  .box {
    position: relative; height: 104px; border-radius: 10px; overflow: hidden;
    background: #fff; border: 1px solid #e1e4ea; user-select: none;
  }
  .box b { position: absolute; left: 10px; right: 10px; top: 8px; font-size: 13px; }
  code { display: block; margin-top: 4px; font: 11.5px/1.4 ui-monospace, Consolas, monospace; color: #374151; }
  .dot { position: absolute; width: 6px; height: 6px; margin: -3px 0 0 -3px; border-radius: 50%; background: #dc2626; pointer-events: none; }

  /* 32x32 SVG target. Hotspot 16 16 = its centre. Fallback: crosshair */
  .ring {
    cursor: url("data:image/svg+xml,%3Csvg xmlns='http://www.w3.org/2000/svg' width='32' height='32'%3E%3Ccircle cx='16' cy='16' r='12' fill='none' stroke='%232563eb' stroke-width='3'/%3E%3Ccircle cx='16' cy='16' r='2' fill='%232563eb'/%3E%3C/svg%3E") 16 16, crosshair;
  }
  /* same image, no hotspot: the click lands at its top-left corner */
  .ring-nohot {
    cursor: url("data:image/svg+xml,%3Csvg xmlns='http://www.w3.org/2000/svg' width='32' height='32'%3E%3Ccircle cx='16' cy='16' r='12' fill='none' stroke='%239a3412' stroke-width='3'/%3E%3Ccircle cx='16' cy='16' r='2' fill='%239a3412'/%3E%3C/svg%3E"), crosshair;
  }
  /* the image cannot be decoded, so the browser uses the keyword */
  .broken { cursor: url("data:image/png;base64,AAAA"), pointer; }
  /* no keyword at the end: the whole declaration is invalid and ignored */
  .nofallback {
    cursor: url("data:image/svg+xml,%3Csvg xmlns='http://www.w3.org/2000/svg' width='32' height='32'%3E%3Ccircle cx='16' cy='16' r='12' fill='%23dc2626'/%3E%3C/svg%3E") 16 16;
  }
</style>
</head>
<body>
<p class="note">Hover each box, then click. The red dot marks where the click really landed.</p>
<p class="note touch-note">On a touch screen there is no cursor. Taps still leave a dot.</p>
<div class="grid">
  <div class="box ring"><b>Hotspot 16 16</b></div>
  <div class="box ring-nohot"><b>No hotspot</b></div>
  <div class="box broken"><b>Broken image</b></div>
  <div class="box nofallback"><b>No fallback keyword</b></div>
</div>
<p class="note" id="out" style="margin-top:10px"></p>

<script>
  const out = document.getElementById('out');
  document.querySelectorAll('.box').forEach((box) => {
    // print what the browser actually kept for this box
    const kept = getComputedStyle(box).cursor;
    const code = document.createElement('code');
    code.textContent = kept.startsWith('url') ? 'kept: image, else ' + kept.split(',').pop().trim() : 'kept: ' + kept;
    box.querySelector('b').appendChild(code);

    box.addEventListener('pointerdown', (e) => {
      const r = box.getBoundingClientRect();
      const x = Math.round(e.clientX - r.left), y = Math.round(e.clientY - r.top);
      const dot = document.createElement('span');
      dot.className = 'dot';
      dot.style.left = x + 'px';
      dot.style.top = y + 'px';
      box.appendChild(dot);
      out.textContent = 'Click landed at ' + x + ', ' + y + ' inside "' + box.querySelector('b').firstChild.textContent + '".';
    });
  });
</script>
</body>
</html>
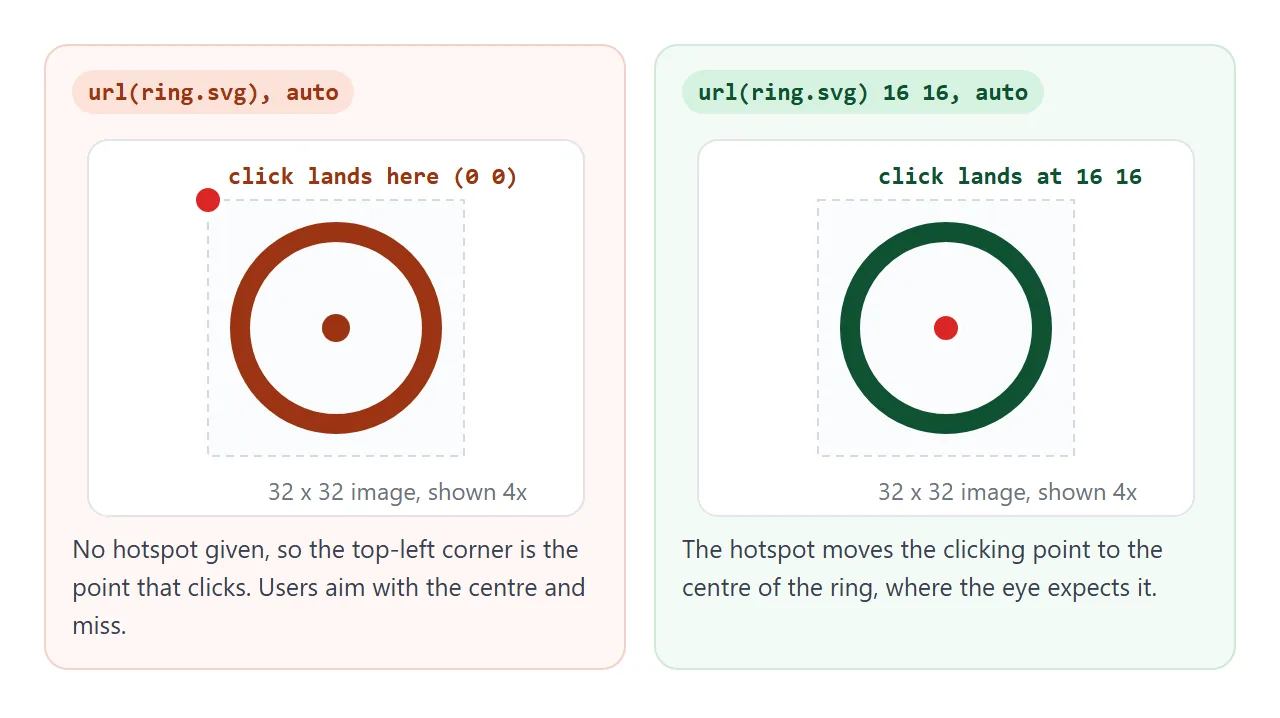
A data: URI keeps the image inside the CSS, so it travels with the page. Encode # as %23 and < > as %3C %3E inside the SVG string.
Changing the cursor from JavaScript
Cursor state usually follows app state: the tool picked, a drag in progress, a locked layer. Set a class or a data attribute and let CSS pick the cursor, rather than writing style.cursor in many places:
.stage[data-tool="draw"] { cursor: crosshair; }
.stage[data-tool="pan"] { cursor: grab; }
.stage[data-tool="pan"].panning { cursor: grabbing; }
.stage[data-tool="draw"].locked { cursor: not-allowed; }
Here that pattern runs a small drawing surface. Draw with the crosshair, switch to Pan and hold to see grabbing, then lock the layer and the cursor turns to not-allowed.
<!doctype html>
<html lang="en">
<head>
<meta charset="utf-8">
<meta name="viewport" content="width=device-width, initial-scale=1">
<title>Cursor per tool</title>
<style>
  body { margin: 0; padding: 12px; font-family: system-ui, sans-serif; background: #eceef1; color: #1d2330; }
  .bar { display: flex; flex-wrap: wrap; gap: 6px; align-items: center; margin-bottom: 8px; }
  button {
    font: 14px system-ui, sans-serif; padding: 7px 12px; border-radius: 8px;
    border: 1px solid #cfd4dc; background: #fff; color: #1d2330; cursor: pointer;
  }
  button[aria-pressed="true"] { background: #1d4ed8; border-color: #1d4ed8; color: #fff; }
  .status { font: 13px ui-monospace, Consolas, monospace; color: #374151; }

  .stage {
    position: relative; height: 320px; border-radius: 12px; overflow: hidden;
    background: #fff; touch-action: none; user-select: none;
  }
  canvas { position: absolute; left: 0; top: 0; }

  /* one rule per state: the cursor says what a press will do */
  .stage[data-tool="draw"] { cursor: crosshair; }
  .stage[data-tool="draw"].locked { cursor: not-allowed; }
  .stage[data-tool="pan"] { cursor: grab; }
  .stage[data-tool="pan"].panning { cursor: grabbing; }
</style>
</head>
<body>
<div class="bar">
  <button id="draw" aria-pressed="true">Draw</button>
  <button id="pan" aria-pressed="false">Pan</button>
  <button id="lock" aria-pressed="false">Lock layer</button>
  <span class="status" id="status"></span>
</div>
<div class="stage" id="stage" data-tool="draw">
  <canvas id="cv" width="1200" height="800"></canvas>
</div>

<script>
  const stage = document.getElementById('stage');
  const cv = document.getElementById('cv');
  const ctx = cv.getContext('2d');
  const status = document.getElementById('status');
  let ox = -300, oy = -200;  // how far the canvas is panned
  let last = null;           // last pointer position while pressed

  // dotted paper, so panning is visible
  ctx.fillStyle = '#d9dde3';
  for (let x = 10; x < 1200; x += 20) for (let y = 10; y < 800; y += 20) ctx.fillRect(x, y, 2, 2);
  ctx.lineWidth = 3; ctx.lineCap = 'round'; ctx.strokeStyle = '#1d4ed8';

  function place() { cv.style.transform = `translate(${ox}px, ${oy}px)`; }
  function show() { status.textContent = 'cursor: ' + getComputedStyle(stage).cursor; }
  place(); show();

  function setTool(tool) {
    stage.dataset.tool = tool;
    document.getElementById('draw').setAttribute('aria-pressed', tool === 'draw');
    document.getElementById('pan').setAttribute('aria-pressed', tool === 'pan');
    show();
  }
  document.getElementById('draw').addEventListener('click', () => setTool('draw'));
  document.getElementById('pan').addEventListener('click', () => setTool('pan'));
  document.getElementById('lock').addEventListener('click', (e) => {
    const on = stage.classList.toggle('locked');
    e.currentTarget.setAttribute('aria-pressed', on);
    show();
  });

  stage.addEventListener('pointerdown', (e) => {
    const locked = stage.dataset.tool === 'draw' && stage.classList.contains('locked');
    if (locked) return;  // nothing happens, as the cursor promised
    stage.setPointerCapture(e.pointerId);
    last = { x: e.clientX, y: e.clientY };
    if (stage.dataset.tool === 'pan') { stage.classList.add('panning'); show(); }
  });

  stage.addEventListener('pointermove', (e) => {
    if (!last) return;
    if (stage.dataset.tool === 'pan') {
      ox += e.clientX - last.x; oy += e.clientY - last.y; place();
    } else {
      const r = cv.getBoundingClientRect();  // already includes the pan offset
      ctx.beginPath();
      ctx.moveTo(last.x - r.left, last.y - r.top);
      ctx.lineTo(e.clientX - r.left, e.clientY - r.top);
      ctx.stroke();
    }
    last = { x: e.clientX, y: e.clientY };
  });

  stage.addEventListener('lostpointercapture', () => {
    last = null;
    stage.classList.remove('panning');
    show();
  });
</script>
</body>
</html>
The locked state does two things: the cursor says "blocked", and pointerdown really ignores the press. A cursor that says one thing while the code does another is worse than no cursor hint.
The drawing itself is explained in HTML canvas draw, and panning a bigger view in canvas zoom and pan.
"Follow" cursors: cursor none plus an element
Some sites hide the system cursor and move a styled element to the mouse position instead:
@media (hover: hover) and (pointer: fine) {
  body { cursor: none; }
  .dot { position: fixed; pointer-events: none; }
}
addEventListener('pointermove', (e) => {
  dot.style.transform = `translate(${e.clientX}px, ${e.clientY}px)`;
});
It works, with costs you should know before shipping it:
- Wrap it in the media query. On a touch screen there are no pointer moves between taps, so the dot would sit wherever the last tap was.
- Add
pointer-events: noneto the dot. Otherwise the dot sits under the pointer and catches every click. - It replaces the user's own pointer. Anyone who set a larger or high-contrast pointer in their system settings loses it on your page.
- Hidden hints disappear too. With
cursor: none, the text I-beam and the link hand are gone unless you rebuild them.
If you only need a different look, a url() cursor is simpler and keeps the pointer moving at system speed.
Touch screens have no cursor
On a phone or tablet used by touch, nothing rests over the page, so no cursor is ever shown. A tablet with a trackpad or mouse attached can show a pointer, but how closely it follows each cursor value depends on the system, so test there if it matters.
Treat the cursor as an extra hint for mouse users, never the only one. A draggable item also needs a handle or a label, a disabled button needs the disabled attribute and a dimmed style, and a clickable card needs to look like one.
When it does not work
| What you see | Cause | Fix |
|---|---|---|
| Custom image never shows | No keyword at the end, so the declaration is invalid | End with a keyword: url(...) 8 8, auto |
| Custom image never shows, keyword is there | The URL does not load from the page's location | Open the image URL directly, or use a data: URI |
| Custom image shows as the keyword cursor | The image is too large and the browser ignores it | Resize it to about 32 by 32 pixels |
| SVG cursor does not appear | The SVG has no width and height |
Set both on the <svg> element |
| Clicks land off from the image | No hotspot, so the top-left corner clicks | Add x y after url(), such as 16 16 |
| A child shows a different cursor than the parent | The child has its own cursor rule, or a browser default such as the hand on links | Set the child's cursor explicitly |
| Users click text that does nothing | cursor: pointer on non-clickable elements |
Keep pointer on real links and buttons |
| No cursor change on a phone | Touch screens have no cursor | Add a visible hint that does not rely on the cursor |
Share it as a link
Cursor changes only show when someone moves a mouse over the page, so a screenshot cannot show them. Send the page itself instead.
Paste the page into a NOS document and choose Create share link. HTML to link walks through it.
The page renders as written and its scripts run, so the people you send it to can hover every tile and try each tool themselves. If you change the code later, the same link shows the new version.