pointer-events: none tells the browser to ignore an element when it works out what the mouse is over. The element stays on screen, but clicks, taps and hover fall through to whatever is underneath. The default value, auto, is the normal behavior.
Try it below. The blue overlay covers both buttons. Click them, then tick the box and click again.
<!doctype html>
<html lang="en">
<head>
<meta charset="utf-8">
<meta name="viewport" content="width=device-width, initial-scale=1">
<title>pointer-events: none lets clicks through</title>
<style>
  body { margin: 0; padding: 16px; font-family: system-ui, sans-serif; background: #f4f5f7; color: #1d2330; }
  .stage { position: relative; max-width: 420px; padding: 24px 16px; border-radius: 12px; background: #fff; }
  .stage button { font: inherit; padding: 10px 16px; margin: 4px; border-radius: 8px; border: 1px solid #c7ccd6; background: #fff; cursor: pointer; }
  .stage button:hover { background: #e8f0ff; }
  /* The overlay covers both buttons */
  .overlay {
    position: absolute; inset: 0; border-radius: 12px;
    background: rgba(37, 99, 235, .18); border: 2px dashed #2563eb;
    display: flex; align-items: flex-end; justify-content: flex-end;
    padding: 6px 10px; font-size: 12px; color: #1e40af;
  }
  .overlay.through { pointer-events: none; }  /* clicks go to what is underneath */
  label { display: block; margin: 14px 0 8px; font-weight: 600; }
  #log { margin: 0; padding: 10px 12px; min-height: 90px; border-radius: 8px; background: #1d2330; color: #d1fae5; font: 13px/1.5 ui-monospace, Consolas, monospace; }
</style>
</head>
<body>
<div class="stage">
  <button id="save">Save</button>
  <button id="share">Share</button>
  <div class="overlay" id="overlay">overlay</div>
</div>

<label><input type="checkbox" id="toggle"> pointer-events: none on the overlay</label>
<pre id="log">Click the buttons.</pre>

<script>
  const overlay = document.getElementById('overlay');
  const log = document.getElementById('log');
  const lines = [];

  document.getElementById('toggle').addEventListener('change', (e) => {
    overlay.classList.toggle('through', e.target.checked);
  });

  // Report which element actually received each click
  document.querySelector('.stage').addEventListener('click', (e) => {
    const name = e.target.id === 'overlay' ? 'the overlay' : 'button "' + e.target.textContent + '"';
    lines.unshift('click landed on ' + name);
    log.textContent = lines.slice(0, 4).join('\n');
  });
</script>
</body>
</html>
.overlay { pointer-events: none; }
That one line is the whole fix for a see-through layer that blocks clicks. The rest of this guide is about where it helps, and where it quietly does less than it seems to.
How pointer-events: none works
Every time the pointer moves or presses, the browser looks for the topmost element at that point. That element becomes the event target. An element with pointer-events: none is left out of that search, so the next element down is chosen.
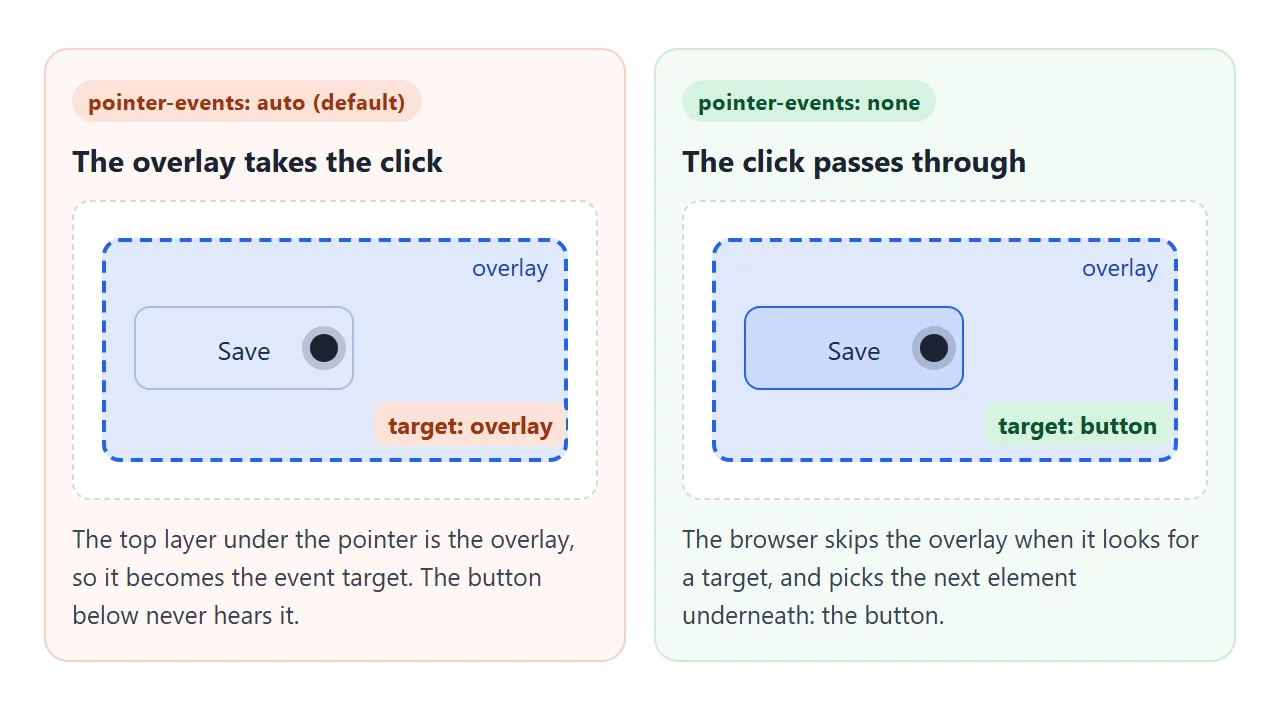
Only the target changes. The overlay still paints, still takes up space in the layout, and still sits above the button visually. If you need it gone, that is a job for display or visibility, not for this property.
| Value | Where to use it | What it does |
|---|---|---|
auto |
Anything | Normal behavior. The default. |
none |
Anything | Never the target. Events go to what is underneath. |
visiblePainted, fill, stroke, all and a few more |
SVG shapes | Choose which part of a shape responds |
Parent none, child auto
pointer-events is inherited. Put none on a container and every element inside it is none as well, so the whole block lets clicks through.
You can switch a single child back on with pointer-events: auto. That child takes clicks again, and the rest of the container stays see-through.
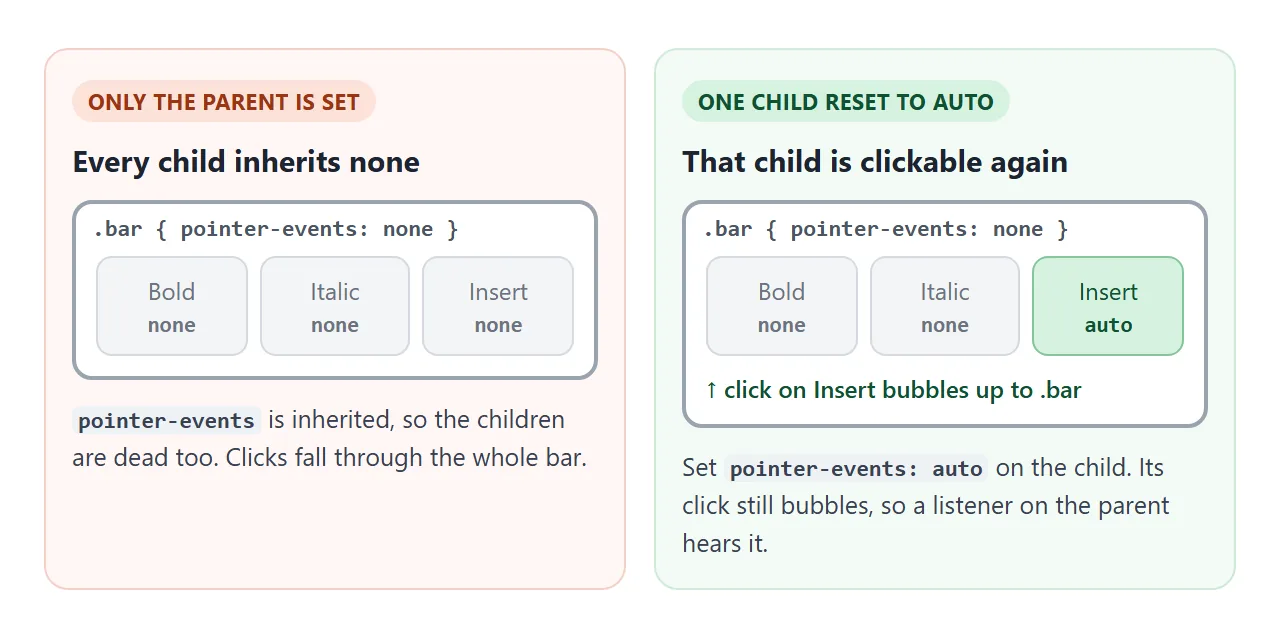
.toolbar { pointer-events: none; }
.toolbar .live { pointer-events: auto; }
The click on the child still bubbles up through the parent. A listener on the container hears it, even though the container itself can never be the target. The demo below shows this in its log.
It is not a real disabled state
A common use is a link that looks disabled: grey text and pointer-events: none. The mouse can no longer click it. The keyboard can.
<!doctype html>
<html lang="en">
<head>
<meta charset="utf-8">
<meta name="viewport" content="width=device-width, initial-scale=1">
<title>Parent none, child auto</title>
<style>
  body { margin: 0; padding: 16px; font-family: system-ui, sans-serif; background: #f4f5f7; color: #1d2330; }
  h3 { font-size: 14px; margin: 0 0 8px; }
  .bar {
    pointer-events: none;           /* the bar ignores the mouse... */
    display: flex; gap: 8px; align-items: center; flex-wrap: wrap;
    padding: 10px; border-radius: 10px; background: #fff; border: 1px solid #dfe3ea;
  }
  .bar button { font: inherit; padding: 8px 12px; border-radius: 8px; border: 1px solid #c7ccd6; background: #fff; cursor: pointer; }
  .bar .live { pointer-events: auto; background: #d6f2df; border-color: #86c69b; }  /* ...but this child is reset */
  a.disabled { pointer-events: none; color: #9aa3af; }
  a:focus-visible { outline: 3px solid #f59e0b; outline-offset: 2px; }
  .box { margin-top: 18px; padding: 12px; border-radius: 10px; background: #fff; border: 1px solid #dfe3ea; }
  #log { margin: 12px 0 0; padding: 10px 12px; min-height: 70px; border-radius: 8px; background: #1d2330; color: #d1fae5; font: 13px/1.5 ui-monospace, Consolas, monospace; }
</style>
</head>
<body>
<h3>Menu bar: pointer-events: none, one child set back to auto</h3>
<div class="bar" id="bar">
  <button>Bold</button>
  <button>Italic</button>
  <button class="live">Insert</button>
</div>

<div class="box">
  <h3>A "disabled" link with pointer-events: none</h3>
  <a href="#pricing" class="disabled" id="link">See pricing</a>
  <p style="font-size:13px;margin:8px 0 0">Click it: nothing. Now press Tab until it is outlined, then press Enter.</p>
</div>
<pre id="log">Click the buttons, then try the link.</pre>

<script>
  const log = document.getElementById('log');
  const lines = [];
  const say = (t) => { lines.unshift(t); log.textContent = lines.slice(0, 4).join('\n'); };

  // The listener sits on the parent. It still hears clicks from the "auto" child.
  document.getElementById('bar').addEventListener('click', (e) => {
    say('bar heard a click from "' + e.target.textContent + '"');
  });

  document.getElementById('link').addEventListener('click', (e) => {
    e.preventDefault();  // stay on this page for the demo
    say('link activated (' + (e.detail === 0 ? 'keyboard or script' : 'mouse') + ')');
  });
</script>
</body>
</html>
pointer-events only affects hit testing, the step that decides which element is under the pointer. It does not remove anything from the tab order and does not block events that come from somewhere else.
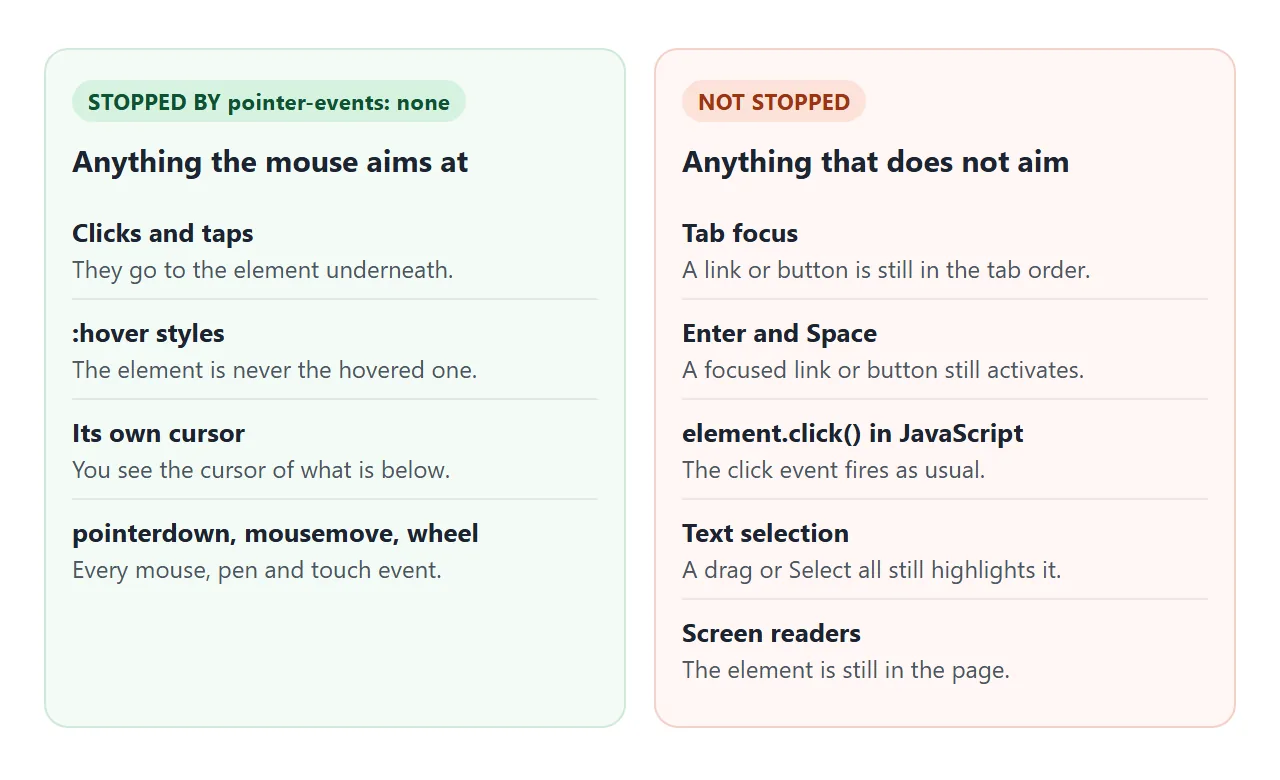
- Tab still moves focus to the link or button. tabindex controls that order.
- Enter on a focused link, or Enter and Space on a focused button, still activate it.
element.click()in JavaScript still fires the click event and its listeners.- Screen readers still find the element, because it is still in the page.
To really disable something, use the right tool for the element:
<!-- A button: the disabled attribute stops mouse, keyboard and form submission -->
<button disabled>Save</button>

<!-- A link: without href it is not a link, so it is not focusable -->
<a aria-disabled="true">See pricing</a>
Keep pointer-events: none for elements that should never be interactive, such as decoration, rather than as an off switch.
Where it is the right tool
The property shines on layers that sit on top of something clickable but have nothing to do themselves.
- Gradient or shade over an image link, so a click anywhere on the picture still opens it.
- Captions and labels placed over a clickable area, such as text on a map.
- Custom cursors and glow effects that follow the pointer. Without
none, the dot under the pointer catches every click. CSS cursor builds one. - Watermarks and "Preview" stamps laid over a page.
Transparent elements need this too. An element at opacity: 0 is still clickable, which CSS opacity covers in detail.
SVG values in brief
SVG shapes have extra values, because a shape has a fill and a stroke that can be painted or not. On SVG shapes, the default auto behaves like visiblePainted: a shape responds only where its fill or stroke is actually painted and the shape is visible.
That is why a rectangle drawn with fill="none" ignores clicks in its middle. A fill of transparent counts as painted, so it does respond.
fill: responds over the fill area, even if the fill isnone.stroke: responds over the stroke only.all: responds over fill or stroke, whatever the paint or visibility.none: never responds. Useful for text labels on top of shapes.
SVG in HTML shows how to put a drawing like this into a page.
A finished example: image card and clickable map
This example puts both ideas together. On the left, a gradient and a caption cover an image link without blocking it. The Like button inside the caption is reset to auto. On the right, only the shapes on a map respond.
<!doctype html>
<html lang="en">
<head>
<meta charset="utf-8">
<meta name="viewport" content="width=device-width, initial-scale=1">
<title>Card overlay and clickable map shapes</title>
<style>
  body { margin: 0; padding: 16px; font-family: system-ui, sans-serif; background: #f4f5f7; color: #1d2330; }
  .wrap { display: flex; flex-wrap: wrap; gap: 16px; }
  /* Image card: the link is the photo, the gradient and caption sit on top */
  .card { position: relative; width: 260px; height: 190px; border-radius: 14px; overflow: hidden; }
  .card a { display: block; height: 100%;
    background: radial-gradient(circle at 70% 30%, #fde68a 0 18%, transparent 19%),
                linear-gradient(180deg, #7dd3fc, #38bdf8 55%, #15803d 56%, #166534); }
  .card a:hover { filter: brightness(1.08); }
  .shade {
    position: absolute; inset: 0; display: flex; align-items: flex-end; justify-content: space-between;
    padding: 12px; color: #fff; background: linear-gradient(transparent 45%, rgba(0, 0, 0, .7));
    pointer-events: none;           /* the gradient and caption never block the link */
  }
  .shade b { font-size: 15px; }
  .shade button { pointer-events: auto; font: inherit; border: 0; border-radius: 99px; padding: 6px 12px; background: #fff; cursor: pointer; }
  /* Map: only the painted shapes respond */
  svg { width: 260px; height: 190px; background: #fff; border-radius: 14px; }
  .region { fill: #cbd5e1; stroke: #64748b; stroke-width: 2; cursor: pointer; }
  .region:hover { fill: #93c5fd; }
  .region.outline { fill: none; pointer-events: fill; }  /* no paint inside, but the inside still counts */
  .region.outline:hover { stroke: #2563eb; stroke-width: 4; }
  svg text { font-size: 13px; fill: #1d2330; pointer-events: none; }  /* labels do not steal clicks */
  #out { margin-top: 14px; padding: 10px 12px; border-radius: 8px; background: #1d2330; color: #d1fae5; font: 13px/1.5 ui-monospace, Consolas, monospace; }
</style>
</head>
<body>
<div class="wrap">
  <div class="card">
    <a href="#photo-1" id="photo" aria-label="Open the photo"></a>
    <div class="shade"><b>Lake at noon</b><button id="like">Like</button></div>
  </div>

  <svg viewBox="0 0 260 190" id="map" aria-label="Zone map">
    <path class="region" data-name="North" d="M20 20 H150 V85 H20 Z"/>
    <path class="region" data-name="East" d="M160 20 H240 V170 H160 Z"/>
    <path class="region outline" data-name="South (outline only)" d="M20 95 H150 V170 H20 Z"/>
    <text x="62" y="57">North</text>
    <text x="182" y="100">East</text>
    <text x="62" y="137">South</text>
  </svg>
</div>
<div id="out">Click the photo, its caption, the Like button, or a zone.</div>

<script>
  const out = document.getElementById('out');

  document.getElementById('photo').addEventListener('click', (e) => {
    e.preventDefault();  // a real page would open the photo
    out.textContent = 'Opened the photo';
  });
  document.getElementById('like').addEventListener('click', () => {
    out.textContent = 'Liked';
  });

  // One listener for the map; e.target is the shape under the pointer
  document.getElementById('map').addEventListener('click', (e) => {
    out.textContent = e.target.dataset.name ? 'Zone: ' + e.target.dataset.name : 'Empty map area';
  });
</script>
</body>
</html>
- Shade: the
.shadelayer haspointer-events: none, so its gradient and caption text never become the target. - Like button:
pointer-events: autobrings it back inside the see-through shade. - Map labels:
text { pointer-events: none; }so a click on the word "North" lands on the North shape. - Outline-only zone:
fill: nonepluspointer-events: fillmakes the empty middle clickable.
When it does not work
| What you see | Cause | Fix |
|---|---|---|
| The element still works from the keyboard | pointer-events only stops the mouse |
Use disabled, remove href, or tabindex="-1" |
| A child cannot be clicked | The parent has none and the child inherits it |
Set pointer-events: auto on the child |
| The overlay still blocks clicks | The rule is on the wrong element, or another layer is on top | Inspect the spot and put none on the element that is selected |
| A sibling above still catches clicks | A higher z-index element covers the target |
Lower it or give it none. See z-index |
| :hover styles on the element never fire | It is never the hovered element | Put the hover on the element underneath, or on a child with auto |
| Its cursor never shows | The cursor comes from the element underneath | Set cursor on the element below |
| The text can still be selected | Selection is not controlled by pointer-events |
Add user-select: none |
For a button that will not respond at all, and how to find what is covering it, see HTML button not clickable. For text that should not highlight, see make text not highlightable.
Share it as a link
Click-through behavior is hard to show in a screenshot. The person you send it to needs to move the mouse and click to see which layer answers.
To send the working version, paste the page into a NOS document and choose Create share link. HTML to link walks through it.
The page renders as written and its scripts run, so people can click through the overlays themselves. If you change the code later, the same link shows the new version.