daisyUI is a component library for Tailwind CSS, a CSS library rather than a service. It gives you class names such as btn, card and modal, so a styled button is one short class list. The smallest working page needs two tags in the head.
Try it. Type a name, press the button, and notice that no CSS was written.
<!doctype html>
<html lang="en">
<head>
<meta charset="utf-8">
<meta name="viewport" content="width=device-width, initial-scale=1">
<title>daisyUI card</title>
<!-- 1. daisyUI component classes (btn, card, badge, ...) -->
<link href="https://cdn.jsdelivr.net/npm/daisyui@5.7.47/daisyui.css" rel="stylesheet" type="text/css">
<!-- 2. Tailwind browser build: makes utilities such as p-4, w-full, max-w-sm work -->
<script src="https://cdn.jsdelivr.net/npm/@tailwindcss/browser@4.3.3"></script>
</head>
<body class="bg-base-200 p-4">
  <div class="card bg-base-100 w-full max-w-sm shadow-sm mx-auto">
    <div class="card-body">
      <h2 class="card-title">
        Standup notes
        <span class="badge badge-secondary">new</span>
      </h2>
      <p>Pick a button and watch the counter. Every style here is a class name, no CSS written.</p>
      <label class="input w-full">
        <span class="label">Name</span>
        <input type="text" id="name" placeholder="Your name">
      </label>
      <div id="msg" class="alert alert-info alert-soft">Nobody has said hello yet.</div>
      <div class="card-actions justify-end">
        <button class="btn btn-ghost" id="reset">Reset</button>
        <button class="btn btn-primary" id="hello">Say hello</button>
      </div>
    </div>
  </div>

<script>
  const name = document.getElementById('name');
  const msg = document.getElementById('msg');
  let count = 0;

  // daisyUI only styles things; plain JavaScript still does the work
  document.getElementById('hello').addEventListener('click', () => {
    count++;
    msg.textContent = 'Hello, ' + (name.value.trim() || 'friend') + '! (' + count + ')';
    msg.className = 'alert alert-success alert-soft';
  });
  document.getElementById('reset').addEventListener('click', () => {
    count = 0;
    name.value = '';
    msg.textContent = 'Nobody has said hello yet.';
    msg.className = 'alert alert-info alert-soft';
  });
</script>
</body>
</html>
If this file looks right and your React app does not, the library is fine and the difference is in your project setup. The rest of this page shows how to read that difference.
What daisyUI is, and the two tags it needs
The project calls itself "Faster, cleaner, easier Tailwind CSS development" and describes itself as pure CSS with no JavaScript dependency. It is released under the MIT licence.
There are two pieces, and both are in the example above:
<link href="https://cdn.jsdelivr.net/npm/daisyui@5.7.47/daisyui.css" rel="stylesheet" type="text/css">
<script src="https://cdn.jsdelivr.net/npm/@tailwindcss/browser@4.3.3"></script>
The stylesheet defines the component classes and the theme colours. The Tailwind browser script reads your class names and makes the utilities work.
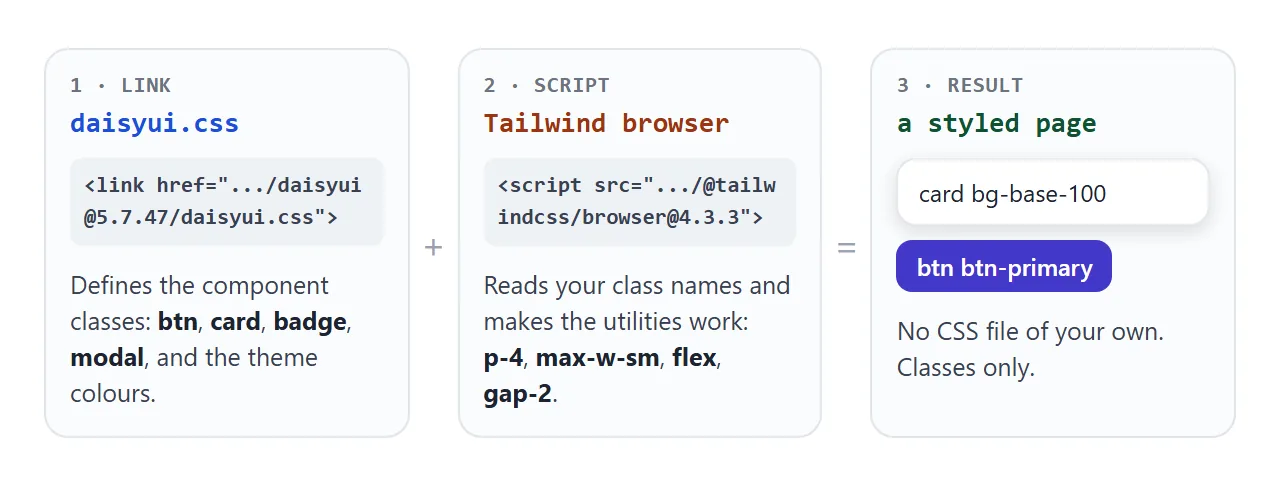
The daisyUI docs write these tags with a floating major version, daisyui@5 and @tailwindcss/browser@4. Pin an exact version as above, so a page you shared last month still looks the same today. These were the latest releases when this page was written.
Class names: component, modifier, utility
Every daisyUI element follows one pattern. Start with the component class, add modifiers for colour and size, then add plain Tailwind utilities for spacing and layout.
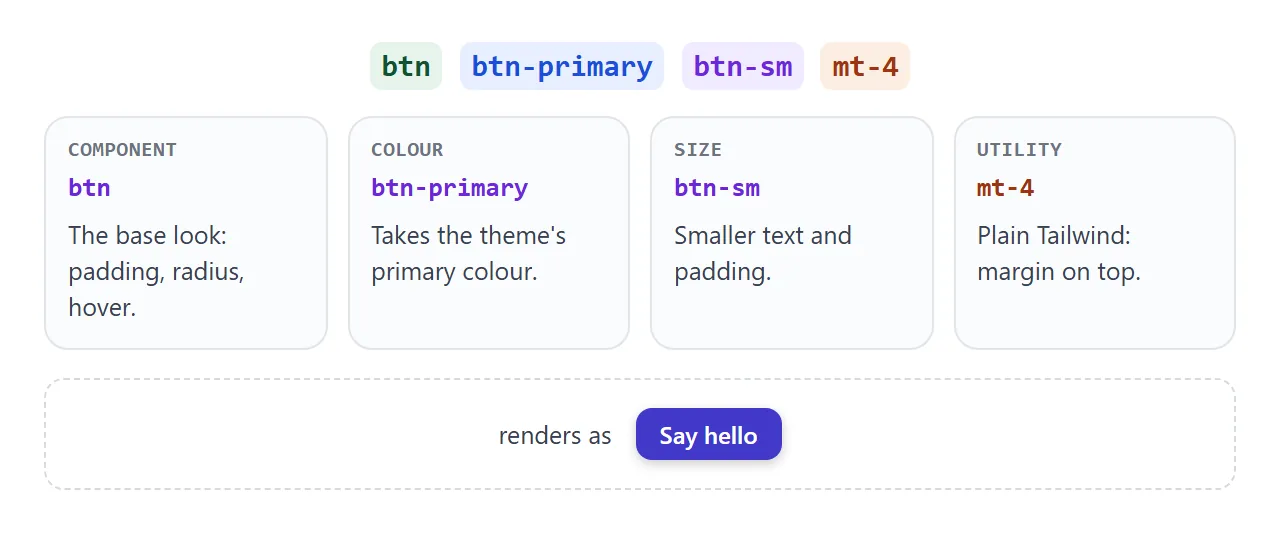
For example, a button has colour modifiers such as btn-primary, btn-secondary and btn-error, style modifiers such as btn-outline and btn-ghost, and sizes from btn-xs to btn-xl. A card is built from card, card-body, card-title and card-actions.
Colours use semantic names: primary, secondary, accent, base-100 and so on. You can use them in utilities too, such as bg-primary or text-base-content. They change when the theme changes, which is the point.
Themes with data-theme
Add data-theme="cupcake" to the html element and the whole page takes that theme. Add it to any other element and only what is inside changes. Themes can be nested without a limit.
<!doctype html>
<html lang="en">
<head>
<meta charset="utf-8">
<meta name="viewport" content="width=device-width, initial-scale=1">
<title>daisyUI themes</title>
<link href="https://cdn.jsdelivr.net/npm/daisyui@5.7.47/daisyui.css" rel="stylesheet" type="text/css">
<!-- light and dark are already inside daisyui.css; the other themes live in themes.css -->
<link href="https://cdn.jsdelivr.net/npm/daisyui@5.7.47/themes.css" rel="stylesheet" type="text/css">
<script src="https://cdn.jsdelivr.net/npm/@tailwindcss/browser@4.3.3"></script>
</head>
<body class="bg-base-200 text-base-content p-4 min-h-screen">
  <div class="max-w-md mx-auto space-y-4">
    <label class="select w-full">
      <span class="label">Theme</span>
      <select id="theme">
        <option value="">(none: default)</option>
        <option>light</option>
        <option>dark</option>
        <option>cupcake</option>
        <option>synthwave</option>
        <option>dracula</option>
        <option>retro</option>
      </select>
    </label>

    <div class="card bg-base-100 shadow-sm">
      <div class="card-body">
        <h2 class="card-title">Same markup, new look</h2>
        <p>Current theme: <b id="current">none</b></p>
        <div class="flex flex-wrap gap-2">
          <button class="btn btn-primary">Primary</button>
          <button class="btn btn-secondary">Secondary</button>
          <button class="btn btn-accent">Accent</button>
          <span class="badge badge-success">success</span>
          <span class="badge badge-error">error</span>
        </div>
      </div>
    </div>

    <!-- data-theme on any element themes everything inside it -->
    <div data-theme="cupcake" class="card bg-base-100 shadow-sm">
      <div class="card-body">
        <h2 class="card-title">I always use cupcake</h2>
        <p>This card has its own <code>data-theme</code>, so the select above does not change it.</p>
      </div>
    </div>
  </div>

<script>
  const select = document.getElementById('theme');
  const current = document.getElementById('current');
  select.addEventListener('change', () => {
    const t = select.value;
    // data-theme on <html> themes the whole page; removing it returns to the default
    if (t) document.documentElement.setAttribute('data-theme', t);
    else document.documentElement.removeAttribute('data-theme');
    current.textContent = t || 'none';
  });
</script>
</body>
</html>
Two details catch people. First, only light and dark live in daisyui.css, so the demo also links themes.css for the rest.
Second, in a test of the pinned CDN stylesheet, a device set to dark mode did not switch the page on its own. Set data-theme yourself. A script-free switch exists too: the theme-controller component in the daisyUI docs.
A finished page: sign-up form with a modal
A real page mixes components with a little JavaScript. This one has a navbar, a form with an input, a select and a toggle, and a modal that opens on submit.
<!doctype html>
<html lang="en">
<head>
<meta charset="utf-8">
<meta name="viewport" content="width=device-width, initial-scale=1">
<title>Workshop sign-up</title>
<link href="https://cdn.jsdelivr.net/npm/daisyui@5.7.47/daisyui.css" rel="stylesheet" type="text/css">
<script src="https://cdn.jsdelivr.net/npm/@tailwindcss/browser@4.3.3"></script>
</head>
<body class="bg-base-200 p-4" data-theme="light">
  <div class="navbar bg-base-100 rounded-box shadow-sm max-w-md mx-auto mb-4">
    <span class="text-lg font-bold px-2">Workshop</span>
    <span class="badge badge-outline ml-auto">Fri 10:00</span>
  </div>

  <form id="form" class="card bg-base-100 shadow-sm max-w-md mx-auto">
    <div class="card-body">
      <h2 class="card-title">Save a seat</h2>

      <label class="input w-full">
        <span class="label">Name</span>
        <input type="text" name="name" placeholder="Ada Lovelace" required>
      </label>

      <label class="select w-full">
        <span class="label">Track</span>
        <select name="track">
          <option>Beginner</option>
          <option>Intermediate</option>
        </select>
      </label>

      <label class="flex items-center gap-3 cursor-pointer">
        <input type="checkbox" name="lunch" class="toggle toggle-primary">
        <span>I want lunch</span>
      </label>

      <div class="card-actions justify-end">
        <button type="reset" class="btn btn-ghost">Clear</button>
        <button type="submit" class="btn btn-primary">Sign up</button>
      </div>
    </div>
  </form>

  <!-- daisyUI modal on top of the native dialog element -->
  <dialog id="done" class="modal">
    <div class="modal-box">
      <h3 class="text-lg font-bold">You are in!</h3>
      <pre id="out" class="bg-base-200 rounded-box p-3 my-3 text-sm whitespace-pre-wrap"></pre>
      <div class="modal-action">
        <form method="dialog"><button class="btn">Close</button></form>
      </div>
    </div>
    <form method="dialog" class="modal-backdrop"><button>close</button></form>
  </dialog>

<script>
  const form = document.getElementById('form');
  const dialog = document.getElementById('done');
  const out = document.getElementById('out');

  form.addEventListener('submit', (e) => {
    e.preventDefault();  // keep the page here; nothing is sent anywhere
    const data = Object.fromEntries(new FormData(form));
    out.textContent = JSON.stringify(data, null, 2);
    dialog.showModal();  // native method; the .modal class only styles it
  });
</script>
</body>
</html>
The modal is the native HTML dialog element. The modal class only styles it, and the page opens it by calling showModal(). A form with method="dialog" inside it closes it again.
The sign-up form calls preventDefault() on submit and reads the fields with FormData, so it works with no server. Sending the data somewhere is a separate job, covered in HTML modal form.
Is it daisyUI or your React setup?
A plain HTML file has no bundler, so there are fewer places to go wrong. If your page works there, check the setup. For daisyUI 5 in a Vite React project, the docs install Tailwind, its Vite plugin and daisyUI:
npm install tailwindcss@latest @tailwindcss/vite@latest daisyui@latest
Then register the Tailwind plugin in vite.config.js, and add two lines to the CSS file your app imports:
@import "tailwindcss";
@plugin "daisyui";
Version 5 moved the setup out of tailwind.config.js. In version 4 you wrote plugins: [require("daisyui")] there. The upgrade guide says version 5 also needs Tailwind CSS 4.
In JSX the attribute is className, not class, because class is a reserved word in JavaScript. Your classes stay the same.
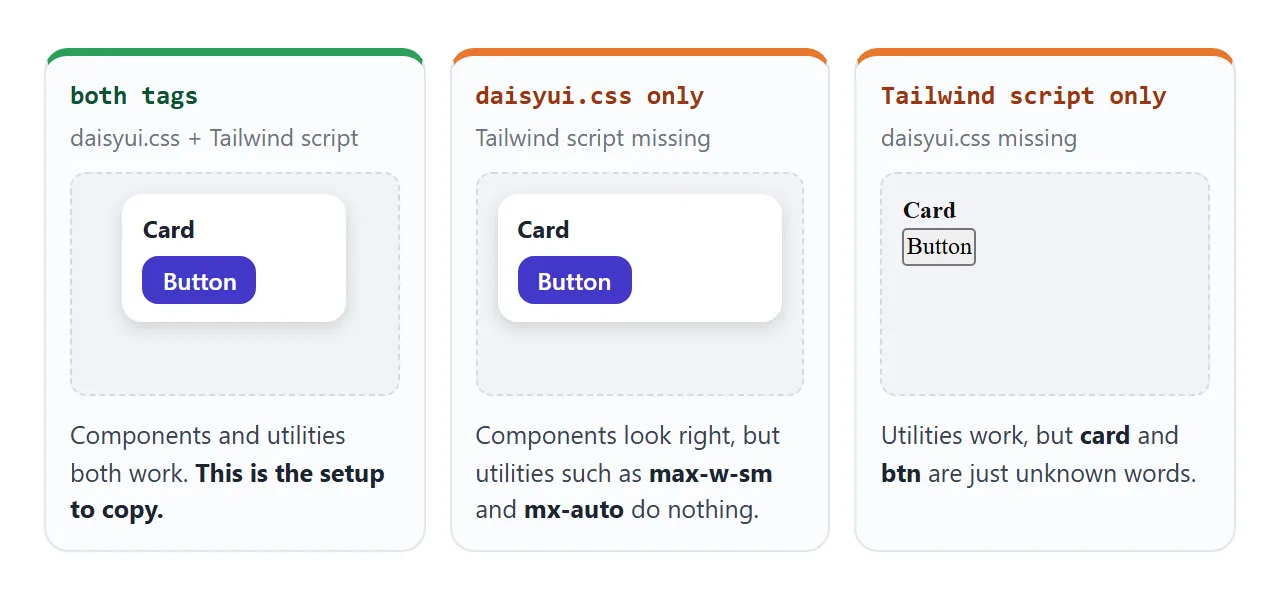
When it does not work
| What you see | Cause | Fix |
|---|---|---|
| Page is plain, as if no CSS | The daisyui.css link is missing, misspelled or offline | Check the link and open the Network panel |
| Components look right, layout classes do nothing | The Tailwind script tag is missing | Add the @tailwindcss/browser script |
Utilities work, btn and card do nothing |
The daisyui.css link is missing | Add the stylesheet link |
card-bordered, tabs-boxed or btn-group do nothing |
Version 4 names in a version 5 page | Use card-border, tabs-box and join |
| Theme does not change | Name is not light or dark and themes.css is missing | Add themes.css, set data-theme |
| Modal never opens | The modal class only styles the dialog |
Call showModal() |
| Works in HTML, not in React | The @plugin line is not in an imported CSS file |
Follow the Vite steps above |
Drawer variants such as is-drawer-open do nothing |
The CDN files leave those names out | Use a build step |
Share it as a link
A styled page is hard to judge from a screenshot. Both CDN tags load from jsDelivr, a host a NOS page is allowed to use, so the styles arrive with the link.
To send the working version, paste the page into a NOS document and choose Create share link. HTML to link walks through it.
The page renders as written and its scripts run, so the people you send it to can open the modal and switch the theme themselves. If you change the code later, the same link shows the new version.
If styles go missing after sharing, see HTML not loading CSS. For plain Tailwind without daisyUI, see how to add Tailwind to an HTML file.