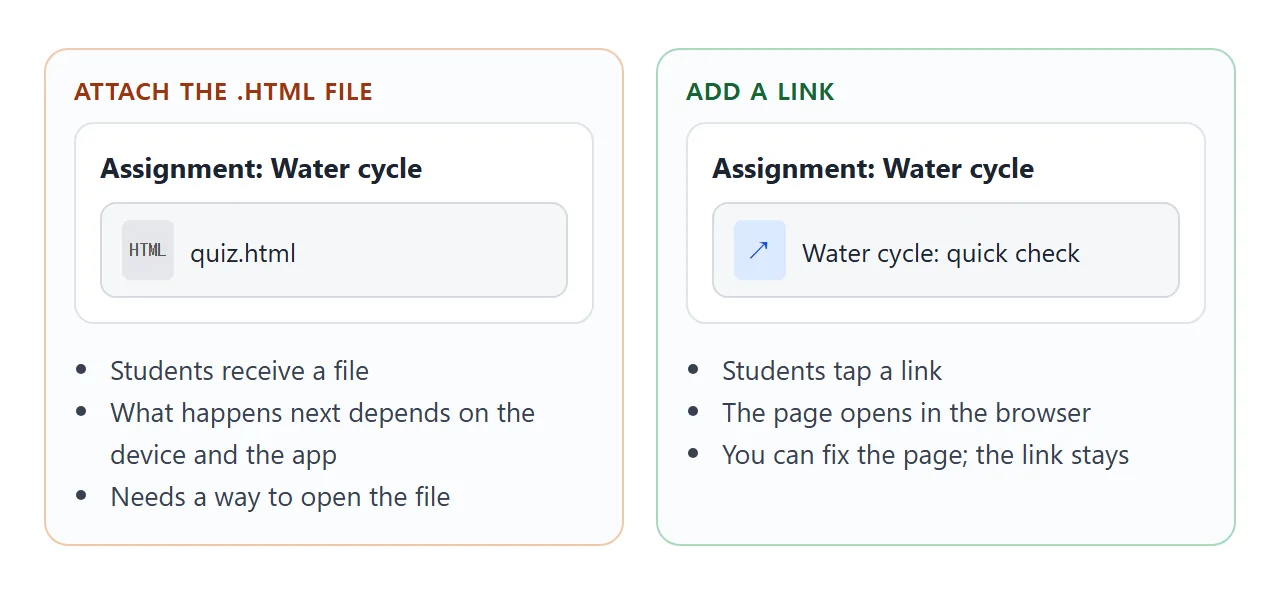
To send an HTML page in Google Classroom, put the page at a web link and add that link to the assignment. Attaching the .html file itself gives students a file, and what they do with it depends on their device.
A question in Google's Classroom community asks the same thing: how to get an HTML file attached to an assignment to open in Chrome, not Docs.
Here is a page you could post. It is a four-question quiz for a class. Answer it, press the button, then read on to see how it gets from a chat window into Classroom.
<!doctype html>
<html lang="en">
<head>
<meta charset="utf-8">
<meta name="viewport" content="width=device-width, initial-scale=1">
<title>Water cycle check</title>
<style>
  * { box-sizing: border-box; }
  body { margin: 0; padding: 18px 14px 28px; font-family: system-ui, sans-serif; background: #f4f6fa; color: #1d2330; }
  main { max-width: 560px; margin: 0 auto; }
  h1 { font-size: 22px; margin: 0 0 4px; }
  .sub { margin: 0 0 16px; color: #566; font-size: 15px; }
  fieldset { border: 1px solid #d9dee8; border-radius: 12px; background: #fff; margin: 0 0 12px; padding: 12px 14px; }
  legend { font-weight: 700; padding: 0 6px; font-size: 15px; }
  label { display: block; padding: 8px 6px; border-radius: 8px; cursor: pointer; font-size: 16px; }
  label:hover { background: #eef2fb; }
  label.right { background: #dcf3e4; }
  label.wrong { background: #fde3d6; }
  button { font: inherit; font-weight: 700; padding: 11px 20px; border: 0; border-radius: 10px; background: #1d4ed8; color: #fff; cursor: pointer; }
  button.alt { background: #e5e9f2; color: #1d2330; margin-left: 8px; }
  #result { margin-top: 14px; font-size: 18px; font-weight: 700; min-height: 26px; }
</style>
</head>
<body>
<main>
  <h1>Water cycle: quick check</h1>
  <p class="sub">Pick one answer for each question, then press Check.</p>
  <form id="quiz"></form>
  <button type="button" id="check">Check my answers</button>
  <button type="button" id="reset" class="alt">Start again</button>
  <p id="result" aria-live="polite"></p>
</main>

<script>
  // Each question: text, choices, and the index of the right choice
  const questions = [
    { q: 'What turns liquid water into vapour?', a: ['Evaporation', 'Condensation', 'Precipitation'], right: 0 },
    { q: 'Clouds form when vapour cools and...', a: ['melts', 'condenses', 'freezes solid'], right: 1 },
    { q: 'Rain, snow and hail are all kinds of...', a: ['runoff', 'evaporation', 'precipitation'], right: 2 },
    { q: 'Which source of energy drives the water cycle?', a: ['The Sun', 'The Moon', 'Wind turbines'], right: 0 }
  ];
  const form = document.getElementById('quiz');
  const result = document.getElementById('result');

  function build() {
    form.innerHTML = '';
    questions.forEach((item, i) => {
      const box = document.createElement('fieldset');
      const legend = document.createElement('legend');
      legend.textContent = (i + 1) + '. ' + item.q;
      box.appendChild(legend);
      item.a.forEach((text, j) => {
        const label = document.createElement('label');
        const input = document.createElement('input');
        input.type = 'radio';
        input.name = 'q' + i;
        input.value = j;
        label.appendChild(input);
        label.appendChild(document.createTextNode(' ' + text));
        box.appendChild(label);
      });
      form.appendChild(box);
    });
    result.textContent = '';
  }

  document.getElementById('check').addEventListener('click', () => {
    let score = 0;
    questions.forEach((item, i) => {
      const labels = form.querySelectorAll('input[name="q' + i + '"]');
      labels.forEach((input, j) => {
        const label = input.parentElement;
        label.classList.remove('right', 'wrong');
        if (j === item.right) label.classList.add('right');
        else if (input.checked) label.classList.add('wrong');
      });
      const picked = form.querySelector('input[name="q' + i + '"]:checked');
      if (picked && Number(picked.value) === item.right) score++;
    });
    result.textContent = 'You got ' + score + ' out of ' + questions.length + '.';
  });

  document.getElementById('reset').addEventListener('click', build);
  build();
</script>
</body>
</html>
The answers are inside the file, so treat a page like this as practice, not as a graded test. Building an HTML quiz explains why.
Make it with AI
You do not need to write any code. Describe the page in plain words and ask for one file.
Make a single-file HTML page for a class of 10-year-olds.
Topic: the water cycle. Four multiple-choice questions with three
choices each. A button "Check my answers" shows the score and marks
right answers green and wrong ones orange. Large text that works on
a phone and a Chromebook. No external images, fonts or scripts.
Return only the HTML.
Check three things in the result before you copy it:
- The answers are correct. AI can state a wrong answer with confidence.
- The page works with no internet-only parts. Ask again if you see a link to an outside script or image.
- The text is large enough to read on a small screen.
Here is a second kind of page. A lesson page with a shaded bar, show-the-answer boxes and a tick list.
<!doctype html>
<html lang="en">
<head>
<meta charset="utf-8">
<meta name="viewport" content="width=device-width, initial-scale=1">
<title>Lesson page: Fractions</title>
<style>
  * { box-sizing: border-box; }
  body { margin: 0; padding: 0 0 28px; font-family: system-ui, sans-serif; background: #fff; color: #1d2330; line-height: 1.5; }
  header { background: #0f766e; color: #fff; padding: 20px 16px; }
  header h1 { margin: 0; font-size: 22px; }
  header p { margin: 4px 0 0; opacity: .9; font-size: 15px; }
  main { max-width: 560px; margin: 0 auto; padding: 16px; }
  h2 { font-size: 17px; margin: 22px 0 8px; }
  .bar { display: flex; height: 44px; border-radius: 8px; overflow: hidden; border: 2px solid #0f766e; max-width: 360px; }
  .bar span { flex: 1; border-right: 2px solid #0f766e; background: #fff; }
  .bar span:last-child { border-right: 0; }
  .bar span.on { background: #99e0d6; }
  .row { display: flex; gap: 8px; margin: 10px 0 4px; flex-wrap: wrap; }
  button { font: inherit; padding: 9px 14px; border: 1px solid #0f766e; border-radius: 8px; background: #fff; color: #0f766e; cursor: pointer; font-weight: 600; }
  button[aria-pressed="true"] { background: #0f766e; color: #fff; }
  ul.tasks { list-style: none; margin: 0; padding: 0; }
  ul.tasks li { padding: 6px 0; }
  ul.tasks label { cursor: pointer; font-size: 16px; }
  details { border: 1px solid #d9dee8; border-radius: 10px; padding: 10px 12px; margin-bottom: 8px; }
  summary { cursor: pointer; font-weight: 600; }
  #done { font-weight: 700; color: #0f766e; margin-top: 8px; min-height: 24px; }
</style>
</head>
<body>
<header>
  <h1>Lesson: Fractions of a bar</h1>
  <p>Grade 4 maths, 20 minutes. Work through the three parts.</p>
</header>
<main>
  <h2>1. Shade the bar</h2>
  <p>Choose how many of the 8 parts to shade.</p>
  <div class="bar" id="bar"></div>
  <div class="row" id="picks"></div>
  <p id="say"></p>

  <h2>2. Try these</h2>
  <details><summary>Shade 4 parts. What fraction is that?</summary><p>4/8, which is the same as 1/2.</p></details>
  <details><summary>Shade 2 parts. What fraction is that?</summary><p>2/8, which is the same as 1/4.</p></details>

  <h2>3. Tick when finished</h2>
  <ul class="tasks">
    <li><label><input type="checkbox"> I shaded the bar</label></li>
    <li><label><input type="checkbox"> I tried both questions</label></li>
    <li><label><input type="checkbox"> I can say 4/8 is one half</label></li>
  </ul>
  <p id="done"></p>
</main>

<script>
  const bar = document.getElementById('bar');
  const picks = document.getElementById('picks');
  const say = document.getElementById('say');
  const parts = [];

  for (let i = 0; i < 8; i++) {
    const s = document.createElement('span');
    bar.appendChild(s);
    parts.push(s);
  }

  function shade(n) {
    parts.forEach((s, i) => s.classList.toggle('on', i < n));
    say.textContent = n + '/8 of the bar is shaded.';
    picks.querySelectorAll('button').forEach((b) => b.setAttribute('aria-pressed', String(Number(b.dataset.n) === n)));
  }

  [1, 2, 4, 6, 8].forEach((n) => {
    const b = document.createElement('button');
    b.textContent = n;
    b.dataset.n = n;
    b.setAttribute('aria-pressed', 'false');
    b.addEventListener('click', () => shade(n));
    picks.appendChild(b);
  });

  const boxes = document.querySelectorAll('.tasks input');
  boxes.forEach((box) => box.addEventListener('change', () => {
    const all = [...boxes].every((b) => b.checked);
    document.getElementById('done').textContent = all ? 'All done. Well done!' : '';
  }));
  shade(3);
</script>
</body>
</html>
Send it as a link
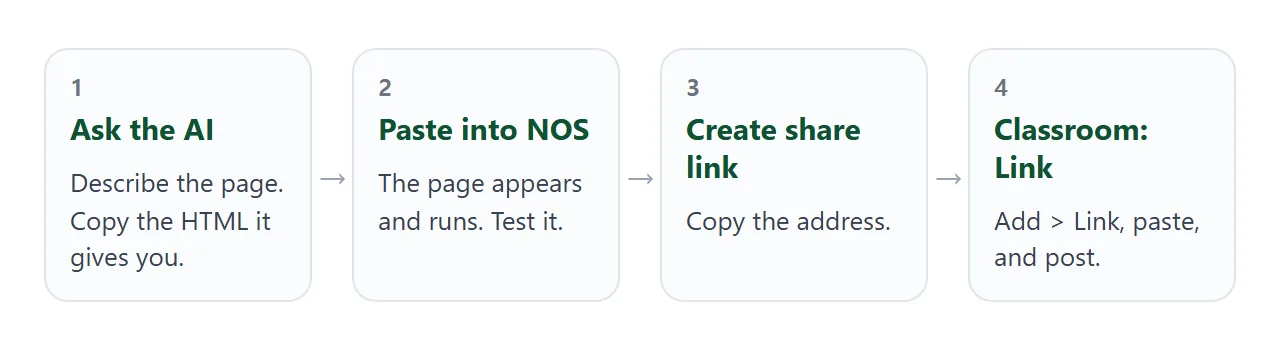
Open a NOS document and paste the HTML in. The page renders right there and its scripts run. Test every button yourself. Then choose Create share link and copy the address.
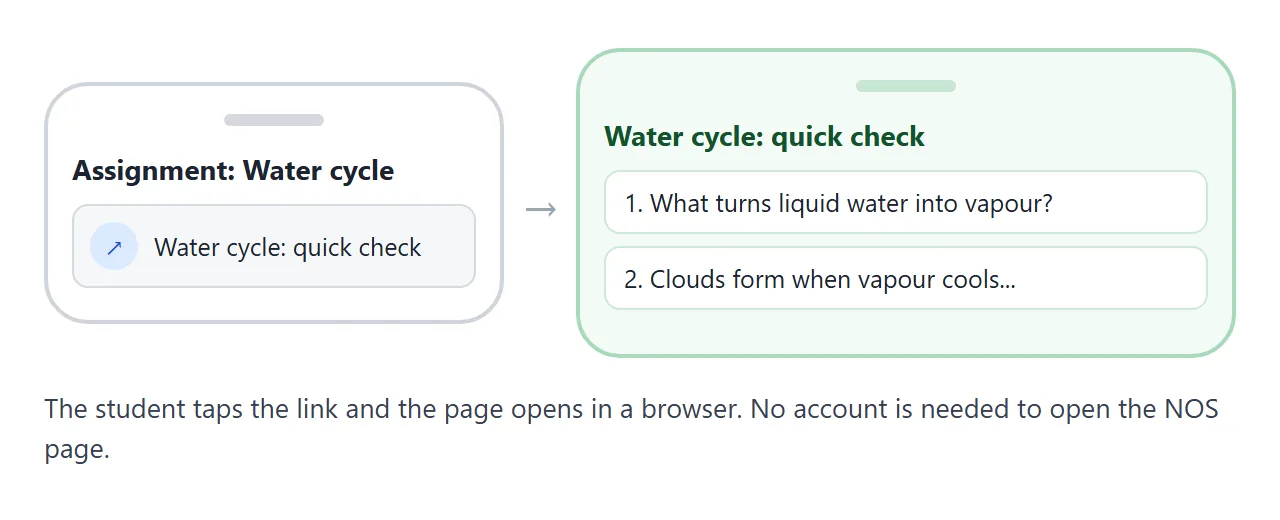
Anyone with that address can open the page in a browser, on a phone too, without an account. They can use it, but they cannot edit it.
If you spot a mistake tomorrow, change the code in your NOS document. The same link then shows the new version. HTML to link walks through the whole thing.
Add the link in Google Classroom
Google's help page for creating an assignment lists the attach options. One of them is Link, described as attaching a link to your assignment. The page is at Create an assignment.
- Open the class, go to Classwork, and choose Create, then Assignment.
- Enter a title and instructions.
- Under the attach options, choose Link.
- Paste the NOS address and add it.
- Assign or schedule the post.
A material post on the Classwork page accepts links as well, according to Add materials to the Classwork page. Use that for a reference page that is not an assignment.
File, Drive or link
Classroom has three attach routes that could carry an HTML page. They behave differently.
| Upload the .html file | Attach from Drive | Add a Link | |
|---|---|---|---|
| What the student gets | A file | A Drive file | A web address |
| Opens as a page | Not promised | See below | Yes, it is a web page |
| Fix a mistake later | Upload the file again | Change the Drive file | Edit once, same link |
| Needs an account | Classroom login | Classroom login | None for the NOS page |
For a Drive file, Google offers three student options: view, edit, or a copy for each student.
A page that runs needs a place that serves it as a page, and Drive stores files rather than serving pages.
Check it the way students will see it
Before you post, open the link on the device your class uses. On a school Chromebook, sign in as a student if your school gives you a test student account. Then try a phone.
Google's list of file types that work on Chromebooks does not include .html, as of October 2026. That is one more reason to send an address, not a file. If a class works on phones, read opening an HTML file on a phone.
If your students work in Google Sites, embedding HTML in Google Sites is another route.
Students can also send a link back. In Classroom's turn-in options they choose Add or create, then Link, and paste an address.
When it does not work
| Symptom | Cause | Fix |
|---|---|---|
| Students say the page will not open at school | The school may block some sites on managed devices | Ask your school IT to allow the address |
| The quiz shows no score | The page has an error, or the AI left out the script | Test it in NOS and ask the AI to fix it |
| Pictures are missing | The AI used an outside image | Ask for inline SVG or CSS shapes only |
| The link opens but looks tiny on a phone | The page lacks a viewport setting | Ask the AI to make it mobile friendly |
| You want to see who finished | A shared page does not report that | Ask for a screenshot or answer in Classroom |
| A student's ticks vanish on reload | A visitor's changes are not saved | Tell them it is practice only |
School administrators can block or allow addresses on managed Chromebooks, according to Google's Allow or block access to websites page. Whether that applies to your students depends on your school's settings.