To submit an HTML file in Google Classroom, have the student turn in a link to the page instead of the file. Under Your work, they choose Add or create, then Link, paste the address and click Turn In.
You open the page itself, with no download and no saving it first.
Here is a handout you can give the class. It is one HTML page with a tick list, so each student can follow the steps and see their progress.
<!doctype html>
<html lang="en">
<head>
<meta charset="utf-8">
<meta name="viewport" content="width=device-width, initial-scale=1">
<title>Turn in your HTML project</title>
<style>
  * { box-sizing: border-box; }
  body { margin: 0; padding: 18px; font-family: system-ui, sans-serif; background: #f4f5f7; color: #1d2330; }
  .sheet { max-width: 560px; margin: 0 auto; background: #fff; border-radius: 14px; padding: 20px 20px 18px; box-shadow: 0 4px 16px rgba(0,0,0,.08); }
  h1 { font-size: 21px; margin: 0 0 4px; }
  .sub { margin: 0 0 14px; color: #556070; font-size: 14px; }
  .bar { height: 8px; background: #e6e9ef; border-radius: 99px; overflow: hidden; }
  .bar i { display: block; height: 100%; width: 0; background: #1f9d55; transition: width .25s; }
  #count { margin: 6px 0 14px; font-size: 13px; font-weight: 600; color: #1f6f43; }
  ol { list-style: none; margin: 0; padding: 0; }
  li { margin: 0 0 8px; }
  label { display: flex; gap: 10px; align-items: flex-start; padding: 10px 12px; border: 1px solid #e1e4ea; border-radius: 10px; cursor: pointer; font-size: 15px; line-height: 1.4; }
  label:has(input:checked) { background: #eefaf2; border-color: #b7e4c7; color: #4b5563; }
  label:has(input:checked) span { text-decoration: line-through; }
  input { width: 20px; height: 20px; margin: 1px 0 0; flex: none; accent-color: #1f9d55; }
  b { color: #0f5132; }
  .note { margin: 14px 0 0; padding: 10px 12px; background: #fff7ed; border-radius: 10px; font-size: 13.5px; line-height: 1.45; color: #7c3a0b; }
  #done { display: none; margin: 14px 0 0; padding: 12px; border-radius: 10px; background: #1f9d55; color: #fff; font-weight: 600; text-align: center; }
</style>
</head>
<body>
<div class="sheet">
  <h1>Turn in your HTML project</h1>
  <p class="sub">Do these in order. Tick each one when it is finished.</p>
  <div class="bar"><i id="fill"></i></div>
  <div id="count">0 of 6 done</div>
  <ol>
    <li><label><input type="checkbox"><span>Open your project file in a text editor, select everything and <b>copy</b> it.</span></label></li>
    <li><label><input type="checkbox"><span>In NOS, make a new document and <b>paste</b>. Check the page looks right.</span></label></li>
    <li><label><input type="checkbox"><span>Click <b>Share</b>, open the Share link tab, press <b>Create share link</b>, copy the address.</span></label></li>
    <li><label><input type="checkbox"><span>Open the link in a private window to see what your teacher will see.</span></label></li>
    <li><label><input type="checkbox"><span>In Classroom, under Your work choose <b>Add or create</b>, then <b>Link</b>, paste, <b>Add</b>.</span></label></li>
    <li><label><input type="checkbox"><span>Press <b>Turn In</b> and confirm.</span></label></li>
  </ol>
  <p class="note">Do not edit the page after you turn it in. The link always shows the latest version.</p>
  <div id="done">All done. Your teacher can open the page.</div>
</div>
<script>
  const boxes = document.querySelectorAll('input[type=checkbox]');
  const fill = document.getElementById('fill');
  const count = document.getElementById('count');
  const done = document.getElementById('done');

  function update() {
    const n = [...boxes].filter((b) => b.checked).length;
    fill.style.width = (n / boxes.length * 100) + '%';
    count.textContent = n + ' of ' + boxes.length + ' done';
    done.style.display = n === boxes.length ? 'block' : 'none';
  }
  boxes.forEach((b) => b.addEventListener('change', update));
</script>
</body>
</html>
Classroom's Add or create menu has a File option, and Google's Classroom help forum has a thread titled "Upload an HTML file to GC?".
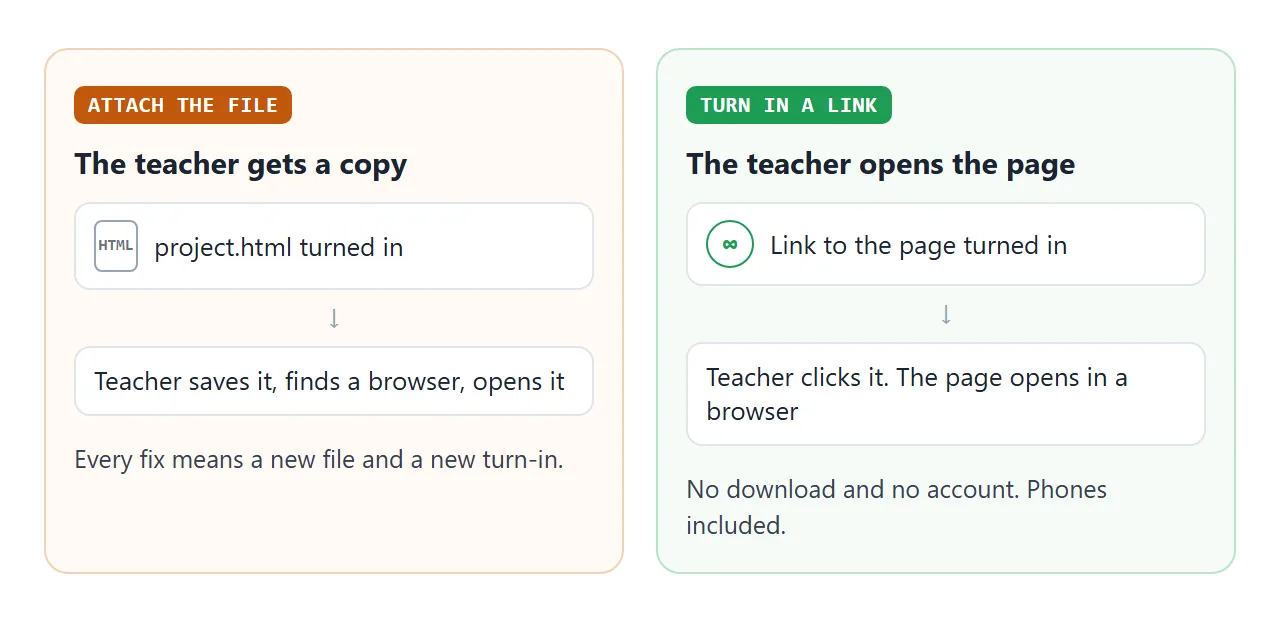
But an HTML project is a page, and a file is only a copy of it. Someone has to open that copy in a browser before it looks like anything.
Make it with AI
Students often get their project from ChatGPT, Claude or Gemini. Give them a prompt that produces a page that will survive being shared. Paste this into the chat and change the words in capitals:
Make a single HTML file for a class project about TOPIC.
Put all CSS and JavaScript inside the file.
Do not load images from other websites. Draw pictures with
inline SVG or CSS. Do not send forms to a server; show the
result on the page instead. Make it readable on a phone.
Return only the code in one block.
Check three things in the result before the student pastes it anywhere. Does the page have a title? Does every button do something? Does it look right on a narrow window, not only a wide one?
Send it as a link
The student pastes the whole file into a NOS document. NOS draws the page as written and runs its scripts, so a quiz scores itself and a calculator calculates.
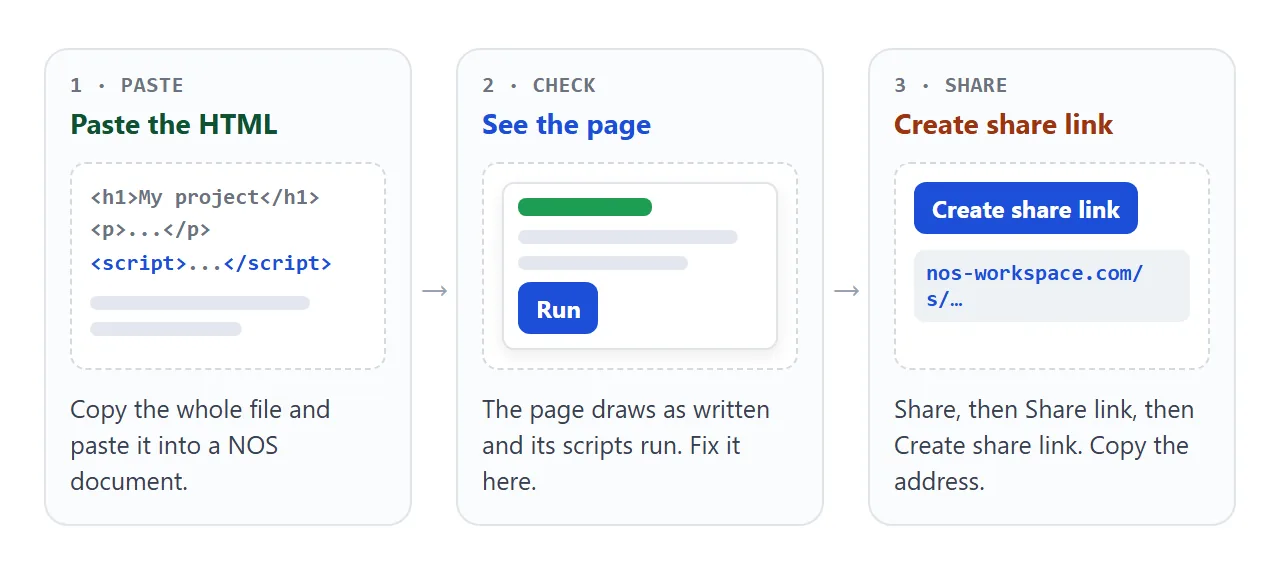
- Open the project file in a text editor, select everything and copy it.
- In NOS, make a new document and paste. Check the page looks right.
- Click Share, open the Share link tab, press Create share link and copy the address.
Anyone with the link can open the page without an account, on a phone too, and cannot edit it. If the student fixes the code later, the same link shows the new version. HTML to link shows the same steps with pictures.
NOS loads scripts, styles and fonts from cdnjs.cloudflare.com, cdn.jsdelivr.net, cdn.tailwindcss.com, code.jquery.com, unpkg.com and Google Fonts. Other outside resources do not load.
Turn in the link in Google Classroom
On a computer, the student opens the assignment and finds the Your work card. They click Add or create, choose Link, paste the share address and click Add. Then Turn In and confirm.
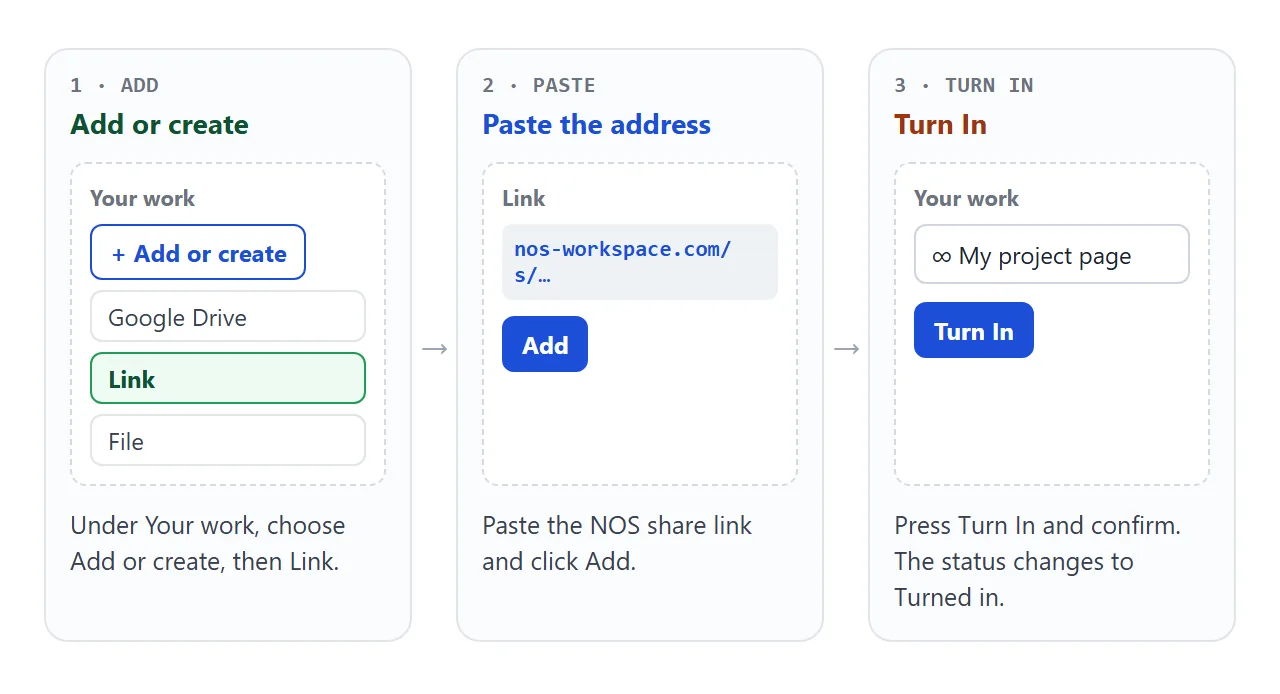
In the Android app the same path is Your work, Expand, Add, then Link. Both routes are from Classroom Help as of October 2026. Menu names can change, so check them if your version looks different.
Two things to put in your assignment instructions, which you can type under the title when you create it:
- Turn in one link, the NOS share link, not the HTML file.
- Do not edit the page after Turn In, because the link always shows the latest version.
To read the work, open the assignment, click the number over Turned in, and click the attachment thumbnail. The page opens as the student built it. Anything you click or tick on it is not saved.
File, link or Drive: which to ask for
| Attach the file | Attach from Drive | Turn in a NOS link | |
|---|---|---|---|
| What you get | A copy of the file | A file in Drive | The page at an address |
| To see the page | Open the file in a browser yourself | Drive previews it, which Google calls a scaled-down version of the file | Click the link |
| Student fixes a mistake | Unsubmit, replace the file, turn in again | Same | Edit the document; the link stays the same |
| Works for a quiz with scripts | Only if you open it in a browser | Preview may differ from the real page | Scripts run on the page |
Why an HTML file in Google Drive shows code explains the Drive column. One Classroom rule matters if a student unsubmits to swap a file: work turned in again after the due date is marked late.
Keep track of what came in
A class set is thirty tabs. This board lists each student with their link, a tick for pages you have opened and a result. Paste it into NOS, replace the names and keep it beside Classroom.
<!doctype html>
<html lang="en">
<head>
<meta charset="utf-8">
<meta name="viewport" content="width=device-width, initial-scale=1">
<title>Project review board</title>
<style>
  * { box-sizing: border-box; }
  body { margin: 0; padding: 16px; font-family: system-ui, sans-serif; background: #f4f5f7; color: #1d2330; }
  .sheet { max-width: 640px; margin: 0 auto; background: #fff; border-radius: 14px; padding: 18px; box-shadow: 0 4px 16px rgba(0,0,0,.08); }
  h1 { font-size: 20px; margin: 0 0 2px; }
  .sub { margin: 0 0 12px; color: #556070; font-size: 14px; }
  #sum { display: inline-block; margin-bottom: 12px; padding: 4px 10px; border-radius: 99px; background: #eefaf2; color: #1f6f43; font-size: 13px; font-weight: 600; }
  table { width: 100%; border-collapse: collapse; font-size: 14px; }
  th { text-align: left; font-size: 12px; color: #6b7280; padding: 6px 6px; border-bottom: 1px solid #e1e4ea; }
  td { padding: 9px 6px; border-bottom: 1px solid #eef0f4; vertical-align: middle; }
  tr.seen td { background: #f6fbf8; }
  .link { font: 12px ui-monospace, Consolas, monospace; color: #1d4ed8; word-break: break-all; }
  input[type=checkbox] { width: 20px; height: 20px; accent-color: #1f9d55; }
  select, input[type=text] { font: inherit; padding: 6px 8px; border: 1px solid #cfd5df; border-radius: 8px; background: #fff; max-width: 100%; }
  .add { display: flex; gap: 8px; margin-top: 14px; flex-wrap: wrap; }
  .add input { flex: 1 1 140px; min-width: 0; }
  button { font: inherit; font-weight: 600; padding: 7px 14px; border: 0; border-radius: 8px; background: #1d4ed8; color: #fff; cursor: pointer; }
  @media (max-width: 480px) { th:nth-child(2), td:nth-child(2) { display: none; } }
</style>
</head>
<body>
<div class="sheet">
  <h1>Unit 4 web projects</h1>
  <p class="sub">One row per student. Tick a row once you have opened the page.</p>
  <div id="sum"></div>
  <table>
    <thead><tr><th>Student</th><th>Link</th><th>Opened</th><th>Result</th></tr></thead>
    <tbody id="rows">
      <tr><td>Nova Ellery</td><td class="link">nos…/s/a1b2</td><td><input type="checkbox"></td><td><select><option>-</option><option>Meets</option><option>Not yet</option></select></td></tr>
      <tr><td>Pip Harlow</td><td class="link">nos…/s/c3d4</td><td><input type="checkbox"></td><td><select><option>-</option><option>Meets</option><option>Not yet</option></select></td></tr>
      <tr><td>Juno Marsh</td><td class="link">nos…/s/e5f6</td><td><input type="checkbox"></td><td><select><option>-</option><option>Meets</option><option>Not yet</option></select></td></tr>
      <tr><td>Kit Okafor</td><td class="link">nos…/s/g7h8</td><td><input type="checkbox"></td><td><select><option>-</option><option>Meets</option><option>Not yet</option></select></td></tr>
    </tbody>
  </table>
  <form class="add" id="add">
    <input type="text" id="name" placeholder="Add a student" aria-label="Student name" required>
    <button type="submit">Add row</button>
  </form>
</div>
<script>
  const rows = document.getElementById('rows');
  const sum = document.getElementById('sum');

  function update() {
    const all = rows.querySelectorAll('tr');
    let seen = 0;
    all.forEach((tr) => {
      const on = tr.querySelector('input[type=checkbox]').checked;
      tr.classList.toggle('seen', on);
      if (on) seen++;
    });
    sum.textContent = seen + ' of ' + all.length + ' opened';
  }

  rows.addEventListener('change', update);

  document.getElementById('add').addEventListener('submit', (e) => {
    e.preventDefault();
    const name = document.getElementById('name');
    const tr = document.createElement('tr');
    tr.innerHTML = '<td></td><td class="link">pending</td><td><input type="checkbox"></td>' +
      '<td><select><option>-</option><option>Meets</option><option>Not yet</option></select></td>';
    tr.firstChild.textContent = name.value.trim();  // textContent keeps typed text from being read as HTML
    rows.appendChild(tr);
    name.value = '';
    update();
  });

  update();
</script>
</body>
</html>
If you open your own copy of this board in View mode, the ticks and rows you add are saved. A visitor's changes are not. That makes it safe to share a read-only copy with a co-teacher.
When it does not work
| What you see | Cause | Fix |
|---|---|---|
| The page is plain text with no style | The CSS was in a separate file | Move the CSS inside the HTML file |
| A picture is missing | It loads from another website | Use inline SVG or CSS instead |
| A form does nothing | It sends data to a server, which NOS blocks | Show the answer on the page instead |
| A page inside a page is blank | An iframe is blocked | Put the content directly in the page |
| A chart or map does not load | It fetches data from another site | Put the data in the page |
| The link asks to download | A file was turned in, not the link | Ask for the NOS share link |
| The page differs from what you graded | The student edited it after Turn In | Ask for no edits, or for a PDF copy |
| Phone shows tiny text | The page has no viewport tag | Ask the student to add a mobile line to the head |
For a phone-specific guide, see opening an HTML file on a phone. For quiz projects, HTML quiz shows what a working one looks like.