A study notes website can be one page: a title, a table of contents at the top and your notes in sections underneath. People ask how to build a simple website to share study materials, and for notes this is the simple answer.
You do not need a site builder, only one page and one link.
Here is a page of that kind for a made-up biology lecture. Scroll it, tap a heading in the contents list, and open the review questions at the bottom.
<!doctype html>
<html lang="en">
<head>
<meta charset="utf-8">
<meta name="viewport" content="width=device-width, initial-scale=1">
<title>Lecture 4: Cellular Respiration</title>
<style>
* { box-sizing: border-box; }
html { scroll-behavior: smooth; }
body { margin: 0; font-family: system-ui, sans-serif; color: #1f2937; background: #f6f7f9; line-height: 1.55; }
header { background: #1e3a5f; color: #fff; padding: 16px 20px; }
header h1 { margin: 0; font-size: 20px; }
header p { margin: 4px 0 0; font-size: 13px; opacity: .85; }
.wrap { display: flex; gap: 24px; max-width: 900px; margin: 0 auto; padding: 16px 20px 40px; align-items: flex-start; }
nav { position: sticky; top: 12px; flex: 0 0 200px; background: #fff; border: 1px solid #e1e4ea; border-radius: 10px; padding: 12px 14px; font-size: 14px; }
nav b { display: block; font-size: 12px; text-transform: uppercase; letter-spacing: .5px; color: #6b7280; margin-bottom: 6px; }
nav a { display: block; padding: 5px 8px; color: #374151; text-decoration: none; border-left: 3px solid transparent; border-radius: 0 6px 6px 0; }
nav a:hover { background: #f1f5f9; }
nav a.on { border-left-color: #2563eb; background: #eff6ff; color: #1d4ed8; font-weight: 600; }
main { flex: 1; min-width: 0; }
section { background: #fff; border: 1px solid #e1e4ea; border-radius: 10px; padding: 4px 18px 14px; margin-bottom: 14px; scroll-margin-top: 12px; }
h2 { font-size: 18px; margin: 14px 0 6px; color: #1e3a5f; }
p { margin: 6px 0; }
.key { background: #fef9c3; border-left: 4px solid #eab308; padding: 8px 12px; border-radius: 0 8px 8px 0; margin: 10px 0; font-size: 14px; }
table { width: 100%; border-collapse: collapse; font-size: 14px; margin: 8px 0; }
th, td { text-align: left; padding: 6px 8px; border-bottom: 1px solid #e5e7eb; }
th { background: #f1f5f9; }
details { border: 1px solid #e1e4ea; border-radius: 8px; padding: 8px 12px; margin: 8px 0; background: #fafbfc; }
summary { cursor: pointer; font-weight: 600; }
@media (max-width: 640px) {
.wrap { flex-direction: column; gap: 12px; padding: 12px; }
nav { position: static; flex: none; width: 100%; }
nav .links { display: grid; grid-template-columns: 1fr 1fr; gap: 0 8px; }
}
</style>
</head>
<body>
<header>
<h1>Lecture 4: Cellular Respiration</h1>
<p>Intro Biology (made-up course) · notes for the study group</p>
</header>
<div class="wrap">
<nav aria-label="Contents">
<b>Contents</b>
<div class="links">
<a href="#overview">1. Overview</a>
<a href="#glycolysis">2. Glycolysis</a>
<a href="#krebs">3. Krebs cycle</a>
<a href="#etc">4. Electron chain</a>
<a href="#review">5. Review</a>
</div>
</nav>
<main>
<section id="overview">
<h2>1. Overview</h2>
<p>Cells break down glucose to make ATP, the molecule that powers most cell work. The full process has three stages.</p>
<div class="key"><b>Key idea:</b> one glucose gives roughly 30 ATP in total, most of it in the last stage.</div>
</section>
<section id="glycolysis">
<h2>2. Glycolysis</h2>
<p>Happens in the cytoplasm. Glucose is split into two pyruvate molecules. No oxygen is needed.</p>
<table>
<tr><th>Stage</th><th>Where</th><th>Needs oxygen?</th></tr>
<tr><td>Glycolysis</td><td>Cytoplasm</td><td>No</td></tr>
<tr><td>Krebs cycle</td><td>Mitochondrial matrix</td><td>Indirectly</td></tr>
<tr><td>Electron chain</td><td>Inner membrane</td><td>Yes</td></tr>
</table>
</section>
<section id="krebs">
<h2>3. Krebs cycle</h2>
<p>Pyruvate is turned into acetyl-CoA and fed into a cycle. The cycle gives off CO2 and loads carrier molecules (NADH, FADH2).</p>
</section>
<section id="etc">
<h2>4. Electron transport chain</h2>
<p>The carriers hand electrons down a chain of proteins. The energy pumps protons across the membrane, and ATP synthase uses that flow to make ATP. Oxygen is the final electron acceptor.</p>
<div class="key"><b>Exam tip:</b> if oxygen is missing, the chain stops and the cell falls back on glycolysis alone.</div>
</section>
<section id="review">
<h2>5. Review questions</h2>
<details>
<summary>Where does glycolysis happen?</summary>
<p>In the cytoplasm.</p>
</details>
<details>
<summary>What is the final electron acceptor?</summary>
<p>Oxygen.</p>
</details>
</section>
</main>
</div>
<script>
// Highlight the contents link of the section being read
const links = document.querySelectorAll('nav a');
const sections = document.querySelectorAll('section');
function update() {
let current = sections[0].id;
sections.forEach((s) => {
if (s.getBoundingClientRect().top <= 60) current = s.id;
});
// at the very bottom, the last section is the one being read
if (window.innerHeight + window.scrollY >= document.documentElement.scrollHeight - 2) current = sections[sections.length - 1].id;
links.forEach((a) => a.classList.toggle('on', a.getAttribute('href') === '#' + current));
}
window.addEventListener('scroll', update);
update();
</script>
</body>
</html>
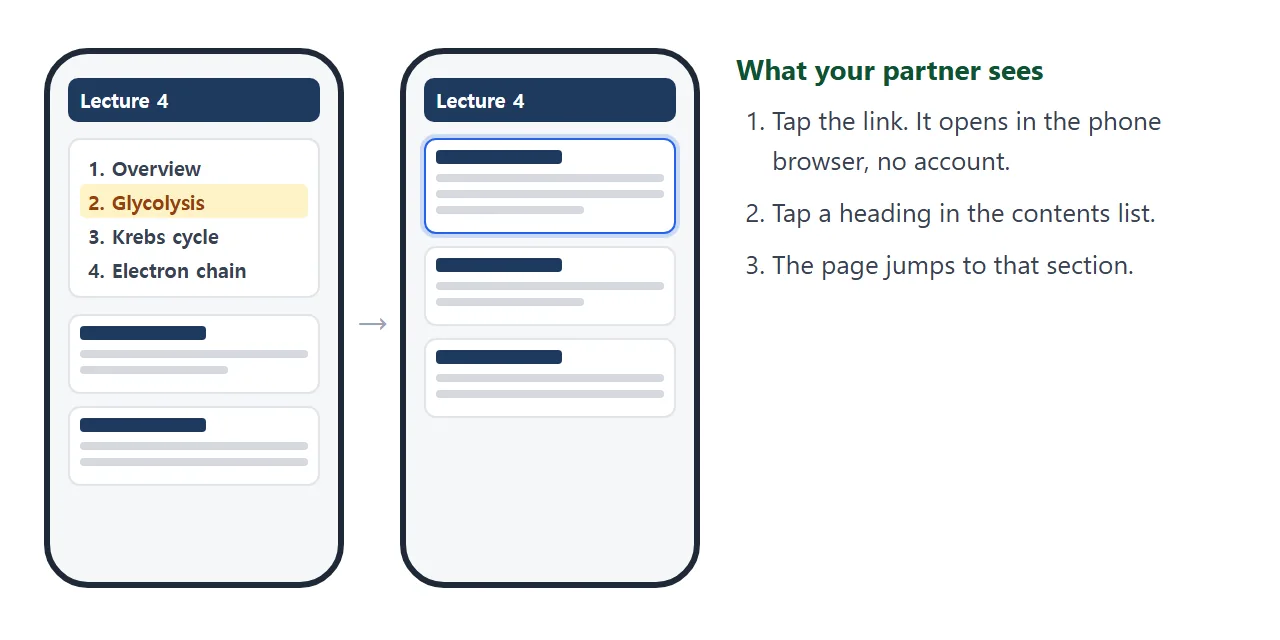
The contents list is a set of links to the headings on the same page. On a wide screen it stays at the side while you scroll. On a phone it moves above the notes.
To see how those links work, read HTML table of contents.
Make it with AI
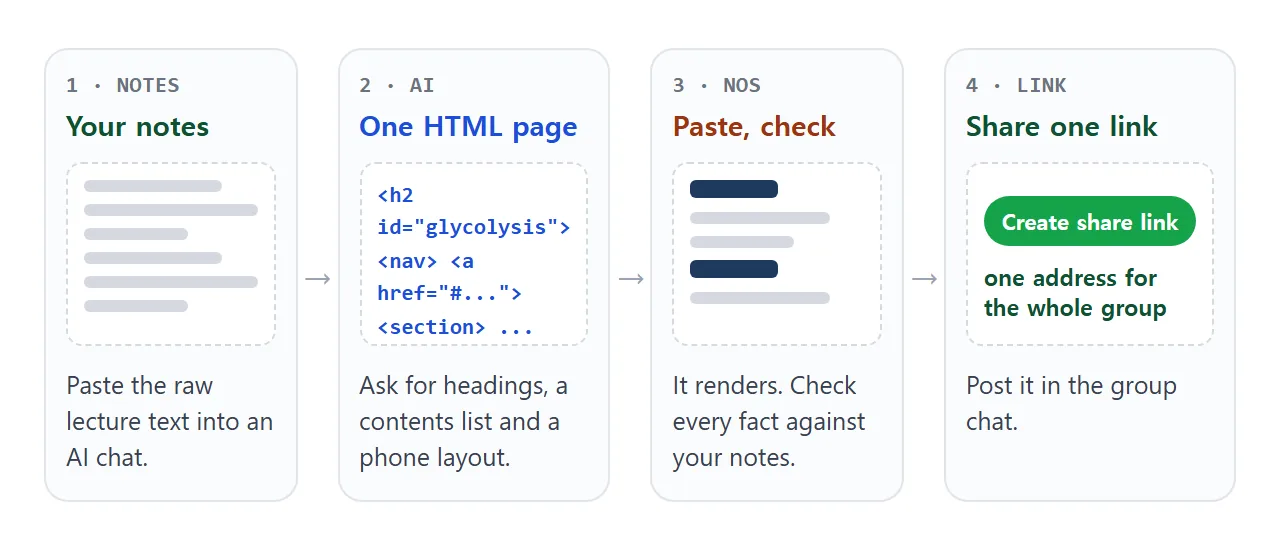
An AI chat can turn plain notes into this page in one go. Paste your notes below the prompt and send it.
Turn the lecture notes below into ONE self-contained HTML page.
- A title with the course name and lecture number.
- A table of contents at the top that links to each section.
  Give every section heading an id so the links work.
- Group my notes under clear headings, in the same order as my text.
- Put key terms in bold and any exam tips in a highlighted box.
- Turn lists of facts that compare things into a small table.
- End with my review questions, each in a click-to-open answer box.
- Make it readable on a phone: large text, no sideways scrolling.
- No external images, no external scripts. Do not change my facts
  and do not add facts that are not in my notes.

NOTES:
(paste your notes here)
Then check the result before you share it:
- Facts: read the page against your own notes. An AI can reword a number or a definition without telling you.
- Contents list: click every link. Each one should land on the matching heading.
- Order: the sections should follow the lecture, not an order the AI chose.
- Phone: make the browser window narrow. Nothing should run off the side.
If a section is wrong, tell the AI which one and what it should say, and ask for the whole page again.
Send it as a link
Paste the code into a NOS document. The page appears as written and its scripts run, so the contents list and the answer boxes work. Choose Create share link. HTML to link walks through it.
Your study partners open the link in a browser, on a computer or a phone, with no account. They can read and click around, but they cannot edit your notes.
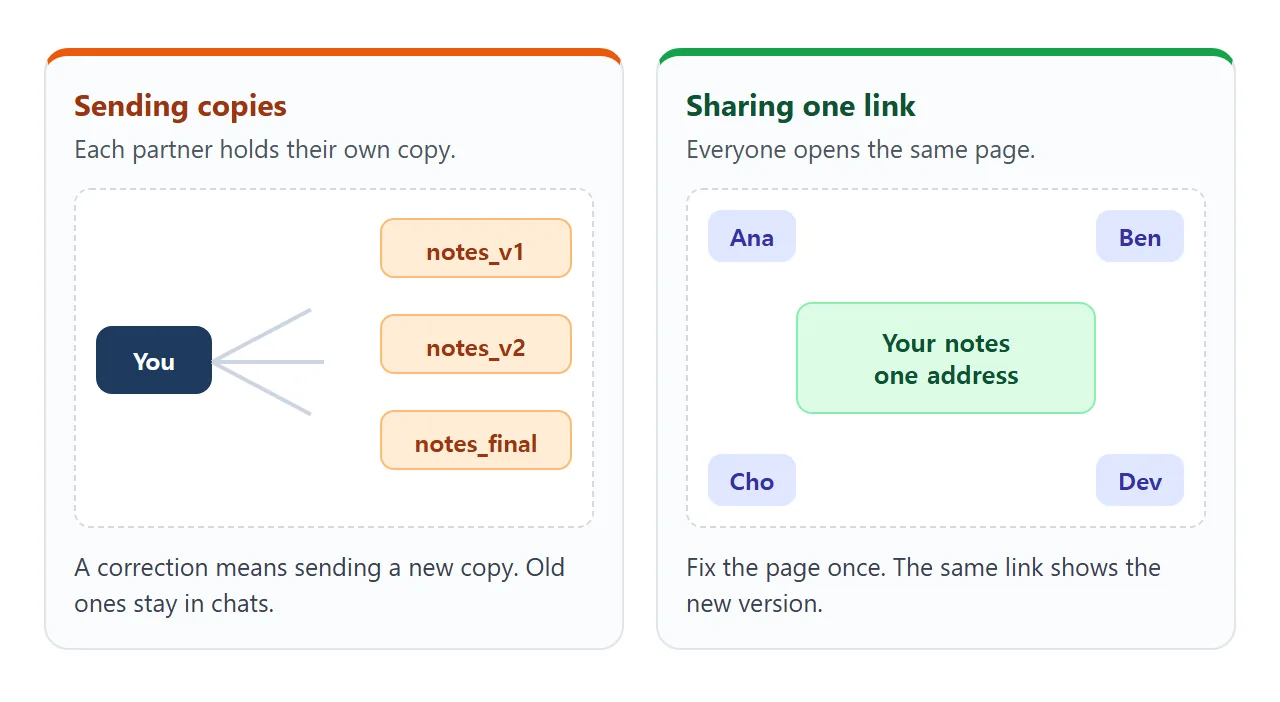
When you add the next lecture, paste the new version into the same document. The link you already sent shows it.
Why one link beats copies of the notes
Photos of notes, a PDF and a file attachment are each a copy. When you fix a mistake, the copies in other people's chats stay wrong.
An HTML file sent as an attachment may also appear as plain text on a phone. Open HTML file on phone explains why. A link avoids both, because there is only one page.
| A file sent to each partner | Share link | |
|---|---|---|
| What each partner holds | Their own copy | The same page as everyone else |
| After you fix a mistake | Send the file again | The same link shows the fix |
| On a phone | An HTML file may show as text | Opens in the browser |
| Contents list that jumps | Only if the file opens as a page | Works on the page |
| Partner needs an account | Depends on where the file is stored | No |
| Partner can edit it | They can change their own copy | No |
Add a checklist and a term search
Once you have a lecture page, a second page can help before an exam. This one lists the topics you have to cover with tick boxes and a progress bar, and a key-terms list you can search.
<!doctype html>
<html lang="en">
<head>
<meta charset="utf-8">
<meta name="viewport" content="width=device-width, initial-scale=1">
<title>Exam review sheet</title>
<style>
* { box-sizing: border-box; }
body { margin: 0; font-family: system-ui, sans-serif; color: #1f2937; background: #f6f7f9; line-height: 1.5; }
.page { max-width: 760px; margin: 0 auto; padding: 18px 16px 40px; }
h1 { font-size: 22px; margin: 0 0 2px; color: #14532d; }
.sub { color: #6b7280; font-size: 14px; margin: 0 0 14px; }
.card { background: #fff; border: 1px solid #e1e4ea; border-radius: 10px; padding: 12px 16px; margin-bottom: 14px; }
h2 { font-size: 16px; margin: 0 0 8px; }
.prog { font-size: 13px; color: #374151; margin: 0 0 8px; }
.bar { height: 8px; background: #e5e7eb; border-radius: 4px; overflow: hidden; margin-bottom: 10px; }
.bar i { display: block; height: 100%; width: 0; background: #16a34a; transition: width .2s; }
.topics label { display: flex; gap: 10px; align-items: center; padding: 8px 4px; border-bottom: 1px solid #f1f5f9; cursor: pointer; font-size: 15px; }
.topics input { width: 20px; height: 20px; flex: none; }
input[type=search] { width: 100%; padding: 10px 12px; font-size: 16px; border: 1px solid #cbd5e1; border-radius: 8px; margin-bottom: 8px; }
dl { margin: 0; }
.term { padding: 8px 0; border-bottom: 1px solid #f1f5f9; }
.term dt { font-weight: 700; color: #14532d; }
.term dd { margin: 2px 0 0; font-size: 14px; }
.none { color: #6b7280; font-size: 14px; display: none; }
</style>
</head>
<body>
<div class="page">
<h1>Midterm review: Intro Biology</h1>
<p class="sub">Made-up course · chapters 1–4</p>
<div class="card topics">
<h2>Topics covered</h2>
<p class="prog" id="prog">0 of 5 done</p>
<div class="bar"><i id="fill"></i></div>
<label><input type="checkbox"> Cell structure</label>
<label><input type="checkbox"> Membrane transport</label>
<label><input type="checkbox"> Enzymes</label>
<label><input type="checkbox"> Photosynthesis</label>
<label><input type="checkbox"> Cellular respiration</label>
</div>
<div class="card">
<h2>Key terms</h2>
<input type="search" id="q" placeholder="Search terms, e.g. ATP" aria-label="Search terms">
<dl id="terms">
<div class="term"><dt>ATP</dt><dd>The molecule that carries energy for most cell work.</dd></div>
<div class="term"><dt>Osmosis</dt><dd>Water moving across a membrane toward the side with more dissolved substances.</dd></div>
<div class="term"><dt>Enzyme</dt><dd>A protein that speeds up one chemical reaction.</dd></div>
<div class="term"><dt>Chloroplast</dt><dd>The part of a plant cell where photosynthesis happens.</dd></div>
<div class="term"><dt>Mitochondrion</dt><dd>The part of a cell where most ATP is made.</dd></div>
<div class="term"><dt>Active transport</dt><dd>Moving a substance across a membrane using energy.</dd></div>
</dl>
<p class="none" id="none">No term matches.</p>
</div>
</div>
<script>
// Progress bar from the ticked boxes
const boxes = document.querySelectorAll('.topics input');
function progress() {
const done = [...boxes].filter((b) => b.checked).length;
document.getElementById('prog').textContent = done + ' of ' + boxes.length + ' done';
document.getElementById('fill').style.width = (done / boxes.length * 100) + '%';
}
boxes.forEach((b) => b.addEventListener('change', progress));
// Filter the terms as you type
const q = document.getElementById('q');
q.addEventListener('input', () => {
const text = q.value.trim().toLowerCase();
let shown = 0;
document.querySelectorAll('.term').forEach((t) => {
const hit = t.textContent.toLowerCase().includes(text);
t.style.display = hit ? '' : 'none';
if (hit) shown++;
});
document.getElementById('none').style.display = shown ? 'none' : 'block';
});
</script>
</body>
</html>
One thing to know: if you tick boxes as the owner in View mode, your ticks are saved.
When a study partner ticks a box on the shared link, it is not saved, so their ticks are gone when they reload. Each partner keeps their own count in their head or on paper.
Where to post the link
The link is plain text, so it goes anywhere text goes. Post it in the group chat, an email or a shared calendar event.
If your teacher runs the class in Google Classroom, its help page for teachers says a Material post can include a link (as of October 2026). Ask them to attach the link instead of a file.
A link can also go into a QR code on paper, see QR code link.
When it does not work
| What you see | Cause | Fix |
|---|---|---|
| A contents link does nothing | The heading has no id, or the id differs from the link | Ask the AI to give every heading an id that matches its link |
| The page runs off the side on a phone | The page has no viewport tag or a fixed wide table | Ask for a mobile friendly layout and check it at narrow width |
| A picture is missing | Pictures from other sites are blocked on the shared page | Ask for diagrams drawn with CSS or inline SVG |
| A fact changed | The AI reworded your notes | Compare with your original and ask it to restore the exact wording |
| Partners still have the old version | They saved a copy instead of using the link | Ask them to open the link again |
| Your partner's ticks vanish | Visitors' changes are not saved | Keep the checklist for your own use, in your own view |
Related reading
Sending the whole course to a group? See send course materials. The same pattern works for other material you hand over: why links beat attachments and share AI generated HTML.