An SVG marker is a small drawing, usually an arrowhead, that the browser places on the points of a line. Draw it once inside a <marker> element and attach it with marker-end, marker-start or marker-mid. With orient="auto", the head follows the line.
Try it first. Click or drag in the box and the curve bends to the pointer, with its head turning as it goes.
<!doctype html>
<html lang="en">
<head>
<meta charset="utf-8">
<meta name="viewport" content="width=device-width, initial-scale=1">
<title>SVG arrow with a marker</title>
<style>
  body { margin: 0; font-family: system-ui, sans-serif; background: #f4f5f7; }
  p { margin: 10px 14px 0; font-size: 14px; color: #444; }
  svg {
    display: block; width: 100%; height: 270px;
    touch-action: none;  /* a finger moves the arrow instead of scrolling */
    cursor: crosshair;
  }
</style>
</head>
<body>
<p>Click or drag anywhere. The arrowhead turns to follow the line.</p>
<svg id="svg">
  <defs>
    <!-- one arrowhead, drawn once in a 10 x 10 box -->
    <marker id="arrow" viewBox="0 0 10 10" refX="10" refY="5"
            markerWidth="6" markerHeight="6" orient="auto">
      <path d="M0 0 L10 5 L0 10 z" fill="#2563eb"/>
    </marker>
  </defs>
  <circle cx="40" cy="200" r="5" fill="#2563eb"/>
  <path id="line" d="M40 200 Q 140 40 260 120" fill="none"
        stroke="#2563eb" stroke-width="3" marker-end="url(#arrow)"/>
</svg>

<script>
  const svg = document.getElementById('svg');
  const line = document.getElementById('line');

  function aim(e) {
    const r = svg.getBoundingClientRect();
    const x = e.clientX - r.left, y = e.clientY - r.top;
    // a curve from the start point to the pointer; the marker sits on its end
    line.setAttribute('d', `M40 200 Q ${(40 + x) / 2} 40 ${x} ${y}`);
  }

  svg.addEventListener('pointerdown', (e) => {
    svg.setPointerCapture(e.pointerId);
    aim(e);
  });
  svg.addEventListener('pointermove', (e) => {
    if (svg.hasPointerCapture(e.pointerId)) aim(e);
  });
</script>
</body>
</html>
The arrowhead is defined once, and every line in the page can reuse it.
The marker element, piece by piece
A marker has its own small drawing space. The arrowhead is drawn in that space, then scaled and moved so that one chosen point lands on the line.
<defs>
  <marker id="arrow" viewBox="0 0 10 10" refX="10" refY="5"
          markerWidth="6" markerHeight="6" orient="auto">
    <path d="M0 0 L10 5 L0 10 z" fill="#2563eb"/>
  </marker>
</defs>
<path d="M40 200 Q 140 40 260 120" fill="none" stroke="#2563eb"
      stroke-width="3" marker-end="url(#arrow)"/>
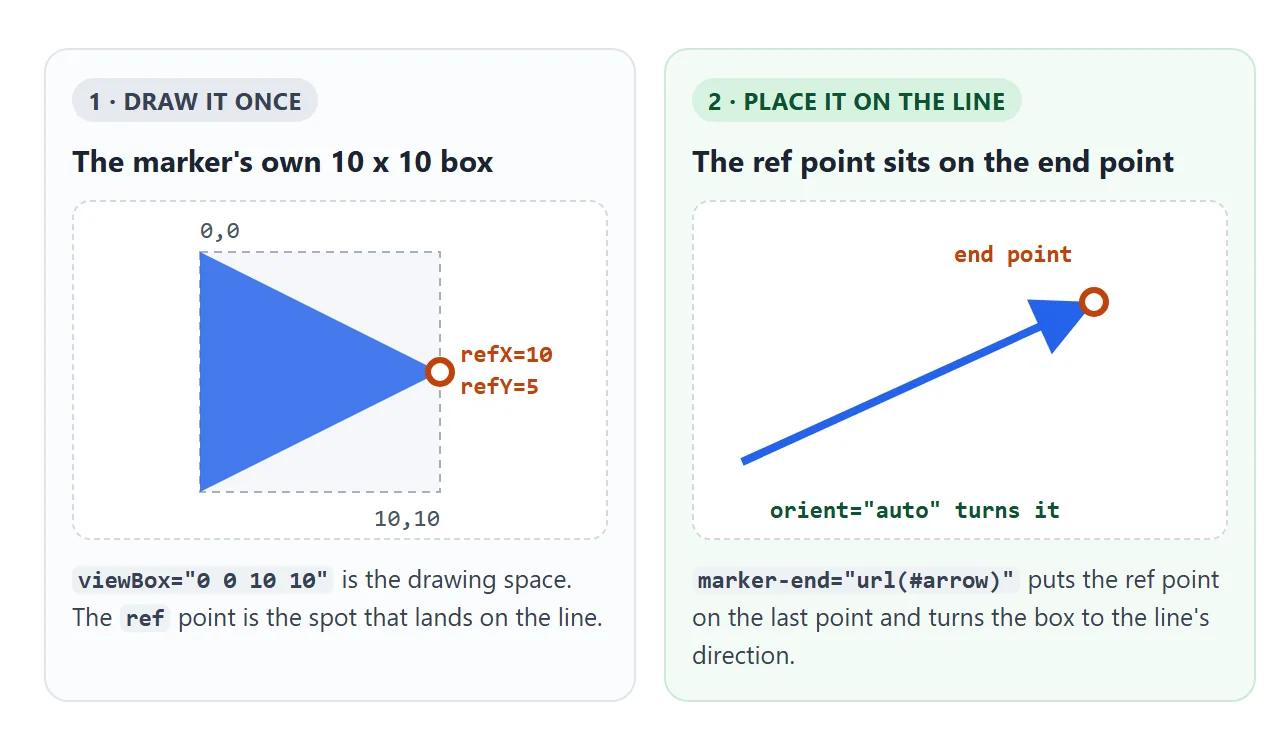
| Attribute | What it sets | In the example |
|---|---|---|
viewBox |
The marker's own drawing space | A 10 by 10 box |
refX, refY |
The point placed on the line | The tip, at 10,5 |
markerWidth, markerHeight |
How big the box is drawn (default 3) | 6 stroke widths |
orient |
How the box is turned (default 0) | Follow the line |
markerUnits |
What the width and height are measured in | Stroke widths (default) |
Put the tip on the ref point. With refX="0", the base of the triangle sits on the end point and the tip overshoots it by the length of the head.
marker-start, marker-mid and marker-end
Three properties decide where the marker goes. The value is always url(#id), pointing at the marker's id.
marker-startdraws it on the first point.marker-enddraws it on the last point.marker-middraws it on every point in between. On a polyline, that is each corner.
Markers only appear on four elements: <path>, <line>, <polyline> and <polygon>. A <rect> or <circle> ignores them, so draw the shape as a path when it needs arrows.
The three can also be set in CSS, and the marker shorthand sets all three at once:
.edge { marker-end: url(#arrow); }
.route { marker: url(#dot); }  /* start, every corner, end */
orient: auto, auto-start-reverse or an angle
By default a marker is not turned at all (orient="0"). An arrow on a line that runs down or left would still point right. orient="auto" turns it to the direction of the path at that point.
The catch comes with a double-headed arrow. auto turns every copy to the direction the path travels, so the head at the start points inward, along the line, instead of out.
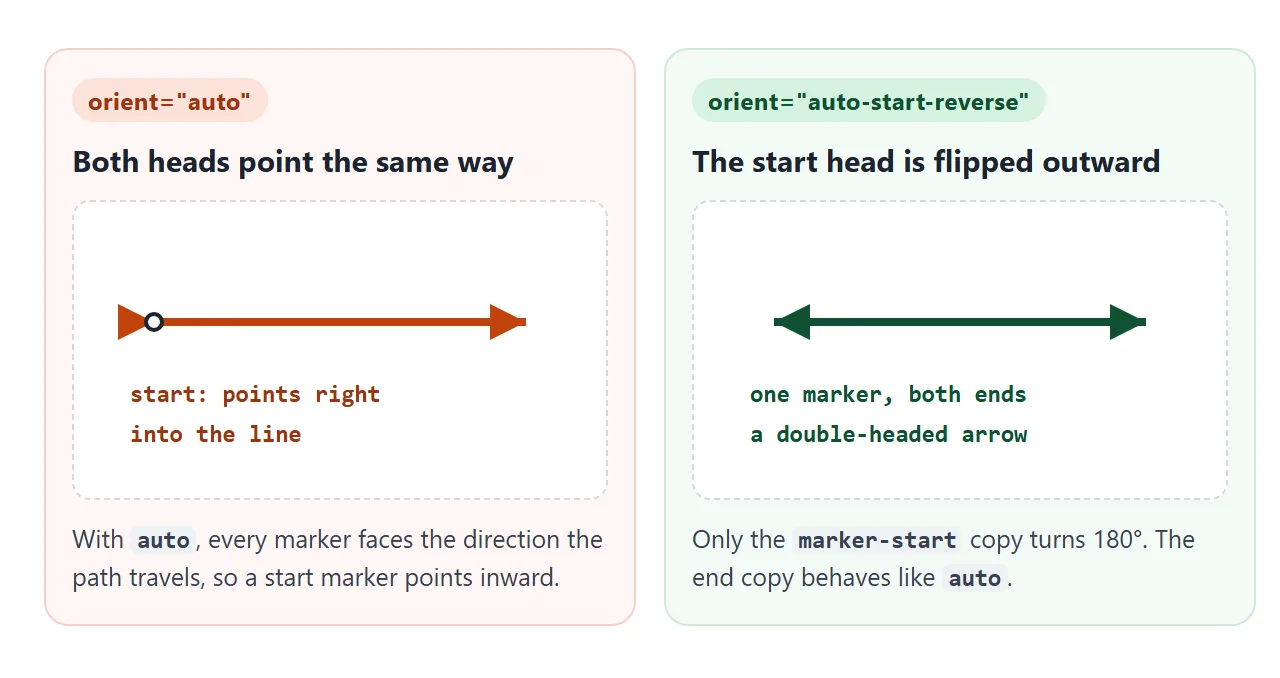
orient="auto-start-reverse" fixes it. The copy drawn by marker-start turns 180 degrees, and the others behave like auto. One marker then serves both ends. A number such as orient="45" fixes the angle in degrees, whatever the line does.
Switch between the options below, and move the stroke-width slider to see the next section at work.
<!doctype html>
<html lang="en">
<head>
<meta charset="utf-8">
<meta name="viewport" content="width=device-width, initial-scale=1">
<title>orient and markerUnits</title>
<style>
  body { margin: 0; padding: 12px 14px; font-family: system-ui, sans-serif; background: #f4f5f7; color: #222; }
  .controls { display: flex; flex-wrap: wrap; gap: 10px 18px; font-size: 14px; }
  label { display: flex; align-items: center; gap: 6px; }
  select, input { font: inherit; }
  svg { display: block; width: 100%; height: 190px; margin-top: 10px; background: #fff; border-radius: 10px; }
  pre { margin: 10px 0 0; padding: 10px; font-size: 12.5px; background: #1f2430; color: #e6e8ee; border-radius: 8px; white-space: pre-wrap; }
</style>
</head>
<body>
<div class="controls">
  <label>orient
    <select id="orient">
      <option>auto</option>
      <option selected>auto-start-reverse</option>
      <option>0</option>
    </select>
  </label>
  <label>markerUnits
    <select id="units">
      <option selected>strokeWidth</option>
      <option>userSpaceOnUse</option>
    </select>
  </label>
  <label>stroke-width <input id="width" type="range" min="1" max="8" value="2"> <span id="wv">2</span></label>
</div>

<svg viewBox="0 0 400 190">
  <defs>
    <marker id="head" viewBox="0 0 10 10" refX="10" refY="5"
            markerWidth="5" markerHeight="5" orient="auto-start-reverse">
      <path d="M0 0 L10 5 L0 10 z" fill="#c2410c"/>
    </marker>
  </defs>
  <!-- the same marker on both ends of both shapes -->
  <line id="a" x1="40" y1="50" x2="360" y2="50" stroke="#c2410c" stroke-width="2"
        marker-start="url(#head)" marker-end="url(#head)"/>
  <path id="b" d="M40 150 C 140 80 260 200 360 120" fill="none" stroke="#c2410c" stroke-width="2"
        marker-start="url(#head)" marker-end="url(#head)"/>
</svg>

<pre id="code"></pre>

<script>
  const head = document.getElementById('head');
  const shapes = [document.getElementById('a'), document.getElementById('b')];
  const orient = document.getElementById('orient');
  const units = document.getElementById('units');
  const width = document.getElementById('width');

  function update() {
    head.setAttribute('orient', orient.value);
    head.setAttribute('markerUnits', units.value);
    // in user units, 5 x 5 would be tiny, so give a size in viewBox units
    const size = units.value === 'userSpaceOnUse' ? 14 : 5;
    head.setAttribute('markerWidth', size);
    head.setAttribute('markerHeight', size);
    shapes.forEach((s) => s.setAttribute('stroke-width', width.value));
    document.getElementById('wv').textContent = width.value;
    document.getElementById('code').textContent =
      `<marker id="head" viewBox="0 0 10 10" refX="10" refY="5"\n` +
      `        markerWidth="${size}" markerHeight="${size}"\n` +
      `        orient="${orient.value}" markerUnits="${units.value}">`;
  }

  [orient, units, width].forEach((el) => el.addEventListener('input', update));
  update();
</script>
</body>
</html>
markerUnits: should the head grow with the line?
markerWidth and markerHeight are measured in stroke widths by default (markerUnits="strokeWidth"). A head of markerWidth="4" on a 2 unit line is 8 units wide. On an 8 unit line it is 32. The arrow keeps its shape relative to the line.
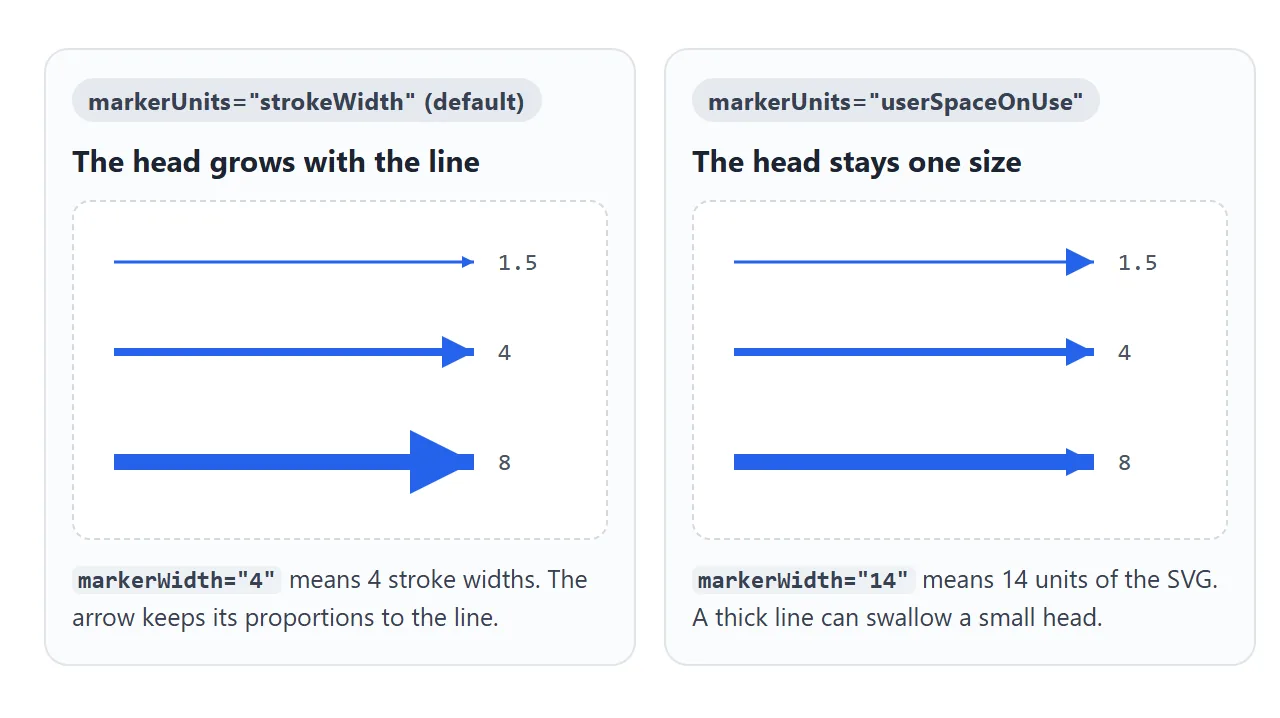
markerUnits="userSpaceOnUse" measures them in the SVG's own units instead. The head stays one size, whatever the stroke. That suits diagrams where lines vary in thickness but arrows should match. Use a larger number, since 4 units is small.
One trade-off: a thick line can then cover a small head.
One marker for every colour: context-stroke
The shapes inside a marker do not inherit from the line that uses it. They inherit from the marker's own ancestors. A blue line with a marker drawn in black gets a black head. The traditional fix is one marker per colour.
SVG 2 added the value context-stroke for fill and stroke. Inside a marker, it means "the stroke of the element this marker is on". We measured it in the three browser engines that Playwright ships, painting a red line with a fill="context-stroke" head:
| Engine | Head colour | Fallback colour kept |
|---|---|---|
| Chromium | Red, same as the line | Not needed |
| Firefox | Red, same as the line | Not needed |
| WebKit (Safari's engine) | Black | Yes, with the CSS below |
The safe pattern is two declarations in CSS. An engine that does not accept context-stroke drops the second one and keeps the first:
.head {
  fill: #555;            /* used where context-stroke is not supported */
  fill: context-stroke;  /* the head takes the colour of the line */
}
In our WebKit test, this gave a grey head instead of a black one. Where the exact colour matters in every browser, keep one marker per colour.
A finished example: a small diagram
This diagram uses two markers for everything. The arrowhead uses auto-start-reverse, so the top line is double headed with the same marker. A ring marker on marker-mid marks each corner of the route. Both use context-stroke, so recolouring a line recolours its head.
<!doctype html>
<html lang="en">
<head>
<meta charset="utf-8">
<meta name="viewport" content="width=device-width, initial-scale=1">
<title>Coloured arrows from one marker</title>
<style>
  body { margin: 0; padding: 12px 14px; font-family: system-ui, sans-serif; background: #f4f5f7; color: #222; }
  svg { display: block; width: 100%; max-width: 520px; margin: 0 auto; background: #fff; border-radius: 10px; }
  .box { fill: #fff; stroke: #cbd2dc; stroke-width: 1.5; }
  text { font-size: 15px; text-anchor: middle; dominant-baseline: middle; }
  .edge { fill: none; stroke-width: 2.5; }
  /* fallback colour first, then context-stroke where it is supported */
  .head { fill: #555; fill: context-stroke; }
  .ring { fill: #fff; stroke: #555; stroke: context-stroke; stroke-width: 2; }
  .swatches { display: flex; gap: 8px; justify-content: center; margin-top: 10px; flex-wrap: wrap; }
  button { font: inherit; font-size: 14px; padding: 6px 12px; border-radius: 8px; border: 1px solid #cbd2dc; background: #fff; cursor: pointer; }
</style>
</head>
<body>
<svg viewBox="0 0 400 320">
  <defs>
    <!-- one arrowhead for every colour -->
    <marker id="arrow" viewBox="0 0 10 10" refX="10" refY="5"
            markerWidth="5" markerHeight="5" orient="auto-start-reverse">
      <path class="head" d="M0 0 L10 5 L0 10 z"/>
    </marker>
    <!-- a small ring for each corner of a route -->
    <marker id="ring" viewBox="0 0 10 10" refX="5" refY="5"
            markerWidth="3" markerHeight="3">
      <circle class="ring" cx="5" cy="5" r="3.5"/>
    </marker>
  </defs>

  <rect class="box" x="20" y="20" width="120" height="50" rx="8"/><text x="80" y="45">Order</text>
  <rect class="box" x="260" y="20" width="120" height="50" rx="8"/><text x="320" y="45">Payment</text>
  <rect class="box" x="20" y="250" width="120" height="50" rx="8"/><text x="80" y="275">Refund</text>
  <rect class="box" x="260" y="250" width="120" height="50" rx="8"/><text x="320" y="275">Shipping</text>

  <!-- double-headed: the same marker on both ends -->
  <line id="e1" class="edge" x1="146" y1="45" x2="254" y2="45" stroke="#2563eb"
        marker-start="url(#arrow)" marker-end="url(#arrow)"/>
  <!-- a route with corners: marker-mid puts a ring on each corner -->
  <polyline id="e2" class="edge" points="320,76 320,130 220,130 220,190 320,190 320,244"
            stroke="#16a34a" marker-mid="url(#ring)" marker-end="url(#arrow)"/>
  <path id="e3" class="edge" d="M258 64 C 180 110 90 170 80 244" stroke="#c2410c"
        marker-end="url(#arrow)"/>
</svg>

<div class="swatches">
  <button data-c="#2563eb">Blue</button>
  <button data-c="#9333ea">Purple</button>
  <button data-c="#db2777">Pink</button>
  <button data-c="#111827">Black</button>
</div>

<script>
  const edges = ['e1', 'e2', 'e3'].map((id) => document.getElementById(id));
  let next = 0;

  // each click recolours the next arrow; the head follows the line colour
  document.querySelectorAll('button').forEach((b) =>
    b.addEventListener('click', () => {
      edges[next % edges.length].setAttribute('stroke', b.dataset.c);
      next++;
    })
  );
</script>
</body>
</html>
- Double head: both ends use the same marker.
- Corners:
marker-midon a<polyline>rings every corner, not the ends. - Placement: each line stops 6 units short of its box, so the tip stays visible.
To lay out boxes and calculate the connections from their positions, see how to build a flowchart in HTML. To animate a line drawing itself before the head appears, see stroke-dasharray.
When it does not work
| What you see | Cause | Fix |
|---|---|---|
| No arrowhead at all | The marker is on a <rect> or <circle> |
Use <path>, <line>, <polyline> or <polygon> |
| No arrowhead, markup looks right | The <marker> sits in an SVG with display: none |
Give that SVG zero width and height instead |
| Arrow points right on every line | orient is missing, so it defaults to 0 |
Add orient="auto" |
| Start head points into the line | orient="auto" on a start marker |
Use auto-start-reverse |
| Head is huge on thick lines | markerUnits is strokeWidth |
Use userSpaceOnUse or a smaller markerWidth |
| Half the head is missing | Its drawing goes outside the viewBox; markers clip it |
Draw inside the box, or widen the viewBox |
| Head is black | The marker does not inherit from the line | Set a fill, or context-stroke with a fallback |
| The line's blunt end shows past the tip | Thick line with the tip exactly on the end point | Move refX back a little, or end the line earlier |
| Another SVG's arrow shows up | Two markers share one id in the page |
Give each marker a unique id |
This one is easy to miss when markers live in a hidden sprite SVG. We tested an SVG with display: none holding the marker, and no engine drew the head. An SVG kept in the page with zero width and height worked in all three.
Share it as a link
A diagram with arrows is easier to send than to describe. A screenshot cannot be recoloured or dragged, and an .html attachment may open as plain code on a phone. A link to the working page keeps it interactive.
To send it, paste the page into a NOS document and choose Create share link. HTML to link walks through it.
The page renders as written and its scripts run, so the people you send it to can drag the arrow and click the colours themselves. If you change the code later, the same link shows the new version.