웹 구성요소는 일반적인 웹사이트의 일부가 아닌 자신만의 HTML 태그를 만들기 위한 브라우저 표준을 의미합니다. 맞춤 요소는 태그를 정의하고, Shadow DOM은 태그에 비공개 마크업과 스타일을 제공하고, 템플릿은 태그를 보유할 수 있습니다.
프레임워크나 빌드 단계가 필요하지 않습니다. customElements.define() 클래스와 마크업의 새 태그가 포함된 하나의 HTML 파일이 작동하는 구성 요소입니다. 아래에서 시도해 보세요.
<!doctype html>
<html lang="en">
<head>
<meta charset="utf-8">
<meta name="viewport" content="width=device-width, initial-scale=1">
<title>A web component in one HTML file</title>
<style>
  body { margin: 0; padding: 18px; font-family: system-ui, sans-serif; background: #f4f5f7; color: #1d2330; }
  /* Page CSS: this turns the page's own button orange,
     but it does not reach the buttons inside each counter. */
  button { background: #f97316; color: #fff; border: 0; border-radius: 8px; padding: 9px 14px; font: inherit; cursor: pointer; }
  #list { display: grid; gap: 10px; margin-bottom: 14px; }
</style>
</head>
<body>
<div id="list">
  <click-counter label="Coffees"></click-counter>
  <click-counter label="Glasses of water" start="2"></click-counter>
</div>
<button id="add">Add another counter</button>

<script>
  class ClickCounter extends HTMLElement {
    constructor() {
      super();                              // always first
      this.attachShadow({ mode: 'open' });  // a private DOM tree with its own CSS
    }

    // Runs when the element is put on the page: read attributes here
    connectedCallback() {
      if (this.shadowRoot.childElementCount) return;  // already built
      let count = Number(this.getAttribute('start')) || 0;

      this.shadowRoot.innerHTML = `
        <style>
          :host { display: flex; align-items: center; gap: 12px;
                  background: #fff; padding: 10px 14px; border-radius: 10px;
                  box-shadow: 0 2px 8px rgba(0,0,0,.08); }
          span { flex: 1; }
          button { background: #e8f0fe; color: #1a56db; border: 0; border-radius: 8px;
                   padding: 8px 14px; font: inherit; font-weight: 600; cursor: pointer; }
          b { min-width: 2ch; text-align: right; font-size: 1.2em; }
        </style>
        <span></span><button>+1</button><b></b>`;

      const out = this.shadowRoot.querySelector('b');
      this.shadowRoot.querySelector('span').textContent = this.getAttribute('label') || 'Clicks';
      out.textContent = count;
      this.shadowRoot.querySelector('button').addEventListener('click', () => {
        out.textContent = ++count;
      });
    }
  }

  // The name must contain a hyphen
  customElements.define('click-counter', ClickCounter);

  // Elements added later work too
  let n = 0;
  document.getElementById('add').addEventListener('click', () => {
    const c = document.createElement('click-counter');
    c.setAttribute('label', 'New counter ' + (++n));
    document.getElementById('list').append(c);
  });
</script>
</body>
</html>
페이지 CSS는 모든 button를 주황색으로 바꾸지만 +1 버튼은 파란색으로 유지됩니다. 해당 버튼은 페이지 선택기가 도달하지 않는 각 카운터의 섀도우 루트에 있습니다.
MDN은 웹 구성 요소를 함께 사용되는 세 가지 기술로 설명합니다. 작동하는 태그를 얻으려면 첫 번째 태그만 필요합니다. 두 번째는 그것을 독립적으로 만드는 것입니다.
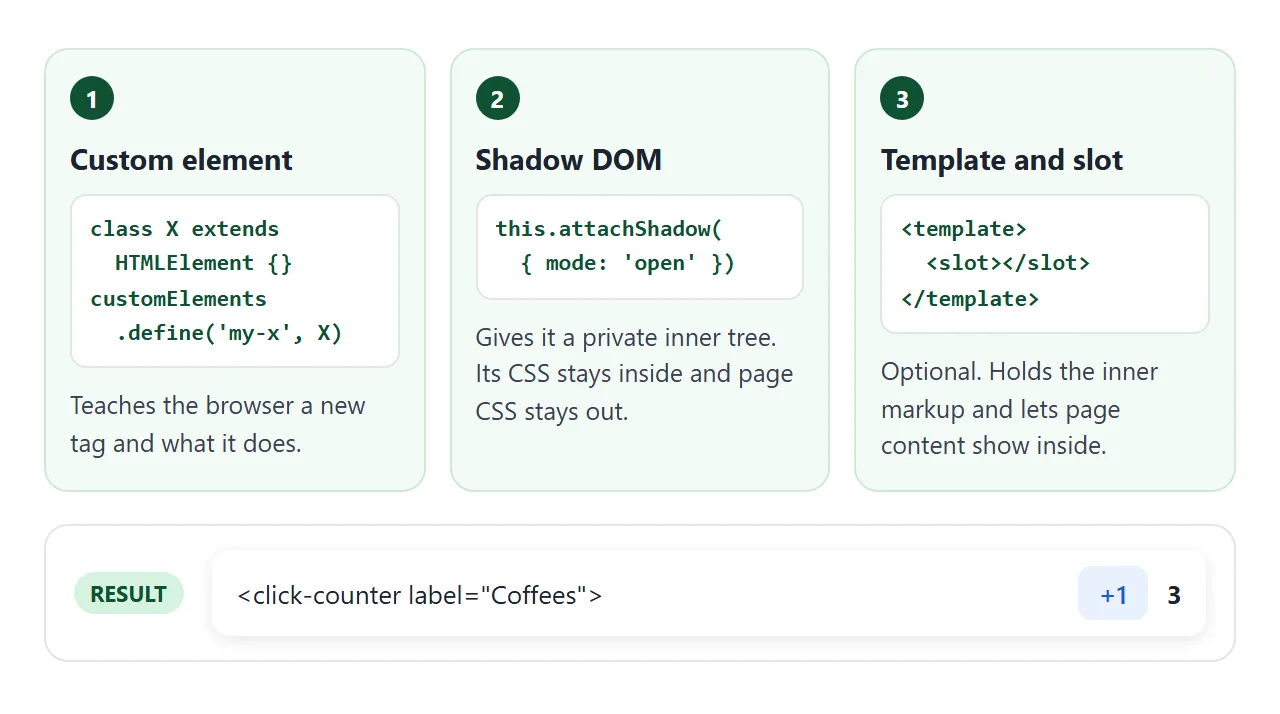
- 커스텀 요소.
extends HTMLElement가customElements.define()라는 태그 이름으로 등록된 클래스입니다. - Shadow DOM.
this.attachShadow({ mode: 'open' })는 개인 트리를 연결합니다. 스타일이 새어나오지 않고 페이지 스타일이 새어 들어오지 않습니다. - 템플릿 및 슬롯. 선택 사항입니다.
<template>는 복제할 마크업을 보유하고<slot>는 구성 요소 내부에 페이지의 하위 항목을 표시합니다. HTML 템플릿 태그는 두 가지를 모두 자세히 다루고 있습니다.
가장 작은 작업 예, 한 줄씩
이것은 스타일이 생략된 위 카운터의 핵심입니다.
<click-counter label="Coffees"></click-counter>

<script>
  class ClickCounter extends HTMLElement {
    constructor() {
      super();
      this.attachShadow({ mode: 'open' });
    }
    connectedCallback() {
      if (this.shadowRoot.childElementCount) return;
      let count = 0;
      this.shadowRoot.innerHTML = '<span></span> <button>+1</button> <b>0</b>';
      this.shadowRoot.querySelector('span').textContent = this.getAttribute('label');
      const out = this.shadowRoot.querySelector('b');
      this.shadowRoot.querySelector('button')
        .addEventListener('click', () => { out.textContent = ++count; });
    }
  }
  customElements.define('click-counter', ClickCounter);
</script>
super()는this를 터치하기 전에 생성자에서 먼저 나타납니다.- **
connectedCallback**는 요소가 페이지에 추가될 때마다 실행됩니다. HTML 표준에서는 생성자가 아닌 여기에서 설정을 수행할 것을 권장하므로 여기에서 속성을 읽습니다. - 가드 라인은 요소가 이동하면 두 번째 빌드를 중지합니다. 요소를 이동하면
connectedCallback가 다시 실행되기 때문입니다. - **
textContent**는 라벨을 일반 텍스트로 입력합니다. 이를innerHTML문자열에 빌드하면 그 안의 모든 마크업이 구문 분석됩니다. innerHTML을 참조하세요.
스크립트는 본문 끝에 위치할 수 있습니다. 페이지에 이미 있는 요소는 define()가 실행될 때 업그레이드되며 나중에 생성된 요소도 작동합니다.
수명 주기 콜백: 코드가 실행될 때
사용자 정의 요소 클래스에는 고정된 이름을 가진 몇 가지 메소드가 있을 수 있습니다. 브라우저는 설정된 순간에 이를 호출합니다.
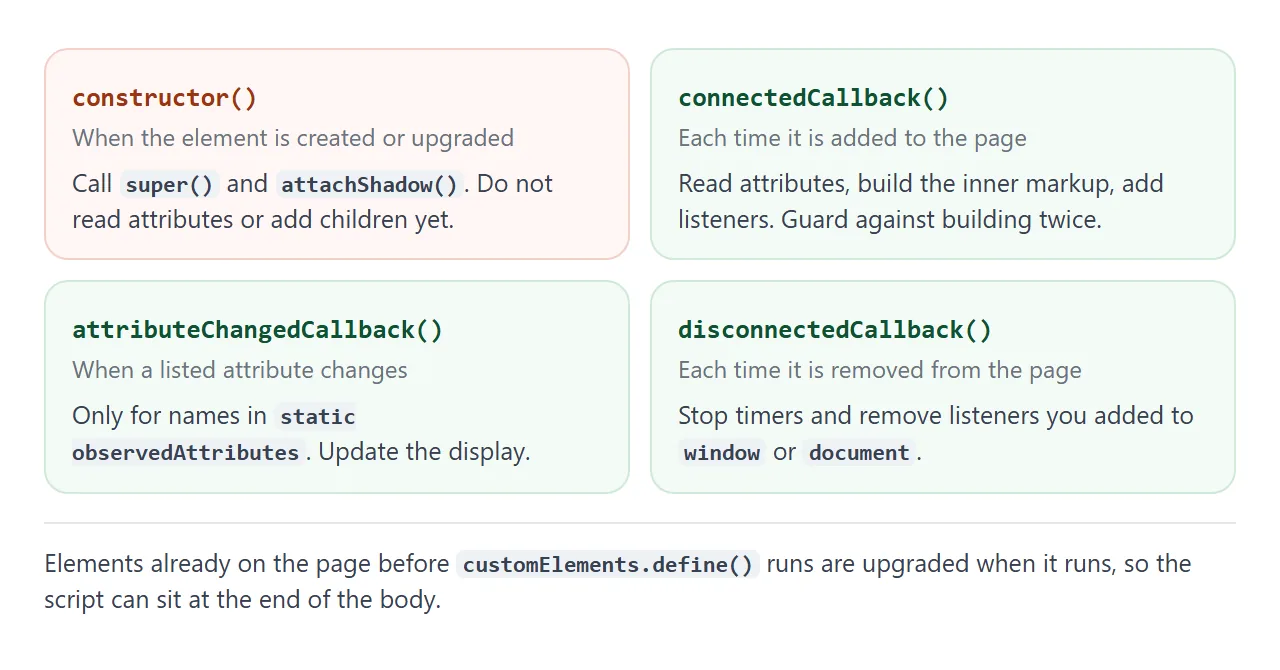
| 콜백 | 실행될 때 | 그것을 사용하여 |
|---|---|---|
constructor() |
요소가 생성되거나 업그레이드되었습니다. | super()를 호출하고 섀도우 루트를 연결합니다. |
connectedCallback() |
페이지에 추가될 때마다 | 속성 읽기, 마크업 작성, 리스너 추가 |
disconnectedCallback() |
제거될 때마다 | 타이머 중지, 외부 청취자 제거 |
attributeChangedCallback() |
나열된 속성이 변경됩니다. | 디스플레이 업데이트 |
adoptedCallback() |
다른 문서로 이동합니다 | 거의 필요하지 않음 |
attributeChangedCallback는 정적 목록에 명명된 속성에 대해서만 실행됩니다. 해당 목록이 없으면 아무 일도 일어나지 않으며 오류도 없습니다.
static observedAttributes = ['value'];
스타일: 그림자 경계를 넘는 것
Shadow DOM은 상속을 위한 벽이 아닌 선택기를 위한 벽입니다. button { ... }와 같은 페이지 규칙은 구성 요소 내부의 요소와 일치하지 않습니다. font-family 및 color와 같은 상속된 값은 여전히 호스트 요소에서 유입됩니다.
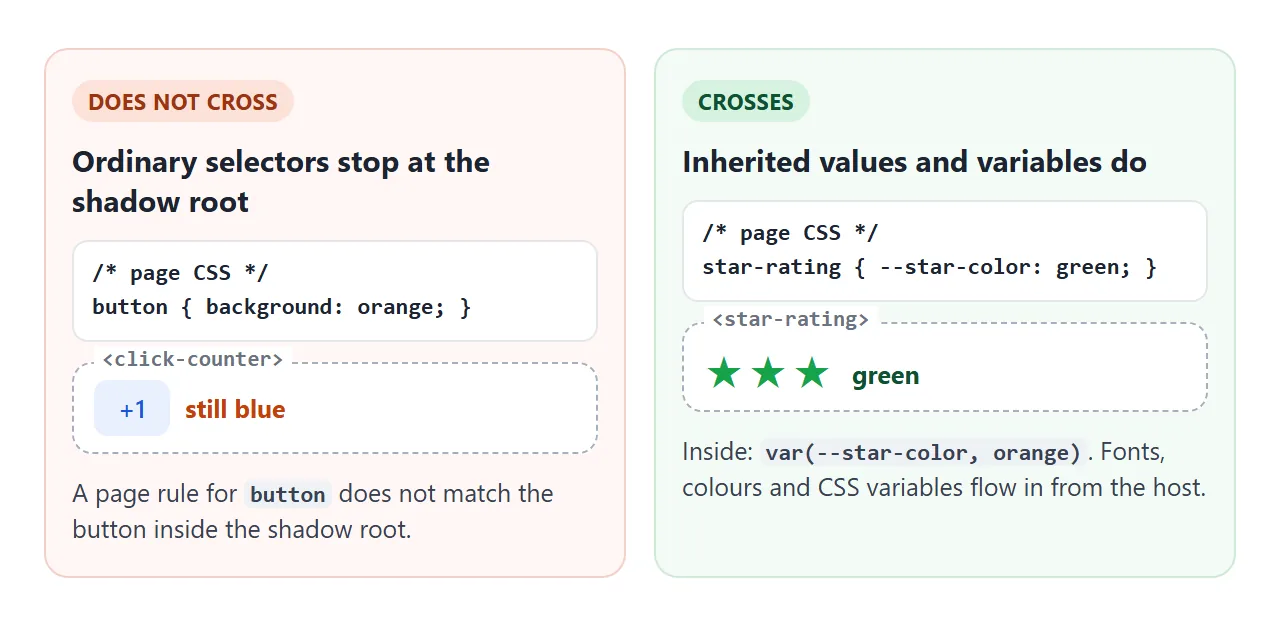
페이지 테마를 구성 요소로 만들려면 다음 문을 사용하세요.
- CSS 변수. 내부에
color: var(--star-color, #f59e0b)를 작성합니다. 페이지는 태그에--star-color를 설정합니다. CSS 변수에서 자세히 알아보세요. ::part().part="label"로 내부 요소를 표시하면 페이지에click-counter::part(label)스타일을 지정할 수 있습니다.:host. 섀도우 CSS 내부에서:host는 사용자 정의 요소 자체의 스타일을 지정합니다(예:display: block).
사용자 정의 요소는 기본적으로 span와 같이 display: inline입니다. 구성요소가 전체 행을 차지해야 하는 경우 :host { display: block; } 또는 flex를 설정하십시오.
CDN의 라이브러리: Lit의 동일한 카운터
웹 구성 요소에는 라이브러리가 필요하지 않지만 일부 사람들은 반복되는 코드를 자르기 위해 라이브러리를 선호합니다. Lit은 그러한 라이브러리 중 하나입니다. 해당 문서에는 <script type="module">와 함께 로드되는 cdn.jsdelivr.net의 기성 번들 목록이 있으므로 단일 HTML 파일에서 작동합니다.
<!doctype html>
<html lang="en">
<head>
<meta charset="utf-8">
<meta name="viewport" content="width=device-width, initial-scale=1">
<title>The same counter with Lit from a CDN</title>
<style>
  body { margin: 0; padding: 18px; font-family: system-ui, sans-serif; background: #f4f5f7; color: #1d2330; }
  #list { display: grid; gap: 10px; }
  /* Until the script has loaded and defined the tag, show it faded */
  lit-counter:not(:defined) { display: block; height: 46px; border-radius: 10px; background: #e5e7eb; }
  p { font-size: 14px; color: #4b5563; }
</style>
</head>
<body>
<div id="list">
  <lit-counter label="Coffees"></lit-counter>
  <lit-counter label="Glasses of water" start="2"></lit-counter>
</div>
<p id="status">Loading Lit 3.3.3 from cdn.jsdelivr.net...</p>

<!-- type="module" is required: the file uses import -->
<script type="module">
  import { LitElement, html, css } from 'https://cdn.jsdelivr.net/gh/lit/dist@3.3.3/core/lit-core.min.js';

  class LitCounter extends LitElement {
    // Reactive properties: changing one re-renders the element
    static properties = {
      label: {},
      count: { type: Number, attribute: 'start' },
    };

    // Lit puts these styles in the shadow root for you
    static styles = css`
      :host { display: flex; align-items: center; gap: 12px;
              background: #fff; padding: 10px 14px; border-radius: 10px;
              box-shadow: 0 2px 8px rgba(0,0,0,.08); }
      span { flex: 1; }
      button { background: #e8f0fe; color: #1a56db; border: 0; border-radius: 8px;
               padding: 8px 14px; font: inherit; font-weight: 600; cursor: pointer; }
      b { min-width: 2ch; text-align: right; font-size: 1.2em; }
    `;

    constructor() {
      super();
      this.label = 'Clicks';
      this.count = 0;
    }

    render() {
      return html`
        <span>${this.label}</span>
        <button @click=${() => this.count++}>+1</button>
        <b>${this.count}</b>`;
    }
  }

  customElements.define('lit-counter', LitCounter);
  document.getElementById('status').textContent = 'Lit 3.3.3 loaded. Same counter, no innerHTML or listeners to wire by hand.';
</script>
</body>
</html>
<script type="module">
  import { LitElement, html, css } from
    'https://cdn.jsdelivr.net/gh/lit/dist@3.3.3/core/lit-core.min.js';

  class LitCounter extends LitElement {
    static properties = { label: {}, count: { type: Number, attribute: 'start' } };
    constructor() { super(); this.label = 'Clicks'; this.count = 0; }
    render() {
      return html`<span>${this.label}</span>
        <button @click=${() => this.count++}>+1</button> <b>${this.count}</b>`;
    }
  }
  customElements.define('lit-counter', LitCounter);
</script>
| 일반 맞춤 요소 | 조명 | |
|---|---|---|
| 추가 다운로드 | 없음 | CDN의 모듈 1개 |
| 다시 렌더링 | DOM을 직접 업데이트합니다. | 반응형 속성을 변경하면 다시 렌더링됩니다. |
| 스타일 | 섀도우 루트의 <style> |
static styles = css |
| 라이센스 | 브라우저 기능 | BSD-3-절 |
@3 대신 정식 버전인 @3.3.3를 고정하면 페이지에서 테스트한 릴리스를 계속 사용하게 됩니다. Lit의 문서에는 npm으로 패키지를 설치하는 경우 이러한 번들 대신 lit 패키지를 사용한다고 나와 있습니다.
두 개의 조명 디테일이 사람들을 사로잡습니다. 스크립트에 type="module"가 필요하거나 import에서 구문 오류가 발생합니다. 그리고 Lit의 문서에서는 반응형 속성과 이름이 같은 클래스 필드가 업데이트를 중지한다고 경고하므로 생성자에서 위와 같이 기본값을 설정하세요.
CDN 스크립트가 로드되는 동안 태그는 여전히 정의되지 않습니다. lit-counter:not(:defined)는 해당 순간에 스타일을 지정하며, 예제에서는 회색 자리 표시자로 사용합니다.
완성된 예: 별점
이 <star-rating>는 관찰된 속성, 사용자 정의 이벤트, 색상에 대한 CSS 변수 등의 조각을 결합합니다. 페이지는 하나의 이벤트를 수신하여 등급을 읽고 속성을 설정하여 등급을 재설정합니다.
<!doctype html>
<html lang="en">
<head>
<meta charset="utf-8">
<meta name="viewport" content="width=device-width, initial-scale=1">
<title>A star-rating web component</title>
<style>
  body { margin: 0; padding: 18px; font-family: system-ui, sans-serif; background: #f4f5f7; color: #1d2330; }
  .row { display: flex; align-items: center; justify-content: space-between; gap: 10px;
         background: #fff; padding: 8px 14px; border-radius: 10px; margin-bottom: 8px; }
  /* CSS variables pass into the shadow root, so the page can theme the stars */
  .row:nth-child(2) star-rating { --star-color: #16a34a; }
  #summary { margin: 12px 0 8px; font-weight: 600; }
  #reset { background: #fff; border: 1px solid #cbd5e1; border-radius: 8px; padding: 8px 14px; font: inherit; cursor: pointer; }
</style>
</head>
<body>
<div class="row">Food <star-rating name="food" value="4"></star-rating></div>
<div class="row">Service <star-rating name="service" value="3"></star-rating></div>
<div class="row">Price <star-rating name="price"></star-rating></div>
<p id="summary" aria-live="polite">Click a star.</p>
<button id="reset">Reset all</button>

<script>
  class StarRating extends HTMLElement {
    // Only attributes listed here trigger attributeChangedCallback
    static observedAttributes = ['value'];

    constructor() {
      super();
      this.attachShadow({ mode: 'open' }).innerHTML = `
        <style>
          :host { display: inline-flex; gap: 2px; }
          button { background: none; border: 0; padding: 2px; font-size: 26px; line-height: 1;
                   cursor: pointer; color: #d1d5db; }
          button.on { color: var(--star-color, #f59e0b); }
        </style>`;
    }

    connectedCallback() {
      if (this.shadowRoot.querySelector('button')) return;  // already built
      for (let i = 1; i <= 5; i++) {
        const b = document.createElement('button');
        b.textContent = '★';
        b.setAttribute('aria-label', i + ' of 5');
        b.addEventListener('click', () => {
          this.setAttribute('value', i);  // goes through attributeChangedCallback
          // bubbles + composed: the event leaves the shadow root and reaches the page
          this.dispatchEvent(new CustomEvent('rating-change', {
            detail: { name: this.getAttribute('name'), value: i },
            bubbles: true, composed: true,
          }));
        });
        this.shadowRoot.append(b);
      }
      this.paint();
    }

    attributeChangedCallback() { this.paint(); }

    paint() {
      const value = Number(this.getAttribute('value')) || 0;
      this.shadowRoot.querySelectorAll('button').forEach((b, i) => {
        b.classList.toggle('on', i < value);
        b.setAttribute('aria-pressed', i < value);
      });
    }
  }
  customElements.define('star-rating', StarRating);

  // The page listens like it would for any other event
  const summary = document.getElementById('summary');
  document.addEventListener('rating-change', (e) => {
    summary.textContent = 'You gave ' + e.detail.name + ' ' + e.detail.value + ' of 5.';
  });

  document.getElementById('reset').addEventListener('click', () => {
    document.querySelectorAll('star-rating').forEach((r) => r.setAttribute('value', 0));
    summary.textContent = 'All ratings reset.';
  });
</script>
</body>
</html>
이벤트는 구성 요소를 페이지의 나머지 부분에 유용하게 만드는 것입니다. 기본적으로 이벤트는 버블링되지 않고 섀도우 루트를 벗어나지 않으므로 두 옵션을 모두 설정합니다.
this.dispatchEvent(new CustomEvent('rating-change', {
  detail: { name: this.getAttribute('name'), value: i },
  bubbles: true,   // travels up through ancestors
  composed: true,  // crosses out of the shadow root
}));
그런 다음 페이지는 document에서 일반 addEventListener를 사용하고 e.detail를 읽습니다.
작동하지 않을 때
| 당신이 보는 것 | 원인 | 수정 |
|---|---|---|
define의 구문 오류 |
이름에 하이픈이 없거나 대문자가 있습니다. | star-rating와 같은 이름을 사용하세요. |
define의 NotSupported오류 |
동일한 이름이 두 번 정의되었습니다. | 한 번 정의하거나 customElements.get(name)를 먼저 확인하세요. |
| 태그 이후의 모든 내용은 태그 안에 포함됩니다. | <my-tag />로 작성됨 |
<my-tag></my-tag> 쓰기 |
createElement로 만든 요소의 속성은 null입니다. |
설정되기 전에 생성자에서 읽습니다. | connectedCallback에서 읽어보세요. |
| 속성을 변경해도 아무 일도 일어나지 않습니다 | 이름이 observedAttributes에 없습니다. |
정적 목록에 추가하세요. |
| 페이지 CSS는 내부에 영향을 미치지 않습니다. | 선택기는 섀도우 루트에서 중지됩니다. | CSS 변수 또는 ::part() 사용 |
| 페이지는 이벤트를 듣지 못합니다. | bubbles 및 composed가 꺼져 있습니다. |
둘 다 true로 설정 |
모듈 외부의 import에 대한 구문 오류 |
일반 <script>에서 CDN 가져오기 |
<script type="module"> 사용 |
| 태그에는 전혀 아무것도 표시되지 않습니다. | define 이전에 스크립트가 실패했습니다. |
콘솔을 확인하세요. HTML JavaScript가 작동하지 않음을 참조하세요. |
두 번 실행될 수 있는 스크립트에 대한 한 번 정의 검사:
if (!customElements.get('star-rating')) {
  customElements.define('star-rating', StarRating);
}
링크로 공유하세요
구성 요소는 설명하는 것보다 시도해 보는 것이 더 쉽습니다. 스크린샷을 클릭할 수 없으며 .html 첨부 파일이 휴대폰에서 일반 텍스트로 열릴 수 있습니다.
작업 버전을 보내려면 페이지를 NOS 문서에 붙여넣고 공유 링크 만들기를 선택하세요. 링크할 HTML이 이를 안내합니다.
페이지는 작성된 대로 렌더링되고 스크립트가 실행되므로 사람들은 계정 없이도 별표를 직접 클릭할 수 있습니다. 고정된 Lit 번들과 같은 cdn.jsdelivr.net의 스크립트도 로드됩니다.
나중에 코드를 변경하면 동일한 링크에 새 버전이 표시됩니다.