The <template> tag holds HTML that the browser parses but does not show. Nothing inside it is drawn, its images do not load and its scripts do not run.
To use it, copy its content with template.content.cloneNode(true), fill the copy with data and append it to the page.
Try it. The three rows below come from a JavaScript array and one template. Add your own items and remove any row.
<!doctype html>
<html lang="en">
<head>
<meta charset="utf-8">
<meta name="viewport" content="width=device-width, initial-scale=1">
<title>Rows from a template</title>
<style>
  body { margin: 0; padding: 14px; font-family: system-ui, sans-serif; background: #f4f5f7; color: #1d2330; }
  form { display: flex; gap: 8px; margin-bottom: 12px; }
  input { flex: 1; min-width: 0; font: 15px system-ui, sans-serif; padding: 8px 10px; border: 1px solid #c9ced6; border-radius: 8px; }
  button { font: 14px system-ui, sans-serif; padding: 8px 12px; border-radius: 8px; border: 1px solid #c9ced6; background: #fff; cursor: pointer; }
  form button { background: #1d4ed8; border-color: #1d4ed8; color: #fff; }
  ul { list-style: none; margin: 0; padding: 0; display: grid; gap: 6px; }
  li { display: flex; align-items: center; gap: 10px; background: #fff; border-radius: 10px; padding: 8px 10px 8px 14px; }
  .name { flex: 1; font-weight: 600; }
  .qty { font-size: 13px; color: #6b7280; }
  .remove { padding: 4px 9px; font-size: 13px; }
  #count { font-size: 13px; color: #6b7280; margin: 10px 2px 0; }
</style>
</head>
<body>
<form id="add">
  <input id="item" placeholder="Add an item, e.g. Coffee" autocomplete="off">
  <button>Add</button>
</form>

<ul id="list"></ul>
<p id="count"></p>

<!-- Not shown on the page. It is a stamp for one row. -->
<template id="row">
  <li>
    <span class="name"></span>
    <span class="qty"></span>
    <button class="remove" type="button">Remove</button>
  </li>
</template>

<script>
  const items = [
    { name: 'Milk', qty: 2 },
    { name: 'Eggs', qty: 12 },
    { name: 'Bread', qty: 1 },
  ];
  const list = document.querySelector('#list');
  const tpl = document.querySelector('#row');

  function addRow(item) {
    const row = tpl.content.cloneNode(true);             // copy the template's content
    row.querySelector('.name').textContent = item.name;  // fill it with data
    row.querySelector('.qty').textContent = 'x ' + item.qty;
    list.append(row);                                    // now it is on the page
  }

  function showCount() {
    document.querySelector('#count').textContent = list.children.length + ' rows on the page';
  }

  items.forEach(addRow);
  showCount();

  document.querySelector('#add').addEventListener('submit', (e) => {
    e.preventDefault();
    const input = document.querySelector('#item');
    if (!input.value.trim()) return;
    addRow({ name: input.value.trim(), qty: 1 });
    input.value = '';
    showCount();
  });

  // one listener on the list handles every Remove button, old and new
  list.addEventListener('click', (e) => {
    if (!e.target.matches('.remove')) return;
    e.target.closest('li').remove();
    showCount();
  });
</script>
</body>
</html>
The row markup is written once, in HTML, where it is easy to read and style. JavaScript only copies it and puts text into the empty spots.
How template, content and cloneNode fit together
A template has two parts: the <template> element itself, which stays hidden in the page, and its content property. The content is a document fragment, a small separate tree that holds the markup.
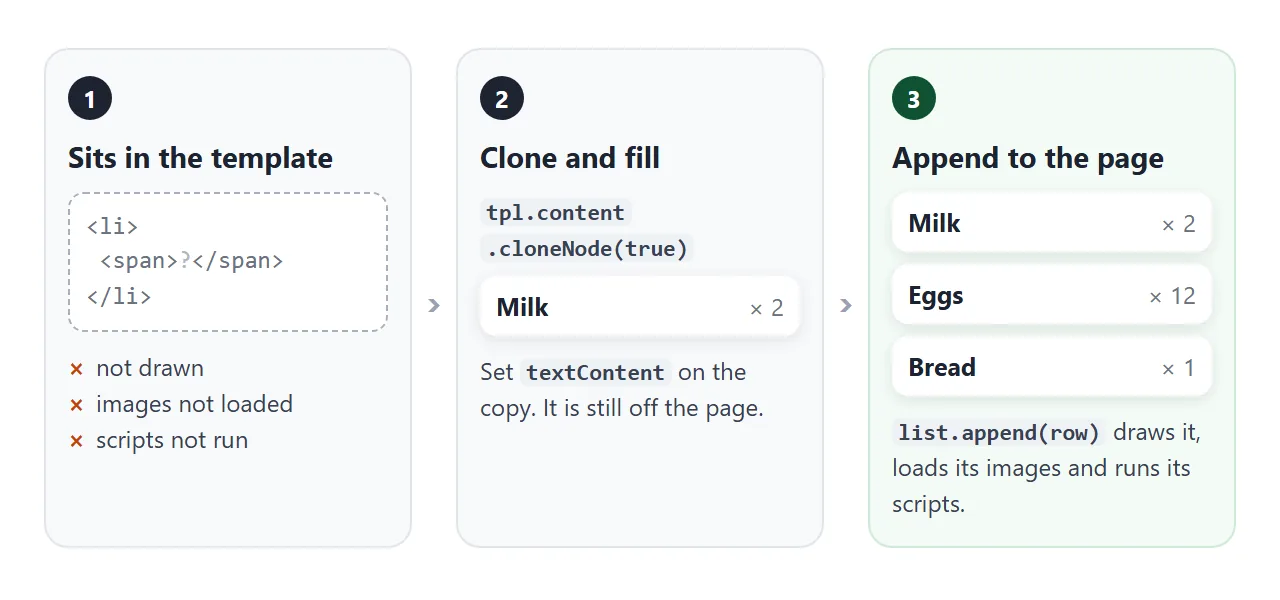
- Write the markup. Put one row inside
<template id="row">, with empty spots for the data. - Clone the content.
tpl.content.cloneNode(true)returns a fresh fragment. Thetruecopies all the children, not only the top element. - Fill the copy. Call
querySelectoron the copy and settextContenton each spot. - Append it. Appending the fragment moves its children onto the page.
<ul id="list"></ul>

<template id="row">
  <li><span class="name"></span> <span class="qty"></span></li>
</template>

<script>
  const tpl = document.querySelector('#row');
  const list = document.querySelector('#list');

  [{ name: 'Milk', qty: 2 }, { name: 'Eggs', qty: 12 }].forEach((item) => {
    const row = tpl.content.cloneNode(true);
    row.querySelector('.name').textContent = item.name;
    row.querySelector('.qty').textContent = 'x ' + item.qty;
    list.append(row);
  });
</script>
document.importNode(tpl.content, true) does the same job. Either one is fine.
Filling each copy with data
Set values with textContent, not by building an HTML string. textContent shows whatever the user typed as plain text, so typing <b>Coffee</b> in the first example adds a row that reads <b>Coffee</b>. innerHTML would parse it as markup instead.
Fill the copy before you append it. After list.append(row), the fragment is empty, because its children moved to the list. A row.querySelector(...) on the next line returns null.
If you need the new element afterwards, keep a reference first:
const row = tpl.content.cloneNode(true);
const li = row.querySelector('li');  // grab it while it is in the fragment
list.append(row);
li.classList.add('new');             // li is now on the page
For buttons inside the rows, one listener on the list catches clicks from every row, including rows added later. The first example removes rows this way with addEventListener and closest('li').
What inert means: nothing draws, loads or runs
The HTML standard calls template content inert. The parser builds it into elements, but they belong to a separate document with no window. That is why nothing happens until a copy is inserted.
The template below holds an image and a <script>. Watch the counters as you insert copies.
<!doctype html>
<html lang="en">
<head>
<meta charset="utf-8">
<meta name="viewport" content="width=device-width, initial-scale=1">
<title>Template content is inert</title>
<style>
  body { margin: 0; padding: 14px; font-family: system-ui, sans-serif; background: #f4f5f7; color: #1d2330; }
  .btns { display: flex; flex-wrap: wrap; gap: 8px; margin-bottom: 12px; }
  button { font: 14px system-ui, sans-serif; padding: 8px 12px; border-radius: 8px; border: 1px solid #c9ced6; background: #fff; cursor: pointer; }
  #stamp { background: #1d4ed8; border-color: #1d4ed8; color: #fff; }
  .nums { display: grid; grid-template-columns: repeat(3, 1fr); gap: 8px; margin-bottom: 12px; }
  .num { min-width: 0; background: #fff; border-radius: 8px; padding: 8px 4px; text-align: center; font-size: 12.5px; line-height: 1.3; overflow-wrap: anywhere; }
  .num b { display: block; font-size: 26px; }
  .num code { font-size: 11px; }
  #page { display: flex; flex-wrap: wrap; gap: 8px; min-height: 60px; padding: 10px; border: 2px dashed #c9ced6; border-radius: 10px; background: #fff; }
  #page:empty::before { content: 'Nothing here yet. The template is on the page, but hidden.'; color: #6b7280; font-size: 13px; }
  .badge { display: flex; align-items: center; gap: 6px; padding: 5px 9px 5px 5px; border-radius: 99px; background: #eef2ff; font-size: 13px; }
  .badge img { width: 28px; height: 28px; border-radius: 50%; }
</style>
</head>
<body>
<div class="btns">
  <button id="stamp">Clone and insert</button>
  <button id="clear">Clear</button>
</div>

<div class="nums">
  <div class="num"><b id="inTpl">0</b>images in<br><code>template.content</code></div>
  <div class="num"><b id="inDoc">0</b>images in<br><code>document</code></div>
  <div class="num"><b id="runs">0</b>times the script<br>inside ran</div>
</div>

<div id="page"></div>

<template id="badge">
  <div class="badge">
    <img alt="" src="data:image/svg+xml,%3Csvg xmlns='http://www.w3.org/2000/svg' viewBox='0 0 28 28'%3E%3Crect width='28' height='28' fill='%2316a34a'/%3E%3Ccircle cx='14' cy='11' r='5' fill='%23fff'/%3E%3Cpath d='M5 26c1-6 5-8 9-8s8 2 9 8' fill='%23fff'/%3E%3C/svg%3E">
    <span>Stamped</span>
  </div>
  <script>
    // runs once per inserted copy, never while it sits in the template
    window.stampRuns = (window.stampRuns || 0) + 1;
    document.querySelector('#runs').textContent = window.stampRuns;
  </script>
</template>

<script>
  const tpl = document.querySelector('#badge');
  const page = document.querySelector('#page');

  function count() {
    // document.querySelectorAll does not look inside a template
    document.querySelector('#inDoc').textContent = document.querySelectorAll('img').length;
    document.querySelector('#inTpl').textContent = tpl.content.querySelectorAll('img').length;
  }

  document.querySelector('#stamp').addEventListener('click', () => {
    page.append(tpl.content.cloneNode(true));
    count();
  });

  document.querySelector('#clear').addEventListener('click', () => {
    page.replaceChildren();
    count();
  });

  count();
</script>
</body>
</html>
In template.content |
A copy appended to the page | |
|---|---|---|
| Drawn on screen | No | Yes |
| Images | Not loaded | Loaded |
| Scripts | Not run | Run once per copy |
Found by document.querySelector |
No | Yes |
Found by tpl.content.querySelector |
Yes | No |
This makes a template a safe place to keep markup you may never use, such as an empty-state message or a row for a rare case. It costs no image downloads until it is needed.
Clearing the inserted copies does not undo their scripts. The counter in the example stays where it was, because each script ran when it was inserted.
Clone template.content, not the template
An easy mistake is one missing word. tpl.cloneNode(true) copies the <template> element itself, and the copy is just another hidden template.
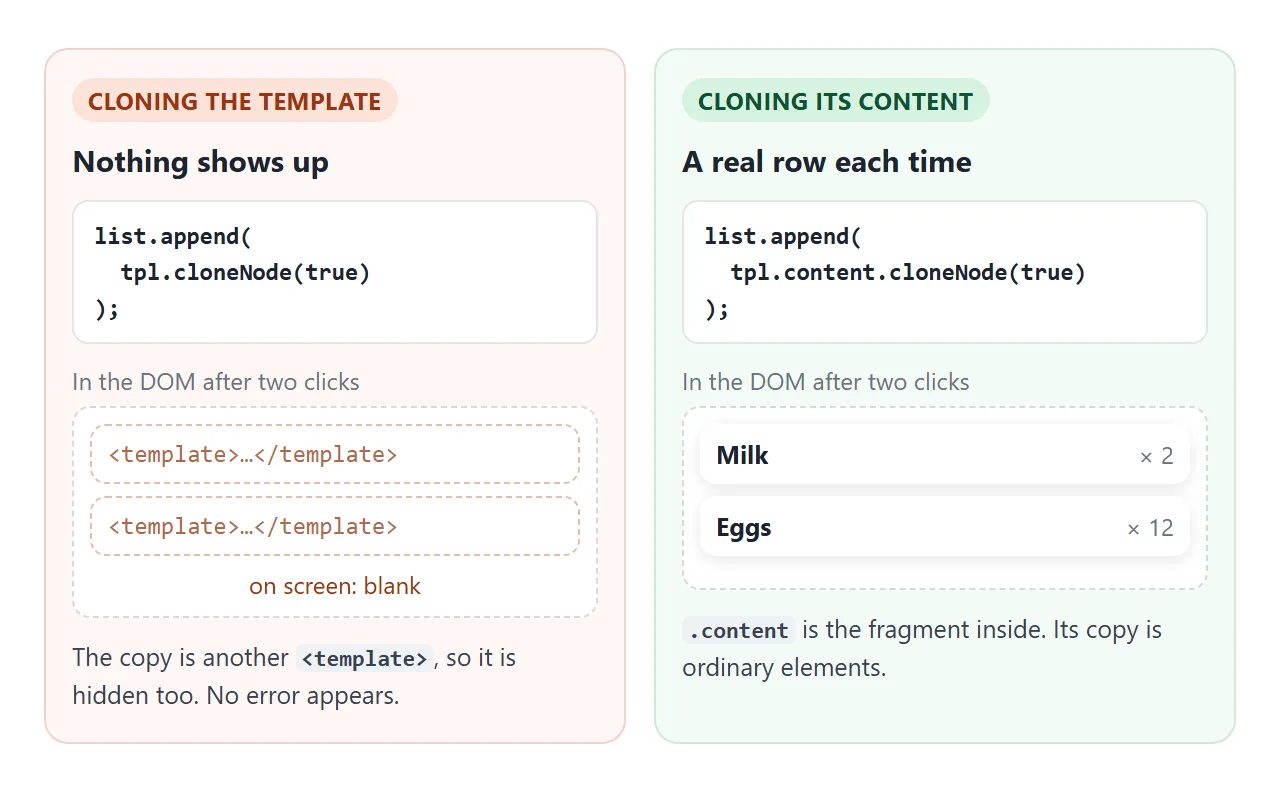
No error appears. In the browser's developer tools the copies show up as <template> elements with the markup tucked inside them, but the page stays blank. Add .content and the rows show up.
The same split explains the second surprise. document.querySelector('.name') never finds anything inside a template, because the template's children are not in the page's tree. Search tpl.content instead. Read more on how the page's tree works in the DOM in JavaScript and querySelector.
Slots: filling a custom element from the outside
Templates are also how web components usually carry their inner markup. A custom element can have a shadow root, a private DOM tree attached to it. Page CSS does not reach inside, and the element's own CSS does not leak out.
A <slot> in that shadow root is a placeholder. The element's normal children, written on the page, are shown in the slots.
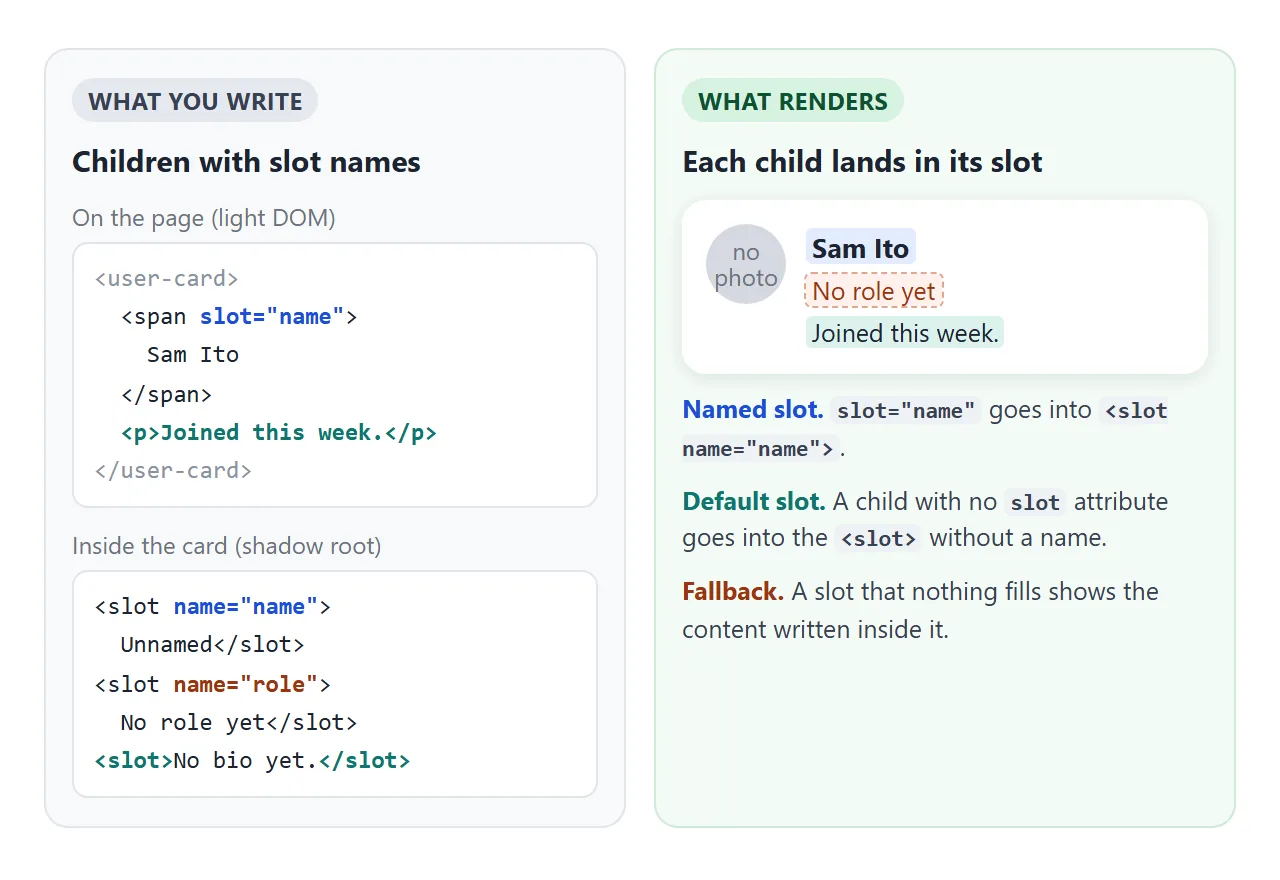
- Named slot:
<slot name="role">shows the child that hasslot="role". - Default slot: a
<slot>without a name takes every child that has noslotattribute. - Fallback content: whatever is written inside a slot shows only when nothing fills it.
<slot name="role">No role yet</slot>reads "No role yet" until a role is given.
The slotted children stay in the page's DOM. They only appear inside the card.
A finished example: a user-card element
This <user-card> has named slots for the avatar, name and role, a default slot for the bio, and fallback text for each. The second and third cards leave some slots empty. Add a card with a name only and every other slot falls back.
<!doctype html>
<html lang="en">
<head>
<meta charset="utf-8">
<meta name="viewport" content="width=device-width, initial-scale=1">
<title>user-card custom element with slots</title>
<style>
  body { margin: 0; padding: 14px; font-family: system-ui, sans-serif; background: #f4f5f7; color: #1d2330; }
  .cards { display: grid; grid-template-columns: repeat(auto-fill, minmax(220px, 1fr)); gap: 10px; }
  form { display: flex; gap: 8px; margin-top: 12px; }
  input { flex: 1; min-width: 0; font: 15px system-ui, sans-serif; padding: 8px 10px; border: 1px solid #c9ced6; border-radius: 8px; }
  button { font: 14px system-ui, sans-serif; padding: 8px 12px; border-radius: 8px; border: 1px solid #1d4ed8; background: #1d4ed8; color: #fff; cursor: pointer; }
  /* page styles still reach slotted content: it lives in the page */
  user-card p { margin: 0; }
</style>
</head>
<body>

<div class="cards" id="cards">
  <user-card>
    <svg slot="avatar" viewBox="0 0 48 48"><rect width="48" height="48" fill="#7c3aed"/><text x="24" y="31" font-size="20" text-anchor="middle" fill="#fff" font-family="system-ui">MK</text></svg>
    <span slot="name">Mina Kang</span>
    <span slot="role">Product designer</span>
    <p>Runs the Thursday design review.</p>
  </user-card>

  <user-card>
    <span slot="name">Leo Park</span>
    <span slot="role">Support lead</span>
  </user-card>

  <user-card>
    <span slot="name">Sam Ito</span>
    <p>Joined this week.</p>
  </user-card>
</div>

<form id="add">
  <input id="who" placeholder="Name for a new card" autocomplete="off">
  <button>Add card</button>
</form>

<!-- The card's inside: private markup and styles for the shadow root -->
<template id="user-card-tpl">
  <style>
    :host { display: flex; gap: 12px; padding: 14px; border-radius: 12px; background: #fff; box-shadow: 0 2px 10px rgba(0, 0, 0, .08); }
    .avatar { flex: none; width: 48px; height: 48px; border-radius: 50%; overflow: hidden; background: #d5d9e0; display: grid; place-items: center; color: #6b7280; font-size: 11px; line-height: 1.1; text-align: center; }
    ::slotted(svg) { width: 48px; height: 48px; display: block; }
    .name { font-weight: 700; }
    .role { font-size: 13px; color: #1d4ed8; margin: 2px 0 6px; }
    .bio { font-size: 13.5px; color: #374151; }
  </style>
  <div class="avatar"><slot name="avatar">no photo</slot></div>
  <div>
    <div class="name"><slot name="name">Unnamed</slot></div>
    <div class="role"><slot name="role">No role yet</slot></div>
    <div class="bio"><slot>No bio yet.</slot></div>
  </div>
</template>

<script>
  class UserCard extends HTMLElement {
    constructor() {
      super();
      const tpl = document.querySelector('#user-card-tpl');
      this.attachShadow({ mode: 'open' })            // a private DOM for this card
          .append(tpl.content.cloneNode(true));      // filled from the template
    }
  }
  // the name must contain a hyphen, and can be defined only once
  if (!customElements.get('user-card')) customElements.define('user-card', UserCard);

  document.querySelector('#add').addEventListener('submit', (e) => {
    e.preventDefault();
    const input = document.querySelector('#who');
    if (!input.value.trim()) return;
    const card = document.createElement('user-card');
    const name = document.createElement('span');
    name.slot = 'name';
    name.textContent = input.value.trim();   // textContent, so a typed <b> stays text
    card.append(name);                        // no role, no avatar, no bio: fallbacks show
    document.querySelector('#cards').append(card);
    input.value = '';
  });
</script>
</body>
</html>
The JavaScript part is short:
class UserCard extends HTMLElement {
  constructor() {
    super();
    const tpl = document.querySelector('#user-card-tpl');
    this.attachShadow({ mode: 'open' })
        .append(tpl.content.cloneNode(true));
  }
}
customElements.define('user-card', UserCard);
class ... extends HTMLElementmakes a new kind of element.super()must come first in the constructor.attachShadow({ mode: 'open' })creates the private tree.openlets outside code reach it ascard.shadowRoot.customElements.defineties the tag name to the class. Every<user-card>on the page, including ones added later, gets upgraded.
Styling across the shadow boundary
- A
<style>inside the shadow root styles only the card.:hosttargets the<user-card>element itself. - Page CSS does not match elements inside the shadow root. Inherited properties such as
colorandfont-familystill flow in, and so do CSS variables. - Slotted children are styled by the page, because they live there. From inside,
::slotted(svg)styles them. It only matches the slotted element itself, not elements nested inside it.
Declarative Shadow DOM, briefly
A shadow root can also be written in plain HTML, with no JavaScript:
<user-card>
  <template shadowrootmode="open">
    <slot name="name">Unnamed</slot>
  </template>
  <span slot="name">Mina Kang</span>
</user-card>
The parser turns that template into the element's shadow root as the page loads. It only happens when the HTML parser reads the page.
Setting the same string with innerHTML leaves an ordinary template behind and no shadow root. For pages built in the browser, the attachShadow version above is the one to reach for.
When it does not work
| What you see | Cause | Fix |
|---|---|---|
| Nothing appears, and there is no error | Cloned the template instead of its content | tpl.content.cloneNode(true) |
querySelector returns null for an element in the template |
document does not search template content |
tpl.content.querySelector(...) |
row.querySelector returns null after appending |
Appending emptied the fragment | Fill the copy before append, or keep a reference |
| Page CSS does not style the inside of a custom element | Shadow DOM keeps page selectors out | Style it from the shadow <style>, or pass values with CSS variables |
::slotted(p span) matches nothing |
::slotted only takes the slotted element |
Style nested parts from the page CSS |
SyntaxError from customElements.define |
The name has no hyphen, such as card |
Use a name like user-card |
NotSupportedError: name already used |
define ran twice, for example the script is included twice |
Check customElements.get('user-card') first |
| A slot shows its fallback although the child is there | The slot value does not match the slot's name |
Make the two strings match exactly |
Share it as a link
Templates and custom elements are built by the script when the page opens, so a screenshot shows only one moment of them. Sent as an .html attachment, the file may open as plain code on a phone.
To send the working version, paste the page into a NOS document and choose Create share link. HTML to link walks through it.
The page renders as written and its scripts run, so the people you send it to can add rows and cards themselves. If you change the code later, the same link shows the new version.