The DOM (Document Object Model) is the page as the browser holds it in memory: a tree of objects built from your HTML. Each tag becomes an element object, each run of text becomes a text node.
JavaScript does not edit the HTML file. It changes this tree, and the screen redraws to match.
Try it. The panel on the right walks the tree and prints one line per node. Add and remove items, and watch the tree change while the source stays the same.
<!doctype html>
<html lang="en">
<head>
<meta charset="utf-8">
<meta name="viewport" content="width=device-width, initial-scale=1">
<title>Live DOM tree viewer</title>
<style>
body { margin: 0; padding: 12px; font-family: system-ui, sans-serif; background: #f4f5f7; color: #1d2330; }
#stage { background: #fff; border-radius: 10px; padding: 4px 14px; height: 116px; overflow: auto; font-size: 14px; }
#stage .done { text-decoration: line-through; color: #8a93a3; }
.bar { display: flex; flex-wrap: wrap; gap: 6px; margin: 10px 0; align-items: center; }
button { font: 600 13px system-ui, sans-serif; padding: 7px 10px; border: 1px solid #cfd5de; border-radius: 8px; background: #fff; cursor: pointer; }
label { font-size: 13px; }
.panels { display: grid; grid-template-columns: 1fr 1fr; gap: 8px; }
h3 { margin: 0 0 4px; font-size: 12px; text-transform: uppercase; letter-spacing: .4px; color: #6b7280; }
pre { margin: 0; height: 190px; overflow: auto; padding: 8px 10px; border-radius: 8px; font: 12px/1.45 ui-monospace, Consolas, monospace; }
#source { background: #fff; border: 1px solid #e1e4ea; }
#tree { background: #10231a; color: #c7f2d4; }
</style>
</head>
<body>
<div id="stage"></div>
<div class="bar">
<button id="add">append <li></button>
<button id="remove">remove first <li></button>
<button id="toggle">toggle .done</button>
<label><input type="checkbox" id="ws"> show whitespace text</label>
</div>
<div class="panels">
<div><h3>HTML source (never changes)</h3><pre id="source"></pre></div>
<div><h3>Live DOM tree</h3><pre id="tree"></pre></div>
</div>
<script>
// The source leaves out every </li> and </p>. The parser adds them.
const SOURCE = '<ul id="list">\n <li>Milk\n <li class="done">Bread\n</ul>\n<p>2 items';
const stage = document.getElementById('stage');
const tree = document.getElementById('tree');
const ws = document.getElementById('ws');
let n = 0;
document.getElementById('source').textContent = SOURCE;
stage.innerHTML = SOURCE; // parse it once, like a page load
const list = document.getElementById('list');
// Walk childNodes and write one line per node.
function walk(node, depth, out) {
for (const child of node.childNodes) {
const pad = ' '.repeat(depth);
if (child.nodeType === Node.ELEMENT_NODE) {
let label = child.tagName.toLowerCase();
if (child.id) label += '#' + child.id;
if (child.classList.length) label += '.' + [...child.classList].join('.');
out.push(pad + label);
walk(child, depth + 1, out);
} else if (child.nodeType === Node.TEXT_NODE) {
const text = child.textContent.trim();
if (text) out.push(pad + '"' + text + '"');
else if (ws.checked) out.push(pad + '#text (whitespace)');
}
}
return out;
}
function draw() {
tree.textContent = walk(stage, 0, []).join('\n');
stage.querySelector('p').textContent = list.children.length + ' items';
}
document.getElementById('add').addEventListener('click', () => {
const li = document.createElement('li');
li.textContent = 'New item ' + (++n);
list.append(li);
draw();
});
document.getElementById('remove').addEventListener('click', () => {
list.firstElementChild?.remove();
draw();
});
document.getElementById('toggle').addEventListener('click', () => {
list.firstElementChild?.classList.toggle('done');
draw();
});
ws.addEventListener('change', draw);
draw();
</script>
</body>
</html>
The source leaves out every </li>. The tree still shows two separate li elements, because the parser closed them for you.
HTML source vs the live DOM
The HTML file is text. The DOM is what the browser made from that text, plus everything scripts did afterwards. The two start close and drift apart.
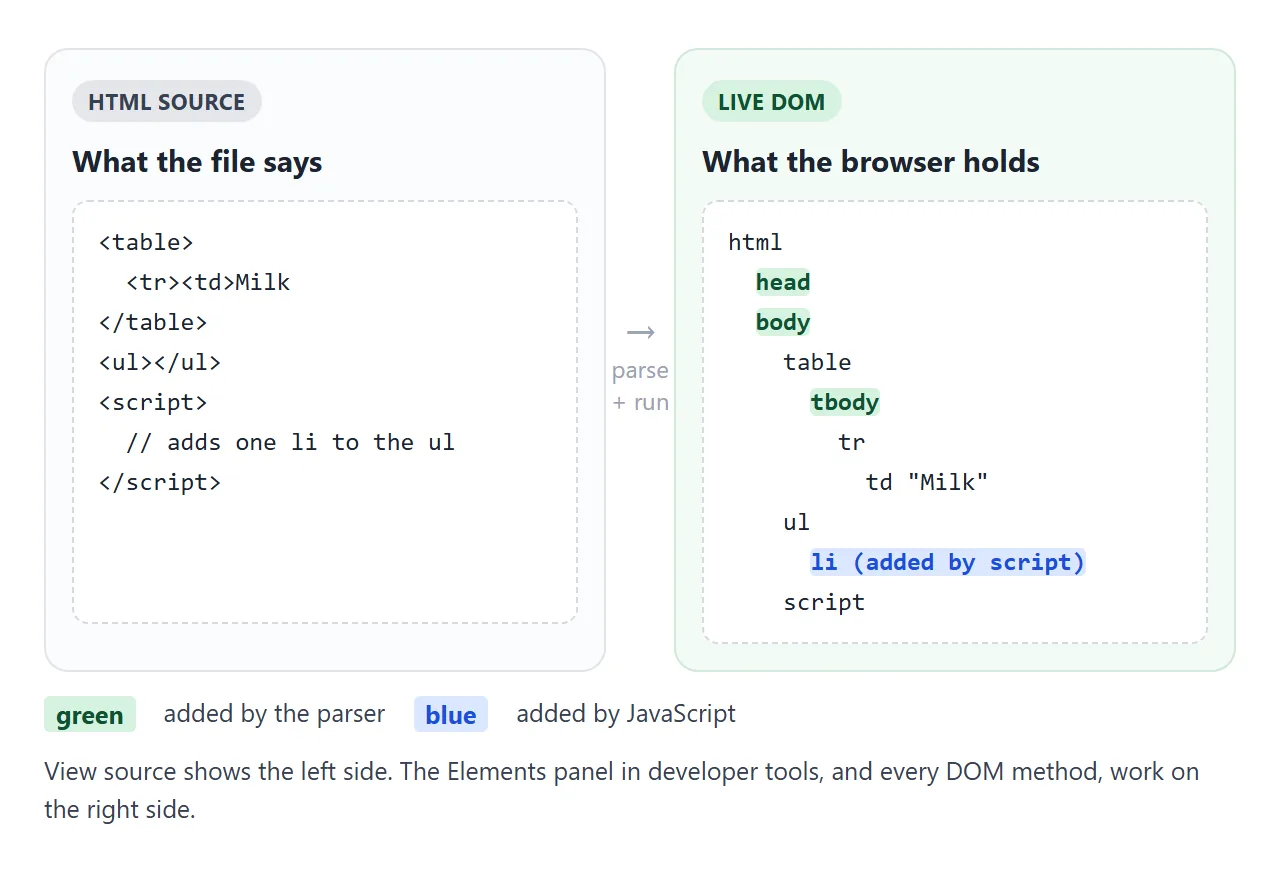
The parser repairs and completes markup. It adds html, head and body when they are missing, closes elements you left open, and puts a tbody between a table and its rows. Then scripts run and change the tree further.
This is why View source and the Elements panel in developer tools disagree. View source shows the file. The Elements panel shows the DOM, and the DOM is what your code works on.
Selecting elements
Before you change anything, you need a reference to it. Two methods cover almost every case:
const list = document.getElementById('list');        // one element by id
const firstDone = document.querySelector('li.done');  // first match of a CSS selector
const allItems = document.querySelectorAll('li');     // every match, as a NodeList
Both return null when nothing matches, and the next line then fails with "Cannot read properties of null". getElementById covers the timing reasons, and querySelector covers selectors, closest() and looping over a NodeList.
Creating, moving and removing elements
Changing a page usually follows four steps:
- Select the place to change, with
querySelectororgetElementById. - Create the new element with
document.createElementand set its text withtextContent. - Insert it with
append,prepend,beforeorafter. - Listen for clicks on a parent element, covered further down.
const li = document.createElement('li');
li.textContent = 'Eggs';     // plain text, never parsed as HTML
list.append(li);             // now it is in the page
| Method | What it does |
|---|---|
parent.append(a, b) |
Adds nodes or strings at the end, inside |
parent.prepend(a) |
Adds at the start, inside |
el.before(a) / el.after(a) |
Adds next to el, as a sibling |
el.remove() |
Takes el out of the page |
el.replaceWith(a) |
Puts a where el was |
A node can only be in one place. Appending an element that is already in the page moves it, it does not copy it. Use el.cloneNode(true) when you want a copy.
textContent sets text safely: a user typing <b> sees those characters, not bold text. To insert a string of HTML, innerHTML explains when that is fine and when it replaces more than you meant.
Attributes vs properties
An attribute is what the HTML says. A property is a field on the live object. For many attributes the two mirror each other, but form fields are the exception people trip on. Type in the box below.
<!doctype html>
<html lang="en">
<head>
<meta charset="utf-8">
<meta name="viewport" content="width=device-width, initial-scale=1">
<title>Attribute vs property</title>
<style>
  body { margin: 0; padding: 14px; font-family: system-ui, sans-serif; background: #f4f5f7; color: #1d2330; }
  form { background: #fff; border-radius: 10px; padding: 12px 14px; }
  label { font-weight: 600; font-size: 14px; }
  input { font: 15px system-ui, sans-serif; padding: 7px 9px; border: 1px solid #cfd5de; border-radius: 8px; width: 100%; box-sizing: border-box; margin-top: 4px; }
  table { width: 100%; border-collapse: collapse; margin-top: 12px; font-size: 13px; background: #fff; border-radius: 10px; overflow: hidden; }
  td { padding: 8px 10px; border-top: 1px solid #eef0f3; vertical-align: top; }
  tr:first-child td { border-top: 0; }
  td:first-child { font: 12px ui-monospace, Consolas, monospace; color: #6b7280; width: 44%; }
  td b { font: 700 13px ui-monospace, Consolas, monospace; word-break: break-all; }
  .prop b { color: #0f5132; } .attr b { color: #9a3412; }
  .bar { display: flex; flex-wrap: wrap; gap: 6px; margin-top: 12px; }
  button { font: 600 12.5px ui-monospace, Consolas, monospace; padding: 7px 9px; border: 1px solid #cfd5de; border-radius: 8px; background: #fff; cursor: pointer; }
  #log { font-size: 13px; margin: 10px 2px 0; color: #374151; min-height: 36px; }
</style>
</head>
<body>
<form id="form">
  <label for="name">Name (type something)</label>
  <input id="name" value="Ada">
</form>

<table>
  <tr class="prop"><td>input.value</td><td><b id="prop"></b></td></tr>
  <tr class="attr"><td>getAttribute('value')</td><td><b id="attr"></b></td></tr>
  <tr><td>input.outerHTML</td><td><b id="html"></b></td></tr>
</table>

<div class="bar">
  <button id="setProp">input.value = 'Grace'</button>
  <button id="setAttr">setAttribute('value', 'Linus')</button>
  <button id="reset">form.reset()</button>
</div>
<p id="log">The attribute is what the HTML said. The property is what is in the box now.</p>

<script>
  const input = document.getElementById('name');
  const form = document.getElementById('form');
  const log = document.getElementById('log');

  function show(message) {
    document.getElementById('prop').textContent = JSON.stringify(input.value);
    document.getElementById('attr').textContent = JSON.stringify(input.getAttribute('value'));
    document.getElementById('html').textContent = input.outerHTML;
    if (message) log.textContent = message;
  }

  input.addEventListener('input', () => show('Typing changes the property. The attribute stays as written.'));
  form.addEventListener('submit', (e) => e.preventDefault());  // Enter must not reload

  document.getElementById('setProp').addEventListener('click', () => {
    input.value = 'Grace';
    show('Setting .value changes the box. The attribute still says the old value.');
  });
  document.getElementById('setAttr').addEventListener('click', () => {
    input.setAttribute('value', 'Linus');
    show('The attribute changed. The box follows only if nobody has edited it yet.');
  });
  document.getElementById('reset').addEventListener('click', () => {
    form.reset();
    show('reset() copies the attribute back into the box.');
  });
  show();
</script>
</body>
</html>
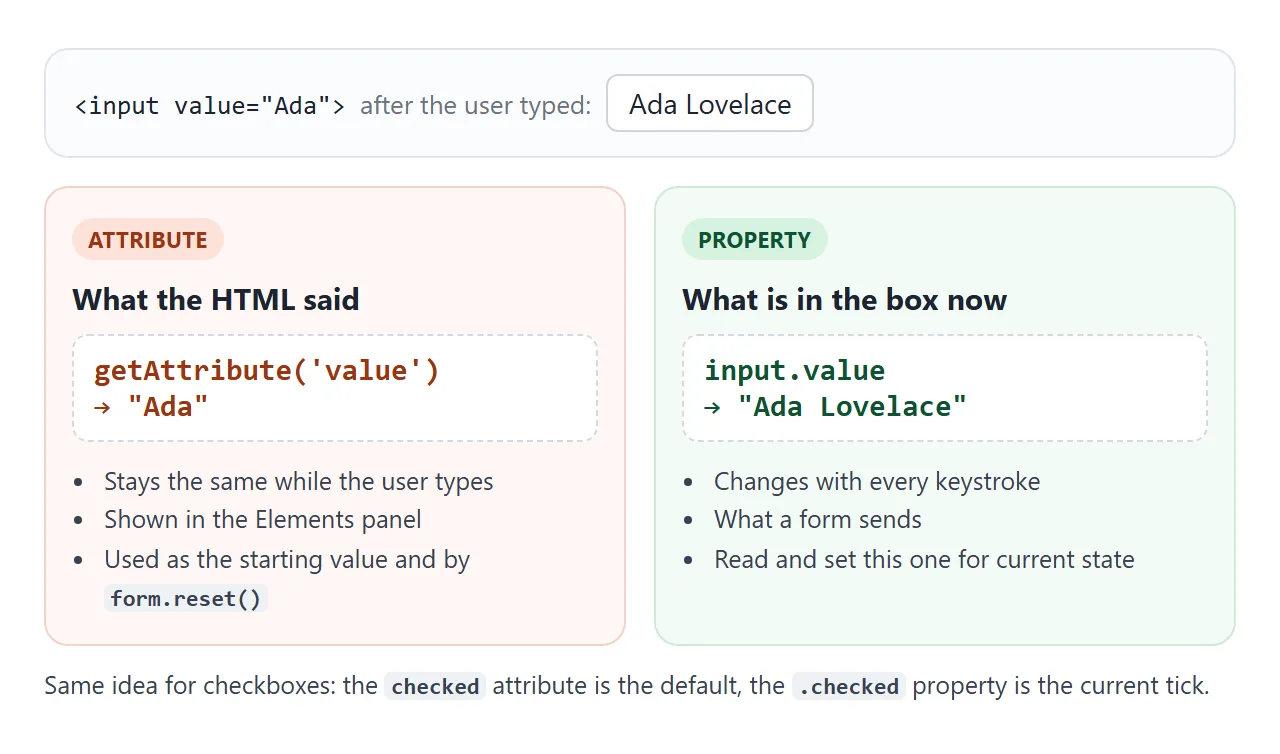
The value attribute is the field's default. Once the user edits the field, or your code sets .value, changing the attribute no longer changes the box. form.reset() copies the attribute back in. The same applies to checked on checkboxes.
Rule of thumb: read and write properties (.value, .checked, .disabled) for current state. Use getAttribute and setAttribute when you really want the markup.
Two properties save you from string juggling:
card.classList.add('done');        // also remove, toggle, contains
card.dataset.id = '42';            // writes data-id="42"
card.dataset.userId;               // reads data-user-id, always a string
classList changes one class without touching the others. dataset maps data-* attributes to camelCase names, which is a tidy way to keep an id or a state on the element itself.
Events and event delegation
addEventListener attaches a function to one element. That is fine for a few fixed buttons. For a list whose items come and go, attaching a listener to every item gets fragile: new items have none, and a replaced item loses the ones it had.
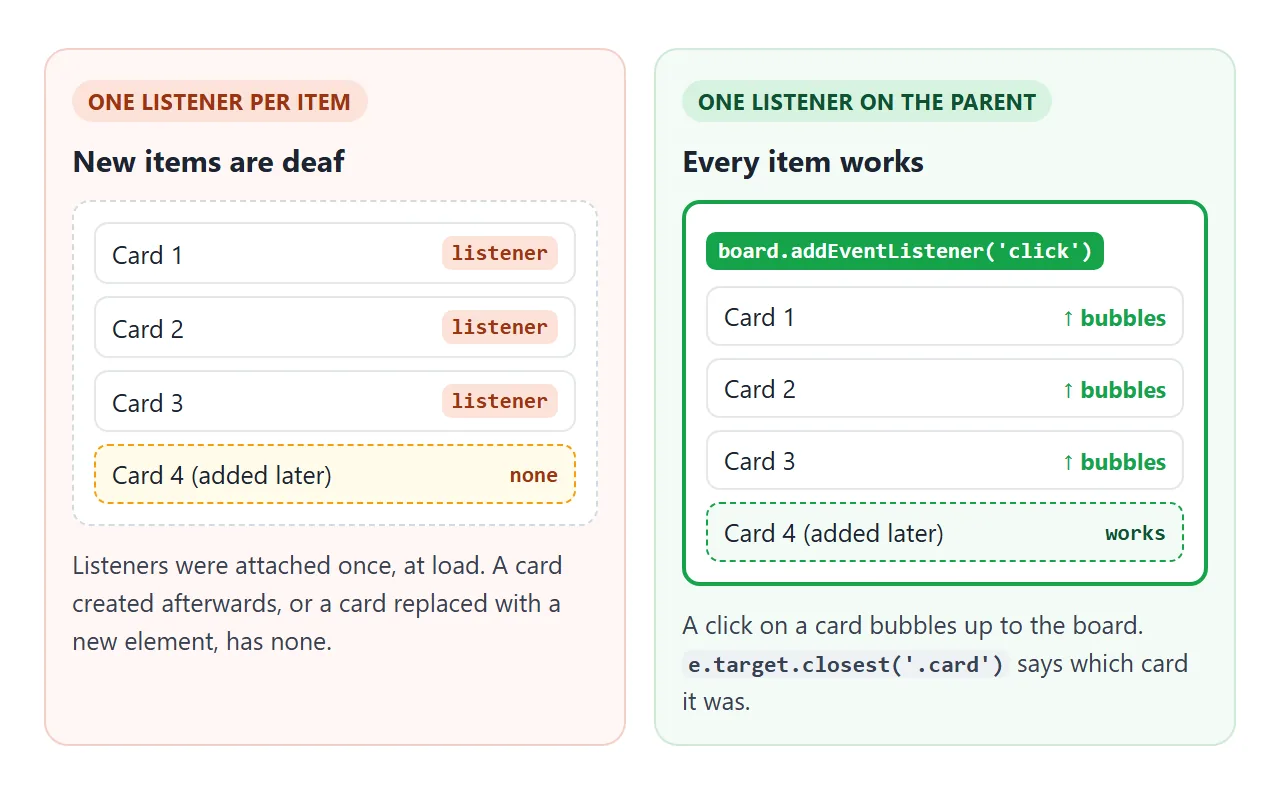
Most events, including click, bubble: after firing on the element you clicked, they fire on its parent, then its parent, up to document. So one listener on the container sees clicks on every child:
board.addEventListener('click', (e) => {
  const btn = e.target.closest('button[data-action]');
  if (!btn) return;                    // the click was somewhere else
  const card = btn.closest('.card');
  if (btn.dataset.action === 'delete') card.remove();
});
e.target is the innermost element clicked, which may be an icon inside the button. closest() walks up to the element you care about. focus and blur do not bubble; use focusin and focusout to delegate those.
Adding many elements at once
Appending items one by one in a loop inserts each into the live page separately.
It gets slow when the loop also reads layout, for example offsetHeight, because the browser must recompute the layout on each read. Using innerHTML += in a loop is worse: it reparses the whole list every time.
A DocumentFragment is a container that is not in the page. Build everything inside it, then insert it once. When appended, the fragment's children move into the page and the fragment is left empty.
const fragment = document.createDocumentFragment();
for (const name of names) {
  const li = document.createElement('li');
  li.textContent = name;
  fragment.append(li);
}
list.append(fragment);   // one insertion into the page
list.append(...items) with an array of elements does the same job in one call.
A finished example: a kanban board
Everything above in one page. Cards are created with createElement, moved between columns with append, deleted with remove(), tagged with dataset, flashed with classList, and every button runs through a single delegated click listener.
<!doctype html>
<html lang="en">
<head>
<meta charset="utf-8">
<meta name="viewport" content="width=device-width, initial-scale=1">
<title>Mini kanban board</title>
<style>
  body { margin: 0; padding: 12px; font-family: system-ui, sans-serif; background: #eceef1; color: #1d2330; }
  form { display: flex; gap: 6px; flex-wrap: wrap; margin-bottom: 10px; }
  form input { flex: 1 1 140px; min-width: 0; font: 14px system-ui, sans-serif; padding: 8px 10px; border: 1px solid #cfd5de; border-radius: 8px; }
  button { font: 600 13px system-ui, sans-serif; border: 1px solid #cfd5de; border-radius: 8px; background: #fff; cursor: pointer; padding: 8px 10px; }
  .board { display: grid; grid-template-columns: repeat(3, 1fr); gap: 8px; }
  .col { background: #dfe3e8; border-radius: 10px; padding: 8px; min-width: 0; }
  .col h2 { margin: 0 0 6px; font-size: 13px; display: flex; justify-content: space-between; }
  .count { color: #6b7280; font-weight: 600; }
  .list { list-style: none; margin: 0; padding: 0; height: 330px; overflow-y: auto; }
  .card { background: #fff; border-radius: 8px; padding: 7px 8px; margin-bottom: 6px; font-size: 13px; box-shadow: 0 1px 3px rgba(0, 0, 0, .1); overflow-wrap: anywhere; }
  .card .tools { display: flex; gap: 4px; margin-top: 6px; }
  .card .tools button { padding: 3px 0; flex: 1; font-size: 14px; line-height: 1; }
  .col:first-child [data-action="left"], .col:last-child [data-action="right"] { visibility: hidden; }
  .card.moved { animation: flash .6s; }
  @keyframes flash { from { background: #d6f2df; } }
</style>
</head>
<body>
<form id="add">
  <input id="text" placeholder="New card" maxlength="60" autocomplete="off">
  <button>Add</button>
  <button type="button" id="many">Add 20 (fragment)</button>
</form>

<div class="board" id="board">
  <section class="col"><h2>To do <span class="count"></span></h2><ul class="list"></ul></section>
  <section class="col"><h2>Doing <span class="count"></span></h2><ul class="list"></ul></section>
  <section class="col"><h2>Done <span class="count"></span></h2><ul class="list"></ul></section>
</div>

<script>
  const board = document.getElementById('board');
  const lists = board.querySelectorAll('.list');
  let nextId = 0;

  function button(action, label, name) {
    const b = document.createElement('button');
    b.type = 'button';
    b.dataset.action = action;          // becomes data-action="..."
    b.textContent = label;
    b.setAttribute('aria-label', name);
    return b;
  }

  function makeCard(text) {
    const card = document.createElement('li');
    card.className = 'card';
    card.dataset.id = ++nextId;
    const title = document.createElement('div');
    title.textContent = text;           // shown as text, never parsed as HTML
    const tools = document.createElement('div');
    tools.className = 'tools';
    tools.append(button('left', '←', 'Move left'), button('right', '→', 'Move right'), button('delete', '×', 'Delete'));
    card.append(title, tools);
    return card;
  }

  function updateCounts() {
    board.querySelectorAll('.col').forEach((col) => {
      col.querySelector('.count').textContent = col.querySelector('.list').children.length;
    });
  }

  // One listener for every card, now and later.
  board.addEventListener('click', (e) => {
    const btn = e.target.closest('button[data-action]');
    if (!btn) return;
    const card = btn.closest('.card');
    const col = card.closest('.col');
    const action = btn.dataset.action;

    if (action === 'delete') {
      card.remove();
    } else {
      const target = action === 'right' ? col.nextElementSibling : col.previousElementSibling;
      if (!target) return;
      target.querySelector('.list').append(card);   // append moves, it does not copy
      card.classList.remove('moved');
      void card.offsetWidth;                         // restart the flash animation
      card.classList.add('moved');
    }
    updateCounts();
  });

  document.getElementById('add').addEventListener('submit', (e) => {
    e.preventDefault();
    const input = document.getElementById('text');
    const text = input.value.trim();
    if (!text) return;
    lists[0].prepend(makeCard(text));
    input.value = '';
    updateCounts();
  });

  // Build 20 cards off-page, then insert them in one step.
  document.getElementById('many').addEventListener('click', () => {
    const fragment = document.createDocumentFragment();
    for (let i = 0; i < 20; i++) fragment.append(makeCard('Task ' + (nextId + 1)));
    lists[0].append(fragment);
    updateCounts();
  });

  lists[0].append(makeCard('Write the brief'), makeCard('Pick a <b>name</b>'));
  lists[1].append(makeCard('Draw the logo'));
  lists[2].append(makeCard('Set up the repo'));
  updateCounts();
</script>
</body>
</html>
- Moving: the arrow buttons find the neighbouring column with
nextElementSiblingandappendthe card there. The card keeps its content, because it is the same object. - One listener: the board listens for clicks and reads
data-actionfrom the button. New cards work with no extra code. - Counts: each column's count is read from
list.children.lengthafter every change, so it cannot drift.
For a list that also survives a reload, a simple HTML to-do list adds saving.
When it does not work
| What you see | Cause | Fix |
|---|---|---|
| "Cannot read properties of null" | The script ran before the element was parsed | Put the script at the end of body, or load an external file with defer |
childNodes has extra entries, firstChild is not your element |
Spaces and line breaks between tags are text nodes | Use children, firstElementChild, nextElementSibling |
| A button stopped responding after an update | The element was replaced, and listeners stay on the old one | Delegate the listener to a parent that is not replaced |
setAttribute('value', ...) does not change the box |
The attribute is the default, and the field was already edited | Set input.value instead |
getAttribute('value') shows the old text |
The attribute does not follow typing | Read input.value |
| Adding hundreds of items is slow | Items inserted one at a time, or innerHTML += in a loop |
Build them in a DocumentFragment, append once |
If the page shows nothing at all, HTML with JavaScript not working walks through the console checks first.
Share it as a link
A page that changes when you click is hard to show in a screenshot, and an .html attachment often opens as code on a phone.
To send the working version, paste the page into a NOS document and choose Create share link. HTML to link walks through it.
The page renders as written and its scripts run, so the people you send it to can add, move and delete cards themselves. If you change the code later, the same link shows the new version.