To add a portfolio link to LinkedIn, open your profile, choose Contact info in the introduction section, then Edit and Add website, and paste the address. LinkedIn Help says you can show up to three website links there.
Many students searching for this are in the same spot: the work exists, but there is no page to point to. Free portfolio builders are one answer. A single page you make yourself is another, and it can be ready in an afternoon.
Here is a page of that kind for a made-up design student. It has four projects, a filter, and a short brief under each one. Try the filter and open a brief.
<!doctype html>
<html lang="en">
<head>
<meta charset="utf-8">
<meta name="viewport" content="width=device-width, initial-scale=1">
<title>Noor Haddad - portfolio</title>
<style>
  * { box-sizing: border-box; }
  body { margin: 0; font-family: system-ui, sans-serif; background: #f5f7fb; color: #1d2330; line-height: 1.5; }
  header { background: #1e3a8a; color: #fff; padding: 26px 16px 22px; }
  .in { max-width: 760px; margin: 0 auto; }
  header h1 { margin: 0 0 4px; font-size: 26px; }
  header p { margin: 0; font-size: 15px; opacity: .93; }
  .chips { display: flex; flex-wrap: wrap; gap: 6px; margin-top: 12px; }
  .chips span { background: rgba(255,255,255,.16); border-radius: 999px; padding: 3px 11px; font-size: 13px; }
  main { max-width: 760px; margin: 0 auto; padding: 16px; }
  h2 { font-size: 18px; margin: 18px 0 8px; }
  .bar { display: flex; gap: 8px; flex-wrap: wrap; margin-bottom: 12px; }
  .bar button { border: 1px solid #c9d2e6; background: #fff; border-radius: 999px; padding: 8px 16px; font-size: 14px; font-weight: 600; color: #1e3a8a; cursor: pointer; min-height: 40px; }
  .bar button[aria-pressed="true"] { background: #1e3a8a; color: #fff; border-color: #1e3a8a; }
  .grid { display: grid; grid-template-columns: repeat(auto-fit, minmax(210px, 1fr)); gap: 14px; }
  .card { background: #fff; border-radius: 12px; overflow: hidden; box-shadow: 0 1px 6px rgba(0,0,0,.08); display: flex; flex-direction: column; }
  .card svg { display: block; width: 100%; height: 110px; }
  .card .t { padding: 12px 14px 14px; }
  .card h3 { margin: 0 0 2px; font-size: 16px; }
  .card .k { font-size: 12px; font-weight: 700; color: #5b6472; text-transform: uppercase; letter-spacing: .03em; }
  .card p { margin: 6px 0 0; font-size: 14px; }
  .card details { margin-top: 8px; font-size: 14px; }
  .card summary { cursor: pointer; font-weight: 700; color: #1e3a8a; padding: 4px 0; }
  .about, .contact { background: #fff; border-radius: 12px; padding: 14px 16px; box-shadow: 0 1px 6px rgba(0,0,0,.06); font-size: 15px; }
  .about p, .contact p { margin: 0 0 6px; }
  .addr { font-family: ui-monospace, Consolas, monospace; background: #eef2fb; padding: 2px 6px; border-radius: 4px; }
  footer { text-align: center; font-size: 13px; color: #5b6472; padding: 6px 16px 24px; }
</style>
</head>
<body>
<header><div class="in">
  <h1>Noor Haddad</h1>
  <p>Third-year design student. I make small tools and posters that explain things.</p>
  <div class="chips"><span>Visual design</span><span>HTML and CSS</span><span>Open for internships</span></div>
</div></header>
<main>
  <h2>Selected work</h2>
  <div class="bar" id="bar" role="group" aria-label="Filter projects"></div>
  <div class="grid" id="grid"></div>

  <h2>About</h2>
  <div class="about">
    <p>I study communication design. I like turning a long explanation into one clear page.</p>
    <p>Coursework and personal projects are both shown here, and each says which it is.</p>
  </div>

  <h2>Contact</h2>
  <div class="contact">
    <p>Email: noor.example@example.com (fictional)</p>
    <p>This page: <span class="addr">your-share-link-goes-here</span></p>
  </div>
</main>
<footer>Four projects on purpose. One page, nothing to hunt for.</footer>

<script>
  // Edit this list to change the portfolio. type: 'Design' or 'Code'.
  const PROJECTS = [
    { name: 'Bus route poster', type: 'Design', kind: 'Coursework', color: '#2563eb', shape: 'lines',
      line: 'A one-sheet map for a fictional bus line.', brief: 'Brief: make a timetable readable in five seconds. I cut the text by half and tested it on three classmates.' },
    { name: 'Recipe scaler', type: 'Code', kind: 'Personal project', color: '#0f766e', shape: 'dots',
      line: 'A small page that doubles or halves a recipe.', brief: 'Brief: I kept scaling recipes by hand. One input, one list, no sign-up.' },
    { name: 'Campus quiet map', type: 'Design', kind: 'Coursework', color: '#9333ea', shape: 'blocks',
      line: 'Icons and colours for quiet places on a campus.', brief: 'Brief: help a new student find a calm room. I tested three colour sets for contrast.' },
    { name: 'Study timer', type: 'Code', kind: 'Personal project', color: '#c2410c', shape: 'ring',
      line: 'A 25-minute timer with a break reminder.', brief: 'Brief: a timer I would actually open. It has two buttons and nothing else.' }
  ];

  const NS = 'http://www.w3.org/2000/svg';
  function art(p) {
    const s = document.createElementNS(NS, 'svg');
    s.setAttribute('viewBox', '0 0 210 110');
    s.setAttribute('aria-hidden', 'true');
    s.setAttribute('preserveAspectRatio', 'xMidYMid slice');
    const bg = document.createElementNS(NS, 'rect');
    bg.setAttribute('width', '210'); bg.setAttribute('height', '110'); bg.setAttribute('fill', p.color);
    s.appendChild(bg);
    const add = (tag, attrs) => {
      const e = document.createElementNS(NS, tag);
      for (const k in attrs) e.setAttribute(k, attrs[k]);
      e.setAttribute('fill', attrs.fill || 'rgba(255,255,255,.55)');
      s.appendChild(e);
    };
    if (p.shape === 'lines') [22, 44, 66, 88].forEach((y, i) => add('rect', { x: 20, y: y, width: 170 - i * 30, height: 8, rx: 4 }));
    if (p.shape === 'dots') for (let i = 0; i < 12; i++) add('circle', { cx: 28 + (i % 6) * 30, cy: 36 + Math.floor(i / 6) * 38, r: 9 });
    if (p.shape === 'blocks') [[20,20],[80,20],[140,20],[20,62],[80,62]].forEach(([x, y]) => add('rect', { x: x, y: y, width: 50, height: 34, rx: 6 }));
    if (p.shape === 'ring') add('circle', { cx: 105, cy: 55, r: 34, fill: 'none', stroke: 'rgba(255,255,255,.7)', 'stroke-width': 10 });
    return s;
  }

  const grid = document.getElementById('grid');
  const bar = document.getElementById('bar');
  let filter = 'All';

  function draw() {
    grid.textContent = '';
    PROJECTS.filter((p) => filter === 'All' || p.type === filter).forEach((p) => {
      const c = document.createElement('div');
      c.className = 'card';
      c.appendChild(art(p));
      const t = document.createElement('div');
      t.className = 't';
      const k = document.createElement('div'); k.className = 'k'; k.textContent = p.type + ' - ' + p.kind;
      const h = document.createElement('h3'); h.textContent = p.name;
      const l = document.createElement('p'); l.textContent = p.line;
      const d = document.createElement('details');
      const sm = document.createElement('summary'); sm.textContent = 'Read the brief';
      const bp = document.createElement('p'); bp.textContent = p.brief;
      d.appendChild(sm); d.appendChild(bp);
      [k, h, l, d].forEach((e) => t.appendChild(e));
      c.appendChild(t);
      grid.appendChild(c);
    });
    bar.querySelectorAll('button').forEach((b) => b.setAttribute('aria-pressed', String(b.textContent === filter)));
  }

  ['All', 'Design', 'Code'].forEach((name) => {
    const b = document.createElement('button');
    b.type = 'button';
    b.textContent = name;
    b.addEventListener('click', () => { filter = name; draw(); });
    bar.appendChild(b);
  });
  draw();
</script>
</body>
</html>
The three places on a profile
LinkedIn Help describes three places where a link to your own work can sit. As of October 2026 they work like this:
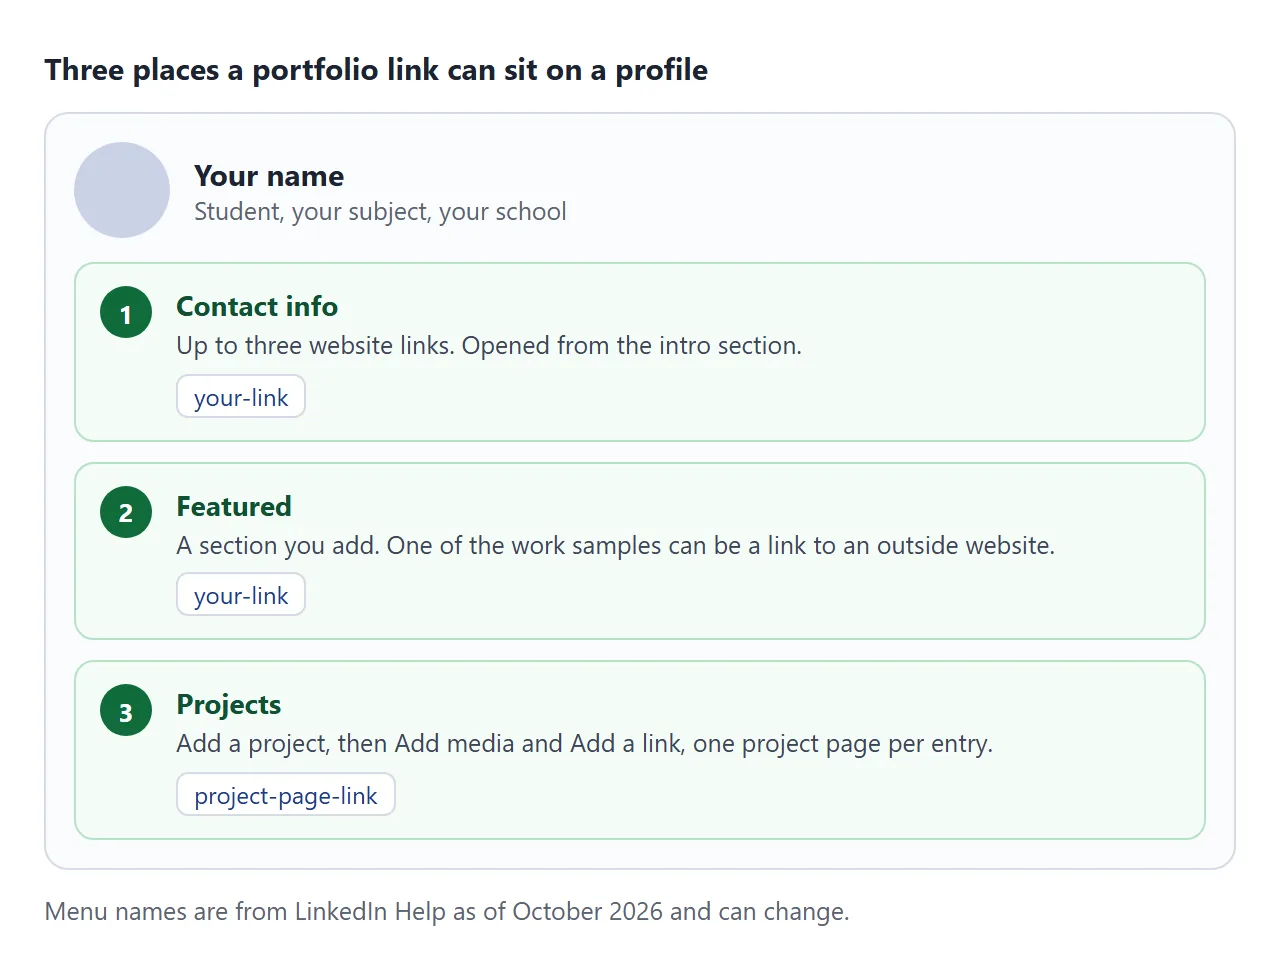
- Contact info. Choose Contact info in the introduction section and Edit, then Add website. Enter the address and pick a website type from the dropdown. Up to three links can show.
- Featured. Choose Add profile section, then Recommended, then Add featured. LinkedIn lists links to external websites, such as a personal blog or portfolio, among the things you can feature.
- Projects. The Project URL field is not offered for newly added projects. LinkedIn says to choose Add media and then Add a link.
On a phone, the app path starts with your profile photo, then View profile. LinkedIn Help lists the exact taps for each place. Menu names change, so check the current help page if a button has moved.
Make the page with AI
You do not have to code. Paste your project notes into ChatGPT, Claude or Gemini with this prompt.
Make one HTML page that is my portfolio. Top: my name, one line
about me, and three short tags. Then four projects as cards, each with
a title, whether it is coursework or a personal project, one line
about it, and a "Read the brief" section that opens and closes.
Add All, Design and Code filter buttons. Put the projects in one
JavaScript list near the bottom. Works on a phone. No outside
libraries, images or fonts. Use simple shapes instead of photos.
Do not save data anywhere.

Here are my projects: [paste your notes here]
Then check the result before it goes on your profile:
- Every name, date and claim. An AI can round up a result or invent a detail. Anything you cannot defend in an interview comes out.
- Coursework is labelled as coursework. A reader who finds out later will remember that.
- A narrow screen. Make the browser window thin. The cards should stack and the buttons stay tappable.
Send it as a link
- Copy all of the code the AI returned.
- Paste it into a NOS document. The page renders and its scripts run, so test the filter yourself.
- Choose Create share link and copy the address. HTML to link walks through it.
- Paste that address into Add website on your profile.
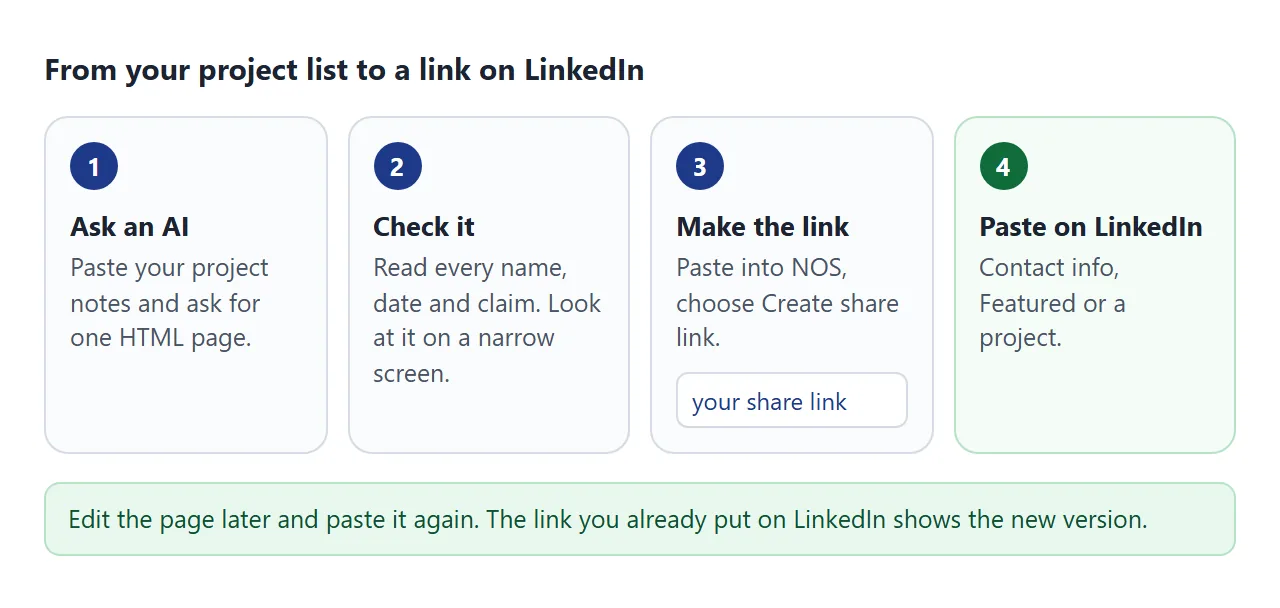
Anyone with the link can open the page in a browser, on a phone or a laptop, without an account. They cannot edit it. If you change the code later, the same link shows the new version.
NOS does not record who opens the link, and it has no password or expiry. If a project must stay private, leave it off the page.
Make the target short
A profile link is usually followed by someone who is deciding quickly. The page it opens should show work at once.
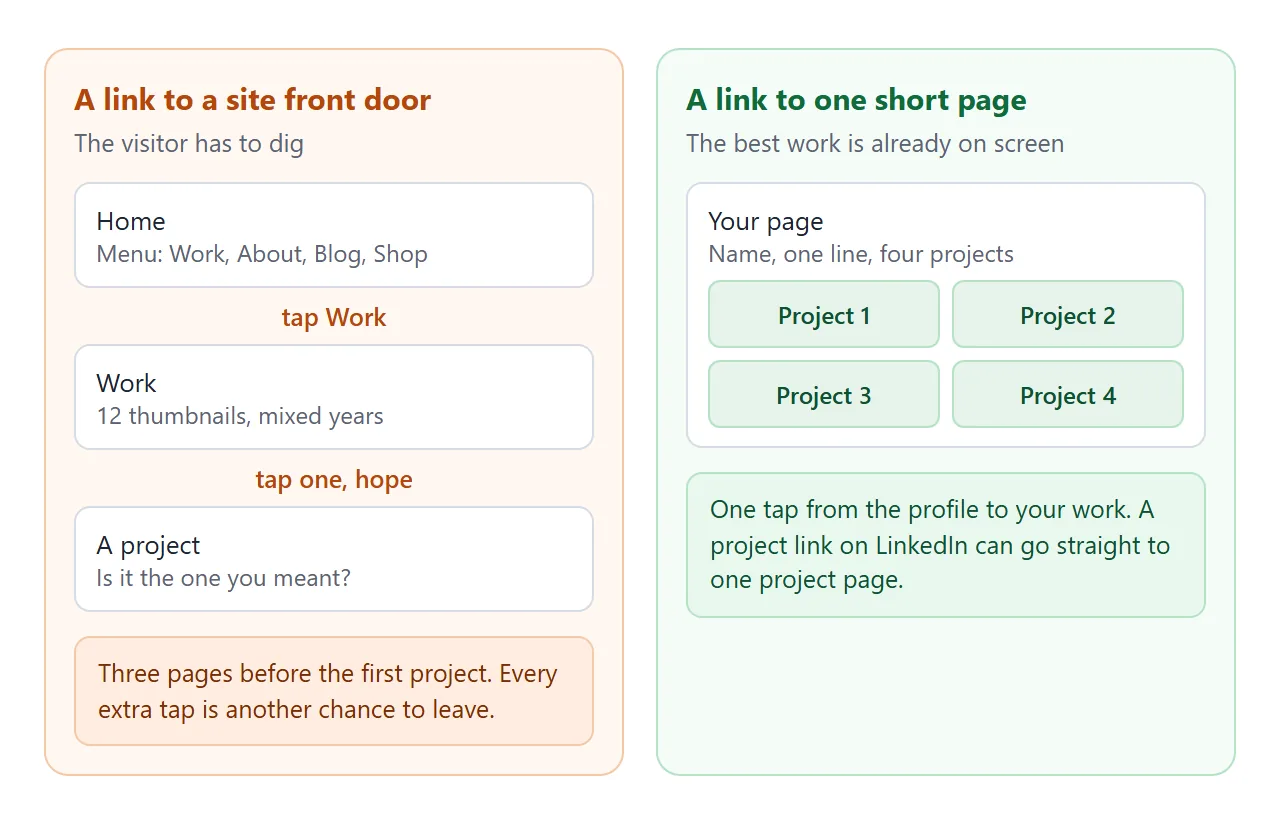
Three or four projects is enough. Put the strongest first and say in one line what each one is. For the longer reasoning, see what to show when you have no clients yet.
Write the address out in full in your resume as well. Linking a portfolio in a resume explains why a hidden link fails on paper.
One page per project
The Projects section works best when each entry opens the page about that project. A short page with the problem, what you changed and what you learned reads faster than a gallery.
<!doctype html>
<html lang="en">
<head>
<meta charset="utf-8">
<meta name="viewport" content="width=device-width, initial-scale=1">
<title>Bus route poster - project page</title>
<style>
  * { box-sizing: border-box; }
  body { margin: 0; font-family: system-ui, sans-serif; background: #f5f7fb; color: #1d2330; line-height: 1.55; }
  .in { max-width: 700px; margin: 0 auto; padding: 0 16px; }
  header { background: #2563eb; color: #fff; padding: 22px 0 18px; }
  header .tag { font-size: 12px; font-weight: 700; text-transform: uppercase; letter-spacing: .05em; opacity: .9; }
  header h1 { margin: 4px 0 4px; font-size: 25px; }
  header p { margin: 0; font-size: 15px; opacity: .95; }
  .facts { display: grid; grid-template-columns: repeat(3, 1fr); gap: 8px; margin: 14px 0; }
  .facts div { background: #fff; border-radius: 10px; padding: 10px 12px; box-shadow: 0 1px 5px rgba(0,0,0,.06); font-size: 14px; }
  .facts b { display: block; font-size: 11px; text-transform: uppercase; letter-spacing: .04em; color: #5b6472; }
  h2 { font-size: 18px; margin: 20px 0 6px; }
  p { margin: 0 0 8px; font-size: 15px; }
  .tabs { display: flex; gap: 8px; margin: 10px 0; }
  .tabs button { flex: 1; border: 1px solid #c9d2e6; background: #fff; border-radius: 10px; padding: 10px; font-size: 15px; font-weight: 700; color: #1e3a8a; cursor: pointer; min-height: 44px; }
  .tabs button[aria-pressed="true"] { background: #1e3a8a; color: #fff; border-color: #1e3a8a; }
  .view { background: #fff; border-radius: 12px; padding: 14px; box-shadow: 0 1px 6px rgba(0,0,0,.08); }
  .view svg { display: block; width: 100%; height: auto; border-radius: 8px; }
  .view .cap { font-size: 14px; color: #3c4658; margin: 10px 0 0; }
  ul { margin: 0 0 8px; padding-left: 20px; font-size: 15px; }
  .back { display: block; margin: 22px 0 28px; padding: 12px 14px; background: #e8eefc; border-radius: 10px; font-size: 14px; }
</style>
</head>
<body>
<header><div class="in">
  <div class="tag">Coursework - Communication design</div>
  <h1>Bus route poster</h1>
  <p>A timetable that can be read in five seconds.</p>
</div></header>
<div class="in">
  <div class="facts">
    <div><b>Course</b>Information design</div>
    <div><b>Time</b>3 weeks</div>
    <div><b>Tools</b>Paper, a vector editor</div>
  </div>

  <h2>The problem</h2>
  <p>The class was given a real-looking timetable for a fictional bus line. It had 40 numbers on it. Nobody could find their stop.</p>

  <h2>What I changed</h2>
  <ul>
    <li>Cut the text to the stops and the next three times.</li>
    <li>Used one colour for the line and one for stops with a lift.</li>
    <li>Put the busiest stop at eye height on the poster.</li>
  </ul>

  <h2>Before and after</h2>
  <div class="tabs" role="group" aria-label="Choose a version">
    <button type="button" id="b1" aria-pressed="true">Before</button>
    <button type="button" id="b2" aria-pressed="false">After</button>
  </div>
  <div class="view">
    <svg id="art" viewBox="0 0 400 200" role="img" aria-label="Poster sketch"></svg>
    <p class="cap" id="cap"></p>
  </div>

  <h2>What I learned</h2>
  <p>Cutting is the design. Three classmates found their stop faster on the second version, so I kept it.</p>

  <span class="back">One page for one project. This is what a Featured link or a Projects link can open.</span>
</div>

<script>
  // Two versions of the poster sketch. Edit the text to match your own project.
  const VERSIONS = {
    before: { caption: 'Before: 40 numbers in a grid, one colour, no hierarchy.', draw: function (s) {
      for (let r = 0; r < 8; r++) for (let c = 0; c < 10; c++) s.push('<rect x="' + (20 + c * 36) + '" y="' + (16 + r * 22) + '" width="28" height="10" rx="3" fill="#b9c2d4"/>');
    } },
    after: { caption: 'After: three stops, the next three times, one colour for the line.', draw: function (s) {
      s.push('<rect x="40" y="96" width="320" height="8" rx="4" fill="#2563eb"/>');
      [70, 200, 330].forEach(function (x, i) {
        s.push('<circle cx="' + x + '" cy="100" r="' + (i === 1 ? 17 : 12) + '" fill="#fff" stroke="#2563eb" stroke-width="6"/>');
        s.push('<rect x="' + (x - 34) + '" y="136" width="68" height="14" rx="4" fill="#1e3a8a"/>');
        s.push('<rect x="' + (x - 26) + '" y="158" width="52" height="8" rx="4" fill="#b9c2d4"/>');
      });
    } }
  };
  const art = document.getElementById('art');
  const cap = document.getElementById('cap');
  const b1 = document.getElementById('b1');
  const b2 = document.getElementById('b2');

  function show(which) {
    const parts = ['<rect width="400" height="200" fill="#f1f4fa"/>'];
    VERSIONS[which].draw(parts);
    art.innerHTML = parts.join('');
    cap.textContent = VERSIONS[which].caption;
    b1.setAttribute('aria-pressed', String(which === 'before'));
    b2.setAttribute('aria-pressed', String(which === 'after'));
  }
  b1.addEventListener('click', function () { show('before'); });
  b2.addEventListener('click', function () { show('after'); });
  show('before');
</script>
</body>
</html>
Make it the same way. Give the AI the notes for one project and ask for a problem, changes, a before and after, and what you learned.
Each project gets its own NOS document and its own link, so you can fix one without touching the others.
Ways to put work on LinkedIn compared
| A PDF file | A one-page share link | A larger site | |
|---|---|---|---|
| What a visitor does | Downloads or previews a file | Taps and reads | Taps, then looks for the work |
| After you fix a typo | Upload again | Edit once, same link | Edit the site |
| Needs an account to view | Depends on the file and the app | No | Depends on the site |
| Good for | A finished PDF | A short portfolio or one project | A long list of work |
A PDF is still the right thing for a printed resume. For a profile, a link is easier to keep current. Portfolio to link compares more ways to publish one.
When it does not work
| Symptom | Cause | Fix |
|---|---|---|
| No Add website button | You are in a different part of the profile | Open the introduction section, then Contact info, then Edit |
| You want a fourth website | LinkedIn Help says up to three show | Keep your best three, and use Featured for the rest |
| The page opens as plain code | An .html file was sent instead of a link | Send the share link, see opening HTML on a phone |
| The page has no pictures | Images came from another website, which the page blocks | Ask the AI for shapes or inline drawings |
| The filter does nothing | A line was lost when copying | Copy all of the AI's code again |
| The old version still shows | The new code was pasted into a different document | Paste it into the original NOS document |
If you plan to send the same address in messages and applications, QR code link shows how to put it on paper, and share AI-generated HTML covers what to check before sending any page an AI wrote.