A client onboarding template is one page with four parts: how you will work together, the timeline, what you need from the client, and how to reach you. Fill in the details for each new client and send one link on day one.
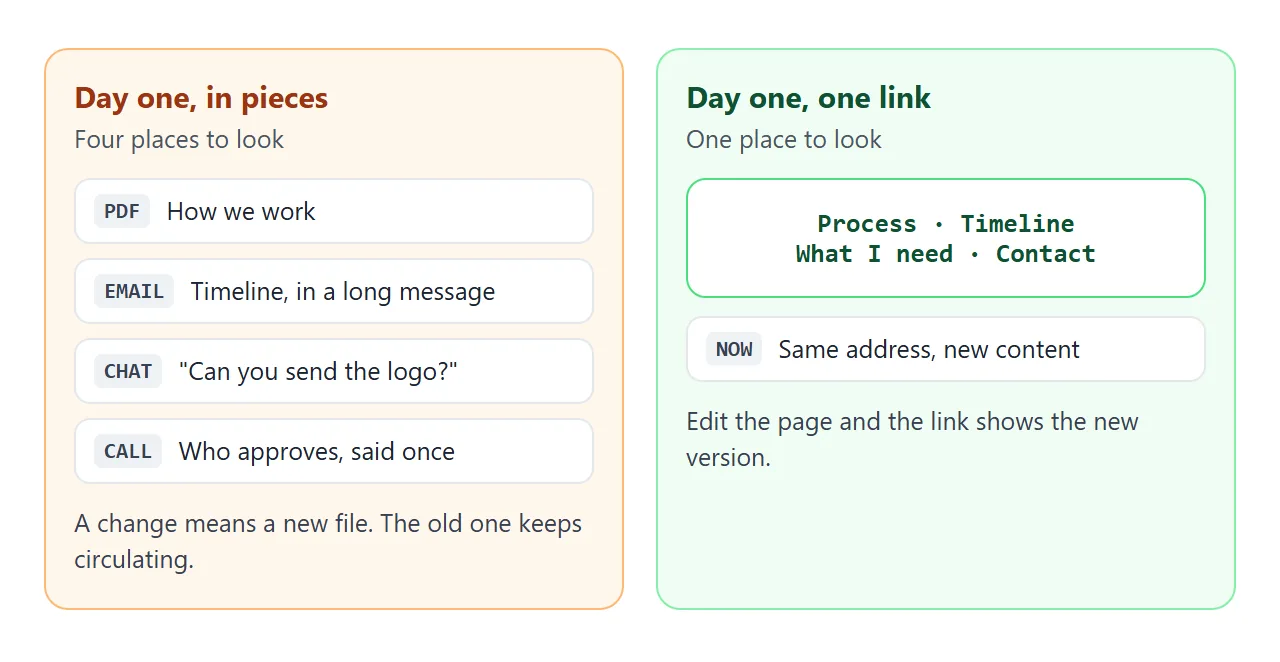
Without that page, the same information leaves your desk in pieces: a PDF for the process, an email for the dates, chat messages asking for a logo.
One writer on sharing HTML files describes a project where "By presentation day there were four versions of the file floating around Slack and no one could say with certainty which one was final."
Onboarding drifts the same way when it lives in attachments. A link has one version.
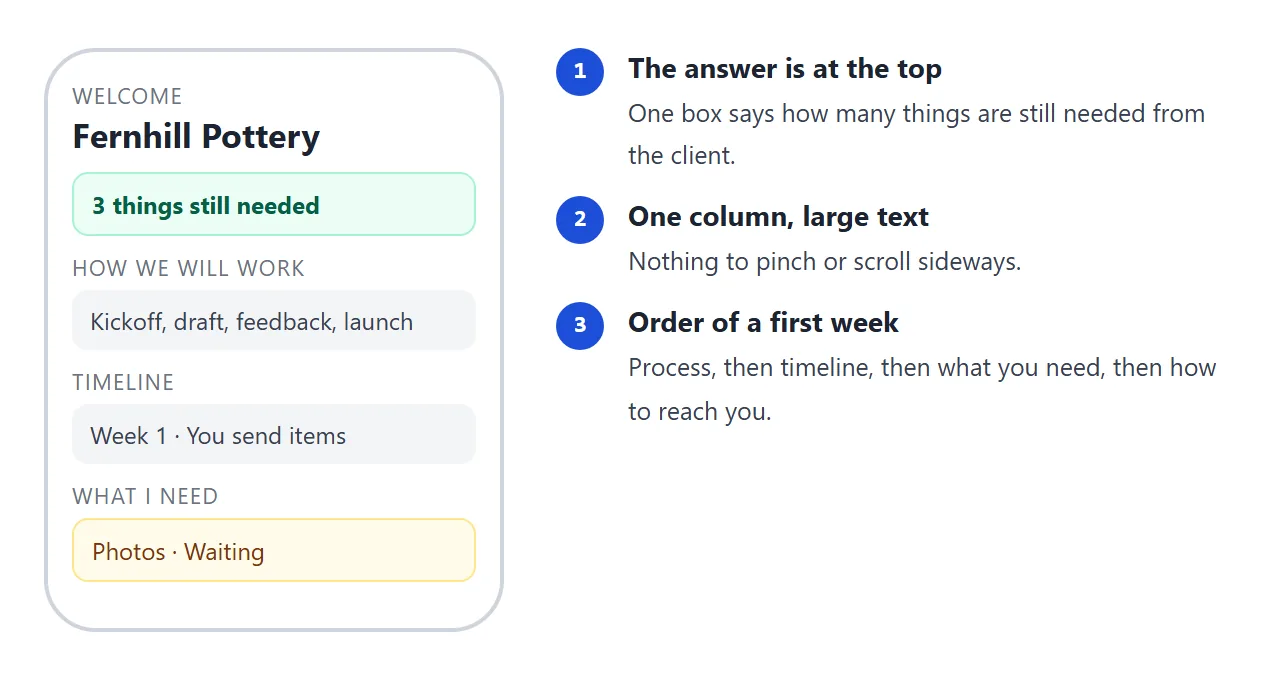
Here is a finished page for a made-up client. It shows the count of open items at the top. Tap the button to hide everything already received.
<!doctype html>
<html lang="en">
<head>
<meta charset="utf-8">
<meta name="viewport" content="width=device-width, initial-scale=1">
<title>Welcome - Fernhill Pottery online shop</title>
<style>
  * { box-sizing: border-box; }
  body { margin: 0; background: #f3f4f6; font-family: system-ui, -apple-system, "Segoe UI", sans-serif; color: #1f2937; line-height: 1.55; }
  .page { max-width: 720px; margin: 0 auto; background: #fff; padding: 24px 20px 32px; min-height: 100vh; }
  .tag { margin: 0; font-size: 13px; letter-spacing: .06em; text-transform: uppercase; color: #6b7280; }
  h1 { margin: 6px 0 4px; font-size: 28px; line-height: 1.15; }
  .meta { margin: 0 0 18px; font-size: 14px; color: #6b7280; }
  .start { background: #ecfdf5; border: 1px solid #a7f3d0; border-radius: 12px; padding: 14px 16px; }
  .start b { display: block; font-size: 20px; color: #047857; }
  .start span { font-size: 15px; color: #374151; }
  h2 { margin: 22px 0 8px; font-size: 13px; letter-spacing: .08em; text-transform: uppercase; color: #6b7280; }
  p { margin: 0 0 8px; font-size: 16px; }
  ol.how { list-style: none; counter-reset: s; padding: 0; margin: 0; }
  ol.how li { counter-increment: s; display: flex; gap: 12px; padding: 7px 0; border-bottom: 1px solid #eef0f3; font-size: 16px; }
  ol.how li::before { content: counter(s); flex: none; width: 26px; height: 26px; border-radius: 50%; background: #1d4ed8; color: #fff; font-size: 14px; font-weight: 700; display: grid; place-items: center; margin-top: 1px; }
  ol.how small { display: block; color: #6b7280; font-size: 14px; }
  .row { display: flex; gap: 12px; padding: 9px 0; border-bottom: 1px solid #eef0f3; align-items: flex-start; }
  .row .wk { min-width: 76px; font-weight: 700; color: #1d4ed8; font-size: 15px; }
  .row .what { flex: 1; font-size: 15px; }
  .ball { flex: none; font-size: 12px; font-weight: 700; padding: 2px 8px; border-radius: 999px; }
  .ball.me { background: #dbeafe; color: #1e40af; }
  .ball.you { background: #fef3c7; color: #92400e; }
  .now { background: #f0f9ff; border-radius: 8px; padding-left: 8px; padding-right: 8px; margin: 0 -8px; }
  .bar { display: flex; justify-content: space-between; align-items: center; gap: 10px; flex-wrap: wrap; margin-bottom: 8px; }
  .count { font-size: 15px; color: #374151; }
  .toggle { font: inherit; font-size: 14px; padding: 6px 12px; border-radius: 999px; border: 1px solid #d1d5db; background: #fff; cursor: pointer; min-height: 36px; }
  .toggle[aria-pressed="true"] { background: #1d4ed8; border-color: #1d4ed8; color: #fff; }
  .need { display: flex; align-items: center; gap: 10px; padding: 8px 12px; border: 1px solid #e5e7eb; border-radius: 10px; margin-bottom: 8px; }
  .need .t { flex: 1; font-size: 15px; }
  .need .t small { display: block; color: #6b7280; font-size: 13px; }
  .pill { flex: none; font-size: 13px; font-weight: 700; padding: 3px 10px; border-radius: 999px; white-space: nowrap; }
  .pill.done { background: #d1fae5; color: #065f46; }
  .pill.wait { background: #fef3c7; color: #92400e; }
  .need.is-done .t { color: #6b7280; }
  .who { margin-top: 26px; padding-top: 14px; border-top: 1px solid #e5e7eb; font-size: 15px; }
  .updated { margin: 14px 0 0; font-size: 13px; color: #6b7280; }
</style>
</head>
<body>
<div class="page">
  <p class="tag">Welcome</p>
  <h1 id="title"></h1>
  <p class="meta" id="meta"></p>

  <div class="start">
    <b id="headline"></b>
    <span>Everything about how we will work is on this one page. Bookmark the link.</span>
  </div>

  <h2>How we will work</h2>
  <ol class="how" id="how"></ol>

  <h2>Timeline</h2>
  <div id="timeline"></div>

  <h2>What I need from you</h2>
  <div class="bar">
    <span class="count" id="count"></span>
    <button class="toggle" id="toggle" type="button" aria-pressed="false">Show only what is still waiting</button>
  </div>
  <div id="needs"></div>

  <div class="who" id="who"></div>
  <p class="updated" id="updated"></p>
</div>

<script>
  // ---- Change the details here. The page below builds itself from them. ----
  const CLIENT = 'Fernhill Pottery';
  const PROJECT = 'Online shop setup';
  const ME = 'Ravi Menon';
  const START = 'Mon 12 Oct';
  const EMAIL = 'ravi@example.com';
  const REPLY = 'one working day';
  const UPDATED = '14 Oct';
  const NOW_WEEK = 1;   // the week we are in, matches "week" below

  const HOW = [
    ['Kickoff call', '30 minutes. We agree on the goal and who decides what.'],
    ['First draft', 'I send a link to the draft. You read it on your phone or laptop.'],
    ['Your feedback', 'One round of changes per stage, sent as a single reply.'],
    ['Launch', 'We go live together. I stay on call for two weeks after.']
  ];

  // ball: who has the next move that week
  const WEEKS = [
    { week: 'Week 1', what: 'Kickoff call, then you send the items below', ball: 'you' },
    { week: 'Week 2', what: 'I build the shop pages from your photos and prices', ball: 'me' },
    { week: 'Week 3', what: 'You review the draft and send one round of feedback', ball: 'you' },
    { week: 'Week 4', what: 'I make the changes, set up payments and launch', ball: 'me' }
  ];

  // done: true when I have received it
  const NEEDS = [
    { item: 'Logo file (PNG or SVG)', note: 'Any size is fine', due: 'Wed 14 Oct', done: true },
    { item: 'Ten product photos', note: 'Taken in daylight if you can', due: 'Fri 16 Oct', done: false },
    { item: 'Product names and prices', note: 'A list in an email is enough', due: 'Fri 16 Oct', done: false },
    { item: 'Access to your domain settings', note: 'Invite me as a user. Never send passwords.', due: 'Mon 19 Oct', done: true },
    { item: 'Name of the one person who approves', note: 'So feedback comes back as one reply', due: 'Mon 19 Oct', done: false }
  ];
  // ---------------------------------------------------------------------------

  const $ = (id) => document.getElementById(id);
  const waiting = NEEDS.filter((n) => !n.done);

  document.title = 'Welcome - ' + CLIENT + ' ' + PROJECT.toLowerCase();
  $('title').textContent = 'Welcome, ' + CLIENT;
  $('meta').textContent = PROJECT + ' · with ' + ME + ' · starts ' + START;
  $('headline').textContent = waiting.length === 0
    ? 'Nothing is waiting on you'
    : waiting.length + ' thing' + (waiting.length === 1 ? '' : 's') + ' still needed from you';

  $('how').innerHTML = HOW.map((h) => '<li><div>' + h[0] + '<small>' + h[1] + '</small></div></li>').join('');

  $('timeline').innerHTML = WEEKS.map((w, i) =>
    '<div class="row' + (i + 1 === NOW_WEEK ? ' now' : '') + '"><span class="wk">' + w.week + '</span>' +
    '<span class="what">' + w.what + '</span>' +
    '<span class="ball ' + w.ball + '">' + (w.ball === 'you' ? 'You' : 'Me') + '</span></div>').join('');

  $('count').textContent = (NEEDS.length - waiting.length) + ' of ' + NEEDS.length + ' received';

  const toggle = $('toggle');
  function drawNeeds() {
    const only = toggle.getAttribute('aria-pressed') === 'true';
    $('needs').innerHTML = NEEDS.filter((n) => !only || !n.done).map((n) =>
      '<div class="need' + (n.done ? ' is-done' : '') + '"><div class="t">' + n.item +
      '<small>' + (n.done ? n.note : 'By ' + n.due + ' · ' + n.note) + '</small></div>' +
      '<span class="pill ' + (n.done ? 'done' : 'wait') + '">' + (n.done ? 'Received' : 'Waiting') + '</span></div>').join('');
  }
  toggle.addEventListener('click', () => {
    toggle.setAttribute('aria-pressed', String(toggle.getAttribute('aria-pressed') !== 'true'));
    drawNeeds();
  });
  drawNeeds();

  $('who').innerHTML = 'Questions? Write to <b>' + EMAIL + '</b>. I reply within ' + REPLY + '.';
  $('updated').textContent = 'Page updated ' + UPDATED + '. When you send something, I mark it Received and this page changes.';
</script>
</body>
</html>
The page builds itself from a block of details at the top of the script: names, dates, steps and items. You change the details, not the layout.
The four parts, and why they are in this order
The order follows what a new client wonders on day one. This order is an editorial choice, not a standard.
- How we will work – four steps at most. Say who decides what, and how many rounds of feedback are included.
- Timeline – one row per week, with a label for who has the next move: you or the client.
- What I need from you – each item with a due date and a status.
- How to reach me – one address and how fast you reply.
The label for who has the next move is the useful part. It shows the client that the schedule slips when their items are late, without you having to say it.
Keep passwords off the page. Anyone with the link can open it, so ask the client to invite you as a user on their own account.
If you are onboarding a new employee rather than a client, an onboarding HTML template that stays current fits better.
Make it with AI
Paste this prompt into ChatGPT, Claude or Gemini. Put your own facts at the bottom.
Write ONE self-contained HTML file: a client onboarding page, to be read on a phone.
Rules:
- Plain HTML, CSS and JavaScript in one file. No images, no external files, no form that sends data.
- One column. Add a viewport meta tag. Text at least 16px.
- Put every detail (client name, dates, steps, weeks, items, email) in one block at the top of the script, with the comment "Change the details here".
- Start with a box that counts the items still needed from the client.
- Then in order: How we will work, Timeline, What I need from you, How to reach me.
- In Timeline, mark each week "You" or "Me" for who has the next move.
- In What I need from you, show each item with a due date and a status: Waiting or Received.
- If I did not give you a fact, write TODO. Do not invent dates or names.
My facts:
Client and project: ...
Steps: ...
Weeks: ...
Items and due dates: ...
My email and reply time: ...
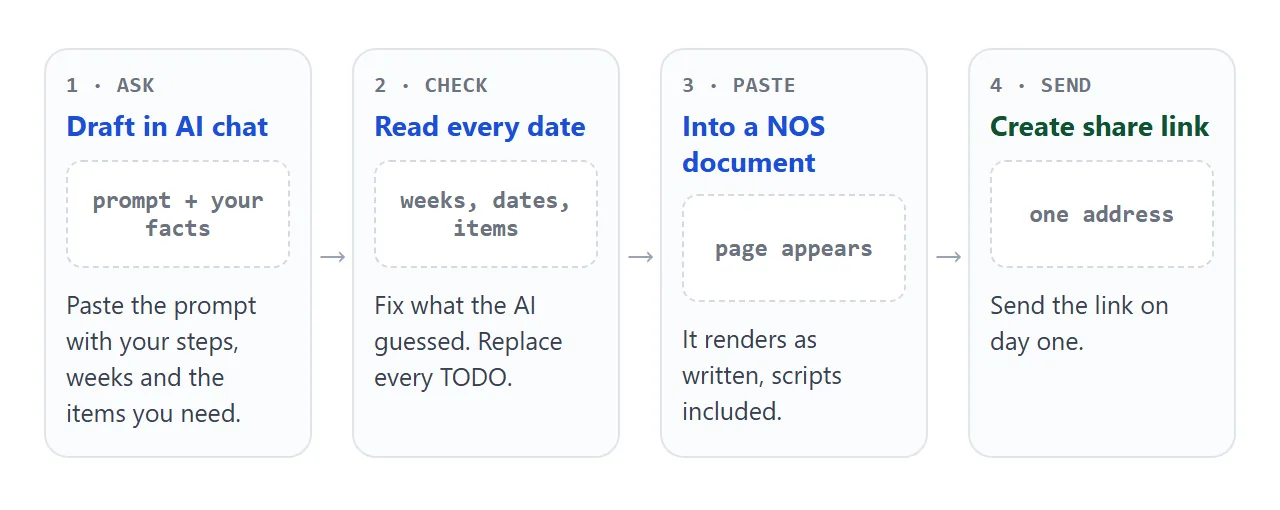
An AI is good at the layout and loose with facts. Read the page like the client will.
- Every date. Compare weeks and due dates with your own calendar.
- Every TODO. Replace it or delete the line.
- Invented promises. Rounds of changes, reply times or extras you did not offer.
- The status labels. Change one item in the block and check the count at the top.
- The phone. Open it on your own phone before the client does.
If the page looks off, fixing AI-generated HTML covers the usual causes.
Send it as a link
Paste the HTML into a NOS document and choose Create share link. HTML to link walks through it.
The result is a page anyone with the link can open in a browser, on a phone too, with no account. They can read it but not edit it. Scripts run, so the button that hides received items works for the client.
Put the link in the body of your day-one email or message, with one line saying what it is. Then say where you want the files to go, such as "reply to this email".
To update it: open the page in NOS, change an item from waiting to received in the block at the top of the script, and save. The same link shows the new version. Add a dated line so the client sees what changed.
A client who ticks something on the page sees it only on their own screen. Those ticks are not saved and you do not see them. Forms that send data to a server are blocked, so the page cannot collect files or replies for you.
The second example works within that. The client ticks what is ready, a reply writes itself, and they paste it into an email to you.
<!doctype html>
<html lang="en">
<head>
<meta charset="utf-8">
<meta name="viewport" content="width=device-width, initial-scale=1">
<title>Before our kickoff - Fernhill Pottery</title>
<style>
  * { box-sizing: border-box; }
  body { margin: 0; background: #f3f4f6; font-family: system-ui, -apple-system, "Segoe UI", sans-serif; color: #1f2937; line-height: 1.55; }
  .page { max-width: 720px; margin: 0 auto; background: #fff; padding: 24px 20px 32px; min-height: 100vh; }
  .tag { margin: 0; font-size: 13px; letter-spacing: .06em; text-transform: uppercase; color: #6b7280; }
  h1 { margin: 6px 0 6px; font-size: 26px; line-height: 1.15; }
  p { margin: 0 0 10px; font-size: 16px; }
  .note { background: #fffbeb; border: 1px solid #fde68a; border-radius: 12px; padding: 12px 14px; font-size: 15px; color: #78350f; }
  h2 { margin: 22px 0 8px; font-size: 13px; letter-spacing: .08em; text-transform: uppercase; color: #6b7280; }
  label.opt { display: flex; align-items: center; gap: 12px; padding: 11px 12px; border: 1px solid #e5e7eb; border-radius: 10px; margin-bottom: 8px; cursor: pointer; font-size: 16px; }
  label.opt input { width: 22px; height: 22px; flex: none; }
  label.opt small { display: block; color: #6b7280; font-size: 13px; }
  textarea { width: 100%; min-height: 150px; padding: 12px; font: inherit; font-size: 15px; border: 1px solid #d1d5db; border-radius: 10px; resize: vertical; background: #f9fafb; color: #1f2937; }
  .btn { margin-top: 10px; font: inherit; font-size: 16px; font-weight: 600; padding: 10px 18px; min-height: 44px; border: 0; border-radius: 10px; background: #1d4ed8; color: #fff; cursor: pointer; }
  .small { font-size: 14px; color: #6b7280; margin-top: 8px; }
</style>
</head>
<body>
<div class="page">
  <p class="tag">Before our kickoff call</p>
  <h1>What is ready on your side?</h1>
  <p>Tick what you already have. A short reply appears below. Select it, paste it into an email to me, and add any files.</p>
  <div class="note">Ticks stay on your screen only. I do not see them, so please send the reply.</div>

  <h2>Tick what you have</h2>
  <div id="list"></div>

  <h2>Your reply</h2>
  <textarea id="reply" readonly aria-label="Reply text"></textarea>
  <button class="btn" id="select" type="button">Select the text</button>
  <p class="small" id="hint"></p>
</div>

<script>
  // ---- Change the freelancer name, client name and items here. ----
  const TO = 'Ravi';
  const FROM = 'Fernhill Pottery';
  const ITEMS = [
    ['Logo file', 'PNG or SVG, any size'],
    ['Ten product photos', 'Daylight if you can'],
    ['Product names and prices', 'A list is enough'],
    ['Shipping rules', 'Where you ship and the cost'],
    ['Domain access', 'Invite me as a user, no passwords']
  ];
  // -----------------------------------------------------------------

  const list = document.getElementById('list');
  const reply = document.getElementById('reply');
  const hint = document.getElementById('hint');

  list.innerHTML = ITEMS.map((it, i) =>
    '<label class="opt"><input type="checkbox" data-i="' + i + '"><span>' + it[0] + '<small>' + it[1] + '</small></span></label>').join('');

  function build() {
    const ready = [], later = [];
    list.querySelectorAll('input').forEach((box) => {
      (box.checked ? ready : later).push(ITEMS[Number(box.dataset.i)][0]);
    });
    let t = 'Hi ' + TO + ',\n\n';
    t += ready.length ? 'Ready now (attached or on its way):\n- ' + ready.join('\n- ') + '\n\n' : 'Nothing is ready yet.\n\n';
    t += later.length ? 'Still to come:\n- ' + later.join('\n- ') + '\n\n' : 'That is everything.\n\n';
    t += 'Thanks,\n' + FROM;
    reply.value = t;
    hint.textContent = ready.length + ' of ' + ITEMS.length + ' ready';
  }

  list.addEventListener('change', build);
  document.getElementById('select').addEventListener('click', () => { reply.focus(); reply.select(); });
  build();
</script>
</body>
</html>
One link compared with the usual ways
| Several attachments | One long email | Link to a page | |
|---|---|---|---|
| Where the client looks | Each file | Scrolling the email | One address |
| Opens on a phone | After a download | Yes | Yes, in the browser |
| Change after sending | Send a new file | Send a new email | Edit the page, same link |
| Shows what is still missing | No | By reading it | Count and labels at the top |
| Client needs an account | No | No | No |
An attachment has to be downloaded to be read, and a change means sending a new file. That is a property of files, not of any product.
For when a link is better than an attachment in general, see email vs link for documents.
After day one
The page earns its place in the first two weeks, when the client still has things to send. Treat it as a status page.
- Change items to received as they arrive.
- Update the line that says which week you are in.
- Edit the page date.
Everything stays at one address, so the link you sent on day one is always the current version. When the work is under way, a client portal page or a shared project page can take over from it.
Put nothing on the page you would not want shown to anyone who gets the link. NOS has no password option, so do not rely on the address staying private.
When it does not work
| What you see | Cause | Fix |
|---|---|---|
| The page shows raw code in the chat | You copied the chat text, not the code block | Copy only the code, from the first doctype line to the last html tag |
| The count at the top is wrong | The AI counted by hand, not from the items | Ask: "Count the waiting items in the script" |
| A picture or logo is missing | Images from other sites are blocked | Ask for no images, or a logo drawn in SVG |
| A form or upload button does nothing | Forms cannot send to a server from the link | Ask for files by reply, and give your email as plain text |
| The client says it still shows Waiting | You edited but did not save, or they have the page open | Save in NOS, then ask them to reload |
| The text is tiny on a phone | No viewport meta tag | Ask the AI to add one, and a 16px base size |