A CSS counter is a number that the browser tracks while it lays out the page. counter-reset creates it, counter-increment adds to it on each element you pick, and counter() prints the current value in a pseudo-element's content. No number is written in the HTML.
Change the values below and watch the list renumber. The CSS on the left is exactly what the list uses.
<!doctype html>
<html lang="en">
<head>
<meta charset="utf-8">
<meta name="viewport" content="width=device-width, initial-scale=1">
<title>CSS counter lab</title>
<style>
  body { margin: 0; padding: 14px; font-family: system-ui, sans-serif; background: #f4f5f7; color: #1d2330; }
  .wrap { display: grid; grid-template-columns: 1fr 1fr; gap: 14px; }
  @media (max-width: 560px) { .wrap { grid-template-columns: 1fr; } }
  .panel { background: #fff; border-radius: 12px; padding: 12px 14px; box-shadow: 0 2px 8px rgba(0, 0, 0, .06); }
  label { display: flex; align-items: center; justify-content: space-between; gap: 8px; font-size: 13px; margin: 6px 0; }
  input[type=number] { width: 64px; font: inherit; padding: 3px 6px; }
  select { font: inherit; padding: 3px; }
  pre { margin: 10px 0 0; padding: 10px; background: #1d2330; color: #e6edf3; border-radius: 8px;
        font: 12px/1.5 ui-monospace, Consolas, monospace; white-space: pre-wrap; }
  .items p { margin: 6px 0; padding: 7px 10px; background: #f4f5f7; border-radius: 8px; font-size: 14px; }
  .items p::before { font-weight: 700; color: #1d4ed8; }
</style>
<style id="live"></style>
</head>
<body>
<div class="wrap">
  <div class="panel">
    <label>counter-reset start <input type="number" id="start" value="0"></label>
    <label>counter-increment step <input type="number" id="step" value="1"></label>
    <label>counter-set on item 4 <input type="number" id="jump" placeholder="off"></label>
    <label>Style
      <select id="style">
        <option>decimal</option>
        <option>decimal-leading-zero</option>
        <option>upper-roman</option>
        <option>lower-alpha</option>
        <option>lower-greek</option>
      </select>
    </label>
    <label>Hide item 3 with display: none <input type="checkbox" id="hide"></label>
    <pre id="code"></pre>
  </div>
  <div class="panel items" id="items">
    <p>Plan</p><p>Draft</p><p>Review</p><p>Edit</p><p>Publish</p><p>Share</p>
  </div>
</div>

<script>
  const $ = (id) => document.getElementById(id);

  // Build the CSS from the controls, apply it, and show the same text.
  function update() {
    const jump = $('jump').value;
    let css =
`.items { counter-reset: item ${$('start').value || 0}; }
.items p { counter-increment: item ${$('step').value || 0}; }
.items p::before {
  content: counter(item, ${$('style').value}) ". ";
}`;
    if (jump !== '') css += `\n.items p:nth-child(4) { counter-set: item ${jump}; }`;
    if ($('hide').checked) css += `\n.items p:nth-child(3) { display: none; }`;
    $('live').textContent = css;
    $('code').textContent = css;
  }

  document.querySelectorAll('input, select').forEach((el) => el.addEventListener('input', update));
  update();
</script>
</body>
</html>
Counters are often met on ordered lists. The ol tag guide covers list numbering, start and nested 1.1 lists. This guide uses counters on everything else: headings, figures, tables and form inputs.
The three properties and one function
Every counter goes through the same three moments: it is created, it grows, and it is printed.
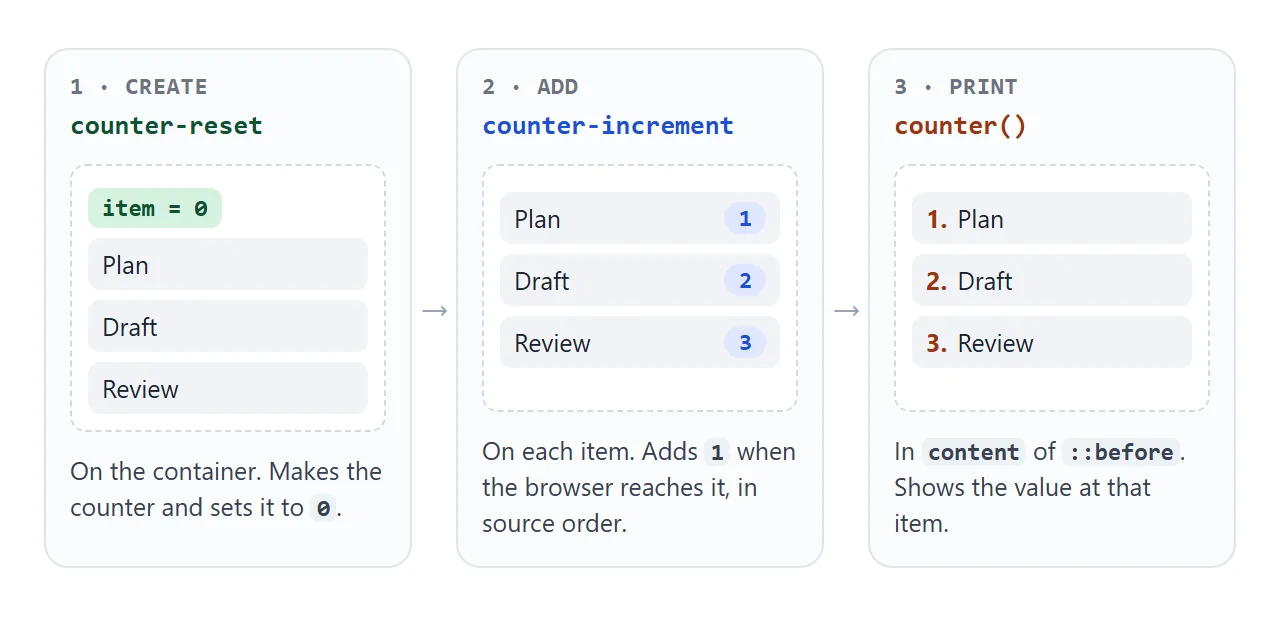
- Create it:
counter-reset: itemon the container. - Add to it:
counter-increment: itemon each item. - Print it:
content: counter(item)in::beforeor::after. - Restart sub-counters on each parent heading for
1.1numbers.
.steps { counter-reset: item; }
.steps p { counter-increment: item; }
.steps p::before { content: counter(item) ". "; }
| Property | What it does | Example |
|---|---|---|
counter-reset |
Creates a counter, 0 by default | counter-reset: item 4 |
counter-increment |
Adds to it, 1 by default | counter-increment: item 2 |
counter-set |
Sets a counter to a value, mid-count | counter-set: item 10 |
counter() |
Prints the value | counter(item, upper-roman) |
The number after the name is the value that counter-reset stores. counter-reset: item 4 stores 4, so the first item shows 5. A negative step such as counter-increment: item -1 counts down.
When one element has both counter-increment and counter-set, the set happens last. That is why item 4 in the lab shows exactly the value you type, and item 5 continues from it.
Number styles: 01, Roman numerals and letters
The second argument of counter() picks how the number is drawn. It takes the same names as list-style-type.
h2::before { content: counter(chapter, decimal-leading-zero) " "; }  /* 01 02 03 */
.part::before { content: "Part " counter(part, upper-roman); }        /* Part IV */
| Style | 1, 2, 4 look like |
|---|---|
decimal |
1, 2, 4 |
decimal-leading-zero |
01, 02, 04 |
upper-roman |
I, II, IV |
lower-alpha |
a, b, d |
lower-greek |
α, β, δ |
decimal-leading-zero pads to two digits. Values from 10 on print as they are.
Numbering headings: 1, 1.1, 1.2
Headings in an article are siblings, not nested lists. Use one counter per level and print both with counter():
article { counter-reset: h2; }
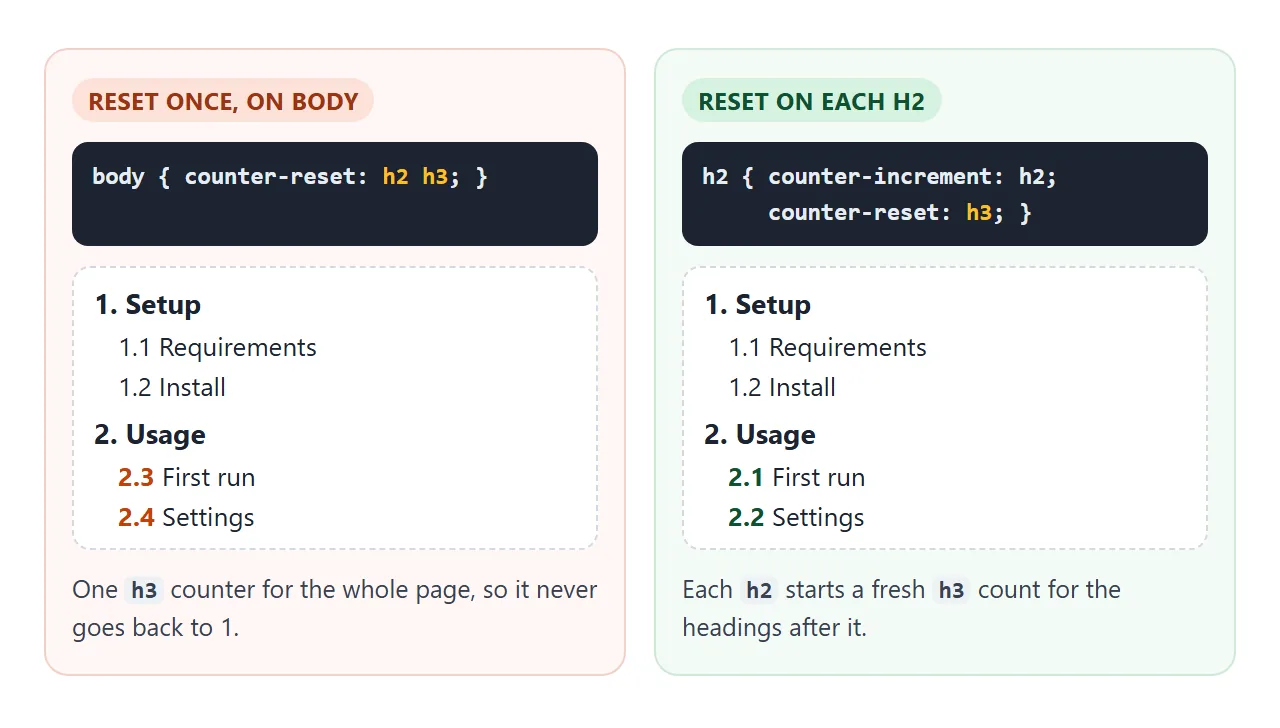
h2 { counter-increment: h2; counter-reset: h3; }  /* each h2 restarts its h3s */
h2::before { content: counter(h2) ". "; }
h3 { counter-increment: h3; }
h3::before { content: counter(h2) "." counter(h3) " "; }
The line that matters is counter-reset: h3 on the h2. A reset applies to the element and to the siblings that follow it, so every h2 starts a new count for the h3 headings under it.
counters(), with an s, is not the tool here. It joins counters that are nested inside each other, as in lists within lists. Flat headings have no nesting to join, so it cannot build 2.1 from them.
Figures and tables: "Figure 3"
Figures and tables get their own counters, separate from the headings. Increment on the element and print in its caption:
article { counter-reset: fig tbl; }
figure { counter-increment: fig; }
figcaption::before { content: "Figure " counter(fig) ". "; }
table { counter-increment: tbl; }
caption::before { content: "Table " counter(tbl) ". "; }
Insert a section at the top below. Every heading and figure after it renumbers, and the script only adds elements. The figure tag guide covers the <figure> element itself.
<!doctype html>
<html lang="en">
<head>
<meta charset="utf-8">
<meta name="viewport" content="width=device-width, initial-scale=1">
<title>Numbered headings and figures with CSS counters</title>
<style>
  body { margin: 0; font-family: system-ui, sans-serif; background: #f4f5f7; color: #1d2330; }
  .bar { position: sticky; top: 0; display: flex; gap: 8px; flex-wrap: wrap; padding: 10px 14px; background: #fff; border-bottom: 1px solid #e1e4ea; }
  button { font: inherit; font-size: 13px; padding: 6px 10px; border-radius: 8px; border: 1px solid #c9cdd4; background: #fff; cursor: pointer; }
  .doc { max-width: 620px; margin: 0 auto; padding: 4px 16px 16px; }
  h2 { font-size: 18px; margin: 18px 0 6px; }
  h3 { font-size: 15px; margin: 12px 0 4px; }
  p { margin: 4px 0; font-size: 14px; line-height: 1.5; }
  figure { margin: 10px 0; }
  .pic { height: 46px; border-radius: 8px; background: linear-gradient(90deg, #93c5fd, #c4b5fd); }
  figcaption, caption { font-size: 13px; color: #5b6270; margin-top: 4px; text-align: left; }
  table { border-collapse: collapse; font-size: 13px; margin: 10px 0; }
  td, th { border: 1px solid #d5d9e0; padding: 4px 8px; }
  .new { background: #fff3c4; }  /* highlights the inserted part */

  /* The numbering. No number is written in the HTML. */
  .doc { counter-reset: h2 fig tbl; }
  .doc h2 { counter-increment: h2; counter-reset: h3; }  /* each h2 restarts its h3s */
  .doc h2::before { content: counter(h2) ". "; }
  .doc h3 { counter-increment: h3; }
  .doc h3::before { content: counter(h2) "." counter(h3) " "; }
  .doc figure { counter-increment: fig; }
  .doc figcaption::before { content: "Figure " counter(fig) ". "; font-weight: 700; }
  .doc table { counter-increment: tbl; }
  .doc caption::before { content: "Table " counter(tbl) ". "; font-weight: 700; }
</style>
</head>
<body>
<div class="bar">
  <button id="add">Insert a section at the top</button>
  <button id="remove">Remove it</button>
</div>
<div class="doc" id="doc">
  <h2>Setup</h2>
  <p>Install the tools you need.</p>
  <h3>Requirements</h3>
  <figure><div class="pic"></div><figcaption>The setup screen</figcaption></figure>
  <h3>Install</h3>
  <h2>Usage</h2>
  <h3>First run</h3>
  <table><caption>Command options</caption>
    <tr><th>Option</th><th>Effect</th></tr>
    <tr><td>--watch</td><td>Rebuild on save</td></tr>
  </table>
  <h3>Settings</h3>
  <figure><div class="pic"></div><figcaption>The settings panel</figcaption></figure>
  <h2>Help</h2>
  <p>Where to ask questions.</p>
</div>

<script>
  // The script only adds or removes elements. CSS renumbers everything.
  const doc = document.getElementById('doc');
  document.getElementById('add').addEventListener('click', () => {
    if (doc.querySelector('.new')) return;
    doc.insertAdjacentHTML('afterbegin',
      '<h2 class="new">Overview</h2><h3 class="new">Who it is for</h3>' +
      '<figure class="new"><div class="pic"></div><figcaption>The big picture</figcaption></figure>');
  });
  document.getElementById('remove').addEventListener('click', () => {
    doc.querySelectorAll('.new').forEach((el) => el.remove());
  });
</script>
</body>
</html>
A counter cannot write "see Figure 3" elsewhere in the text. The value exists only where it is printed, so cross-references need a few lines of JavaScript or a number written by hand.
Counting checked boxes with CSS only
A checkbox that is ticked matches :checked, and a counter can be incremented from any selector. Put the two together and CSS keeps a tally:
.todo { counter-reset: total done; }
.todo input { counter-increment: total; }
.todo input:checked { counter-increment: total done; }
.todo .result::after { content: counter(done) " of " counter(total) " done"; }
Two details make it work. First, the :checked rule names both counters. A second counter-increment replaces the first one, like any CSS property, so counter-increment: done alone would stop counting the total.
Second, the result element comes after the inputs in the HTML. Counters follow source order, so a result placed first would read 0. The demo gives it order: -1 inside a flex column to draw it on top anyway.
<!doctype html>
<html lang="en">
<head>
<meta charset="utf-8">
<meta name="viewport" content="width=device-width, initial-scale=1">
<title>CSS-only checklist and quiz score</title>
<style>
  body { margin: 0; padding: 12px; font-family: system-ui, sans-serif; background: #f4f5f7; color: #1d2330; }
  .wrap { display: grid; grid-template-columns: 1fr 1fr; gap: 12px; align-items: start; }
  @media (max-width: 560px) { .wrap { grid-template-columns: 1fr; } }
  .card { background: #fff; border-radius: 12px; padding: 10px 14px 12px; box-shadow: 0 2px 8px rgba(0, 0, 0, .06);
          display: flex; flex-direction: column; }
  h2 { font-size: 15px; margin: 2px 0 6px; }
  label { display: flex; gap: 8px; align-items: center; font-size: 14px; padding: 4px 0; cursor: pointer; }
  input { width: 17px; height: 17px; margin: 0; accent-color: #16a34a; }
  input:checked + span { color: #6b7280; text-decoration: line-through; }
  .quiz input:checked + span { text-decoration: none; color: inherit; font-weight: 600; }
  .result { order: -1; margin: 0 0 6px; padding: 6px 10px; border-radius: 8px; background: #eef7f1; color: #0f5132; font-weight: 700; font-size: 14px; }

  /* 1. Checklist: count every box, and the checked ones. */
  .todo { counter-reset: total done; }
  .todo input { counter-increment: total; }
  .todo input:checked { counter-increment: total done; }  /* list both: this line replaces the one above */
  .todo .result::after { content: counter(done) " of " counter(total) " done"; }

  /* 2. Quiz: a custom counter style draws circled numbers. */
  @counter-style circled {
    system: fixed;
    symbols: "\2460" "\2461" "\2462" "\2463" "\2464";  /* 1 to 5 in circles */
  }
  .quiz { counter-reset: q score answered; }
  .quiz fieldset { counter-increment: q; border: 0; margin: 0 0 6px; padding: 0; }
  .quiz legend { font-size: 14px; font-weight: 600; padding: 0; margin-bottom: 2px; }
  .quiz legend::before { content: counter(q, circled) " "; color: #1d4ed8; }
  .quiz .opts { display: flex; flex-wrap: wrap; column-gap: 14px; }
  .quiz input:checked { counter-increment: answered; }
  .quiz input.right:checked { counter-increment: answered score; }
  .quiz .result::after { content: counter(score) " of " counter(q) " right, " counter(answered) " answered"; }
</style>
</head>
<body>
<div class="wrap">
  <form class="card todo">
    <h2>Launch checklist</h2>
    <label><input type="checkbox" checked><span>Write the page</span></label>
    <label><input type="checkbox" checked><span>Check it on a phone</span></label>
    <label><input type="checkbox"><span>Fix the broken links</span></label>
    <label><input type="checkbox"><span>Add a page title</span></label>
    <label><input type="checkbox"><span>Compress the images</span></label>
    <label><input type="checkbox"><span>Ask a friend to try it</span></label>
    <label><input type="checkbox"><span>Share the link</span></label>
    <!-- The result sits after the boxes in the HTML, so the counters are already final.
         order: -1 draws it at the top anyway. -->
    <p class="result"></p>
  </form>

  <form class="card quiz">
    <h2>Quick quiz</h2>
    <fieldset>
      <legend>Which property creates a counter?</legend>
      <div class="opts">
        <label><input type="radio" name="a"><span>counter-increment</span></label>
        <label><input type="radio" name="a" class="right"><span>counter-reset</span></label>
      </div>
    </fieldset>
    <fieldset>
      <legend>Which function prints 1.2.3?</legend>
      <div class="opts">
        <label><input type="radio" name="b"><span>counter()</span></label>
        <label><input type="radio" name="b" class="right"><span>counters()</span></label>
      </div>
    </fieldset>
    <fieldset>
      <legend>Does a display: none item count?</legend>
      <div class="opts">
        <label><input type="radio" name="c"><span>Yes</span></label>
        <label><input type="radio" name="c" class="right"><span>No</span></label>
      </div>
    </fieldset>
    <p class="result"></p>
  </form>
</div>
</body>
</html>
The quiz uses the same idea with radio buttons: every checked answer adds to answered, and the right ones also add to score.
The right answers sit in the HTML as a class, so this suits practice checks, not graded tests. The checkbox guide covers the input itself.
Custom symbols with @counter-style
When the built-in styles are not enough, @counter-style defines a new one. The quiz above draws circled numbers:
@counter-style circled {
  system: fixed;
  symbols: "\2460" "\2461" "\2462" "\2463" "\2464";  /* circled 1 to 5 */
}
legend::before { content: counter(q, circled) " "; }
system decides how the symbols are used. fixed uses each symbol once. cyclic repeats them, which suits bullets. extends decimal copies an existing style so you can change parts of it.
A fixed style that runs out of symbols falls back to decimal, so a sixth question here would show a plain 6. Also, prefix and suffix apply when the style is a list marker, as in list-style: circled. counter() prints the symbol without them.
Counters are not part of the document
The number you see is drawn by the browser from CSS. It is not in the HTML text.
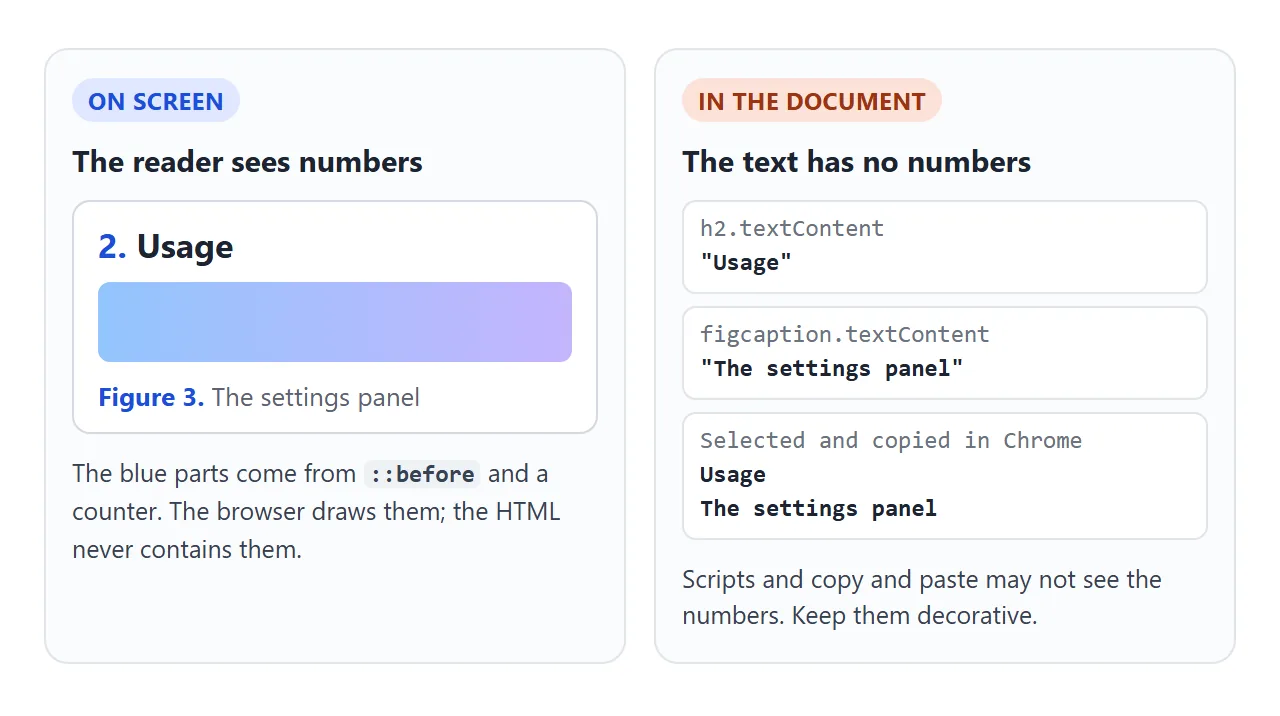
textContentandinnerTextreturn the heading without its number.- Selecting and copying the page usually leaves the numbers out.
- Screen readers differ in how they handle generated content, so a number that carries meaning may not be announced.
Use counters for numbers that decorate or organise. If a number is part of the content, such as a clause number that people quote, write it in the HTML. The ::before and ::after guide has more on what generated content can and cannot do.
When it does not work
| What you see | Cause | Fix |
|---|---|---|
| Nothing appears | The pseudo-element has no content |
Add content: counter(name) |
| Sub-numbers never restart: 2.3, 2.4 | The sub-counter is reset only once, on body |
Reset it on each parent heading |
| Numbering restarts inside each box | No counter-reset on a shared ancestor, so each container starts its own |
Reset on the common parent |
| The first number is 2 | counter-reset: name 1 |
Use counter-reset: name (starts at 0) |
| The first number is 0 | The printing element never increments, for example the increment sits on ::after |
Increment on the element that prints |
counters() shows 1.1 everywhere |
The items are siblings, not nested | Use two counters, or nest and reset at every level |
| A number is skipped or the tally is low | Elements with display: none do not increment |
Expected; visibility: hidden elements still count |
| A tally always reads 0 | The result element comes before the inputs | Move it after them; use order to place it visually |
Share it as a link
Numbered documents and CSS-only checklists are easier to try than to describe. A screenshot cannot be ticked, and an .html attachment may open as plain code on a phone.
To send the working page, paste it into a NOS document and choose Create share link. HTML to link walks through it.
The page renders as written and its scripts run, so the people you send it to can tick the boxes and insert sections themselves. If you change the code later, the same link shows the new version.