The <ol> tag makes an ordered list: items in a sequence the reader should follow. Each item goes in an <li>, and the browser numbers them for you. Add or delete an item and the numbers update on their own.
<ol>
  <li>Boil the water</li>
  <li>Add the tea</li>
  <li>Pour and wait</li>
</ol>
Try the attributes below. Each control changes the real list and prints the HTML it now has.
<!doctype html>
<html lang="en">
<head>
<meta charset="utf-8">
<meta name="viewport" content="width=device-width, initial-scale=1">
<title>ol attribute playground</title>
<style>
  body { margin: 0; padding: 14px; font-family: system-ui, sans-serif; background: #f4f5f7; color: #1d2330; }
  .controls { display: flex; flex-wrap: wrap; gap: 8px 14px; font-size: 14px; }
  .controls label { display: flex; align-items: center; gap: 6px; }
  select, input[type=number] { font: inherit; padding: 3px 4px; }
  input[type=number] { width: 58px; }
  .out { display: grid; grid-template-columns: repeat(auto-fit, minmax(170px, 1fr)); gap: 12px; margin-top: 12px; }
  .box { background: #fff; border-radius: 10px; padding: 10px 12px; box-shadow: 0 2px 8px rgba(0, 0, 0, .08); }
  .box h3 { margin: 0 0 6px; font-size: 12px; color: #5b6270; text-transform: uppercase; letter-spacing: .3px; }
  #list { margin: 0; padding-left: 2.6em; line-height: 1.7; }
  #list li.picked { background: #fff3a8; }
  pre { margin: 0; font: 12.5px/1.5 ui-monospace, Consolas, monospace; white-space: pre-wrap; word-break: break-word; }
</style>
</head>
<body>
<div class="controls">
  <label>type
    <select id="type">
      <option value="1">1</option><option value="a">a</option><option value="A">A</option>
      <option value="i">i</option><option value="I">I</option>
    </select>
  </label>
  <label>start <input id="start" type="number" value="1"></label>
  <label><input id="reversed" type="checkbox"> reversed</label>
  <label>3rd li value <input id="value" type="number" placeholder="none"></label>
  <label>CSS list-style-type
    <select id="css">
      <option value="">(not set)</option>
      <option>decimal-leading-zero</option><option>lower-roman</option>
      <option>upper-alpha</option><option>lower-greek</option>
    </select>
  </label>
</div>

<div class="out">
  <div class="box"><h3>Result</h3>
    <ol id="list">
      <li>Boil the water</li><li>Warm the pot</li><li class="picked">Add the tea</li>
      <li>Pour and wait</li><li>Serve</li>
    </ol>
  </div>
  <div class="box"><h3>The HTML</h3><pre id="code"></pre></div>
</div>

<script>
  const list = document.getElementById('list');
  const $ = (id) => document.getElementById(id);

  function update() {
    const type = $('type').value, start = $('start').value;
    const reversed = $('reversed').checked, value = $('value').value, css = $('css').value;

    // set or remove each attribute on the real <ol>
    if (type === '1') list.removeAttribute('type'); else list.setAttribute('type', type);
    if (start === '' || (start === '1' && !reversed)) list.removeAttribute('start');
    else list.setAttribute('start', start);
    list.reversed = reversed;
    const third = list.children[2];
    if (value === '') third.removeAttribute('value'); else third.setAttribute('value', value);
    list.style.listStyleType = css;   // CSS wins over the type attribute

    // print the markup the list now has
    const attrs = [...list.attributes]
      .filter((a) => a.name !== 'id' && a.name !== 'style')
      .map((a) => a.value === '' ? ' ' + a.name : ` ${a.name}="${a.value}"`).join('');
    const items = [...list.children].map((li) => {
      const v = li.getAttribute('value');
      return `  <li${v !== null ? ` value="${v}"` : ''}>${li.textContent}</li>`;
    }).join('\n');
    const style = css ? `<style>ol { list-style-type: ${css}; }</style>\n` : '';
    $('code').textContent = `${style}<ol${attrs}>\n${items}\n</ol>`;
  }

  document.querySelectorAll('select, input').forEach((el) => el.addEventListener('input', update));
  update();
</script>
</body>
</html>
If the order of your items does not matter, you want a <ul> instead. The ul tag guide covers bullets, indents and ::marker, which work the same way on both lists.
The four attributes: type, start, reversed, value
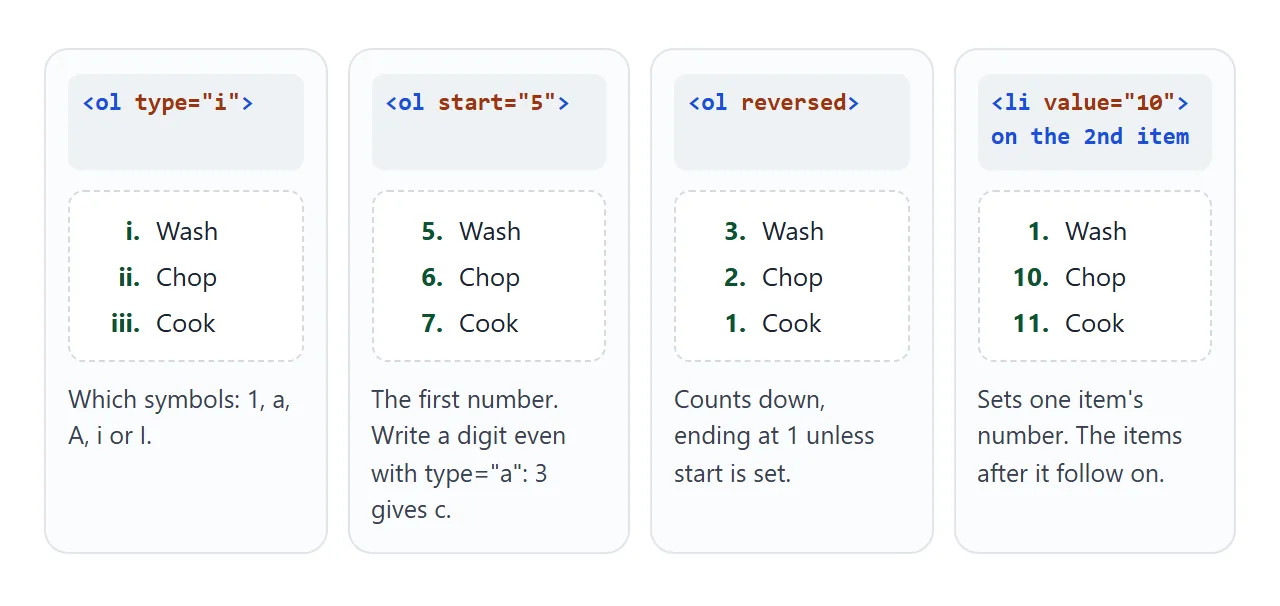
Three attributes go on the <ol> and one on an <li>. None needs CSS.
| Attribute | Goes on | What it does | Example |
|---|---|---|---|
type |
ol |
Numbers, letters or Roman numerals | type="A" gives A, B, C |
start |
ol |
The first number | start="5" gives 5, 6, 7 |
reversed |
ol |
Counts down | 3 items give 3, 2, 1 |
value |
li |
Sets this item's number | Later items continue from it |
start always takes a whole number, even on a lettered list. <ol type="a" start="3"> begins at c. reversed is a boolean attribute: writing it is enough, and reversed="false" still turns it on.
A common use of start is a list split by a paragraph or an image. End the first <ol>, add the paragraph, then open the second one with start set to the next number.
Number styles with list-style-type
The type attribute offers five styles. CSS offers many more through list-style-type, and when both are set, the CSS wins.
ol.chapters { list-style-type: decimal-leading-zero; } /* 01, 02, 03 */
ol.appendix { list-style-type: upper-alpha; }          /* A, B, C */
ol.clauses  { list-style-type: lower-roman; }          /* i, ii, iii */
Other values include lower-greek, upper-roman and lower-alpha. Changing only the colour or size of the numbers does not need a new style. Use li::marker { color: ...; font-weight: 700; } and the numbers stay the browser's own.
Styled number badges with CSS counters
::marker accepts only a few properties, so it cannot draw a coloured circle. For that, hide the built-in numbers and print your own with a CSS counter in ::before. Three properties do it:
.steps { list-style: none; padding: 0; counter-reset: step; }
.steps li { counter-increment: step; position: relative; padding-left: 38px; }
.steps li::before {
  content: counter(step);
  position: absolute; left: 0; top: 0;
  width: 28px; height: 28px; border-radius: 50%;
  background: #2563eb; color: #fff;
  display: grid; place-items: center;
}
counter-reset creates the counter at 0 on the list. counter-increment adds 1 on each item. counter(step) prints the current value. The ::before and ::after guide covers the pseudo-element itself.
<!doctype html>
<html lang="en">
<head>
<meta charset="utf-8">
<meta name="viewport" content="width=device-width, initial-scale=1">
<title>CSS counters for ol</title>
<style>
  body { margin: 0; padding: 14px; font-family: system-ui, sans-serif; background: #f4f5f7; color: #1d2330; }
  .grid { display: grid; grid-template-columns: 1fr 1fr; gap: 12px; }
  .box { background: #fff; border-radius: 10px; padding: 12px; box-shadow: 0 2px 8px rgba(0, 0, 0, .08); font-size: 14px; }
  .box h3 { margin: 0 0 10px; font-size: 12px; color: #5b6270; text-transform: uppercase; letter-spacing: .3px; }

  /* 1. Circle badges: one counter, drawn by ::before */
  .badges { list-style: none; margin: 0; padding: 0; counter-reset: step; }
  .badges li { counter-increment: step; position: relative; padding: 4px 0 4px 38px; min-height: 28px; margin-bottom: 8px; }
  .badges li::before {
    content: counter(step);
    position: absolute; left: 0; top: 0;
    width: 28px; height: 28px; border-radius: 50%;
    background: #2563eb; color: #fff; font-weight: 700;
    display: grid; place-items: center;
  }

  /* 2. Nested 1.1 / 1.2: every ol resets its own counter, counters() joins them */
  .outline, .outline ol { list-style: none; counter-reset: item; margin: 0; padding-left: 0; }
  .outline ol { padding-left: 20px; }
  .outline li { counter-increment: item; margin: 3px 0; }
  .outline li::before { content: counters(item, ".") " "; font-weight: 700; color: #0f5132; margin-right: 4px; }
</style>
</head>
<body>
<div class="grid">
  <div class="box"><h3>Badges</h3>
    <ol class="badges">
      <li>Download the file</li>
      <li>Open it in a browser</li>
      <li>Check every page</li>
      <li>Send the link</li>
    </ol>
  </div>
  <div class="box"><h3>1.1 / 1.2</h3>
    <ol class="outline">
      <li>Setup
        <ol><li>Install</li><li>Sign in</li></ol>
      </li>
      <li>Daily use
        <ol><li>Open a file</li><li>Share it
          <ol><li>Copy link</li></ol></li></ol>
      </li>
      <li>Help</li>
    </ol>
  </div>
</div>
</body>
</html>
Nested numbering: 1.1, 1.2 with counters()
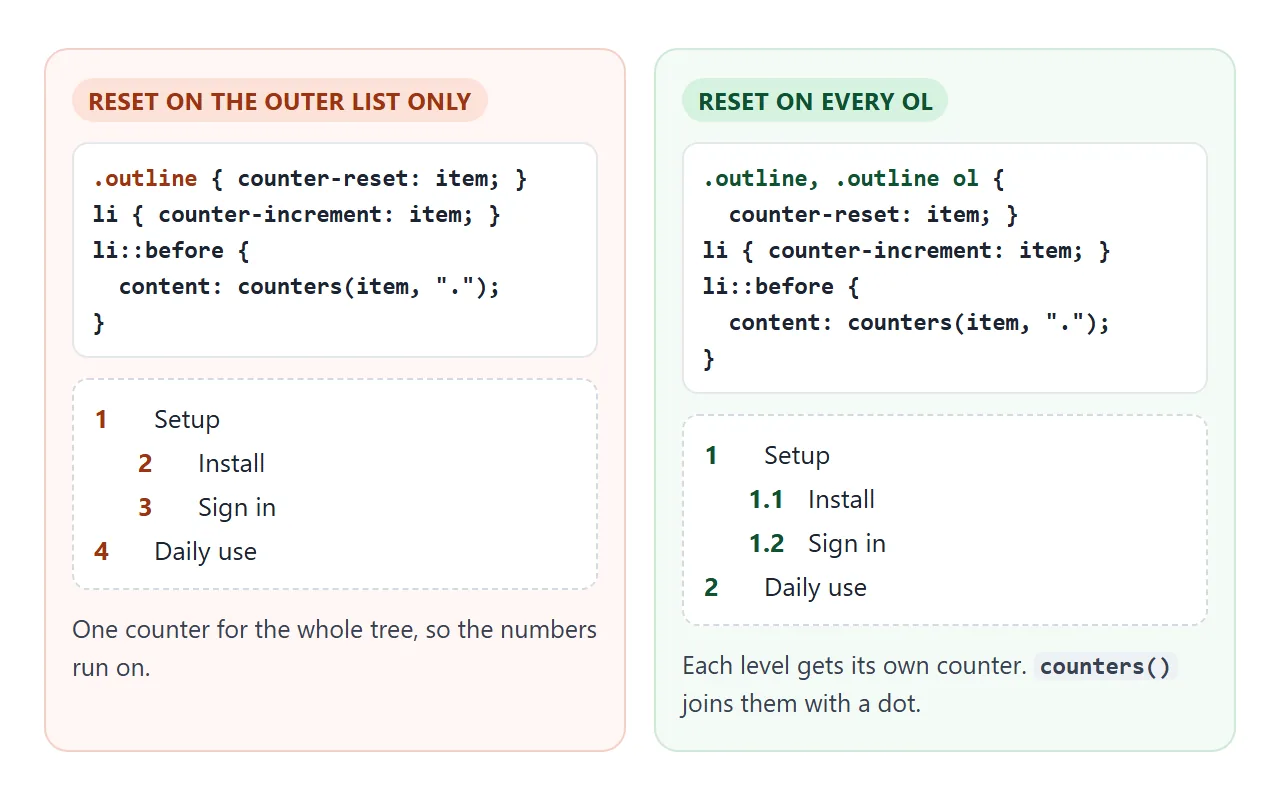
A nested <ol> normally restarts at 1 with no link to its parent. For outline numbers such as 2.1, use counters(), with an s. It prints every counter of that name from the outermost list inwards, joined by the string you pass.
.outline, .outline ol { list-style: none; counter-reset: item; }
.outline li { counter-increment: item; }
.outline li::before { content: counters(item, ".") " "; }
The key is the selector on the first line. Every <ol>, nested ones included, needs its own counter-reset. Reset only the outer list and all levels share one counter.
start, reversed and value with custom counters
Once you print your own counter, the list attributes no longer reach it. start, reversed and value feed the list's built-in numbering, and counter-reset: step created a new counter.
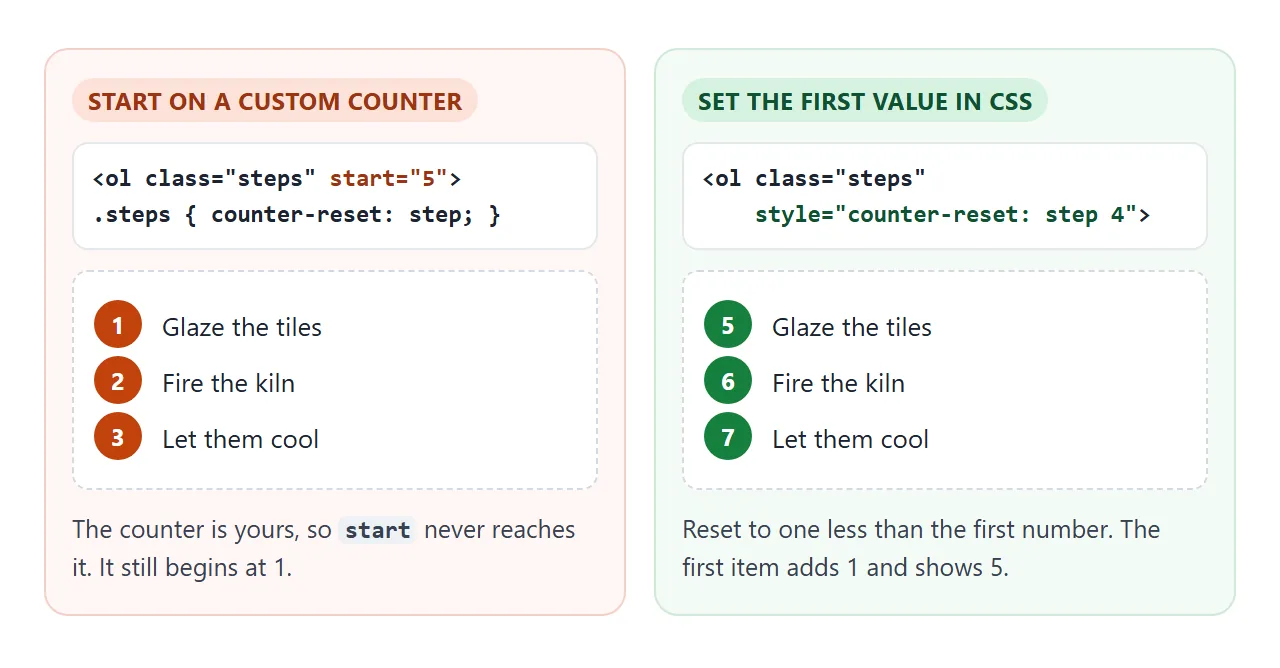
Rebuild each one in CSS:
/* start="5": reset to one less than the first number */
.steps { counter-reset: step 4; }

/* reversed on 3 items: start at 4, count down by 1 */
.steps.down { counter-reset: step 4; }
.steps.down li { counter-increment: step -1; }

/* value="10" on one item */
.steps li.jump { counter-set: step 10; }
A countdown this way needs the item count, so it has to change when items do. If the list changes often, keep the built-in numbers and style them with ::marker.
A finished example: recipe steps
Steps are the classic ordered list. This recipe draws its numbers with a counter, so JavaScript never writes a number. Remove a step or add one, and every badge after it renumbers.
<!doctype html>
<html lang="en">
<head>
<meta charset="utf-8">
<meta name="viewport" content="width=device-width, initial-scale=1">
<title>Recipe steps</title>
<style>
body { margin: 0; padding: 14px; font-family: system-ui, sans-serif; background: #fbf7f2; color: #2b2118; }
.card { max-width: 520px; margin: 0 auto; background: #fff; border-radius: 14px; padding: 16px 18px; box-shadow: 0 4px 16px rgba(0, 0, 0, .08); }
h2 { margin: 0; font-size: 20px; }
.meta { margin: 2px 0 12px; font-size: 13px; color: #7a6a5a; }
.steps { list-style: none; margin: 0; padding: 0; counter-reset: step; }
.steps li {
counter-increment: step;
display: flex; align-items: flex-start; gap: 12px;
padding: 8px 0; border-top: 1px solid #f0e8de; line-height: 1.45;
}
.steps li::before {
content: counter(step);
flex: none; width: 30px; height: 30px; border-radius: 50%;
background: #e8590c; color: #fff; font-weight: 700;
display: grid; place-items: center;
}
.steps li span { flex: 1; padding-top: 4px; }
.steps li button { flex: none; border: 0; background: none; color: #a8998a; font-size: 20px; line-height: 1; cursor: pointer; padding: 4px 6px; }
form { display: flex; gap: 8px; margin-top: 12px; }
form input { flex: 1; min-width: 0; font: inherit; padding: 8px 10px; border: 1px solid #ddd0c2; border-radius: 8px; }
form button { font: inherit; font-weight: 600; padding: 8px 14px; border: 0; border-radius: 8px; background: #e8590c; color: #fff; cursor: pointer; }
</style>
</head>
<body>
<div class="card">
<h2>Pancakes</h2>
<p class="meta" id="count"></p>
<ol class="steps" id="steps" role="list">
<li><span>Whisk flour, sugar and a pinch of salt.</span><button aria-label="Remove step">×</button></li>
<li><span>Beat in the milk and eggs until smooth.</span><button aria-label="Remove step">×</button></li>
<li><span>Rest the batter for ten minutes.</span><button aria-label="Remove step">×</button></li>
<li><span>Cook each pancake until bubbles appear, then flip.</span><button aria-label="Remove step">×</button></li>
</ol>
<form id="add">
<input id="text" placeholder="New step, e.g. Serve with syrup" aria-label="New step">
<button>Add step</button>
</form>
</div>
<script>
const steps = document.getElementById('steps');
const count = document.getElementById('count');
// the numbers come from the CSS counter; JS only updates the total
const showCount = () => { count.textContent = steps.children.length + ' steps'; };
// one listener handles every remove button, including ones added later
steps.addEventListener('click', (e) => {
const btn = e.target.closest('button');
if (btn) { btn.closest('li').remove(); showCount(); }
});
document.getElementById('add').addEventListener('submit', (e) => {
e.preventDefault(); // stay on the page
const input = document.getElementById('text');
const text = input.value.trim();
if (!text) return;
const li = document.createElement('li');
li.innerHTML = '<span></span><button aria-label="Remove step">×</button>';
li.querySelector('span').textContent = text;
steps.append(li);
input.value = '';
showCount();
});
showCount();
</script>
</body>
</html>
- Numbers from CSS: the counter counts whatever
<li>elements exist, so there is nothing to recalculate. - One click listener: it sits on the
<ol>and finds the clicked button, so new steps work. - Still a list: the
<ol>hasrole="list", covered below.
When it does not work
| What you see | Cause | Fix |
|---|---|---|
| No numbers at all | A CSS reset set list-style: none on ol |
Set list-style: decimal on the lists that need numbers |
| Numbers cut off at the left edge | padding: 0 on the ol, markers sit outside the item |
Restore padding-left, or use list-style-position: inside |
start or value does nothing |
Numbers come from your own counter | Set the value in counter-reset or counter-set |
reversed still counts up |
Same cause | counter-increment: step -1 with a matching reset |
| Nested items show 3, 4, 5 instead of 1.1 | counter-reset only on the outer ol |
Reset on every ol, and print with counters() |
type="i" shows 1, 2, 3 |
A list-style-type rule in CSS overrides it |
Remove the rule or set the style in CSS |
The last issue is quieter. Safari with VoiceOver may not announce a list whose markers were removed with list-style: none, so a listener loses "list, 4 items". Adding role="list" to the <ol> restores it. Lists without bullets explains the details.
Share it as a link
A numbered guide is easier to follow when the reader can try it. A screenshot of the recipe cannot add a step, and an .html attachment may open as plain code on a phone.
To send the working version, paste the page into a NOS document and choose Create share link. HTML to link walks through it.
The page renders as written and its scripts run, so the people you send it to can add and remove steps themselves. If you change the code later, the same link shows the new version.