The <kbd> tag marks user input: a key to press, a shortcut, or text to type. Write Press <kbd>Ctrl</kbd>+<kbd>C</kbd> and the key names are marked as input.
Two sibling tags cover the rest: <samp> for what a program prints back, and <var> for a name that stands for a value.
Tick the box below to see which words each tag wraps.
<!doctype html>
<html lang="en">
<head>
<meta charset="utf-8">
<meta name="viewport" content="width=device-width, initial-scale=1">
<title>kbd, samp and var</title>
<style>
body { margin: 0; padding: 16px; font-family: system-ui, sans-serif; background: #f4f5f7; color: #1d2330; }
.box { background: #fff; border-radius: 10px; padding: 12px 14px; margin-bottom: 12px; box-shadow: 0 2px 8px rgba(0, 0, 0, .08); }
p { margin: 0 0 10px; font-size: 16px; line-height: 1.6; }
p:last-child { margin-bottom: 0; }
label { display: flex; gap: 8px; align-items: center; font-size: 14px; cursor: pointer; }
.legend { font-size: 13px; color: #5b6270; margin-top: 8px; line-height: 1.5; }
.legend span { padding: 0 4px; border-radius: 4px; }
/* only when the box is ticked: colour each tag so you can see it */
.show kbd { background: #dbeafe; outline: 1px solid #2563eb; }
.show samp { background: #dcfce7; outline: 1px solid #16a34a; }
.show var { background: #fef3c7; outline: 1px solid #d97706; }
</style>
</head>
<body>
<div class="box" id="text">
<!-- kbd: what the user types or presses -->
<p>To copy, press <kbd>Ctrl</kbd>+<kbd>C</kbd>. Then type <kbd>npm test</kbd> and press <kbd>Enter</kbd>.</p>
<!-- samp: what the program prints back -->
<p>The terminal answers <samp>3 passed, 0 failed</samp>.</p>
<!-- var: a name that stands for a value -->
<p>The area is <var>w</var> × <var>h</var>. Replace <var>filename</var> with your file.</p>
</div>
<div class="box">
<label><input type="checkbox" id="show"> Outline each tag</label>
<div class="legend"><span style="background:#dbeafe">kbd</span> input <span style="background:#dcfce7">samp</span> output <span style="background:#fef3c7">var</span> variable</div>
</div>
<script>
document.getElementById('show').addEventListener('change', (e) => {
document.getElementById('text').classList.toggle('show', e.target.checked);
});
</script>
</body>
</html>
Browsers draw <kbd> and <samp> in a monospace font and <var> in italics. There is no box, no border and no behaviour. Everything else is CSS.
kbd, samp or var: which one?
Ask which way the text travels. Into the computer is <kbd>. Out of the computer is <samp>. A stand-in for some value is <var>.
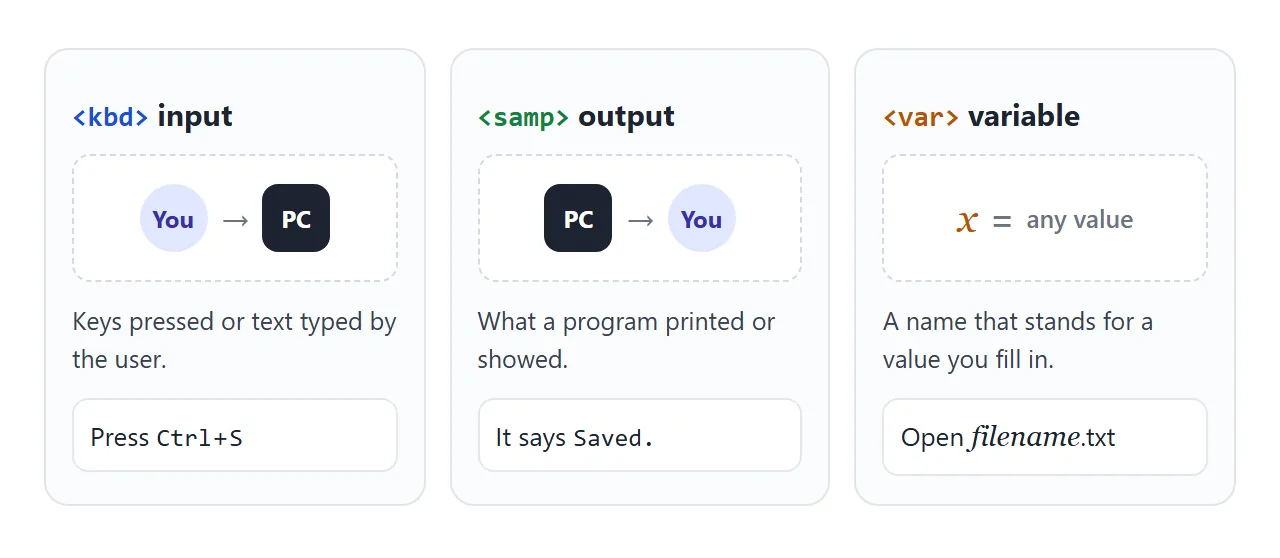
| Tag | Marks | Example |
|---|---|---|
<kbd> |
Keys pressed, text typed, voice commands | Type <kbd>npm test</kbd> |
<samp> |
Output a program printed or showed | It prints <samp>3 passed</samp> |
<var> |
A variable or a placeholder | Open <var>name</var>.txt |
<code> |
A piece of source code | The <code>fetch()</code> function |
<code> is the closest neighbour, and it is easy to mix them up. A command the reader types is <kbd>. The same command shown as part of a script is <code>. The code and pre guide covers code blocks and whitespace.
These tags describe what text is, not how it looks. For stress and italics, the em tag guide covers <em>, <i> and <cite>. For short forms, see the abbr tag.
Writing keyboard shortcuts
Wrap each key in its own <kbd> and put the plus sign between them as plain text:
<p>Press <kbd>Ctrl</kbd>+<kbd>Shift</kbd>+<kbd>Esc</kbd> to open Task Manager.</p>
The HTML spec also allows nesting. An outer <kbd> stands for the whole input, and each inner <kbd> is one key:
<kbd><kbd>Ctrl</kbd>+<kbd>C</kbd></kbd>
Both forms are valid. Nesting helps when you style the keys, because kbd kbd selects only the single keys and leaves the outer wrapper plain.
Write key names the way they are printed on the keyboard: Ctrl, Shift, Enter, Esc. On a Mac the same shortcut often uses Command instead of Ctrl, so a page for both needs two versions. The finished example below switches between them.
Nesting kbd and samp
The spec gives two more combinations. They are useful in manuals and support articles.
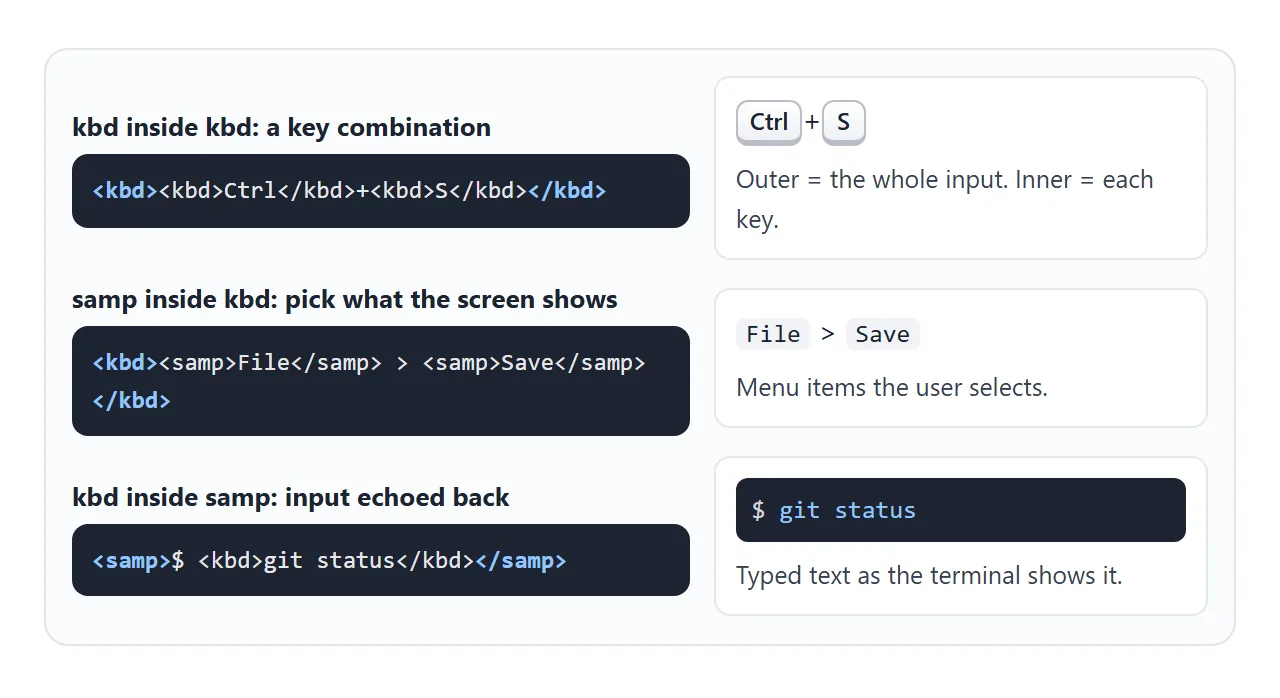
<samp>inside<kbd>: input that picks something the screen shows, such as a menu item.<kbd><samp>File</samp> > <samp>Save</samp></kbd>means "choose File, then Save".<kbd>inside<samp>: input as the system echoed it back, such as a command in a terminal transcript.
<pre><samp>$ <kbd>git status</kbd>
On branch main
nothing to commit, working tree clean</samp></pre>
Wrapping the transcript in <pre> keeps its line breaks. The typed command stays marked as input, so CSS can colour it differently from the output.
Styling kbd as a key cap
The default look is only a font change, and the keys blend into the sentence. A border, rounded corners and a thicker bottom edge make them read as keys.
<!doctype html>
<html lang="en">
<head>
<meta charset="utf-8">
<meta name="viewport" content="width=device-width, initial-scale=1">
<title>kbd key cap styles</title>
<style>
  body { margin: 0; padding: 16px; font-family: system-ui, sans-serif; background: #f4f5f7; color: #1d2330; }
  .row { background: #fff; border-radius: 10px; padding: 10px 14px; margin-bottom: 10px; box-shadow: 0 2px 8px rgba(0, 0, 0, .08); }
  .row h3 { margin: 0 0 4px; font-size: 13px; color: #5b6270; font-weight: 600; }
  .row p { margin: 0; font-size: 16px; line-height: 1.8; }

  /* 2. Flat: a light box and a border */
  .flat kbd {
    font: 0.85em ui-monospace, Consolas, monospace;
    padding: 1px 6px; border: 1px solid #c9ced6; border-radius: 4px; background: #f6f7f9;
  }

  /* 3. Key cap: a thicker bottom edge makes it look raised */
  .cap kbd {
    display: inline-block; min-width: 1.6em; text-align: center;
    font: 600 0.8em/1.5 system-ui, sans-serif;
    padding: 0 6px; border: 1px solid #b8bec8; border-bottom-width: 3px; border-radius: 6px;
    background: linear-gradient(#fff, #eef0f3);
    box-shadow: inset 0 -1px 0 #fff;
    cursor: pointer; user-select: none;
  }
  /* pressed: the edge shrinks and the cap moves down by the same amount */
  .cap kbd:active, .cap kbd.down { border-bottom-width: 1px; transform: translateY(2px); background: #e6e9ee; }

  /* 4. Dark key cap */
  .dark { background: #1f2430; }
  .dark h3 { color: #aab1bf; }
  .dark p { color: #e8ebf1; }
  .dark kbd {
    display: inline-block; min-width: 1.6em; text-align: center;
    font: 600 0.8em/1.5 system-ui, sans-serif; color: #fff;
    padding: 0 6px; border-radius: 6px; background: #3a4150;
    box-shadow: 0 2px 0 #0d1017, inset 0 1px 0 rgba(255, 255, 255, .15);
  }
</style>
</head>
<body>
<div class="row">
  <h3>1. Browser default</h3>
  <p>Press <kbd>Shift</kbd>+<kbd>Enter</kbd> for a new line, <kbd>Ctrl</kbd>+<kbd>Enter</kbd> to send.</p>
</div>
<div class="row flat">
  <h3>2. Flat box</h3>
  <p>Press <kbd>Shift</kbd>+<kbd>Enter</kbd> for a new line, <kbd>Ctrl</kbd>+<kbd>Enter</kbd> to send.</p>
</div>
<div class="row cap">
  <h3>3. Key cap (click a key, or press it)</h3>
  <p>Press <kbd>Shift</kbd>+<kbd>Enter</kbd> for a new line, <kbd>Ctrl</kbd>+<kbd>Enter</kbd> to send.</p>
</div>
<div class="row dark">
  <h3>4. Dark key cap</h3>
  <p>Press <kbd>Shift</kbd>+<kbd>Enter</kbd> for a new line, <kbd>Ctrl</kbd>+<kbd>Enter</kbd> to send.</p>
</div>

<script>
  // Row 3 also reacts to the real keyboard: holding a key presses its cap.
  const caps = document.querySelectorAll('.cap kbd');
  const names = { control: 'ctrl' };
  function setDown(e, on) {
    const k = e.key.toLowerCase();
    caps.forEach((c) => {
      if (c.textContent.toLowerCase() === (names[k] || k)) c.classList.toggle('down', on);
    });
  }
  addEventListener('keydown', (e) => setDown(e, true));
  addEventListener('keyup', (e) => setDown(e, false));
  // if the window loses focus mid-press, release every cap
  addEventListener('blur', () => caps.forEach((c) => c.classList.remove('down')));
</script>
</body>
</html>
kbd {
  display: inline-block;
  min-width: 1.6em;
  text-align: center;
  font: 600 0.8em/1.5 system-ui, sans-serif;
  padding: 0 6px;
  border: 1px solid #b8bec8;
  border-bottom-width: 3px;
  border-radius: 6px;
  background: linear-gradient(#fff, #eef0f3);
}
If you nest keys inside an outer <kbd>, use kbd kbd as the selector instead, so only the single keys get the cap.
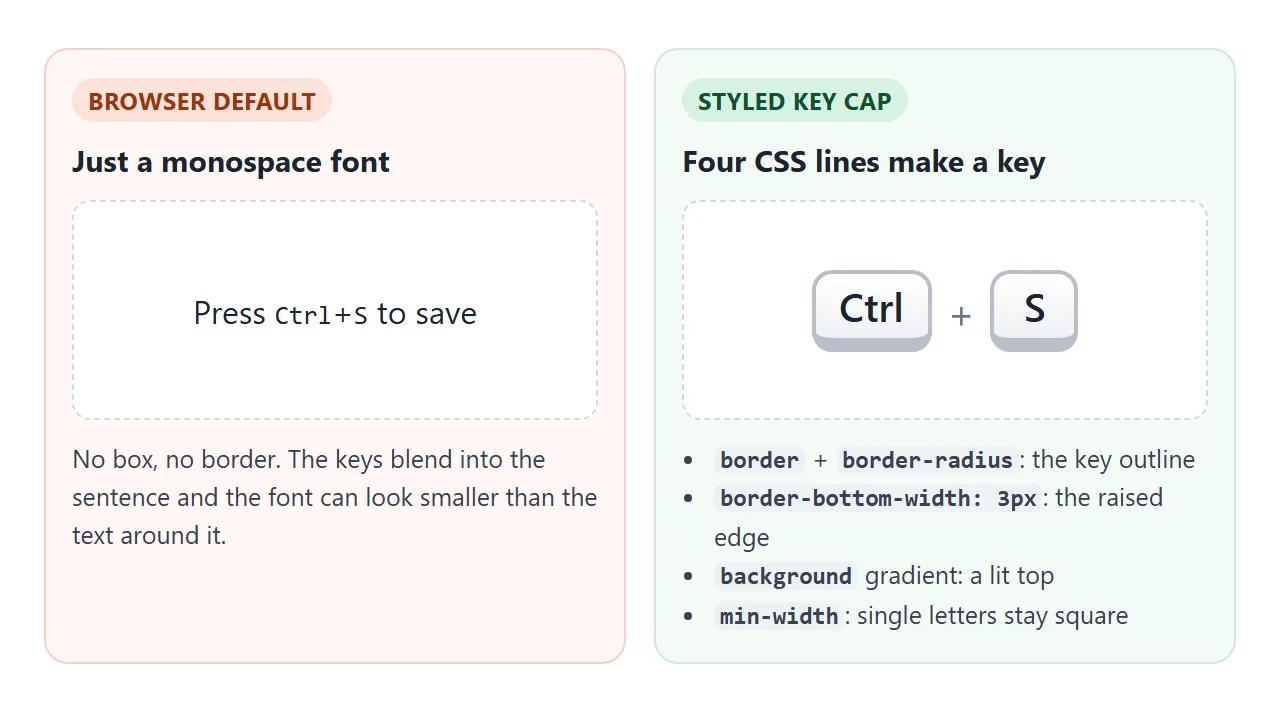
border-bottom-width: 3pxis the raised edge. It is simpler than a stack of shadows and keeps its shape at any zoom.min-widthwithtext-align: centerkeeps single letters from looking thinner than Ctrl.display: inline-blocklets padding andtransformapply cleanly inside a line of text.
For a pressed look, shrink the bottom border and move the key down by the same amount: border-bottom-width: 1px; transform: translateY(2px);. The key sinks in place and the line around it does not move. More shadow ideas are in the box-shadow guide.
Why kbd text looks smaller
The browser style sets font-family: monospace on <kbd>, <samp> and <code>. In Chrome, when the text around it is at the default 16px, such an element computes to 13px.
The fix is to name the fonts yourself. font-family: ui-monospace, Consolas, monospace gives a normal size, and so does setting an explicit font-size on the paragraph or on <kbd> itself. A key cap in a sans-serif font, as above, avoids the question entirely.
A finished example: a shortcut cheat sheet
This cheat sheet lists five editing shortcuts. It picks Windows or Mac keys from the browser, and the buttons switch between them. Click inside it and press the shortcuts: each cap presses down, and a finished shortcut gets a tick.
<!doctype html>
<html lang="en">
<head>
<meta charset="utf-8">
<meta name="viewport" content="width=device-width, initial-scale=1">
<title>Keyboard shortcut cheat sheet</title>
<style>
  body { margin: 0; padding: 16px; font-family: system-ui, sans-serif; background: #f4f5f7; color: #1d2330; }
  .sheet { background: #fff; border-radius: 12px; padding: 14px; box-shadow: 0 2px 8px rgba(0, 0, 0, .08); max-width: 460px; }
  .top { display: flex; justify-content: space-between; align-items: center; gap: 10px; flex-wrap: wrap; margin-bottom: 8px; }
  h2 { margin: 0; font-size: 17px; }
  .os button { font: 600 13px system-ui, sans-serif; padding: 6px 10px; border: 1px solid #c9ced6; background: #fff; cursor: pointer; }
  .os button:first-child { border-radius: 8px 0 0 8px; }
  .os button:last-child { border-radius: 0 8px 8px 0; border-left: 0; }
  .os button[aria-pressed="true"] { background: #1d2330; color: #fff; border-color: #1d2330; }
  ul { list-style: none; margin: 0; padding: 0; }
  li { display: flex; justify-content: space-between; align-items: center; padding: 9px 6px; border-top: 1px solid #eceef2; cursor: pointer; border-radius: 6px; }
  li:hover { background: #f7f8fa; }
  li.tried .name::after { content: " \2713"; color: #16a34a; font-weight: 700; }

  /* the outer kbd is the whole shortcut: keep it plain */
  kbd { font: inherit; white-space: nowrap; }
  /* each inner kbd is one key: draw it as a key cap */
  kbd kbd {
    display: inline-block; min-width: 1.7em; text-align: center;
    font: 600 13px/1.6 system-ui, sans-serif;
    padding: 0 6px; margin: 0 1px; border: 1px solid #b8bec8; border-bottom-width: 3px; border-radius: 6px;
    background: linear-gradient(#fff, #eef0f3);
  }
  kbd kbd.down { border-bottom-width: 1px; transform: translateY(2px); background: #dbeafe; border-color: #2563eb; }
  .out { margin: 12px 0 0; font-size: 14px; color: #5b6270; }
  samp { font: 13px ui-monospace, Consolas, monospace; background: #f1f3f6; padding: 2px 6px; border-radius: 4px; color: #1d2330; }
  .hint { font-size: 12.5px; color: #5b6270; margin: 8px 0 0; line-height: 1.45; }
</style>
</head>
<body>
<div class="sheet">
  <div class="top">
    <h2>Editing shortcuts</h2>
    <div class="os">
      <button type="button" data-os="win">Windows</button><button type="button" data-os="mac">Mac</button>
    </div>
  </div>
  <ul id="list"></ul>
  <p class="out">Last shortcut: <samp id="out">none yet</samp></p>
  <p class="hint">Click here, then press a shortcut. On a phone, tap a row to see its keys pressed.</p>
</div>

<script>
  // One list of shortcuts. mod is Ctrl on Windows and Command on a Mac.
  const shortcuts = [
    { name: 'Copy',       win: ['mod', 'c'],        mac: ['mod', 'c'] },
    { name: 'Paste',      win: ['mod', 'v'],        mac: ['mod', 'v'] },
    { name: 'Undo',       win: ['mod', 'z'],        mac: ['mod', 'z'] },
    { name: 'Redo',       win: ['mod', 'y'],        mac: ['mod', 'shift', 'z'] },
    { name: 'Select all', win: ['mod', 'a'],        mac: ['mod', 'a'] },
  ];
  const label = { control: 'Ctrl', meta: '⌘ Cmd', shift: 'Shift' };
  let os = /Mac|iPhone|iPad/.test(navigator.userAgent) ? 'mac' : 'win';
  const list = document.getElementById('list');
  const out = document.getElementById('out');

  // mod becomes the real key name that event.key reports
  const keysFor = (s) => s[os].map((k) => (k === 'mod' ? (os === 'mac' ? 'meta' : 'control') : k));

  function render() {
    list.innerHTML = '';
    shortcuts.forEach((s) => {
      const li = document.createElement('li');
      // nested kbd: the outer one is the shortcut, each inner one is a key
      const caps = keysFor(s).map((k) => `<kbd data-k="${k}">${label[k] || k.toUpperCase()}</kbd>`).join('+');
      li.innerHTML = `<span class="name">${s.name}</span><kbd>${caps}</kbd>`;
      li.addEventListener('click', () => play(li));
      list.appendChild(li);
      s.li = li;
    });
    document.querySelectorAll('.os button').forEach((b) => b.setAttribute('aria-pressed', b.dataset.os === os));
  }

  // tap a row: press its keys one by one, then release them
  function play(li) {
    const caps = [...li.querySelectorAll('kbd kbd')];
    caps.forEach((c, i) => setTimeout(() => c.classList.add('down'), i * 180));
    setTimeout(() => caps.forEach((c) => c.classList.remove('down')), caps.length * 180 + 350);
  }

  function light(key, on) {
    document.querySelectorAll(`kbd kbd[data-k="${key}"]`).forEach((c) => c.classList.toggle('down', on));
  }

  addEventListener('keydown', (e) => {
    const key = e.key.toLowerCase();
    light(key, true);
    // did this key finish one of the shortcuts?
    const mod = os === 'mac' ? e.metaKey : e.ctrlKey;
    shortcuts.forEach((s) => {
      const keys = s[os];
      if (mod && e.shiftKey === keys.includes('shift') && key === keys[keys.length - 1]) {
        s.li.classList.add('tried');
        out.textContent = s.name + ' (' + keysFor(s).map((k) => label[k] || k.toUpperCase()).join('+') + ')';
      }
    });
  });
  addEventListener('keyup', (e) => {
    light(e.key.toLowerCase(), false);
    // a Mac may not send keyup for letters held with Command, so release all with it
    if (e.key === 'Meta') document.querySelectorAll('.down').forEach((c) => c.classList.remove('down'));
  });
  addEventListener('blur', () => document.querySelectorAll('.down').forEach((c) => c.classList.remove('down')));

  document.querySelectorAll('.os button').forEach((b) => b.addEventListener('click', () => { os = b.dataset.os; render(); }));
  render();
</script>
</body>
</html>
- One list of shortcuts: each entry has Windows keys and Mac keys, with
modstanding for Ctrl or Command. - Nested markup: the script writes
<kbd><kbd>Ctrl</kbd>+<kbd>C</kbd></kbd>for each row. CSS draws onlykbd kbdas caps. - Live keys:
keydownandkeyupreadevent.keyand press the matching caps. - Done check:
event.ctrlKeyorevent.metaKeyplus the last key marks the row, and<samp>shows the result.
The page does not call preventDefault(), so the shortcuts still do their normal job. Pressing Select all selects the text in the example, as it would anywhere else.
When it does not work
| What you see | Cause | Fix |
|---|---|---|
| kbd looks like normal text in monospace | That is the browser default | Add a border and background, as above |
| kbd is smaller than the sentence | font-family: monospace alone, in Chrome |
Name a font list or set font-size |
| A big box around the whole shortcut | Cap style on nested <kbd> hits the outer one too |
Style kbd kbd only, or drop the outer <kbd> |
| A shortcut breaks across two lines | The line wraps at the plus sign | white-space: nowrap on the outer <kbd> |
| Pressing a key does nothing in the demo | The frame does not have focus | Click inside it first |
| Mac readers see Ctrl | Only one set of keys | Show both, or switch with a Windows/Mac toggle |
Share it as a link
A shortcut sheet or a setup guide is something people keep open next to their work. Sent as an .html file, it may open as plain code on a phone, and a screenshot cannot switch between Windows and Mac.
To send the working version, paste the page into a NOS document and choose Create share link. HTML to link walks through it.
The page renders as written and its scripts run, so the people you send it to can press the keys and flip the toggle themselves. If you add shortcuts later, the same link shows the new version.