Lottie is an animation format: a JSON file that describes shapes, layers and keyframes. lottie-web is the JavaScript player that reads that JSON and draws it in the browser.
A lottie react example wraps that player in a React component, which needs npm and a bundler.
In a single HTML file you need much less: one script tag for lottie-web, an empty div, and one call to lottie.loadAnimation().
Here is the whole thing. The ball is a Lottie animation written straight into the page.
<!doctype html>
<html lang="en">
<head>
<meta charset="utf-8">
<meta name="viewport" content="width=device-width, initial-scale=1">
<title>Lottie in one HTML file</title>
<style>
  body { margin: 0; padding: 16px; font-family: system-ui, sans-serif; background: #f4f5f7; color: #1d2330; }
  /* The animation fills this box, so the box sets the size */
  #anim { width: 220px; height: 220px; margin: 0 auto; background: #fff; border-radius: 14px; }
  p { margin: 12px 0 0; text-align: center; font-size: 14px; color: #5b6270; }
</style>
</head>
<body>
<div id="anim"></div>
<p id="info">Loading…</p>

<!-- 1. Load lottie-web first (pinned version) -->
<script src="https://cdn.jsdelivr.net/npm/lottie-web@5.13.0/build/player/lottie.min.js"></script>

<!-- 2. The animation data, pasted in as a JavaScript object -->
<script>
const ease = { i: { x: 0.5, y: 1 }, o: { x: 0.5, y: 0 } };
const ballData = {
  v: '5.7.0', fr: 30, ip: 0, op: 60, w: 200, h: 200, nm: 'ball', ddd: 0, assets: [],
  layers: [{
    ddd: 0, ind: 1, ty: 4, nm: 'ball', sr: 1, ao: 0, ip: 0, op: 60, st: 0, bm: 0,
    ks: {
      o: { a: 0, k: 100 }, r: { a: 0, k: 0 }, a: { a: 0, k: [0, 0, 0] },
      s: { a: 0, k: [100, 100, 100] },
      // Position: up and down again over 60 frames
      p: { a: 1, k: [
        { t: 0,  s: [100, 150, 0], ...ease },
        { t: 30, s: [100, 50, 0],  ...ease },
        { t: 60, s: [100, 150, 0] }
      ] }
    },
    shapes: [{ ty: 'gr', it: [
      { ty: 'el', p: { a: 0, k: [0, 0] }, s: { a: 0, k: [50, 50] }, d: 1 },
      { ty: 'fl', c: { a: 0, k: [0.06, 0.46, 0.43, 1] }, o: { a: 0, k: 100 }, r: 1 },
      { ty: 'tr', p: { a: 0, k: [0, 0] }, a: { a: 0, k: [0, 0] }, s: { a: 0, k: [100, 100] },
        r: { a: 0, k: 0 }, o: { a: 0, k: 100 } }
    ] }]
  }]
};
</script>

<!-- 3. Start it -->
<script>
const anim = lottie.loadAnimation({
  container: document.getElementById('anim'),
  renderer: 'svg',
  loop: true,
  autoplay: true,
  animationData: ballData   // not path: works without a server
});

anim.addEventListener('DOMLoaded', () => {
  document.getElementById('info').textContent =
    'lottie-web ' + lottie.version + ' · ' + anim.totalFrames + ' frames at ' + anim.frameRate + ' fps';
});
</script>
</body>
</html>
The lottie-web repository is published under the MIT license. On 1 October 2026 the latest version on npm is 5.13.0, and that is the version every example here loads.
What a Lottie file is
The lottie-web README describes the usual path. An animator builds the animation in Adobe After Effects and exports it as JSON with the Bodymovin extension. lottie-web then renders that JSON on the page.
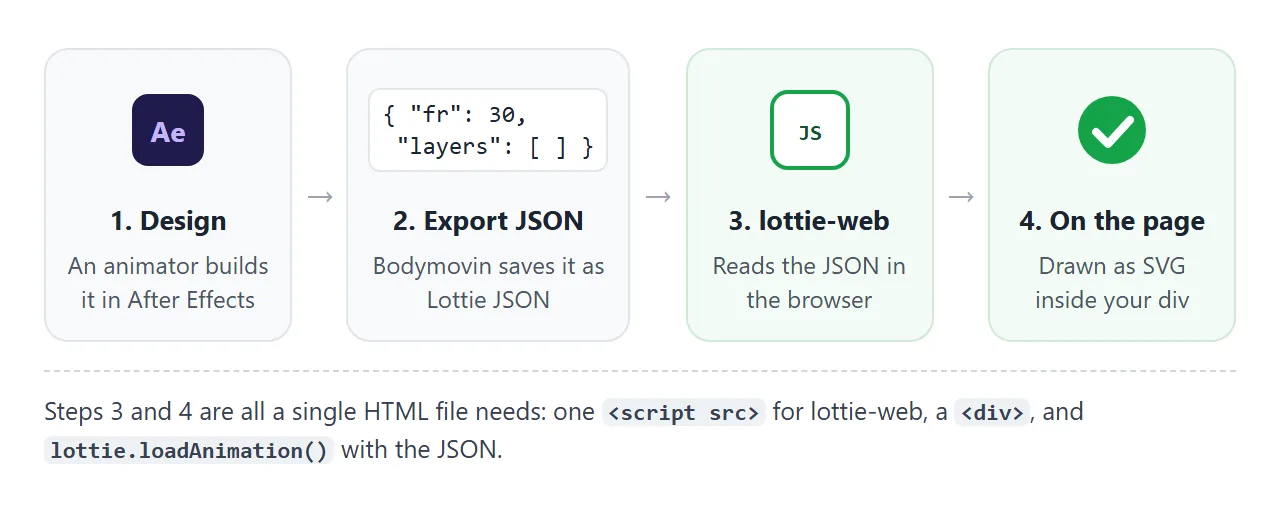
The Lottie Animation Community describes Lottie as an open-source vector animation file format based on JSON. Because it is vector data, the animation stays sharp at any size.
You do not need After Effects to follow this guide. The examples use small JSON objects written by hand, so you can see every part of them.
The smallest working file
Copy this into an empty .html file and open it in a browser. Replace the object after const data = with the contents of your own .json file.
<!doctype html>
<meta charset="utf-8">
<div id="anim" style="width: 300px; height: 300px"></div>

<script src="https://cdn.jsdelivr.net/npm/lottie-web@5.13.0/build/player/lottie.min.js"></script>
<script>
  const data = { /* paste the contents of your .json file here */ };

  lottie.loadAnimation({
    container: document.getElementById('anim'),
    renderer: 'svg',
    loop: true,
    autoplay: true,
    animationData: data
  });
</script>
- The div is where lottie-web draws. It needs a size, because the animation fills it.
- The first script tag loads
lottie.min.js. It puts one global,lottie, on the page. - The second script tag holds the animation data and calls
loadAnimation(). The README lists'svg','canvas'and'html'as renderers.
The same pinned file is also on cdnjs and unpkg. All three addresses below load 5.13.0:
<script src="https://cdn.jsdelivr.net/npm/lottie-web@5.13.0/build/player/lottie.min.js"></script>
<script src="https://cdnjs.cloudflare.com/ajax/libs/lottie-web/5.13.0/lottie.min.js"></script>
<script src="https://unpkg.com/lottie-web@5.13.0/build/player/lottie.min.js"></script>
The lottie react example, and what it needs
In a React project, the lottie-react package gives you a component:
// npm i lottie-react
import { Lottie } from "lottie-react";
import animation from "./hero.json";

export function Hero() {
  return <Lottie src={animation} autoplay loop />;
}
The lottie-react README says src takes a path, a URL or the parsed animation object, and that the animation fills its element. React and react-dom 18.2 or newer are peer dependencies, and lottie-web is installed with it.
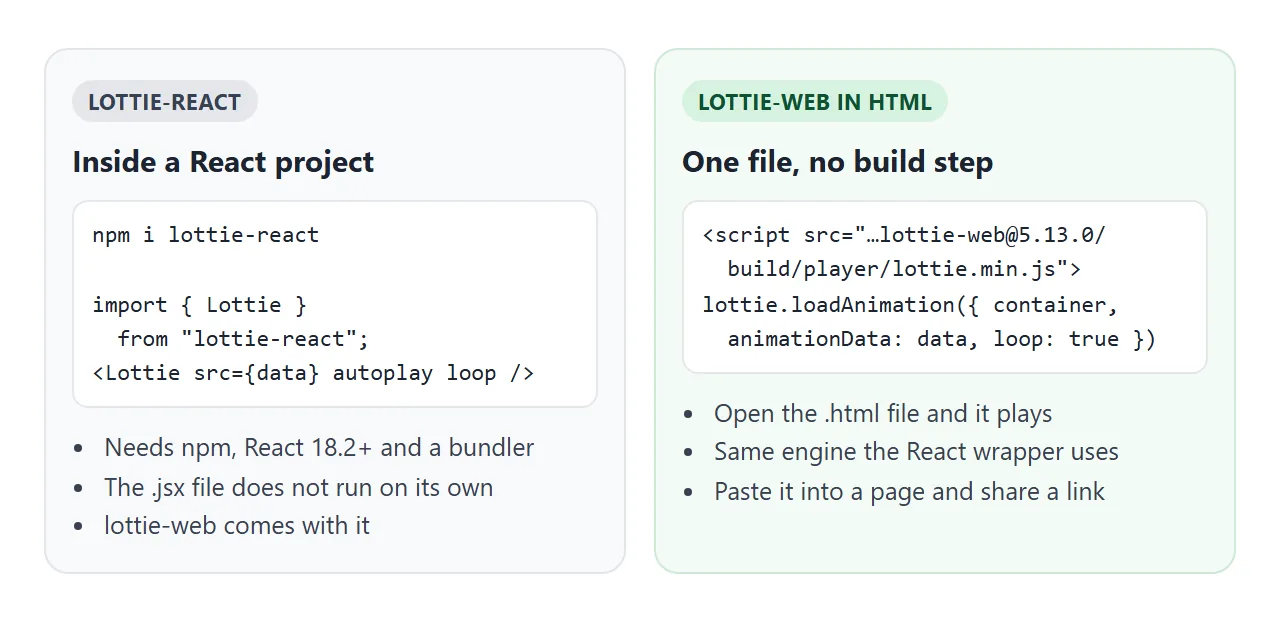
That file does not run on its own. React's docs say JSX is transformed into plain JavaScript under the hood, and in our test JSX in a plain <script> tag stopped with "Unexpected token '<'".
The import line stops with "Cannot use import statement outside a module". A React project runs this through a bundler first.
If you want a single page you can open and send, use lottie-web directly. The component above and the loadAnimation() call in the previous section draw the same animation with the same engine.
Hosting a React app as a page covers the other route, where you build first and share the output.
Why path: 'data.json' shows nothing
The README's own example loads the animation with path instead of animationData. lottie-web then downloads the JSON with a request. Open that page from your disk and the box stays empty.
<!doctype html>
<html lang="en">
<head>
<meta charset="utf-8">
<meta name="viewport" content="width=device-width, initial-scale=1">
<title>Lottie: path vs animationData</title>
<style>
  * { box-sizing: border-box; }
  body { margin: 0; padding: 14px; font-family: system-ui, sans-serif; background: #f4f5f7; color: #1d2330; }
  .row { display: grid; grid-template-columns: 1fr 1fr; gap: 12px; }
  .col { background: #fff; border-radius: 12px; padding: 10px; border: 2px solid #e1e4ea; }
  .col.bad { border-color: #f3d1c8; } .col.good { border-color: #cfe9d7; }
  h2 { margin: 0 0 6px; font-size: 14px; }
  code { font-size: 12.5px; background: #eef1f5; padding: 1px 4px; border-radius: 4px; }
  .box { height: 150px; margin-top: 8px; border-radius: 8px; background: #f8f9fb; }
  .msg { margin: 8px 0 0; font-size: 13px; line-height: 1.4; min-height: 36px; }
  .bad .msg { color: #9a3412; } .good .msg { color: #0f5132; }
</style>
</head>
<body>
<div class="row">
  <div class="col bad">
    <h2>path</h2>
    <code>path: 'ball.json'</code>
    <div class="box" id="byPath"></div>
    <p class="msg" id="pathMsg">Waiting for ball.json…</p>
  </div>
  <div class="col good">
    <h2>animationData</h2>
    <code>animationData: ballData</code>
    <div class="box" id="byData"></div>
    <p class="msg" id="dataMsg">Loading…</p>
  </div>
</div>

<script src="https://cdn.jsdelivr.net/npm/lottie-web@5.13.0/build/player/lottie.min.js"></script>
<script>
// Same bouncing ball as the first example
const ease = { i: { x: 0.5, y: 1 }, o: { x: 0.5, y: 0 } };
const ballData = {
  v: '5.7.0', fr: 30, ip: 0, op: 60, w: 200, h: 200, nm: 'ball', ddd: 0, assets: [],
  layers: [{
    ddd: 0, ind: 1, ty: 4, nm: 'ball', sr: 1, ao: 0, ip: 0, op: 60, st: 0, bm: 0,
    ks: {
      o: { a: 0, k: 100 }, r: { a: 0, k: 0 }, a: { a: 0, k: [0, 0, 0] },
      s: { a: 0, k: [100, 100, 100] },
      p: { a: 1, k: [
        { t: 0, s: [100, 150, 0], ...ease },
        { t: 30, s: [100, 50, 0], ...ease },
        { t: 60, s: [100, 150, 0] }
      ] }
    },
    shapes: [{ ty: 'gr', it: [
      { ty: 'el', p: { a: 0, k: [0, 0] }, s: { a: 0, k: [50, 50] }, d: 1 },
      { ty: 'fl', c: { a: 0, k: [0.06, 0.46, 0.43, 1] }, o: { a: 0, k: 100 }, r: 1 },
      { ty: 'tr', p: { a: 0, k: [0, 0] }, a: { a: 0, k: [0, 0] }, s: { a: 0, k: [100, 100] },
        r: { a: 0, k: 0 }, o: { a: 0, k: 100 } }
    ] }]
  }]
};

// Right: the data is already in the page, nothing to download
const right = lottie.loadAnimation({
  container: document.getElementById('byData'),
  renderer: 'svg', loop: true, autoplay: true,
  animationData: ballData
});
right.addEventListener('DOMLoaded', () => {
  document.getElementById('dataMsg').textContent = 'Playing. The JSON is inside the page.';
});

// Left: lottie has to download the JSON file
const failed = () => {
  document.getElementById('pathMsg').textContent =
    'Failed: the browser could not load ball.json. The box stays empty.';
};
try {
  // From a file the load fails with a data_failed event; on a page with no
  // address of its own (like this example frame) the request cannot even start.
  lottie.loadAnimation({
    container: document.getElementById('byPath'),
    renderer: 'svg', loop: true, autoplay: true,
    path: 'ball.json'
  }).addEventListener('data_failed', failed);
} catch (e) {
  failed();
}
</script>
</body>
</html>
Chromium blocks requests from a page opened with a file:// address. The console shows "blocked by CORS policy", and lottie-web fires its data_failed event. This happened in our test even with ball.json sitting next to the HTML file.
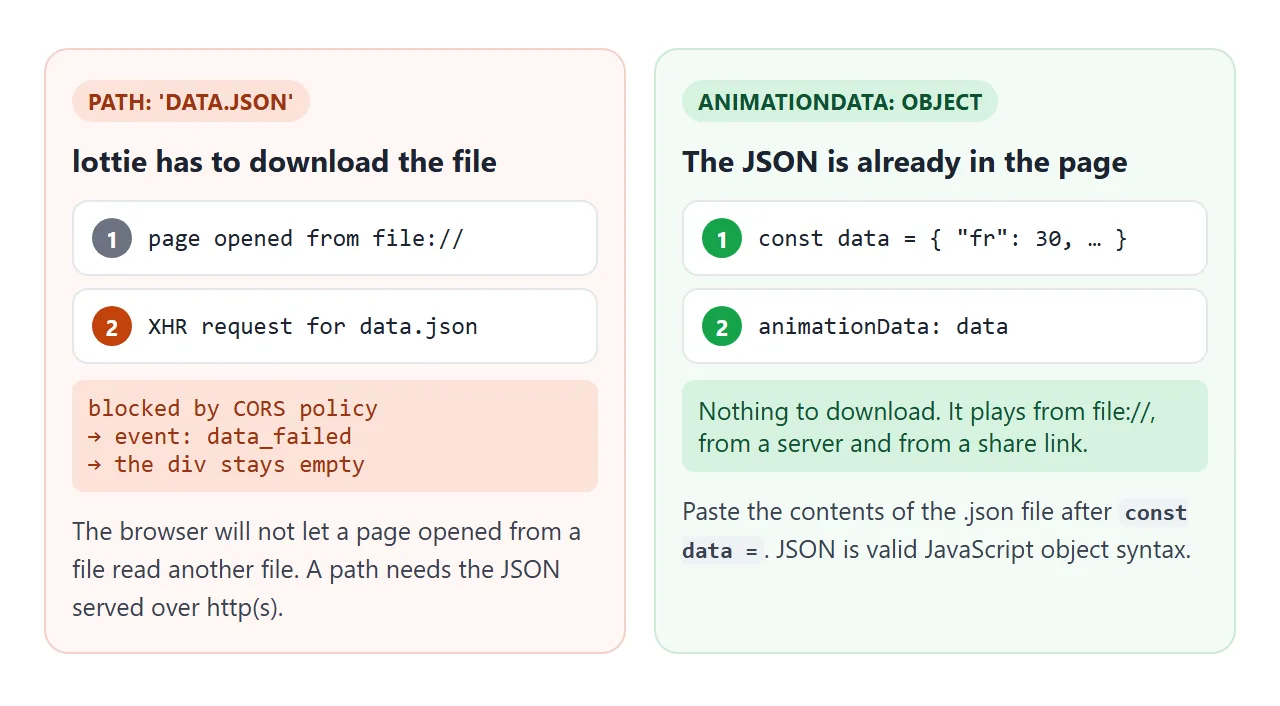
There are two ways out:
- Paste the data into the page. Open the
.jsonfile, copy everything, and put it afterconst data =. JSON is valid JavaScript object syntax, so nothing else changes. - Serve the files over http. A local server or a host makes
pathwork. The README notes thatpathandanimationDataare mutually exclusive.
For one self-contained file, the first way is simpler. It is also the only one that keeps working once the page is shared as a single file.
Setting the size
lottie-web adds an <svg> to your div with width: 100% and height: 100%. The animation keeps its own shape and fills the div.
In our test, a div with no size set got an animation as wide as the page, with the height following the animation's own ratio. Give the div a width and height, or a width and aspect-ratio, and the animation follows.
#anim { width: 240px; aspect-ratio: 1; }
The rendererSettings option takes preserveAspectRatio, with the same values as the SVG attribute, if you need the animation to crop instead of fit.
Controlling playback
loadAnimation() returns an animation object. Keep it in a variable and you can play, stop and jump with it. This example plays a check mark when a form is submitted.
<!doctype html>
<html lang="en">
<head>
<meta charset="utf-8">
<meta name="viewport" content="width=device-width, initial-scale=1">
<title>Lottie success check on a form</title>
<style>
  * { box-sizing: border-box; }
  body { margin: 0; padding: 16px; font-family: system-ui, sans-serif; background: #f4f5f7; color: #1d2330; }
  .card { max-width: 420px; margin: 0 auto; padding: 18px; border-radius: 14px; background: #fff; }
  h2 { margin: 0 0 10px; font-size: 19px; }
  form { display: flex; gap: 8px; flex-wrap: wrap; }
  input[type=email] { flex: 1 1 180px; min-width: 0; font: inherit; padding: 9px 10px; border: 1px solid #c9ced8; border-radius: 8px; }
  button { font: inherit; padding: 9px 14px; border: 0; border-radius: 8px; background: #1d2330; color: #fff; cursor: pointer; }
  #check { width: 120px; height: 120px; margin: 12px auto 0; }
  #out { margin: 4px 0 0; min-height: 22px; text-align: center; font-size: 14px; color: #0f5132; }
  .tools { margin-top: 12px; padding-top: 12px; border-top: 1px solid #eceef2; font-size: 13px; color: #5b6270; }
  .tools label { display: flex; align-items: center; gap: 8px; margin-top: 6px; }
  .tools input[type=range] { flex: 1; }
</style>
</head>
<body>
<div class="card">
  <h2>Join the list</h2>
  <form id="signup">
    <input type="email" name="email" placeholder="you@example.com" required>
    <button>Sign up</button>
  </form>
  <div id="check"></div>
  <p id="out"></p>

  <div class="tools">
    Inspect the animation:
    <label>Frame <input type="range" id="scrub" min="0" max="39" value="0"> <span id="frame">0</span></label>
    <label>Speed
      <select id="speed"><option value="0.5">0.5×</option><option value="1" selected>1×</option><option value="2">2×</option></select>
    </label>
  </div>
</div>

<script src="https://cdn.jsdelivr.net/npm/lottie-web@5.13.0/build/player/lottie.min.js"></script>
<script>
const v = (k) => ({ a: 0, k });                         // a fixed value
const anim1 = (from, to, t0, t1) => ({ a: 1, k: [       // an animated value
  { t: t0, s: from, i: { x: 0.3, y: 1 }, o: { x: 0.6, y: 0 } },
  { t: t1, s: to }
] });
const tr = { ty: 'tr', p: v([0, 0]), a: v([0, 0]), s: v([100, 100]), r: v(0), o: v(100) };

const checkData = {
  v: '5.7.0', fr: 30, ip: 0, op: 40, w: 120, h: 120, nm: 'check', ddd: 0, assets: [],
  layers: [
    { // the tick: a path drawn on with Trim Paths
      ddd: 0, ind: 1, ty: 4, nm: 'tick', sr: 1, ao: 0, ip: 0, op: 40, st: 0, bm: 0,
      ks: { o: v(100), r: v(0), a: v([0, 0, 0]), s: v([100, 100, 100]), p: v([60, 60, 0]) },
      shapes: [{ ty: 'gr', it: [
        { ty: 'sh', ks: v({ c: false, v: [[-24, 2], [-7, 19], [25, -15]],
          i: [[0, 0], [0, 0], [0, 0]], o: [[0, 0], [0, 0], [0, 0]] }) },
        { ty: 'tm', s: v(0), e: anim1([0], [100], 14, 32), o: v(0), m: 1 },
        { ty: 'st', c: v([1, 1, 1, 1]), o: v(100), w: v(9), lc: 2, lj: 2 },
        tr
      ] }]
    },
    { // the green circle: grows from 0 to full size
      ddd: 0, ind: 2, ty: 4, nm: 'circle', sr: 1, ao: 0, ip: 0, op: 40, st: 0, bm: 0,
      ks: { o: v(100), r: v(0), a: v([0, 0, 0]), p: v([60, 60, 0]),
        s: anim1([0, 0, 100], [100, 100, 100], 0, 16) },
      shapes: [{ ty: 'gr', it: [
        { ty: 'el', p: v([0, 0]), s: v([104, 104]), d: 1 },
        { ty: 'fl', c: v([0.09, 0.64, 0.29, 1]), o: v(100), r: 1 },
        tr
      ] }]
    }
  ]
};

const check = lottie.loadAnimation({
  container: document.getElementById('check'),
  renderer: 'svg',
  loop: false,
  autoplay: false,          // wait for the form
  animationData: checkData
});

const scrub = document.getElementById('scrub');
const frame = document.getElementById('frame');

// Keep the slider in step while it plays
check.addEventListener('enterFrame', () => {
  const f = Math.round(check.currentFrame);
  scrub.value = f;
  frame.textContent = f;
});

document.getElementById('signup').addEventListener('submit', (e) => {
  e.preventDefault();                     // nothing is sent anywhere
  const email = new FormData(e.target).get('email');
  check.goToAndPlay(0, true);             // frame 0, then play
  document.getElementById('out').textContent = 'Signed up: ' + email;
});

scrub.addEventListener('input', () => {
  check.goToAndStop(Number(scrub.value), true);   // true = value is a frame
  frame.textContent = scrub.value;
});

document.getElementById('speed').addEventListener('change', (e) => {
  check.setSpeed(Number(e.target.value));
});
</script>
</body>
</html>
The form handler calls preventDefault(), so nothing is sent anywhere. It reads the email with FormData and shows it on the page.
| Method | What it does |
|---|---|
play() / pause() |
Start or pause where it is |
stop() |
Stop and go back to the start |
setSpeed(2) |
1 is normal speed |
setDirection(-1) |
-1 plays in reverse |
goToAndStop(10, true) |
Jump to frame 10 and stay |
goToAndPlay(0, true) |
Jump to frame 0 and play |
playSegments([0, 20], true) |
Play only frames 0 to 20 |
destroy() |
Remove the animation |
The true in goToAndStop matters. The README says the second argument decides whether the first number is a frame or a time, and it defaults to time.
The object also fires events. Listen with addEventListener for complete, loopComplete, enterFrame, DOMLoaded and data_failed. The example uses enterFrame to move the slider while the check plays.
When it does not work
| What you see | Cause | Fix |
|---|---|---|
lottie is not defined |
Your code runs above the lottie-web tag | Put your script after it |
| Empty box, CORS error in the console | path on a page opened from file:// |
Use animationData |
| Empty box, no error | Your script runs before the div exists | Put the script below the div |
| The animation fills the whole width | The div has no size | Set a width and height on the div |
| It plays on load, not on click | autoplay: true |
Set autoplay: false, call play() |
goToAndStop(10) lands in the wrong place |
The number is read as time | Pass true as the second argument |
| "Cannot use import statement outside a module" | A React example pasted into plain HTML | Use the script tag and loadAnimation() |
For console errors in general, HTML JavaScript not working shows where to look.
Share it as a link
An animation is hard to show in a screenshot, and a still image of a check mark says little.
An .html attachment may open as plain code on a phone, and a path to a separate JSON file breaks as soon as the two files are apart.
With the data inside the page, the whole animation is one file. Paste it into a NOS document and choose Create share link. HTML to link walks through it.
The page renders with its scripts running, lottie-web loads from the CDN, and anyone with the link can play it without an account. If you change a keyframe later, the same link shows the new version.