PixiJS is a 2D graphics library for the web. This guide is about using it in one plain HTML file: a script tag loads it, an async function sets it up, and you draw on a canvas. Nothing to install and nothing to build.
Here is the smallest useful page. A square turns, a title sits on top, and the line underneath says which PixiJS version and renderer are running.
<!doctype html>
<html lang="en">
<head>
<meta charset="utf-8">
<meta name="viewport" content="width=device-width, initial-scale=1">
<title>PixiJS in one HTML file</title>
<style>
  body { margin: 0; font-family: system-ui, sans-serif; background: #f4f5f7; color: #1d2330; }
  #stage { height: 260px; }          /* the canvas will fill this box */
  #stage canvas { display: block; }  /* no stray gap under the canvas */
  #info { margin: 0; padding: 10px 14px; font-size: 14px; }
</style>
</head>
<body>
<div id="stage"></div>
<p id="info">Loading PixiJS...</p>

<!-- 1. the library, pinned to one version. It creates a global called PIXI -->
<script src="https://cdn.jsdelivr.net/npm/pixi.js@8.21.0/dist/pixi.min.js"></script>
<script>
  (async () => {
    const holder = document.getElementById('stage');
    const app = new PIXI.Application();

    // 2. init() is async: wait for it before you touch app.canvas
    await app.init({
      resizeTo: holder,              // canvas follows the size of this element
      background: '#1d2330',
      antialias: true,
      resolution: window.devicePixelRatio,  // sharp on high-density screens
      autoDensity: true,
    });
    holder.appendChild(app.canvas);

    // 3. add things to app.stage
    const box = new PIXI.Graphics().roundRect(-50, -50, 100, 100, 18).fill(0x4f8cff);
    const label = new PIXI.Text({ text: 'Hello, Pixi', style: { fill: '#ffffff', fontSize: 22 }, anchor: 0.5 });
    app.stage.addChild(box, label);

    function center() {
      box.position.set(app.screen.width / 2, app.screen.height / 2 + 14);
      label.position.set(app.screen.width / 2, 30);
    }
    center();
    app.renderer.on('resize', center);

    // 4. the ticker runs once per frame
    app.ticker.add((time) => { box.rotation += 0.02 * time.deltaTime; });

    document.getElementById('info').textContent =
      'PixiJS ' + PIXI.VERSION + ' - renderer: ' + app.renderer.name;
  })();
</script>
</body>
</html>
The examples pin version 8.21.0, the latest on npm when this page was written. All of them load the library from jsDelivr, one of the CDN hosts NOS allows.
What PixiJS is, and what lands in the page
PixiJS draws with WebGL and WebGPU renderers and is released under the MIT license. It keeps a tree of objects, called the stage, and redraws that tree on every frame while its ticker runs.
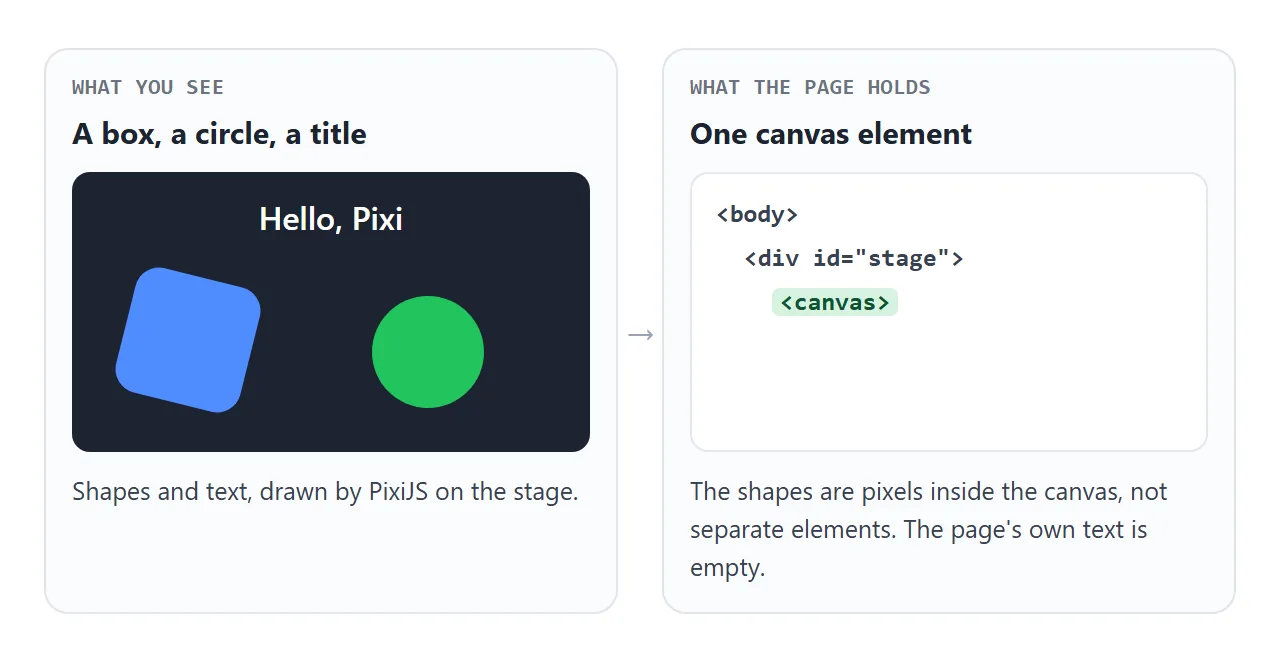
That has one consequence for HTML: the page holds a single <canvas>. The shapes are not elements, and the Pixi text is not page text.
For labels that must be selectable or read aloud, put normal HTML next to the canvas, as the examples do for scores. For lower-level drawing without a library, see WebGL in HTML.
The five steps every file needs
Every PixiJS page, however big, starts the same way.
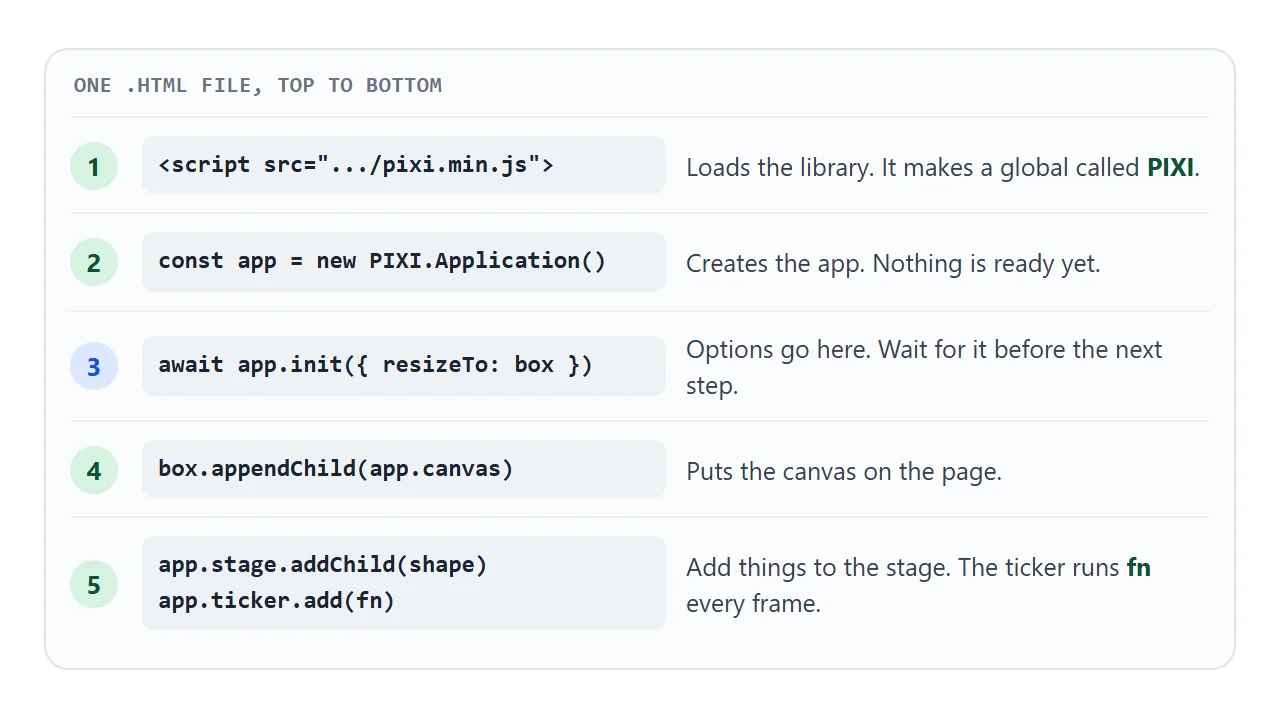
- Load the library. A script tag for
pixi.min.js. It creates a global calledPIXI. - Add a box with a height. A
<div>with a CSS height for the canvas to fill. - Create and initialize. Inside an async function:
new PIXI.Application(), thenawait app.init(...). - Add the canvas. Append
app.canvasto your box. - Add things and a loop. Put objects on
app.stageand animate them inapp.ticker.
Put the library tag above your own script. Scripts run top to bottom, so code that sits above it cannot see PIXI yet.
Write the version into the address, as in pixi.js@8.21.0. jsDelivr loads the newest release if you leave the version out, and its README says that is not recommended for production use.
In an npm project. The same code works in a bundler project, with an import in place of the global. This part needs Node.js and does not run in a plain HTML file:
npm create pixi.js@latest
import { Application, Graphics } from 'pixi.js';
A bare import like this fails in a plain HTML page, because the browser cannot resolve a module name without an import map. In a single file, use the script tag and the global.
Why PixiJS 8 needs await app.init()
PixiJS 8 sets itself up asynchronously, since it now has a WebGPU renderer next to the WebGL one. Options go into init() instead of the constructor, and the canvas is ready only after init() finishes.
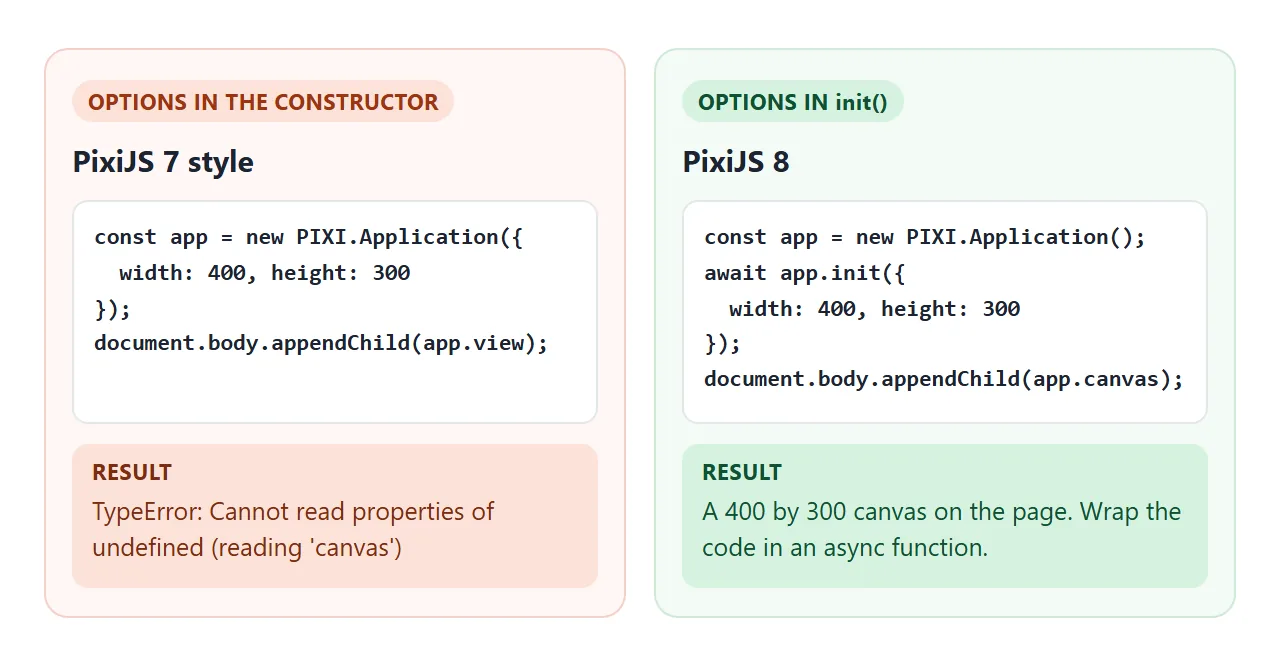
Older tutorials write new Application({ ... }) and read app.view. In 8.21.0 that code throws a TypeError as soon as it reads the canvas, because nothing has been initialized yet. The fix is await app.init({ ... }) and app.canvas.
A classic script cannot use await at the top level, only inside an async function or in a module script. So wrap the setup in an async function that runs right away:
(async () => {
  const app = new PIXI.Application();
  await app.init({ resizeTo: holder, background: '#1d2330' });
  holder.appendChild(app.canvas);
  // add shapes here
})();
Draw, label and animate
Shapes come from PIXI.Graphics. Describe the shape, then fill it:
const box = new PIXI.Graphics().roundRect(-50, -50, 100, 100, 18).fill(0x4f8cff);
const dot = new PIXI.Graphics().circle(0, 0, 30).fill('tomato');
Drawing around the point 0, 0 makes a shape turn around its own middle. Position it with box.position.set(x, y).
Text uses PIXI.Text, which renders with the browser's own text engine and turns the result into a texture. Change it occasionally, not on every frame.
Animation goes in the ticker. It runs once per frame and passes a time object. Multiply each step by deltaTime and the motion no longer depends on the frame rate. The ticker is driven by requestAnimationFrame, covered in requestAnimationFrame.
app.ticker.add((time) => {
  box.rotation += 0.02 * time.deltaTime;
});
Images need care. PIXI.Assets.load() can fetch a picture from an address, but NOS blocks images from other sites. In a shared single file, draw with Graphics instead.
Respond to taps and clicks
Shapes ignore the pointer until you opt in. Every object starts with eventMode set to passive. Set it to static and the object emits events and is hit tested. Then on('pointerdown', fn) works for a mouse, a pen and a finger.
<!doctype html>
<html lang="en">
<head>
<meta charset="utf-8">
<meta name="viewport" content="width=device-width, initial-scale=1">
<title>PixiJS events: eventMode</title>
<style>
  body { margin: 0; padding: 10px; font-family: system-ui, sans-serif; background: #f4f5f7; color: #1d2330; }
  .row { display: flex; gap: 10px; }
  .col { flex: 1; min-width: 0; }
  h3 { margin: 0 0 6px; font-size: 13px; font-family: ui-monospace, Consolas, monospace; }
  .col.bad h3 { color: #9a3412; }
  .col.good h3 { color: #0f5132; }
  .stage { height: 190px; border-radius: 10px; overflow: hidden; }
  .stage canvas { display: block; }
  p { margin: 6px 0 0; font-size: 14px; }
  .note { font-size: 12.5px; color: #4b5563; margin: 10px 0 0; }
</style>
</head>
<body>
<div class="row">
  <div class="col bad">
    <h3>default eventMode</h3>
    <div class="stage" id="stageA"></div>
    <p>Taps: <b id="countA">0</b></p>
  </div>
  <div class="col good">
    <h3>eventMode = 'static'</h3>
    <div class="stage" id="stageB"></div>
    <p>Taps: <b id="countB">0</b></p>
  </div>
</div>
<p class="note">Both circles have the same pointerdown listener. Tap each one.</p>

<script src="https://cdn.jsdelivr.net/npm/pixi.js@8.21.0/dist/pixi.min.js"></script>
<script>
  async function makeStage(holderId, countId, color, mode) {
    const holder = document.getElementById(holderId);
    const out = document.getElementById(countId);
    const app = new PIXI.Application();
    await app.init({ resizeTo: holder, background: '#1d2330', antialias: true,
                     resolution: window.devicePixelRatio, autoDensity: true });
    holder.appendChild(app.canvas);

    const dot = new PIXI.Graphics().circle(0, 0, 44).fill(color);
    dot.position.set(app.screen.width / 2, app.screen.height / 2);
    if (mode) dot.eventMode = mode;   // without this line the object ignores the pointer
    dot.cursor = 'pointer';
    let n = 0;
    dot.on('pointerdown', () => {
      out.textContent = ++n;
      dot.scale.set(1.25);
    });
    dot.on('pointerup', () => dot.scale.set(1));
    dot.on('pointerupoutside', () => dot.scale.set(1));
    app.stage.addChild(dot);
  }
  makeStage('stageA', 'countA', 0xf59e0b, null);
  makeStage('stageB', 'countB', 0x22c55e, 'static');
</script>
</body>
</html>
Add cursor = 'pointer' for a hand cursor over the shape.
In version 8, a plain pointermove fires only while the pointer is over an object. To follow the pointer everywhere, for example while dragging, listen for globalpointermove instead. For the DOM side of pointer input, see pointer events.
Keep it sharp and sized right on phones
Two options decide whether the canvas looks right. resizeTo makes the canvas follow an element or the window.
resolution sets pixel density, and its default is 1. On a screen where devicePixelRatio is 2, a canvas left at 1 has one backing pixel per CSS pixel, so it holds fewer pixels than the screen can show.
await app.init({
  resizeTo: holder,
  resolution: window.devicePixelRatio,
  autoDensity: true,   // the canvas CSS size stays the same
});
In a window 390 pixels wide with a pixel ratio of 2, this gives a canvas 780 pixels wide inside a 390-pixel box. The page also needs the viewport meta tag, and blurry canvas fixes cover the plain-canvas version of this problem.
Give the box a CSS height too. With no height on the box, the test canvas came out 600 pixels tall, which is the default height, not the size of the box.
A finished example: pop the bubbles
This page puts the pieces together. Bubbles are Graphics objects, each with its own speed. Tapping one raises the score and destroys it. The ticker moves them up and removes the ones that leave the top.
<!doctype html>
<html lang="en">
<head>
<meta charset="utf-8">
<meta name="viewport" content="width=device-width, initial-scale=1">
<title>Pop the bubbles - PixiJS</title>
<style>
  body { margin: 0; font-family: system-ui, sans-serif; background: #f4f5f7; color: #1d2330; }
  header { display: flex; align-items: center; gap: 14px; padding: 10px 14px; font-size: 15px; }
  header span { white-space: nowrap; }
  button { margin-left: auto; font: inherit; padding: 6px 14px; border: 0; border-radius: 8px; background: #2563eb; color: #fff; }
  #stage { height: 300px; touch-action: none; }  /* a finger plays the game instead of scrolling the page */
  #stage canvas { display: block; }
  #msg { padding: 8px 14px; font-size: 14px; min-height: 20px; }
</style>
</head>
<body>
<header>
  <span>Score: <b id="score">0</b></span>
  <span>Time: <b id="time">30</b></span>
  <button id="restart" type="button">Restart</button>
</header>
<div id="stage"></div>
<div id="msg">Tap the bubbles before they float away.</div>

<script src="https://cdn.jsdelivr.net/npm/pixi.js@8.21.0/dist/pixi.min.js"></script>
<script>
  const COLORS = [0x4f8cff, 0x22c55e, 0xf59e0b, 0xec4899];
  const holder = document.getElementById('stage');
  const bubbles = [];
  let app, score = 0, timeLeft = 30, spawnIn = 0;

  function addBubble() {
    const r = 18 + Math.random() * 14;
    const b = new PIXI.Graphics()
      .circle(0, 0, r).fill({ color: COLORS[Math.floor(Math.random() * COLORS.length)], alpha: 0.85 })
      .stroke({ width: 2, color: 0xffffff });
    b.position.set(r + Math.random() * (app.screen.width - 2 * r), app.screen.height + r);
    b.speed = 1 + Math.random() * 1.5;
    b.eventMode = 'static';
    b.cursor = 'pointer';
    b.on('pointerdown', () => {
      score++;
      document.getElementById('score').textContent = score;
      remove(b);
    });
    app.stage.addChild(b);
    bubbles.push(b);
  }

  function remove(b) {
    bubbles.splice(bubbles.indexOf(b), 1);
    b.destroy();   // frees the graphics and removes it from the stage
  }

  function reset() {
    while (bubbles.length) remove(bubbles[0]);
    score = 0; timeLeft = 30; spawnIn = 0;
    document.getElementById('score').textContent = 0;
    document.getElementById('msg').textContent = 'Tap the bubbles before they float away.';
  }

  async function start() {
    app = new PIXI.Application();
    await app.init({ resizeTo: holder, background: '#1d2330', antialias: true,
                     resolution: window.devicePixelRatio, autoDensity: true });
    holder.appendChild(app.canvas);

    app.ticker.add((t) => {
      if (timeLeft > 0) {
        timeLeft = Math.max(0, timeLeft - t.elapsedMS / 1000);
        document.getElementById('time').textContent = Math.ceil(timeLeft);
        spawnIn -= t.elapsedMS;
        if (spawnIn <= 0) { addBubble(); spawnIn = 350; }
        if (timeLeft === 0) document.getElementById('msg').textContent = "Time's up. Score: " + score;
      }
      for (let i = bubbles.length - 1; i >= 0; i--) {
        bubbles[i].y -= bubbles[i].speed * t.deltaTime;
        if (bubbles[i].y < -40) remove(bubbles[i]);   // floated off the top
      }
    });
  }

  document.getElementById('restart').addEventListener('click', reset);
  start();
</script>
</body>
</html>
- Many objects: keep them in an array, and loop backwards when you remove some during the loop.
- Clean up: call
destroy()on an object you are done with, so memory does not pile up. - Touch:
touch-action: noneon the stage box lets a finger play the game instead of scrolling the page.
More ideas for this kind of page are in single-file HTML games.
When it does not work
| What you see | Cause | Fix |
|---|---|---|
| PIXI is not defined | Your code runs before the library has loaded | Put the library script tag first |
| TypeError reading canvas | Canvas read before init, or options in the constructor | Call await app.init() first, then read app.canvas |
| await is only valid in async functions | A classic script has no top-level await | Wrap the setup in an async function |
| Failed to resolve module specifier | A bare import of pixi.js in a plain page | Use the script tag and the PIXI global |
| Canvas is 600 pixels tall | The box has no CSS height | Set a height on the box |
| Canvas looks soft on a phone | resolution is left at 1 | Set resolution and autoDensity |
| A shape ignores taps | eventMode is still passive | Set eventMode to static |
| Dragging loses the object | pointermove fires only over an object | Listen for globalpointermove |
| A picture from another site is missing in NOS | NOS blocks outside images | Draw the shape with Graphics |
For other scripts that stay silent, see JavaScript not working in HTML.
Share it as a link
A PixiJS page is easier to show than to describe. A screenshot cannot be tapped, and an .html attachment may open as plain code, or not at all, on a phone.
To send the working version, paste the page into a NOS document and choose Create share link. HTML to link walks through it.
The page renders as written, the PixiJS script from jsDelivr loads and your scripts run, so the people you send it to can tap the bubbles themselves, with no account. If you change the code later, the same link shows the new version.