For a free class website you do not have to find a template. Write down what parents need to see, ask an AI chat to turn it into one web page, paste it into a NOS document, and send the link.
The page below is the kind of result you can get. Try the two buttons.
<!doctype html>
<html lang="en">
<head>
<meta charset="utf-8">
<meta name="viewport" content="width=device-width, initial-scale=1">
<title>Room 12 class page</title>
<style>
  * { box-sizing: border-box; }
  body { margin: 0; font-family: system-ui, sans-serif; color: #1f2937; background: #f5f7fb; line-height: 1.5; }
  header { background: #1d4ed8; color: #fff; padding: 22px 20px; }
  header h1 { margin: 0 0 4px; font-size: 1.5rem; }
  header p { margin: 0; opacity: .9; }
  main { max-width: 860px; margin: 0 auto; padding: 18px 16px 28px; display: grid; gap: 16px; grid-template-columns: 1fr 1fr; }
  main section:first-child { grid-column: 1 / -1; }
  @media (max-width: 640px) { main { grid-template-columns: 1fr; } }
  section { background: #fff; border-radius: 12px; padding: 16px 18px; box-shadow: 0 1px 4px rgba(0,0,0,.08); }
  h2 { margin: 0 0 10px; font-size: 1.1rem; }
  .tabs { display: flex; gap: 8px; margin-bottom: 10px; }
  .tabs button { font: inherit; padding: 6px 14px; border: 1px solid #c7d0e0; background: #fff; border-radius: 999px; cursor: pointer; }
  .tabs button[aria-pressed="true"] { background: #1d4ed8; border-color: #1d4ed8; color: #fff; }
  table { width: 100%; border-collapse: collapse; }
  th, td { text-align: left; padding: 8px 6px; border-bottom: 1px solid #e5e7eb; vertical-align: top; }
  th { width: 34%; color: #4b5563; font-weight: 600; }
  ul { margin: 0; padding-left: 20px; }
  .note { background: #fff7ed; border-left: 4px solid #f97316; }
  a { color: #1d4ed8; }
</style>
</head>
<body>
<header>
  <h1>Room 12 · Grade 4</h1>
  <p>Ms. Alder · Fieldstone Elementary (a made-up class)</p>
</header>
<main>
  <section>
    <h2>This week</h2>
    <div class="tabs">
      <button type="button" id="b1" aria-pressed="true">This week</button>
      <button type="button" id="b2" aria-pressed="false">Next week</button>
    </div>
    <table id="plan"></table>
  </section>

  <section>
    <h2>Homework</h2>
    <ul>
      <li>Reading log: 15 minutes each evening</li>
      <li>Math sheet 7, due Thursday</li>
      <li>Bring a shoebox for Friday's diorama day</li>
    </ul>
  </section>

  <section class="note">
    <h2>Reminders</h2>
    <p>Library books are due Wednesday. Picture day is on the second Monday of the month.</p>
  </section>

  <section>
    <h2>Contact</h2>
    <p>Email <a href="mailto:ms.alder@example.com">ms.alder@example.com</a>. I reply within one school day. Office hours: Tuesdays, 3:15 to 4:00 pm.</p>
  </section>
</main>

<script>
  // EDIT: change the two weeks below. Each row is [day, what happens].
  const weeks = {
    b1: [['Monday', 'Fractions: halves and quarters'], ['Tuesday', 'Library visit'], ['Wednesday', 'Science: plant parts'], ['Thursday', 'Math sheet 7 due'], ['Friday', 'Diorama day']],
    b2: [['Monday', 'Picture day'], ['Tuesday', 'Fractions: thirds'], ['Wednesday', 'Science: seeds'], ['Thursday', 'Spelling test'], ['Friday', 'Class assembly, 9:00']]
  };
  const plan = document.getElementById('plan');

  function show(id) {
    plan.innerHTML = weeks[id].map(r => '<tr><th>' + r[0] + '</th><td>' + r[1] + '</td></tr>').join('');
    ['b1', 'b2'].forEach(b => document.getElementById(b).setAttribute('aria-pressed', b === id));
  }
  document.getElementById('b1').addEventListener('click', () => show('b1'));
  document.getElementById('b2').addEventListener('click', () => show('b2'));
  show('b1');
</script>
</body>
</html>
One teacher-tech newsletter describes this step for classroom tools an AI wrote: you can "copy and paste it into a simple website builder".
Here the builder is a NOS document, and the result is a link you can send.
Why describe the page instead of choosing a template
A template gives you sections someone else picked. You then fit your week into them, rename them and delete the ones you do not use. Describing the page runs the other way: your list comes first and the layout follows it.
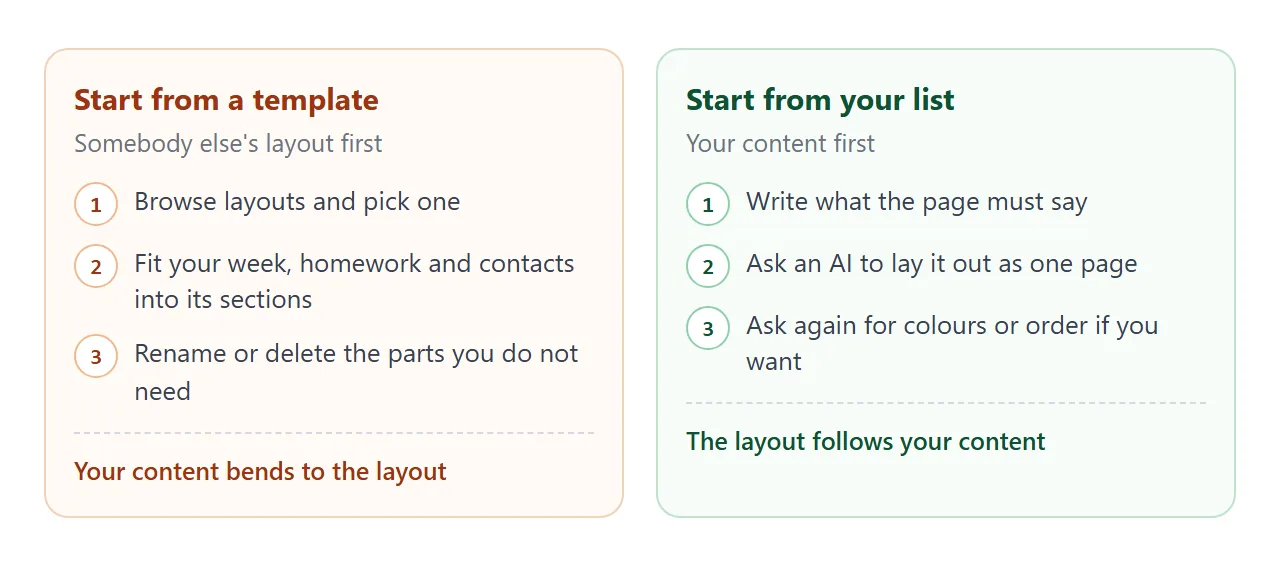
That is also why this works for small jobs: a weekly plan, a syllabus, a field trip sheet, a "who to contact" page. You can ask for a change in plain words, such as "put homework first" or "make the header green".
Make it with AI
Open ChatGPT, Claude or Gemini and paste a prompt like this. Replace the details in capitals with your own. Do not paste real student data.
Make one complete HTML file for a class page.
Class: GRADE and ROOM, teacher name TEACHER.
Sections: this week (a table of days), next week
(a button switches between them), homework, reminders,
contact (email and office hours).
Rules: it must work on a phone, use one font and two
colours, and keep all CSS and JavaScript inside the
file. No images from other sites. Put a comment above
the weekly plan data that says EDIT HERE.
Then check the result before you use it:
- Names and dates: read every one. An AI can invent a date or a room number you never gave it.
- Both weeks: press the buttons and make sure both weeks show the right days.
- Phone width: shrink the browser window, or open it on a phone, and look for text running off the side.
- Private details: remove anything you would not put on a notice board.
If something is off, reply in the same chat with one change at a time. For structure, ask the chat. For wording, fix it yourself in the next step.
Send it as a link
- Copy the whole HTML block from the chat, from the first line to the last.
- Paste it into a NOS document. The page appears as written, with its buttons working.
- Click a wrong word or number on the page and type the right one. Editing without code shows how.
- Choose Share, then Create share link, and copy the link.
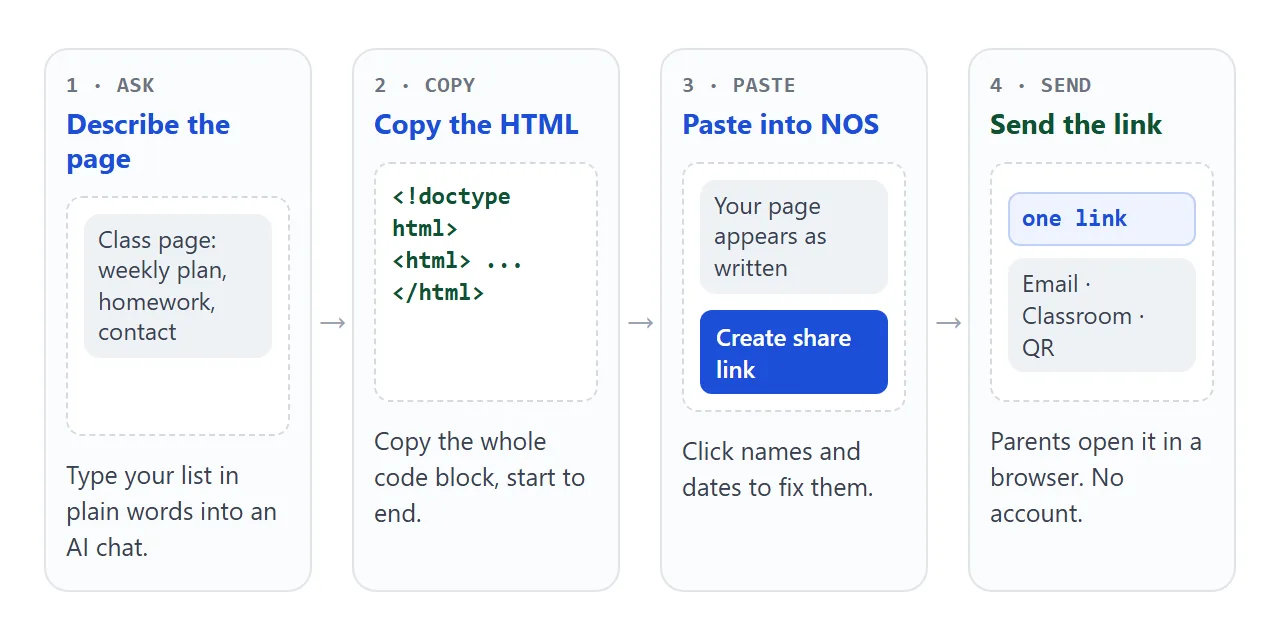
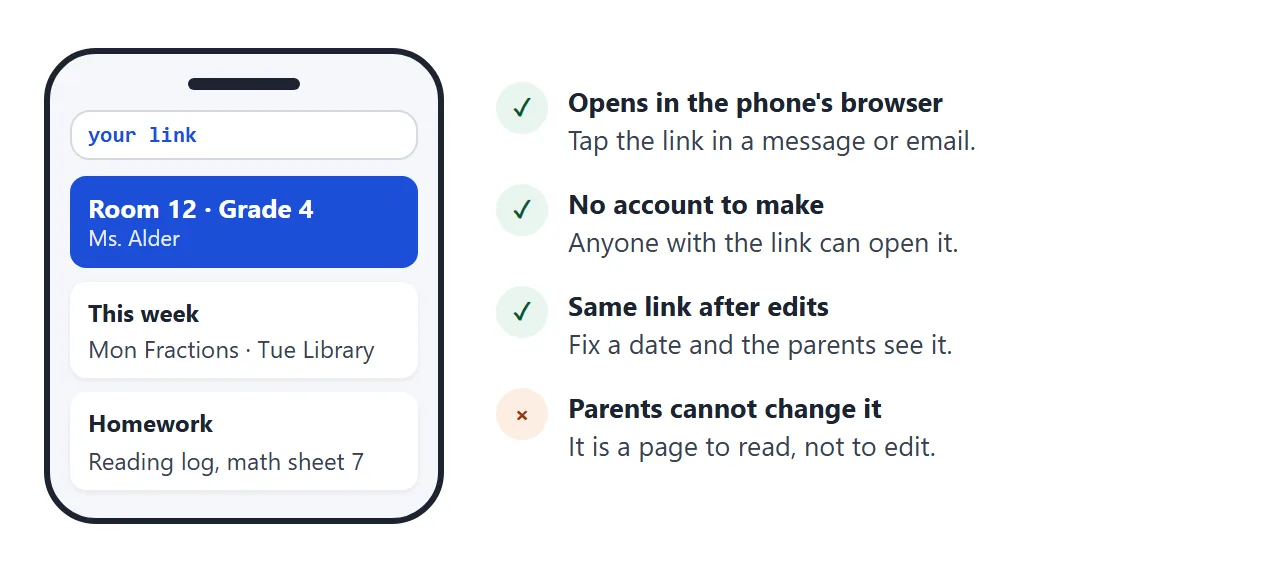
Parents open the link in their browser, on a phone too. They need no account and cannot edit the page. If you fix a date later, edit it in the same document and the same link shows the new version.
A second page to copy: a syllabus with a supplies checklist. A parent can tick the boxes on their own screen, but those ticks are not saved or sent to you. Edit the code and it reruns.
<!doctype html>
<html lang="en">
<head>
<meta charset="utf-8">
<meta name="viewport" content="width=device-width, initial-scale=1">
<title>Grade 7 Science syllabus</title>
<style>
  * { box-sizing: border-box; }
  body { margin: 0; font-family: system-ui, sans-serif; color: #1f2937; background: #f3f8f4; line-height: 1.5; }
  header { background: #166534; color: #fff; padding: 22px 20px; }
  header h1 { margin: 0 0 4px; font-size: 1.5rem; }
  header p { margin: 0; opacity: .9; }
  main { max-width: 860px; margin: 0 auto; padding: 18px 16px 28px; display: grid; gap: 16px; grid-template-columns: 1fr 1fr; }
  main section:first-child { grid-column: 1 / -1; }
  @media (max-width: 640px) { main { grid-template-columns: 1fr; } }
  section { background: #fff; border-radius: 12px; padding: 16px 18px; box-shadow: 0 1px 4px rgba(0,0,0,.08); }
  h2 { margin: 0 0 10px; font-size: 1.1rem; }
  .bars { display: grid; gap: 8px; }
  .bar { display: grid; grid-template-columns: 110px 1fr 44px; align-items: center; gap: 8px; font-size: .95rem; }
  .track { background: #e5e7eb; border-radius: 6px; height: 14px; overflow: hidden; }
  .fill { background: #16a34a; height: 100%; }
  .list { list-style: none; margin: 0; padding: 0; }
  .list li { padding: 6px 0; border-bottom: 1px solid #eef0f2; }
  label { cursor: pointer; display: flex; gap: 10px; align-items: center; }
  input[type=checkbox] { width: 20px; height: 20px; }
  .count { margin-top: 10px; font-weight: 600; color: #166534; }
  table { width: 100%; border-collapse: collapse; }
  td { padding: 7px 4px; border-bottom: 1px solid #e5e7eb; }
  td:first-child { width: 36%; font-weight: 600; }
</style>
</head>
<body>
<header>
  <h1>Grade 7 Science</h1>
  <p>Mr. Okafor · Room 3 · a made-up course</p>
</header>
<main>
  <section>
    <h2>How grades are made</h2>
    <div class="bars">
      <div class="bar"><span>Labs</span><div class="track"><div class="fill" style="width:35%"></div></div><b>35%</b></div>
      <div class="bar"><span>Quizzes</span><div class="track"><div class="fill" style="width:30%"></div></div><b>30%</b></div>
      <div class="bar"><span>Project</span><div class="track"><div class="fill" style="width:25%"></div></div><b>25%</b></div>
      <div class="bar"><span>Homework</span><div class="track"><div class="fill" style="width:10%"></div></div><b>10%</b></div>
    </div>
  </section>

  <section>
    <h2>Supplies (tick what you have)</h2>
    <ul class="list" id="supplies">
      <li><label><input type="checkbox"> Composition notebook</label></li>
      <li><label><input type="checkbox"> Pencils and a ruler</label></li>
      <li><label><input type="checkbox"> Safety glasses</label></li>
      <li><label><input type="checkbox"> Glue stick</label></li>
      <li><label><input type="checkbox"> Calculator</label></li>
    </ul>
    <div class="count" id="count"></div>
  </section>

  <section>
    <h2>Key dates</h2>
    <table>
      <tr><td>Oct 14</td><td>Quiz 1: cells</td></tr>
      <tr><td>Nov 4</td><td>Lab report due</td></tr>
      <tr><td>Nov 21</td><td>Project proposal due</td></tr>
      <tr><td>Dec 12</td><td>Project fair, 6:00 pm</td></tr>
    </table>
  </section>
</main>

<script>
  const boxes = document.querySelectorAll('#supplies input');
  const count = document.getElementById('count');

  function update() {
    const done = document.querySelectorAll('#supplies input:checked').length;
    count.textContent = done + ' of ' + boxes.length + ' packed';
  }
  boxes.forEach(b => b.addEventListener('change', update));
  update();
</script>
</body>
</html>
For a tick-list you keep yourself, see HTML checklist.
Where to put the link
The link is plain text, so it goes wherever you already send things. Two Google routes are worth knowing, and both depend on your school's setup. Paper is the third.
- Google Classroom: the help page for creating an assignment lists a Link option that attaches a link. As of October 2026, that is how Google describes it.
- Google Sites: Insert, then Embed, lets you add a URL or your own code. Google notes that some websites will not let you add their content. This guide did not test NOS pages inside Sites, so a normal text link is the safer choice.
- Paper: turn the link into a QR code for the newsletter or a door sign. QR code link covers it.
More about why a link beats a file in an email: Why links beat attachments.
Ways to send it, compared
| Way | What the parent needs | If you fix a date |
|---|---|---|
| HTML file attached to an email | Download it and open it in a browser | Send a new file |
| NOS share link | Tap the link | Edit once, same link |
| Link in a Classroom assignment | Whoever can see the assignment | Edit once, same link |
| QR code on paper | A phone camera | Edit once, same code |
The last three rows share one benefit: there is a single page, and everyone is looking at it. For handouts and course files, see Send course materials.
When it does not work
| What you see | Cause | Fix |
|---|---|---|
| The chat shows code, not a page | You are reading the code block | Copy it into NOS and it renders |
| The page is cut off at the end | The copy missed the last lines | Copy again to the closing html line |
| A made-up date or name | The AI guessed | Click it and type the real one |
| A picture does not show | Images from other sites are blocked | Ask for shapes and colours, or no picture |
| A form on the page does not send | Sending a form to a server is blocked | Ask parents to email you instead |
| The layout is cramped on a phone | The page was made for a wide screen | Ask the chat to make it work on a phone |
| Your edit shows for you only | You changed it in the AI chat, not NOS | Make the edit in the NOS document |