A training guide template is a page with the same parts every time: outcomes, steps, checklists and a short check. Build it as a web page with AI and send one link. When a step changes, edit the page. The link stays.
One small-business guide puts the risk plainly: "If your training process lives in someone's head, it dies when that person leaves." A page that anyone can open writes it down once, and every new starter gets the same version.
Try the page below. Tick the steps, open a note under a step, and answer the two questions at the bottom.
<!doctype html>
<html lang="en">
<head>
<meta charset="utf-8">
<meta name="viewport" content="width=device-width, initial-scale=1">
<title>Training guide: Handling a customer refund</title>
<style>
  * { box-sizing: border-box; }
  body { margin: 0; padding: 16px; font-family: system-ui, sans-serif; color: #1f2937; background: #f3f4f6; line-height: 1.45; }
  .sheet { max-width: 680px; margin: 0 auto; background: #fff; border-radius: 12px; padding: 22px; box-shadow: 0 1px 4px rgba(0,0,0,.08); }
  .tag { font-size: 12px; letter-spacing: .5px; text-transform: uppercase; color: #6b7280; margin: 0 0 4px; }
  h1 { margin: 0 0 12px; font-size: 22px; }
  h2 { margin: 24px 0 8px; font-size: 16px; display: flex; align-items: center; gap: 8px; }
  h2 span { flex: none; width: 24px; height: 24px; border-radius: 50%; background: #1d4ed8; color: #fff; font-size: 13px; display: grid; place-items: center; }
  .meta { display: grid; grid-template-columns: repeat(3, 1fr); gap: 8px; margin: 0 0 6px; }
  .meta div { background: #f9fafb; border: 1px solid #e5e7eb; border-radius: 8px; padding: 8px 10px; font-size: 13px; }
  .meta b { display: block; font-size: 11px; color: #6b7280; text-transform: uppercase; letter-spacing: .4px; font-weight: 600; }
  p { margin: 0 0 8px; font-size: 14.5px; }
  .goal { background: #eff6ff; border-left: 4px solid #2563eb; border-radius: 6px; padding: 10px 14px; font-size: 14.5px; }
  .goal ul { margin: 4px 0 0; padding-left: 20px; }
  .prog { position: sticky; top: 0; z-index: 2; background: #fff; display: flex; align-items: center; gap: 10px; margin: 14px 0 0; padding: 8px 0; font-size: 13px; color: #374151; border-bottom: 1px solid #e5e7eb; }
  .bar { flex: 1; height: 8px; background: #e5e7eb; border-radius: 99px; overflow: hidden; }
  .bar i { display: block; height: 100%; width: 0; background: #16a34a; transition: width .2s; }
  button { font: inherit; font-size: 13px; padding: 5px 10px; border: 1px solid #d1d5db; background: #fff; border-radius: 6px; cursor: pointer; }
  .list { list-style: none; margin: 0; padding: 0; }
  .list li { padding: 9px 0; border-top: 1px solid #e5e7eb; }
  label { display: flex; gap: 9px; align-items: flex-start; font-size: 15px; cursor: pointer; }
  label input { width: 20px; height: 20px; margin: 1px 0 0; flex: none; }
  li.done label span { text-decoration: line-through; color: #9ca3af; }
  details { margin: 6px 0 0 29px; font-size: 13.5px; color: #4b5563; }
  summary { cursor: pointer; color: #2563eb; }
  details p { margin: 4px 0 0; font-size: 13.5px; }
  .practice { background: #fffbeb; border: 1px solid #fde68a; border-radius: 8px; padding: 10px 14px; font-size: 14.5px; }
  .q { border: 1px solid #e5e7eb; border-radius: 8px; padding: 10px 12px; margin: 0 0 10px; }
  .q p { font-weight: 600; }
  .opts { display: flex; flex-wrap: wrap; gap: 6px; }
  .opts button { text-align: left; font-size: 14px; padding: 7px 11px; }
  .opts button.right { background: #dcfce7; border-color: #16a34a; }
  .opts button.wrong { background: #fee2e2; border-color: #dc2626; }
  .fb { min-height: 20px; margin: 6px 0 0; font-size: 13.5px; font-weight: 400; color: #374151; }
  @media (max-width: 480px) { body { padding: 10px; } .sheet { padding: 16px; } .meta { grid-template-columns: 1fr; } }
</style>
</head>
<body>
<div class="sheet">
  <p class="tag">Training guide · Customer support</p>
  <h1>Handling a customer refund</h1>

  <div class="meta">
    <div><b>Time</b>About 45 minutes</div>
    <div><b>Trainer</b>Support team lead</div>
    <div><b>Last updated</b>1 October 2026</div>
  </div>

  <h2>By the end you can</h2>
  <div class="goal">
    <ul>
      <li>Find an order and check it is eligible for a refund.</li>
      <li>Issue the refund and tell the customer what happens next.</li>
      <li>Say when to ask the team lead instead.</li>
    </ul>
  </div>

  <div class="prog">
    <span id="count">0 of 9 done</span>
    <span class="bar"><i id="fill"></i></span>
    <button type="button" id="reset">Reset</button>
  </div>

  <h2><span>1</span>Before you start</h2>
  <ul class="list" id="l1">
    <li><label><input type="checkbox"><span>Log in to the order system and the help desk.</span></label></li>
    <li><label><input type="checkbox"><span>Open the refund policy page next to you.</span></label></li>
  </ul>

  <h2><span>2</span>Do it, step by step</h2>
  <ul class="list" id="l2">
    <li><label><input type="checkbox"><span>Search the order by the number in the customer's message.</span></label></li>
    <li><label><input type="checkbox"><span>Check the delivery date is inside the return window.</span></label>
      <details><summary>What if it is just outside?</summary><p>Do not refuse and do not promise. Pass it to the team lead with the order number.</p></details></li>
    <li><label><input type="checkbox"><span>Choose Refund, pick the reason, and confirm the amount.</span></label></li>
    <li><label><input type="checkbox"><span>Reply to the customer: the amount, the method and the expected wait.</span></label>
      <details><summary>Why we give the wait</summary><p>Customers write again when they hear nothing. A clear wait saves a second message.</p></details></li>
    <li><label><input type="checkbox"><span>Close the ticket with the tag "refund-done".</span></label></li>
  </ul>

  <h2><span>3</span>Practice</h2>
  <p class="practice">With your trainer, handle two practice tickets in the test system. Tick this when the trainer has watched you finish one without help.</p>
  <ul class="list" id="l3">
    <li><label><input type="checkbox"><span>I finished a practice refund on my own.</span></label></li>
  </ul>

  <h2><span>4</span>Check yourself</h2>
  <div class="q" data-answer="1">
    <p>A customer asks for a refund 3 days after delivery. What do you check first?</p>
    <div class="opts">
      <button type="button">Their mood</button>
      <button type="button">The delivery date</button>
      <button type="button">The reason code</button>
    </div>
    <div class="fb"></div>
  </div>
  <div class="q" data-answer="2">
    <p>The order is outside the window. What do you do?</p>
    <div class="opts">
      <button type="button">Refund it anyway</button>
      <button type="button">Say no</button>
      <button type="button">Pass it to the team lead</button>
    </div>
    <div class="fb"></div>
  </div>
</div>

<script>
  // Ticks drive one counter and one bar for the whole guide.
  const boxes = document.querySelectorAll('.list input');
  function update() {
    let n = 0;
    boxes.forEach(b => {
      b.closest('li').classList.toggle('done', b.checked);
      if (b.checked) n++;
    });
    document.getElementById('count').textContent = n + ' of ' + boxes.length + ' done';
    document.getElementById('fill').style.width = (n / boxes.length * 100) + '%';
  }
  boxes.forEach(b => b.addEventListener('change', update));
  document.getElementById('reset').addEventListener('click', () => {
    boxes.forEach(b => b.checked = false);
    update();
  });
  update();

  // Self-check questions: show right or wrong under each one.
  document.querySelectorAll('.q').forEach(q => {
    const right = Number(q.dataset.answer);
    const fb = q.querySelector('.fb');
    q.querySelectorAll('button').forEach((btn, i) => {
      btn.addEventListener('click', () => {
        q.querySelectorAll('button').forEach(x => x.classList.remove('right', 'wrong'));
        btn.classList.add(i === right ? 'right' : 'wrong');
        fb.textContent = i === right ? 'Right.' : 'Not quite. Try another answer.';
      });
    });
  });
</script>
</body>
</html>
The counter at the top follows every tick. The trainer's name and the date tell the trainee who to ask and how fresh the page is.
What goes in a training guide template
A training-software guide lists five parts of a training manual: an outline, learning objectives, the process, knowledge checks and summaries. The page above uses the same order, in a shorter form for one task.
- Outcomes first. The small-business guide quoted above suggests writing 5 to 10 specific outcomes of what a new hire can do alone. For one task, three is plenty.
- Before you start. Logins and papers, so nobody stops on step 3.
- Steps with one action each. Start with a verb. Put the reason in a note, not in the step.
- A practice task. Something the trainer watches, not something read.
- A short check. Two or three questions the trainee can answer alone.
For a longer plan, split the outcomes into days. That guide also suggests milestones across the first week or two, and a five-minute check-in at the end of each training day.
Make it with AI
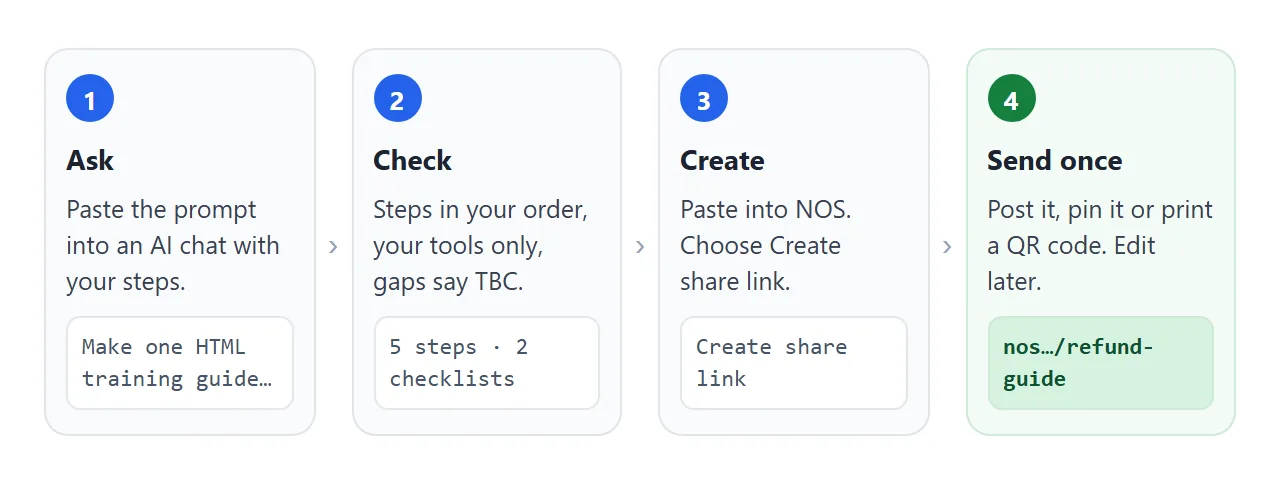
You do not have to build the page by hand. Paste this into ChatGPT, Claude or Gemini and swap in your own task:
Make one self-contained HTML file: a training guide for new staff.
Title: Handling a customer refund. Time: about 45 minutes. Trainer: "Support team lead". Last updated 1 October 2026.
Sections in this order: by the end you can (3 outcomes), before you start (checklist), steps (checklist, one action each, starting with a verb), practice (one task the trainer watches), check yourself (2 multiple-choice questions that show right or wrong).
Rules: add a tick box to every checklist item, show "x of N done" with a bar and a Reset button. Use only the tools and roles I give you. Write TBC where something is missing. No external images, fonts or scripts. It must read well on a phone, so include a viewport meta tag.
Steps: search the order; check the delivery date; choose Refund and confirm; reply with the amount and the wait; close the ticket with a tag.
Then check five things before you share it:
- The steps are in your order, and the counter equals the number of tick boxes.
- Every tool and role is one you named. AI tools sometimes invent a plausible system or job title.
- Gaps say TBC, not an invented deadline or policy.
- The quiz answers are right. Read each one yourself.
- Open it on your phone. Steps should not run off the edge of the screen.
Send it as a link
Copy the code the AI gave you. Paste it into a NOS document and choose Create share link. HTML to link walks through it.
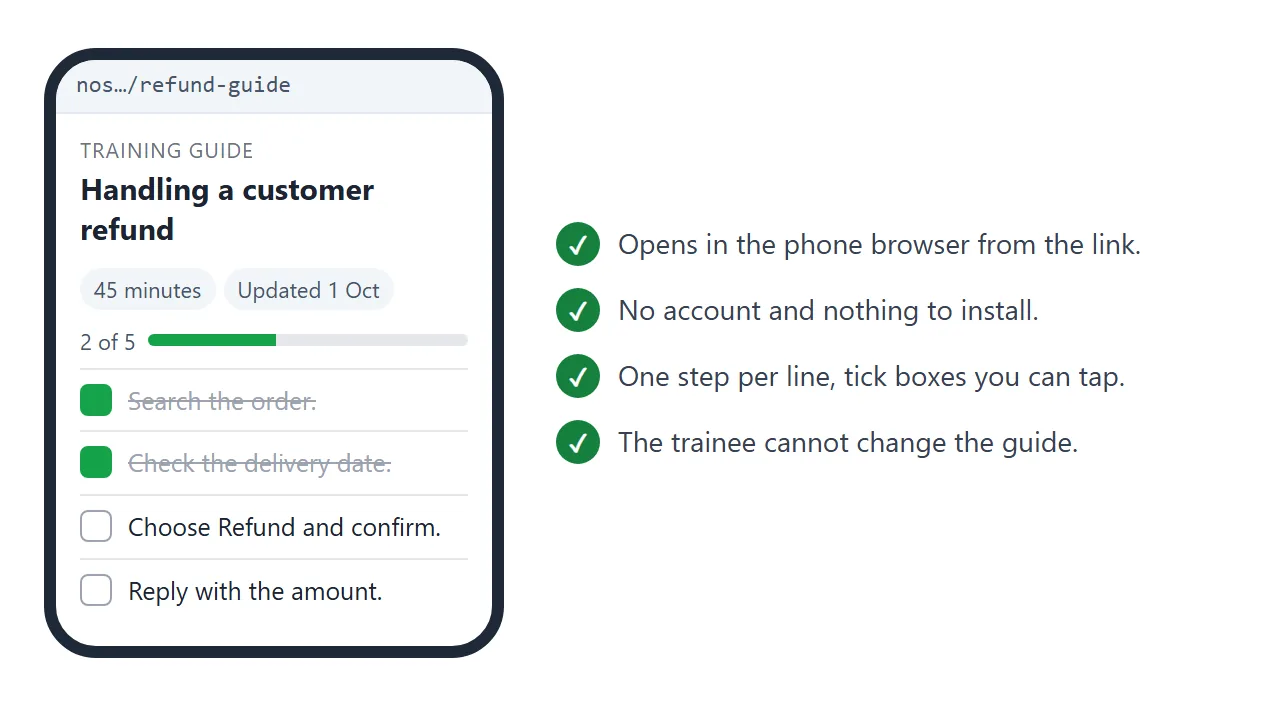
The trainee gets a normal page in their browser. It opens on a phone as well as a laptop, needs no account, and cannot be edited by the person reading it. The page renders as written and its scripts run.
In Slack. As of October 2026, Slack's help says you can pin a message from the three-dot menu, or add a link from the plus sign at the top. On Pro and higher plans, pinning sits under Organize. See sending an HTML file in Slack.
In a welcome email. A link is text, so it fits in the first message a new starter reads. HTML for onboarding docs covers a whole starter pack.
On paper. Print the link as a QR code and stick it by the equipment. QR code links explains how.
Change a step without sending a new file
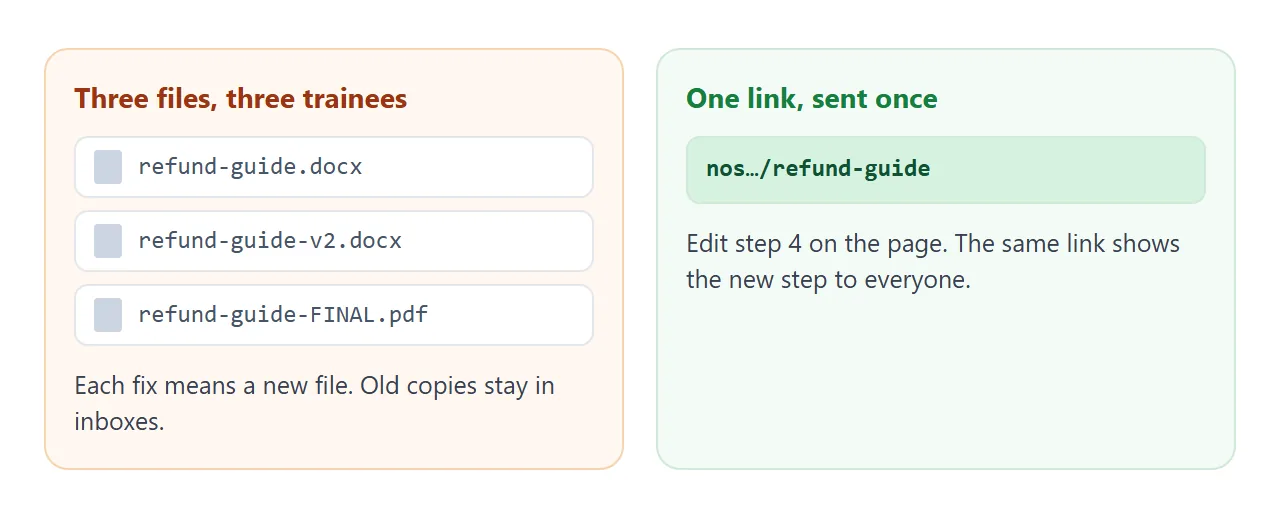
Say the refund process gains a step: tell the customer how long the wait is. With files, you save a new version and hope people delete the old one. With the link, you edit one step and send nothing.
Trainees' ticks are theirs for that visit only. A visitor's changes are not saved, and the owner's ticks and added rows are saved only in View mode. If you need a record of who finished, keep it in your own records.
A week-one plan for the trainer
The guide above is for the trainee. The trainer often wants a second page: a plan for the first week, with a sign-off for each task. Tap a status to move it from Not yet to On own.
<!doctype html>
<html lang="en">
<head>
<meta charset="utf-8">
<meta name="viewport" content="width=device-width, initial-scale=1">
<title>Week one training plan</title>
<style>
  * { box-sizing: border-box; }
  body { margin: 0; padding: 16px; font-family: system-ui, sans-serif; color: #1f2937; background: #f3f4f6; line-height: 1.45; }
  .sheet { max-width: 680px; margin: 0 auto; background: #fff; border-radius: 12px; padding: 22px; box-shadow: 0 1px 4px rgba(0,0,0,.08); }
  .tag { font-size: 12px; letter-spacing: .5px; text-transform: uppercase; color: #6b7280; margin: 0 0 4px; }
  h1 { margin: 0 0 6px; font-size: 22px; }
  .sub { margin: 0 0 12px; font-size: 14px; color: #4b5563; }
  .sum { display: flex; flex-wrap: wrap; gap: 8px; margin: 0 0 8px; }
  .sum div { flex: 1 1 100px; background: #f9fafb; border: 1px solid #e5e7eb; border-radius: 8px; padding: 8px 10px; font-size: 13px; }
  .sum b { display: block; font-size: 20px; }
  h2 { margin: 18px 0 6px; font-size: 13px; text-transform: uppercase; letter-spacing: .4px; color: #374151; }
  .row { display: flex; align-items: center; justify-content: space-between; gap: 10px; padding: 9px 0; border-top: 1px solid #e5e7eb; font-size: 14.5px; }
  .row span { flex: 1; min-width: 0; }
  .st { flex: none; min-width: 104px; font: inherit; font-size: 13px; padding: 7px 10px; border-radius: 99px; border: 1px solid #d1d5db; background: #fff; color: #4b5563; cursor: pointer; }
  .st[data-s="1"] { background: #eff6ff; border-color: #93c5fd; color: #1e40af; }
  .st[data-s="2"] { background: #fffbeb; border-color: #fcd34d; color: #92400e; }
  .st[data-s="3"] { background: #dcfce7; border-color: #4ade80; color: #166534; }
  .note { font-size: 13px; color: #6b7280; margin: 12px 0 0; }
  @media (max-width: 480px) { body { padding: 10px; } .sheet { padding: 16px; } .st { min-width: 92px; } }
</style>
</head>
<body>
<div class="sheet">
  <p class="tag">Trainer sign-off</p>
  <h1>Week one: Front desk team</h1>
  <p class="sub">Tap a status to move it on: Not yet, Shown, With help, On own.</p>

  <div class="sum">
    <div><b id="n-own">0</b>On own</div>
    <div><b id="n-help">0</b>With help</div>
    <div><b id="n-total">0</b>Tasks in all</div>
  </div>

  <div id="plan">
    <h2>Day 1 · Orientation</h2>
    <div class="row"><span>Tour, safety points and where things are kept</span><button type="button" class="st" data-s="0"></button></div>
    <div class="row"><span>Log in to the phone and visitor systems</span><button type="button" class="st" data-s="0"></button></div>

    <h2>Day 2 · Visitors</h2>
    <div class="row"><span>Sign in a visitor and print a badge</span><button type="button" class="st" data-s="0"></button></div>
    <div class="row"><span>Book a meeting room for a visitor</span><button type="button" class="st" data-s="0"></button></div>

    <h2>Day 3 · Phones and post</h2>
    <div class="row"><span>Answer, transfer and take a message</span><button type="button" class="st" data-s="0"></button></div>
    <div class="row"><span>Log a parcel and tell the person it is for</span><button type="button" class="st" data-s="0"></button></div>

    <h2>Day 4 and 5 · On your own</h2>
    <div class="row"><span>Open the desk using the opening checklist</span><button type="button" class="st" data-s="0"></button></div>
    <div class="row"><span>Close the desk using the closing checklist</span><button type="button" class="st" data-s="0"></button></div>
  </div>

  <p class="note">End of each day: five minutes with the trainer. What was clear, what was not?</p>
</div>

<script>
  const labels = ['Not yet', 'Shown', 'With help', 'On own'];
  const btns = document.querySelectorAll('.st');

  function show() {
    let own = 0, help = 0;
    btns.forEach(b => {
      const s = Number(b.dataset.s);
      b.textContent = labels[s];
      if (s === 3) own++;
      if (s === 2) help++;
    });
    document.getElementById('n-own').textContent = own;
    document.getElementById('n-help').textContent = help;
    document.getElementById('n-total').textContent = btns.length;
  }

  btns.forEach(b => b.addEventListener('click', () => {
    b.dataset.s = (Number(b.dataset.s) + 1) % 4;  // go round the four states
    show();
  }));
  show();
</script>
</body>
</html>
The status buttons are a page script. They show where you are while the page is open, and they are not a record. For anything you must keep, copy the result into your own system.
Ways to share a training guide compared
| Way to share | What people get | When a step changes | Fits best |
|---|---|---|---|
| Attach a Word or PDF file | A file to download | Send a new file; old copies stay in inboxes | A printed or signed copy |
| A file in a shared folder | The file, from the folder | Replace the file; saved copies stay | Documents IT manages |
| Share link to the page | A page in the browser, phone included | Edit the page; same link | Training that changes |
| Link in the welcome email | The link, first thing they read | Same link, nothing to resend | New starters |
| QR code at the workstation | The link, printed | The paper stays, the page is current | Equipment and desks |
For why a link beats a file in a thread, see why links beat attachments. For a tick-off list on its own, HTML checklist is the shorter version.
When it does not work
| What you see | Cause | Fix |
|---|---|---|
| Trainees follow an old step | They saved a file copy | Give out only the page link |
| Steps are out of order | The AI re-sorted them | Say "keep my order" in the prompt |
| A tool you never named appears | The AI filled a gap | Tell it to use only your tools and write TBC |
| A quiz answer is wrong | The AI guessed | Read every answer and fix it in the code |
| A trainee's tick does not stay | Visitors' changes are not saved | Treat ticks as personal for that visit |
| A picture from another site is missing | Images from other sites are blocked | Use an inline SVG or a coloured block |
If a form on the page tries to send answers to a server, that is blocked too. Ask trainees to reply by email or in the thread.