라디오 버튼은 <input type="radio">입니다. 여러 라디오에 **동일한 name**를 제공하면 하나의 그룹이 됩니다. 하나를 선택하면 다른 라디오의 선택이 취소되고 양식은 선택된 라디오의 value와 함께 name를 보냅니다.
<fieldset>
  <legend>Size</legend>
  <label><input type="radio" name="size" value="small"> Small</label>
  <label><input type="radio" name="size" value="medium" checked> Medium</label>
  <label><input type="radio" name="size" value="large"> Large</label>
</fieldset>
이름이 만들어내는 차이를 시험해 보세요. 양쪽에 있는 라디오를 클릭한 다음 왼쪽에 있는 화살표 키를 사용하세요.
<!doctype html>
<html lang="en">
<head>
<meta charset="utf-8">
<meta name="viewport" content="width=device-width, initial-scale=1">
<title>Radio groups: same name vs different names</title>
<style>
  body { margin: 0; padding: 14px; font-family: system-ui, sans-serif; background: #f4f5f7; color: #1d2330; }
  .row { display: grid; grid-template-columns: 1fr 1fr; gap: 12px; }
  fieldset { margin: 0; padding: 10px 12px 12px; border: 1px solid #d5d9e0; border-radius: 10px; background: #fff; min-width: 0; }
  legend { padding: 0 4px; font-weight: 700; font-size: 14px; }
  label { display: flex; align-items: center; gap: 8px; padding: 6px 0; font-size: 15px; }
  input { width: 18px; height: 18px; margin: 0; flex: none; accent-color: #2563eb; }
  code { font-size: 12px; background: #eef1f5; border-radius: 4px; padding: 0 3px; }
  .count { margin: 8px 0 0; font-size: 13px; color: #5b6270; }
  .hint { margin: 12px 0 0; font-size: 13px; line-height: 1.45; color: #374151; }
</style>
</head>
<body>
<div class="row">
  <fieldset id="same">
    <legend>Same name</legend>
    <label><input type="radio" name="size" value="s"> Small <code>size</code></label>
    <label><input type="radio" name="size" value="m"> Medium <code>size</code></label>
    <label><input type="radio" name="size" value="l"> Large <code>size</code></label>
    <p class="count">Checked: <b>0</b></p>
  </fieldset>
  <fieldset id="diff">
    <legend>Different names</legend>
    <label><input type="radio" name="size1" value="s"> Small <code>size1</code></label>
    <label><input type="radio" name="size2" value="m"> Medium <code>size2</code></label>
    <label><input type="radio" name="size3" value="l"> Large <code>size3</code></label>
    <p class="count">Checked: <b>0</b></p>
  </fieldset>
</div>
<p class="hint">Click one on the left, then press the arrow keys: the check moves with the focus. Tab leaves the group. On the right, each radio is a group of one, so all three can stay checked.</p>

<script>
  // Count the checked radios in each box after every change
  document.querySelectorAll('fieldset').forEach((box) => {
    box.addEventListener('change', () => {
      box.querySelector('.count b').textContent = box.querySelectorAll('input:checked').length;
    });
  });
</script>
</body>
</html>
name 속성은 그룹을 만듭니다.
브라우저는 어떤 라디오가 name에 의해서만 함께 속하고 동일한 형태의 라디오 중에서만 결정합니다. 어떤 양식에도 포함되지 않은 라디오는 페이지 전체에서 이름별로 그룹화됩니다.
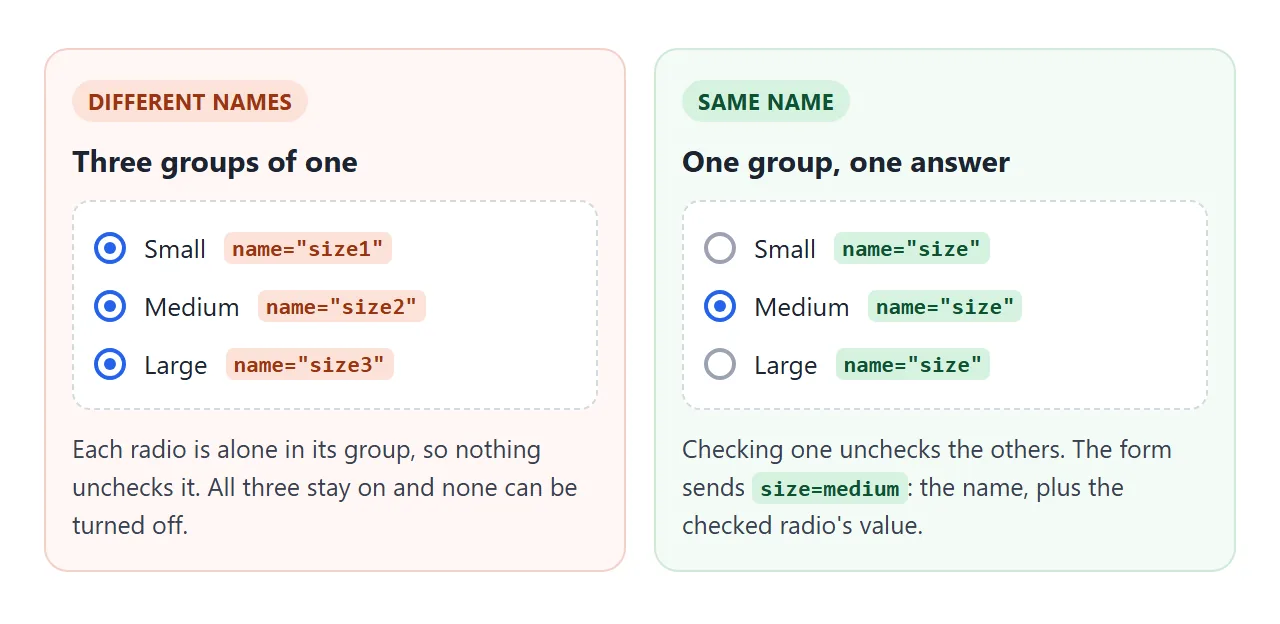
데모 오른쪽에 있는 실수는 라디오를 하나씩 복사하고 이름을 바꿀 때 흔히 발생합니다. 각 라디오는 하나의 그룹이 됩니다. 라디오는 모두 선택된 상태로 유지되며, 라디오는 절대로 스스로 선택을 취소하지 않기 때문에 어느 것도 다시 끌 수 없습니다.
id는 아무것도 그룹화하지 않습니다. 페이지의 다른 곳에 있는 <label for>에만 라디오를 연결합니다.
값, 확인 및 양식에서 보내는 내용
각 라디오에는 자체 value가 필요합니다. 양식을 제출하면 그룹에서 선택한 라디오만 name=value로 전송됩니다. value="medium"를 선택하면 요청에 size=medium가 전달됩니다.
value속성 없음: 확인된 라디오는size=on를 전송하지만 어느 라디오가 선택되었는지는 알 수 없습니다.- 확인된 항목 없음: 그룹에서 아무 것도 보내지 않습니다. 요청에 이름이 누락되어 있으며 비어 있지 않습니다.
checked속성: 기본값을 설정합니다. 또한 재설정 버튼이 돌아가는 곳이기도 합니다.
응답 없이 양식이 나가는 것을 중지하려면 그룹의 하나 라디오에 required를 추가하세요. 이로 인해 전체 그룹이 필요하게 되며, 그 안에 있는 라디오를 확인하면 규칙을 충족합니다. 모든 라디오에 required를 설치하는 것은 동일한 작업을 수행하며 무해합니다.
양식 제출 가이드에서는 버튼을 누른 후 어떤 일이 발생하는지 다룹니다.
키보드: 탭 입력, 화살표 선택
라디오 그룹은 탭 순서에서 세 개가 아닌 한 정거장입니다. 크롬으로 측정:
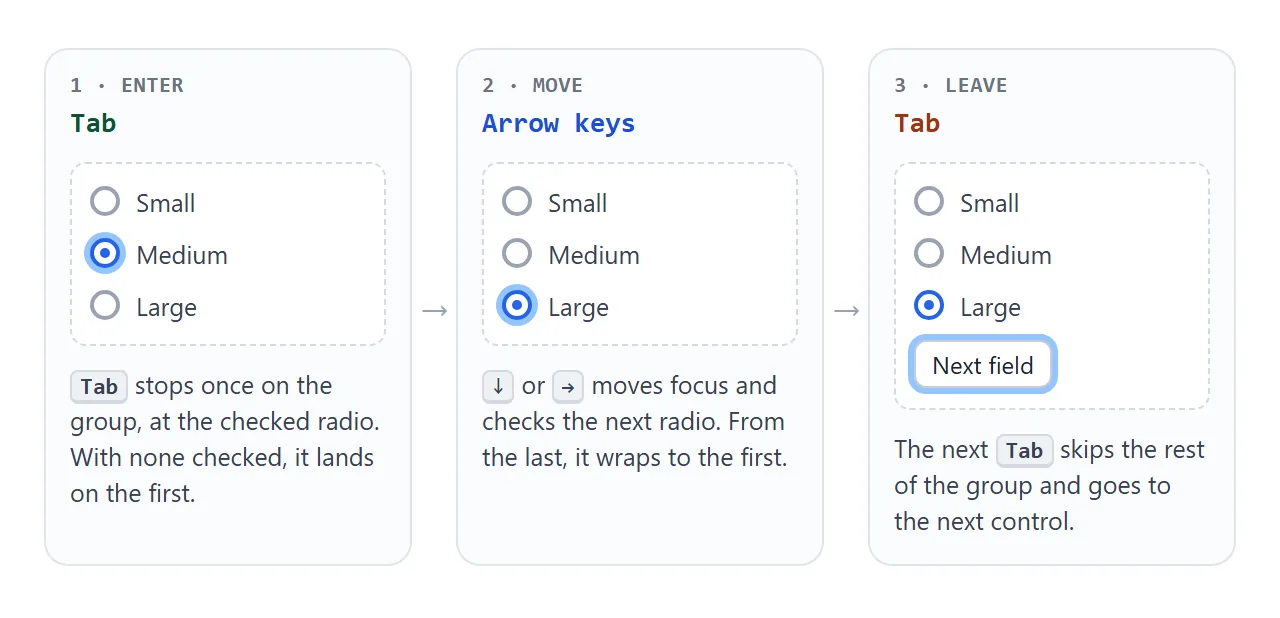
- 탭은 선택된 라디오에서 멈춥니다. 아무 것도 선택하지 않으면 첫 번째 항목에서 중지됩니다.
- 화살표 키 초점을 다음 또는 이전 라디오로 이동하고 동시에 확인하세요. 마지막 라디오부터 첫 번째 라디오까지 래핑됩니다.
- Space는 그룹에 아직 선택된 항목이 없을 때 집중된 라디오를 확인합니다.
- Tab은 다음 컨트롤을 위해 다시 그룹을 떠납니다.
이 동작은 라디오가 이름을 공유하는 경우에만 발생합니다. 이름이 다른 라디오는 별도의 탭 정지이며 화살표 키는 라디오 사이에서 이동하지 않습니다.
모든 라디오에 라벨을 붙이고 전설에 대해 질문하세요
라디오 자체는 18픽셀 타겟입니다. <label>로 감싸거나 for 및 id로 두 개를 연결하면 텍스트도 클릭할 수 있게 됩니다. 라벨 가이드에는 두 가지 패턴이 모두 있습니다.
라벨에는 "소형", "중형", "대형"이라고 표시되어 있지만 문제는 아닙니다. "크기"와 같은 <legend>를 사용하여 그룹을 <fieldset>에 넣으면 초점이 그룹에 들어갈 때 보조 기술이 질문을 알립니다. 필드 세트 및 범례는 세부 사항과 CSS에 대해 설명합니다.
JavaScript에서 확인된 라디오 값 가져오기
그룹을 읽는 세 가지 일반적인 방법이 있습니다. 아무것도 확인하지 않았을 때 반환하는 내용만 다릅니다.
<!doctype html>
<html lang="en">
<head>
<meta charset="utf-8">
<meta name="viewport" content="width=device-width, initial-scale=1">
<title>Read the checked radio value</title>
<style>
  body { margin: 0; padding: 14px; font-family: system-ui, sans-serif; background: #f4f5f7; color: #1d2330; }
  fieldset { margin: 0; padding: 10px 12px 12px; border: 1px solid #d5d9e0; border-radius: 10px; background: #fff; }
  legend { padding: 0 4px; font-weight: 700; font-size: 14px; }
  .opts { display: flex; flex-wrap: wrap; gap: 6px 18px; }
  label { display: flex; align-items: center; gap: 7px; font-size: 15px; }
  input { width: 18px; height: 18px; margin: 0; accent-color: #2563eb; }
  button { margin-top: 10px; font: inherit; font-size: 13px; padding: 5px 12px; border: 1px solid #c9cdd4; border-radius: 7px; background: #fff; cursor: pointer; }
  table { width: 100%; margin-top: 12px; border-collapse: collapse; background: #fff; border-radius: 10px; overflow: hidden; font-size: 13px; }
  td { padding: 8px 10px; border-top: 1px solid #eef0f3; vertical-align: top; }
  tr:first-child td { border-top: 0; }
  td:first-child { font-family: ui-monospace, Consolas, monospace; font-size: 12px; color: #374151; word-break: break-all; }
  td:last-child { width: 30%; font-family: ui-monospace, Consolas, monospace; font-weight: 700; color: #0f5132; }
</style>
</head>
<body>
<form id="order">
  <fieldset>
    <legend>Size</legend>
    <div class="opts">
      <label><input type="radio" name="size" value="small"> Small</label>
      <label><input type="radio" name="size" value="medium"> Medium</label>
      <label><input type="radio" name="size" value="large"> Large</label>
    </div>
    <button type="button" id="clear">Uncheck all</button>
  </fieldset>
</form>

<table>
  <tr><td>form.querySelector('input[name=size]:checked') then .value</td><td id="a"></td></tr>
  <tr><td>form.elements.size.value</td><td id="b"></td></tr>
  <tr><td>new FormData(form).get('size')</td><td id="c"></td></tr>
</table>

<script>
  const form = document.getElementById('order');

  function show() {
    const picked = form.querySelector('input[name=size]:checked');  // null when none is checked
    document.getElementById('a').textContent = picked ? JSON.stringify(picked.value) : 'null';
    document.getElementById('b').textContent = JSON.stringify(form.elements.size.value);  // a RadioNodeList
    document.getElementById('c').textContent = JSON.stringify(new FormData(form).get('size'));
  }

  form.addEventListener('change', show);

  document.getElementById('clear').addEventListener('click', () => {
    form.querySelectorAll('input[name=size]').forEach((r) => { r.checked = false; });
    show();  // setting .checked from code does not fire "change", so update by hand
  });

  show();
</script>
</body>
</html>
const form = document.querySelector('form');

// 1. Find the checked radio. null if none is checked.
form.querySelector('input[name=size]:checked')?.value;

// 2. RadioNodeList: "" if none is checked.
form.elements.size.value;

// 3. FormData: null if none is checked.
new FormData(form).get('size');
여러 컨트롤이 이름을 공유하는 경우 form.elements.size는 RadioNodeList를 반환합니다. value는 확인된 라디오의 값이며, 이에 할당하면 일치하는 라디오인 form.elements.size.value = 'large'를 확인합니다.
선택 사항에 반응하려면 양식이나 필드 세트에서 change를 들어보세요. 새로운 선택마다 한 번씩 실행됩니다. 코드가 .checked로 설정되면 실행되지 않으므로 스크립트에서 라디오를 변경한 후 직접 페이지를 업데이트하세요.
쿼리선택기 가이드에서는 :checked 선택기에 대해 설명합니다.
CSS를 사용하여 라디오 버튼 스타일 지정
색상 변경에만 accent-color를 사용하십시오. 기본 라디오에 색조를 지정하고 크기, 초점 링 및 키보드 동작을 유지합니다.
input[type=radio] { accent-color: #2563eb; width: 18px; height: 18px; }
카드나 알약 버튼과 같은 완전한 맞춤형 모양을 위해서는 입력을 시각적으로 숨기고 바로 뒤에 있는 요소의 스타일을 지정하세요. 함정은 그것을 숨기는 방법입니다.
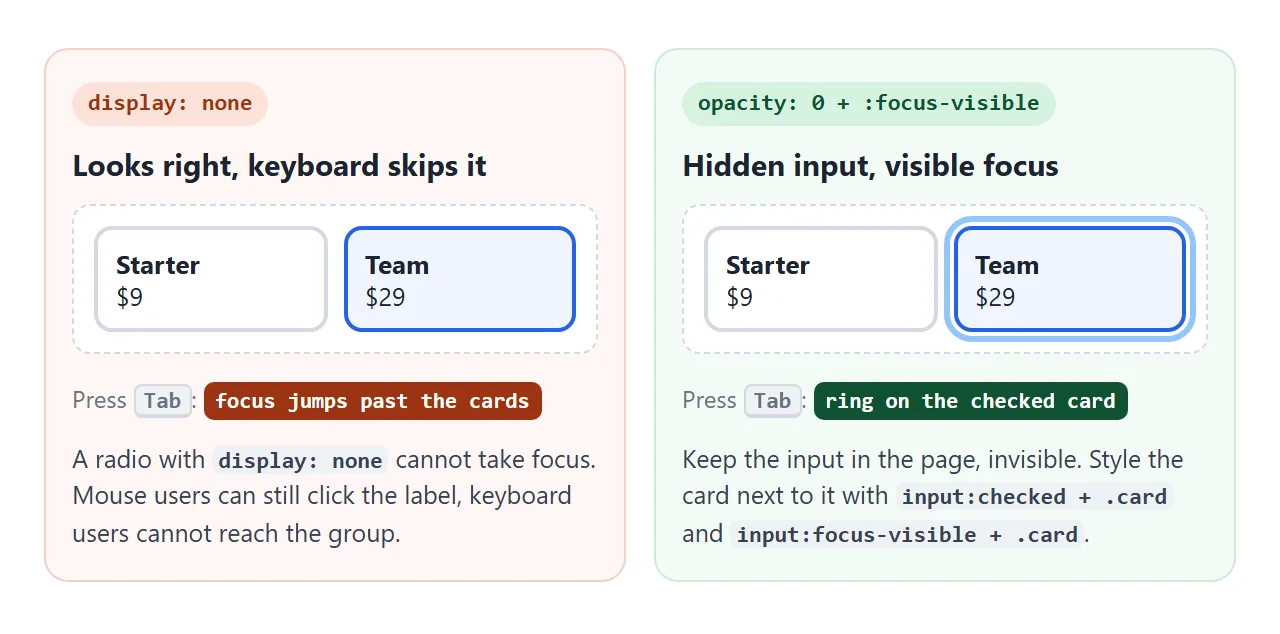
.sr { position: absolute; width: 1px; height: 1px; margin: 0; opacity: 0; }
input:checked + .card { border-color: #2563eb; }
input:focus-visible + .card { outline: 3px solid #93c5fd; }
동일한 기술로 아래에 있는 확인란인 CSS 토글 스위치를 구동합니다.
완성된 예: 카드 라디오가 포함된 계획 선택기
하나의 형태로 두 그룹. 빌링은 기본으로 알약 모양의 쌍으로 이루어지며, 기본 없이 플랜 카드가 필요합니다. 각 카드는 전체 <label>이므로 카드의 아무 곳이나 클릭하면 라디오가 확인됩니다.
<!doctype html>
<html lang="en">
<head>
<meta charset="utf-8">
<meta name="viewport" content="width=device-width, initial-scale=1">
<title>Plan picker with card-style radios</title>
<style>
body { margin: 0; padding: 14px; font-family: system-ui, sans-serif; background: #f4f5f7; color: #1d2330; }
fieldset { margin: 0 0 14px; padding: 0; border: 0; min-width: 0; }
legend { padding: 0; margin-bottom: 8px; font-weight: 700; font-size: 15px; }
label { position: relative; display: block; }
/* Hide the real input but keep it focusable. display: none would drop it from the keyboard. */
.sr { position: absolute; width: 1px; height: 1px; margin: 0; opacity: 0; }
.cards { display: grid; grid-template-columns: repeat(auto-fit, minmax(150px, 1fr)); gap: 10px; }
.card { display: block; height: 100%; box-sizing: border-box; padding: 12px 14px; border: 2px solid #d5d9e0; border-radius: 12px; background: #fff; cursor: pointer; }
.card b { display: block; font-size: 15px; }
.card .price { display: block; margin: 4px 0 6px; font-size: 20px; font-weight: 700; }
.card small { color: #5b6270; font-size: 13px; line-height: 1.4; }
input:checked + .card { border-color: #2563eb; background: #eff5ff; }
input:focus-visible + .card { outline: 3px solid #93c5fd; outline-offset: 2px; } /* keyboard focus ring */
.seg { display: inline-flex; border: 1px solid #c9cdd4; border-radius: 99px; background: #fff; padding: 3px; }
.seg span { display: block; padding: 6px 16px; border-radius: 99px; font-size: 14px; cursor: pointer; }
.seg input:checked + span { background: #1d2330; color: #fff; }
.seg input:focus-visible + span { outline: 3px solid #93c5fd; }
.summary { padding: 12px 14px; border-radius: 12px; background: #1d2330; color: #fff; font-size: 14px; line-height: 1.5; }
.summary strong { font-size: 18px; text-transform: capitalize; }
button { margin-top: 10px; width: 100%; padding: 10px; font: inherit; font-weight: 700; border: 0; border-radius: 9px; background: #2563eb; color: #fff; cursor: pointer; }
pre { margin: 8px 0 0; font-size: 12px; color: #a7f3d0; white-space: pre-wrap; word-break: break-all; }
</style>
</head>
<body>
<form id="plan">
<fieldset>
<legend>Billing</legend>
<div class="seg">
<label><input class="sr" type="radio" name="billing" value="monthly" checked><span>Monthly</span></label>
<label><input class="sr" type="radio" name="billing" value="yearly"><span>Yearly</span></label>
</div>
</fieldset>
<fieldset>
<legend>Choose a plan</legend>
<div class="cards">
<label><input class="sr" type="radio" name="plan" value="starter" data-price="9" required>
<span class="card"><b>Starter</b><span class="price">$9</span><small>1 project, email support</small></span></label>
<label><input class="sr" type="radio" name="plan" value="team" data-price="29">
<span class="card"><b>Team</b><span class="price">$29</span><small>10 projects, shared folders</small></span></label>
<label><input class="sr" type="radio" name="plan" value="business" data-price="79">
<span class="card"><b>Business</b><span class="price">$79</span><small>Unlimited projects, priority help</small></span></label>
</div>
</fieldset>
<div class="summary">
<div id="line">No plan chosen yet.</div>
<button type="submit">Continue</button>
<pre id="sent"></pre>
</div>
</form>
<script>
const form = document.getElementById('plan');
function update() {
const plan = form.querySelector('input[name=plan]:checked');
if (!plan) return;
const yearly = form.elements.billing.value === 'yearly';
const price = Number(plan.dataset.price);
const total = yearly ? price * 10 : price; // yearly: pay 10 months, get 12
document.getElementById('line').innerHTML =
'<strong>' + plan.value + '</strong> · $' + total + (yearly ? ' per year (2 months free)' : ' per month');
}
form.addEventListener('change', update);
// Demo only: show what the form would send instead of sending it
form.addEventListener('submit', (e) => {
e.preventDefault();
document.getElementById('sent').textContent =
'Would send: ' + new URLSearchParams(new FormData(form));
});
</script>
</body>
</html>
- 전체 카드 클릭 가능: 라벨이 숨겨진 입력과 카드를 모두 둘러쌉니다.
- 체크 스타일:
input:checked + .card. - 초점 링:
input:focus-visible + .card, 마우스 클릭이 아닌 키보드에 대해 표시됩니다. - 요약: 양식의
change수신기 하나가 두 그룹을 모두 읽습니다.
라디오, 체크박스 또는 선택?
| 제어 | 사용자가 할 수 있는 선택 | 다음에 좋습니다 |
|---|---|---|
| 라디오 버튼 | 정확히 하나, 모든 옵션 표시 | 나란히 비교할 가치가 있는 2~6가지 옵션 |
| 체크박스 | 없음을 포함한 모든 숫자 | 추가 항목과 같은 독립적인 예/아니요 옵션 |
| 드롭다운 선택 | 정확히 하나, 열 때까지 숨겨진 옵션 | 국가와 같은 긴 목록 |
| 단일 체크박스 또는 스위치 | 켜짐 또는 꺼짐 | "업데이트를 이메일로 보내주세요"와 같은 하나의 설정 |
라디오는 모든 옵션을 한 번에 표시하므로 옵션을 비교해야 할 때 도움이 됩니다. 하나의 예/아니요 질문은 두 개의 라디오보다 하나의 확인란으로 더 잘 읽혀집니다.
작동하지 않을 때
| 당신이 보는 것 | 원인 | 수정 |
|---|---|---|
| 한 번에 여러 라디오 확인 | 다양한 name 값 또는 다양한 형태의 라디오 |
하나의 양식 안에 세트 하나의 name를 제공하십시오. |
| 제출된 데이터에서 해당 필드가 누락되었습니다. | 라디오가 선택되지 않았으며 기본값도 없습니다. | 기본에 checked를 추가하거나 하나의 라디오에 required를 추가하세요. |
서버가 size=on를 수신합니다. |
라디오에는 value가 없습니다. |
각 라디오에 고유한 value 제공 |
| 라디오는 선택 취소할 수 없습니다. | 그것이 라디오가 작동하는 방식이다 | "없음" 옵션을 추가하거나 확인란을 사용하세요. |
| Tab으로는 맞춤형 라디오에 접근할 수 없습니다. | 입력은 display: none로 숨겨집니다. |
opacity: 0 및 스타일 :focus-visible로 숨기기 |
| 텍스트를 클릭해도 아무 일도 일어나지 않습니다 | 라벨의 for가 라디오의 id와 일치하지 않습니다. |
일치시키거나 라벨 안에 라디오를 감싸세요. |
코드는 .checked를 설정하고 업데이트는 없습니다. |
change는 사용자 작업에 대해서만 실행됩니다. |
업데이트 기능을 설정한 후 호출하세요. |
링크로 공유하세요
사람들이 양식을 클릭할 수 있으면 양식을 판단하기가 더 쉽습니다. 계획 선택기의 스크린샷을 시도할 수 없으며 .html 첨부 파일이 전화기에서 일반 코드로 열릴 수 있습니다.
작업 버전을 보내려면 페이지를 NOS 문서에 붙여넣고 공유 링크 만들기를 선택하세요. 링크할 HTML이 이를 안내합니다.
페이지는 작성된 대로 렌더링되고 해당 스크립트가 실행되므로 페이지를 보내는 사람들은 계획을 선택하고 라디오 자체를 통해 탭할 수 있습니다. 나중에 코드를 변경하면 동일한 링크에 새 버전이 표시됩니다.