Next.js is a React framework: you write pages as React components, and Next.js turns them into HTML.
That makes "Next.js HTML" mean two things. You either want the HTML files Next.js produces, or you want a Next.js page as one plain HTML file. This guide covers both.
The short answers. Next.js can export static HTML with output: 'export', but the result is a folder, not a file. A small page is often easier to rebuild as plain HTML. Here is a Next.js docs counter, rebuilt that way:
<!doctype html>
<html lang="en">
<head>
<meta charset="utf-8">
<meta name="viewport" content="width=device-width, initial-scale=1">
<title>Counter in plain HTML</title>
<style>
  body { margin: 0; padding: 20px; font-family: system-ui, sans-serif; background: #f4f5f7; color: #1d2330; }
  .card { max-width: 360px; background: #fff; border-radius: 12px; padding: 18px 20px; box-shadow: 0 4px 16px rgba(0, 0, 0, .08); }
  h1 { font-size: 20px; margin: 0 0 6px; }
  p { margin: 0 0 14px; color: #4b5563; }
  button { font: inherit; padding: 9px 16px; border: 0; border-radius: 8px; background: #111827; color: #fff; cursor: pointer; }
  button.ghost { background: #e5e7eb; color: #111827; margin-left: 6px; }
  #count { font-weight: 700; color: #111827; }
</style>
</head>
<body>
<!-- The HTML that Next.js would prerender from page.tsx -->
<main class="card">
  <h1>Hello, Next.js!</h1>
  <p><span id="count">0</span> likes</p>
  <button id="like" type="button">Click me</button>
  <button id="reset" class="ghost" type="button">Reset</button>
</main>

<script>
  // useState(0) becomes a plain variable
  let count = 0;
  const out = document.getElementById('count');

  // setCount(...) becomes: change the variable, then update the text
  function render() { out.textContent = count; }

  // onClick={...} becomes addEventListener('click', ...)
  document.getElementById('like').addEventListener('click', () => { count++; render(); });
  document.getElementById('reset').addEventListener('click', () => { count = 0; render(); });
</script>
</body>
</html>
No React, no build, no server. The file opens on its own, which is what you need to email it, preview it or share it as a link.
Where the HTML in a Next.js app comes from
A Next.js project has no index.html to edit. With the App Router, each route is a folder under app/, and the page is a component in page.tsx. The outer document comes from the root layout, app/layout.tsx.
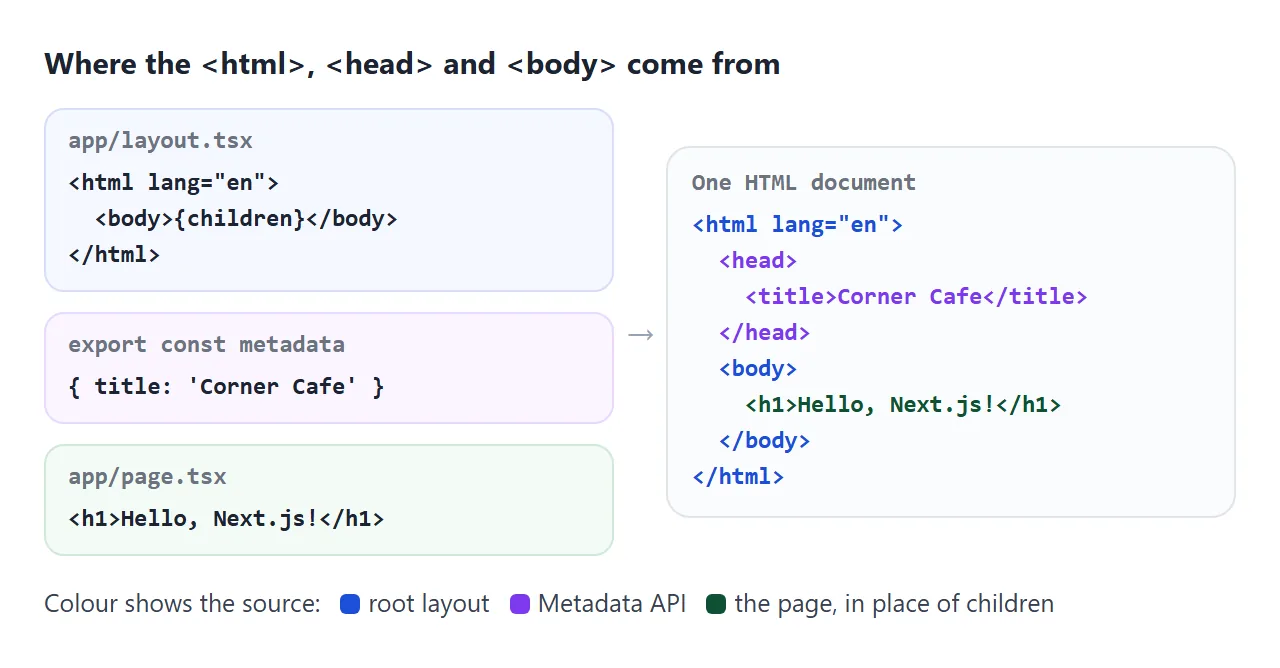
// app/layout.tsx
export const metadata = { title: 'Corner Cafe' }

export default function RootLayout({ children }) {
  return (
    <html lang="en">
      <body>{children}</body>
    </html>
  )
}
The Next.js docs say the root layout must define <html> and <body>. They also say not to write <title> and <meta> tags into it by hand. Use the metadata export instead, which fills the <head>.
By default, layouts and pages are Server Components. They are rendered to HTML ahead of time. Anything with state or click handlers must be a Client Component, marked with 'use client' at the top of its file.
Export static HTML with output: 'export'
To get HTML files out of Next.js, turn on static export in next.config.js:
// next.config.js
const nextConfig = {
  output: 'export',
}

module.exports = nextConfig
Then run next build. Next.js writes an out folder with one HTML file per route, for example out/index.html and out/404.html. The JavaScript and CSS go under _next/static/ in the same folder.
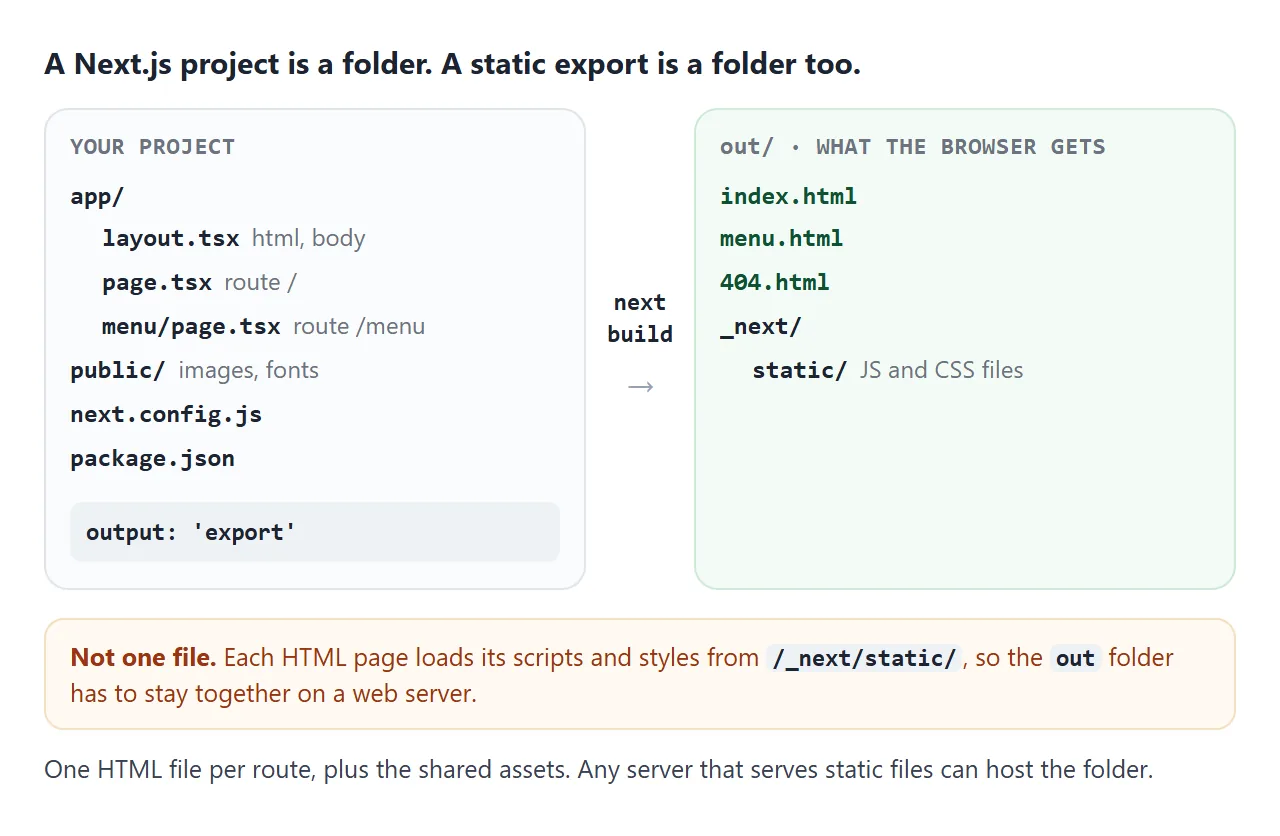
The Next.js docs say the export can be hosted on any web server that serves static HTML, CSS and JavaScript. Some features need a running server and do not work in an export:
| Needs a server, so not in a static export | What to do instead |
|---|---|
| Cookies and Route Handlers that read the request | Read data in the browser, or keep a server |
| Rewrites, redirects and custom headers in next.config | Configure them on the host |
| Server Actions | Send forms to a separate API |
| Image Optimization with the default loader | Set a custom image loader |
| Incremental Static Regeneration | Rebuild and upload again |
Two things trip people up. First, next build needs the project and Node.js; the docs list Node.js 20.9 as the minimum.
Second, the asset paths in the exported pages start with /_next/. Opened from disk, a path starting with / points at the root of the drive, not the out folder, so serve the folder instead.
When one HTML file is the better target
An export keeps your whole Next.js app working. But sometimes the job is smaller: a landing section, a calculator, a prototype for a client. Then a single .html file is easier to send, open and edit than a project and a build.
The rewrite is mechanical. Server Components render to plain markup, so copy it as it is. Client Components need a few lines of script each.
- Copy the rendered HTML into the
<body>of a new file. - Rename JSX attributes:
classNametoclass,htmlFortofor, style objects to CSS strings. - Replace state with variables. Each
useStatevalue becomes a variable, plus a function that writes it into the page. - Replace event props with listeners. Each
onClickbecomesaddEventListener('click', ...)in a<script>. - Open the file and test it. No build step, no server.
This is the docs counter before the rewrite. The demo at the top is the same component after it:
'use client'
import { useState } from 'react'

export default function Counter() {
  const [count, setCount] = useState(0)
  return (
    <div>
      <p>{count} likes</p>
      <button onClick={() => setCount(count + 1)}>Click me</button>
    </div>
  )
}
JSX is not HTML: the attributes that change
JSX looks like HTML, so pasting it into an .html file is the most common first attempt. The browser shows it, but some attributes are silently ignored and the event handlers never run.
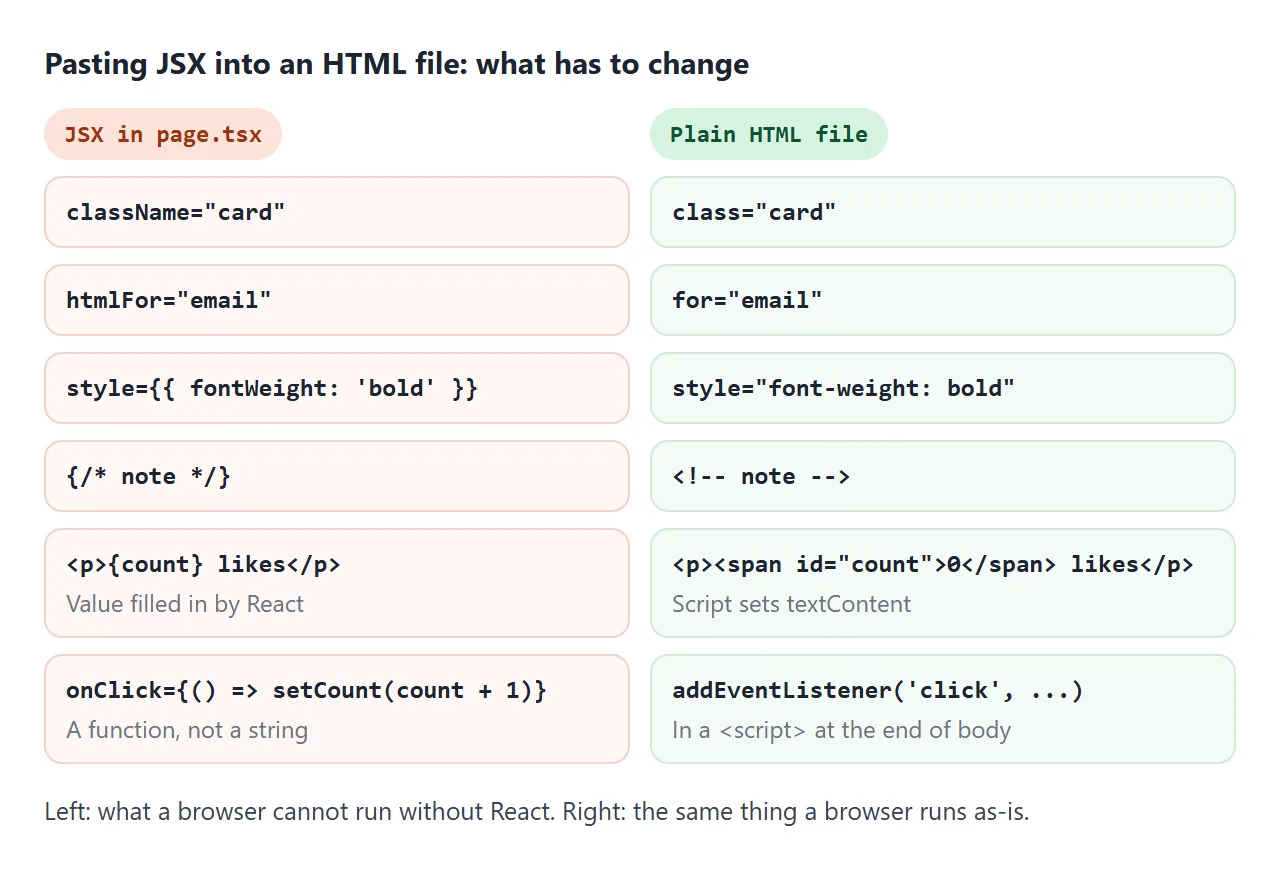
React uses DOM property names, so a CSS class is className and a label's target is htmlFor. style takes an object with camelCase names, such as fontWeight. Event props such as onClick take a function, not a string of code.
Paste a JSX snippet below and convert it. The converter handles the common cases from the table above, not every piece of JSX:
<!doctype html>
<html lang="en">
<head>
<meta charset="utf-8">
<meta name="viewport" content="width=device-width, initial-scale=1">
<title>JSX to HTML attribute fixer</title>
<style>
  body { margin: 0; padding: 16px; font-family: system-ui, sans-serif; background: #f4f5f7; color: #1d2330; }
  label { display: block; font-weight: 600; margin: 0 0 6px; }
  textarea { box-sizing: border-box; width: 100%; height: 150px; font: 13px/1.45 ui-monospace, Consolas, monospace; padding: 10px; border: 1px solid #cfd4dc; border-radius: 8px; resize: vertical; }
  button { font: inherit; margin: 10px 0 14px; padding: 9px 16px; border: 0; border-radius: 8px; background: #111827; color: #fff; cursor: pointer; }
  ul { margin: 10px 0 0; padding-left: 20px; font-size: 14px; color: #374151; }
  li.warn { color: #9a3412; }
</style>
</head>
<body>
<label for="jsx">JSX from a Next.js page</label>
<textarea id="jsx" spellcheck="false"><div className="card" style={{ fontWeight: 'bold', marginTop: 8 }}>
  {/* a comment */}
  <label htmlFor="email">Email</label>
  <input id="email" type="email" />
  <button onClick={() => send()}>Send</button>
</div></textarea>
<button id="go" type="button">Convert to HTML</button>
<label for="html">HTML</label>
<textarea id="html" spellcheck="false" readonly></textarea>
<ul id="notes"></ul>

<script>
  // camelCase CSS name -> kebab-case, e.g. fontWeight -> font-weight
  const kebab = s => s.replace(/[A-Z]/g, c => '-' + c.toLowerCase());

  function convert(src, notes) {
    let out = src;
    const swap = (re, to, note) => { if (re.test(out)) { out = out.replace(re, to); notes.push([note]); } };

    swap(/\bclassName=/g, 'class=', 'className became class');
    swap(/\bhtmlFor=/g, 'for=', 'htmlFor became for');
    swap(/\{\/\*([\s\S]*?)\*\/\}/g, '<!--$1-->', 'JSX comments became HTML comments');

    // style={{ a: 'b', c: 8 }} -> style="a: b; c: 8px"
    swap(/style=\{\{([^}]*)\}\}/g, (m, body) => 'style="' + body.split(',').map(p => {
      const [k, v] = p.split(':').map(x => x && x.trim().replace(/^['"]|['"]$/g, ''));
      if (!k) return '';
      return kebab(k) + ': ' + (/^\d+$/.test(v) && v !== '0' ? v + 'px' : v);
    }).filter(Boolean).join('; ') + '"', 'The style object became a CSS string (numbers got px)');

    // <input ... /> -> <input ...>
    swap(/<(input|img|br|hr|meta|link)\b([^>]*?)\s*\/>/g, '<$1$2>', 'Self-closing void tags lost the slash');

    // onClick={...} cannot live in plain HTML: remove it and say so
    swap(/\s+on[A-Z]\w*=\{[^}]*\}\}?/g, '', 'Event props were removed: add them back with addEventListener in a script');
    return out;
  }

  document.getElementById('go').addEventListener('click', () => {
    const notes = [];
    document.getElementById('html').value = convert(document.getElementById('jsx').value, notes);
    document.getElementById('notes').innerHTML = notes.length
      ? notes.map(([n]) => '<li' + (n.startsWith('Event') ? ' class="warn"' : '') + '>' + n + '</li>').join('')
      : '<li>Nothing to change.</li>';
  });
</script>
</body>
</html>
Anything inside curly braces, such as {count} or {items.map(...)}, is JavaScript. In plain HTML, put a placeholder element there and fill it from your script with textContent.
Raw HTML inside a Next.js page
Sometimes the question runs the other way: you have an HTML string and want it inside a Next.js page. Plain React does this with dangerouslySetInnerHTML:
const markup = { __html: '<p>Some <b>trusted</b> HTML</p>' }

export default function Page() {
  return <div dangerouslySetInnerHTML={markup} />
}
The React docs warn that HTML from an untrusted source, such as user input, can create an XSS hole this way. Only pass HTML you wrote or have sanitized.
For whole files such as images and fonts, there is the public folder. A file at public/avatars/me.png is served at /avatars/me.png.
A finished example: several routes in one file
A Next.js site has one folder per route. One HTML file can do the same with the URL hash: each "page" is a <section>, and a short script shows the one that matches #/menu or #/contact.
<!doctype html>
<html lang="en">
<head>
<meta charset="utf-8">
<meta name="viewport" content="width=device-width, initial-scale=1">
<title>Three routes in one HTML file</title>
<style>
  body { margin: 0; font-family: system-ui, sans-serif; background: #f4f5f7; color: #1d2330; }
  nav { display: flex; gap: 4px; padding: 12px 16px; background: #111827; }
  nav a { color: #d1d5db; text-decoration: none; padding: 6px 12px; border-radius: 6px; }
  nav a.active { background: #fff; color: #111827; }
  section { padding: 18px 20px; max-width: 520px; }
  section[hidden] { display: none; }
  h1 { font-size: 22px; margin: 0 0 8px; }
  .price { display: grid; grid-template-columns: 1fr auto; gap: 6px 16px; background: #fff; border-radius: 10px; padding: 12px 14px; }
  form { display: grid; gap: 8px; background: #fff; border-radius: 10px; padding: 14px; }
  input, textarea { font: inherit; padding: 8px; border: 1px solid #cfd4dc; border-radius: 6px; }
  button { font: inherit; padding: 9px 14px; border: 0; border-radius: 8px; background: #111827; color: #fff; cursor: pointer; justify-self: start; }
  #sent { color: #0f5132; white-space: pre-wrap; }
</style>
</head>
<body>
<!-- app/layout.tsx: the part every route shares -->
<nav>
  <a href="#/">Home</a>
  <a href="#/menu">Menu</a>
  <a href="#/contact">Contact</a>
</nav>

<!-- app/page.tsx -->
<section data-route="/">
  <h1>Corner Cafe</h1>
  <p>Open 8 to 6, every day. This whole site is one HTML file.</p>
</section>

<!-- app/menu/page.tsx -->
<section data-route="/menu" hidden>
  <h1>Menu</h1>
  <div class="price"><span>Espresso</span><b>3.00</b><span>Flat white</span><b>4.20</b><span>Croissant</span><b>3.50</b></div>
</section>

<!-- app/contact/page.tsx -->
<section data-route="/contact" hidden>
  <h1>Contact</h1>
  <form id="form">
    <input name="name" placeholder="Your name" required>
    <textarea name="message" rows="3" placeholder="Message" required></textarea>
    <button>Send</button>
    <div id="sent"></div>
  </form>
</section>

<script>
  // Show the section whose data-route matches the hash, e.g. #/menu -> /menu
  function show() {
    const path = location.hash.slice(1) || '/';
    let found = false;
    document.querySelectorAll('section').forEach(s => {
      s.hidden = s.dataset.route !== path;
      if (!s.hidden) found = true;
    });
    if (!found) document.querySelector('[data-route="/"]').hidden = false;
    document.querySelectorAll('nav a').forEach(a => a.classList.toggle('active', a.getAttribute('href') === '#' + path));
  }
  addEventListener('hashchange', show);
  show();

  // No server: handle the form in the page and show what would be sent
  document.getElementById('form').addEventListener('submit', e => {
    e.preventDefault();
    const data = new FormData(e.target);
    document.getElementById('sent').textContent = 'Would send:\n' +
      [...data].map(([k, v]) => k + ': ' + v).join('\n');
  });
</script>
</body>
</html>
- Layout: the
<nav>sits outside the sections, like the shared part oflayout.tsx. - Routes: a
hashchangelistener readslocation.hashand un-hides the matching section. The location.hash guide explains the details. - Form: with no server, the submit handler calls
preventDefault()and shows the form data. To actually receive messages, see forms on static pages.
When it does not work
| What you see | Cause | Fix |
|---|---|---|
Exported index.html has no styles when opened from disk |
Asset paths start with /_next/ |
Serve the out folder from a web server |
Next.js shows an error after adding output: 'export' |
A feature that needs a server, such as cookies or redirects | Remove it or drop the static export |
| Pasted JSX shows text, but classes do nothing | className is not an HTML attribute |
Rename to class |
| Inline styles are ignored | style still holds a JSX object |
Write a CSS string |
| Buttons do nothing in the HTML file | onClick was a React prop |
Add addEventListener in a script |
{count} shows up as literal text |
Curly braces are JSX, not HTML | Use an element and set textContent |
For other reasons a page's script will not run, see HTML JavaScript not working.
Share it as a link
A deployed Next.js app already has an address. A single HTML file does not, and an attachment may open as plain code, or not at all, on a phone. To host a full build instead, see hosting a built front end.
To send the one-file version, paste the page into a NOS document and choose Create share link. HTML to link walks through it.
The page renders as written and its scripts run, so the people you send it to can click through the routes and try the form. If you change the code later, the same link shows the new version.