A resume website can be one web page. You give an AI chat your roles, dates and projects, and it writes a single HTML file. Create share link in NOS turns that file into an address, and the address is what you paste into an application form.
The question is common enough to appear on Quora in plain words: How can I create a link for my resume? The resume is a file. The form, the email or the profile wants an address.
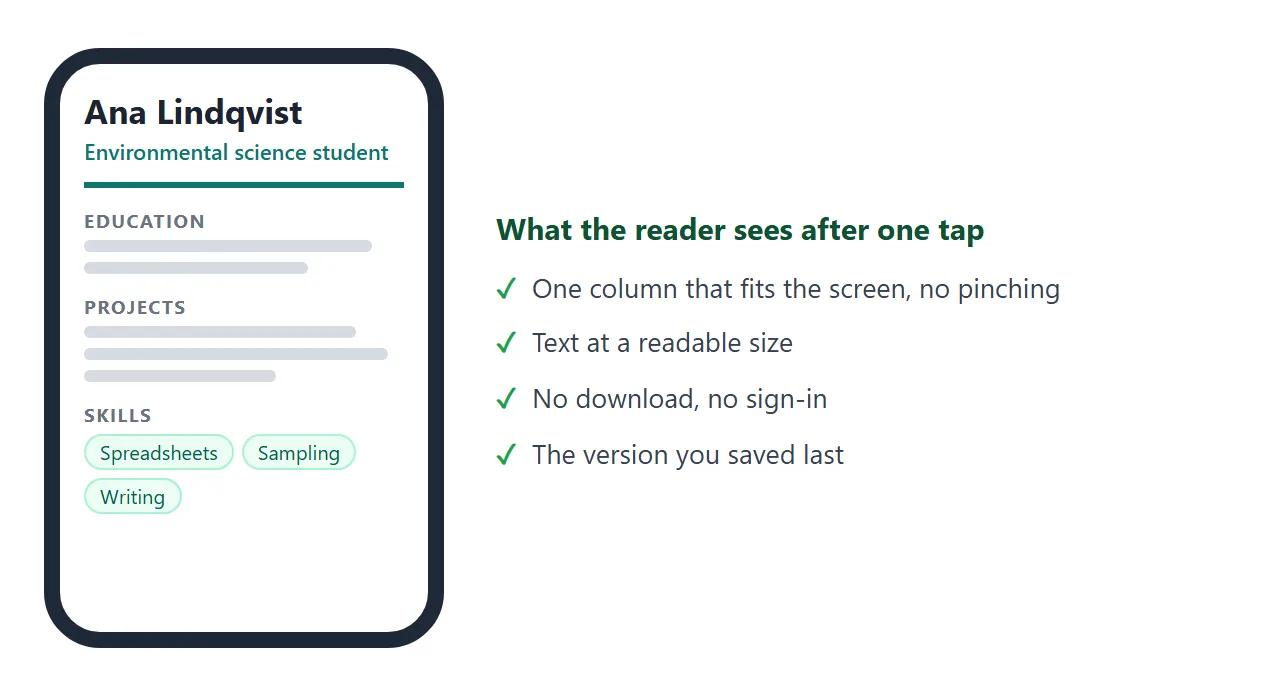
Here is the kind of page you will end up with. It is a made-up student, so none of it is real.
<!doctype html>
<html lang="en">
<head>
<meta charset="utf-8">
<meta name="viewport" content="width=device-width, initial-scale=1">
<title>Ana Lindqvist - Resume</title>
<style>
  * { box-sizing: border-box; }
  body { margin: 0; background: #f3f4f6; font-family: system-ui, -apple-system, "Segoe UI", sans-serif; color: #1f2937; line-height: 1.5; }
  .page { max-width: 760px; margin: 0 auto; padding: 22px 18px 30px; background: #fff; min-height: 100vh; }
  header { border-bottom: 3px solid #0f766e; padding-bottom: 14px; margin-bottom: 4px; }
  h1 { margin: 0; font-size: 28px; line-height: 1.15; }
  .role { margin: 4px 0 8px; font-size: 16px; color: #0f766e; font-weight: 600; }
  .contact { display: flex; flex-wrap: wrap; gap: 6px 16px; font-size: 14px; color: #4b5563; }
  .contact a { color: #0f766e; }
  h2 { margin: 22px 0 8px; font-size: 13px; letter-spacing: .08em; text-transform: uppercase; color: #6b7280; }
  .item { margin-bottom: 14px; }
  .row { display: flex; justify-content: space-between; gap: 10px; flex-wrap: wrap; }
  .row b { font-size: 16px; }
  .when { font-size: 14px; color: #6b7280; }
  .sub { font-size: 14px; color: #4b5563; }
  ul { margin: 6px 0 0; padding-left: 20px; }
  li { margin-bottom: 3px; font-size: 15px; }
  .chips { display: flex; flex-wrap: wrap; gap: 6px; }
  .chips span { background: #ecfdf5; color: #065f46; border: 1px solid #a7f3d0; border-radius: 999px; padding: 3px 11px; font-size: 14px; }
  .links a { display: inline-block; margin: 0 8px 8px 0; padding: 8px 14px; border-radius: 8px; background: #0f766e; color: #fff; text-decoration: none; font-size: 14px; font-weight: 600; }
  .updated { margin-top: 20px; font-size: 13px; color: #9ca3af; }
  @media (max-width: 480px) { h1 { font-size: 24px; } }
</style>
</head>
<body>
<div class="page">
  <header>
    <h1>Ana Lindqvist</h1>
    <p class="role">Environmental science student, looking for a summer internship</p>
    <div class="contact">
      <span>Open to remote or Lisbon</span>
      <span>ana.lindqvist@example.com</span>
      <a href="#projects">Projects</a>
    </div>
  </header>

  <h2>Education</h2>
  <div class="item">
    <div class="row"><b>BSc Environmental Science</b><span class="when">2023 - 2026 (expected)</span></div>
    <div class="sub">Northvale University. Thesis: stormwater runoff on a city campus.</div>
  </div>

  <h2 id="projects">Projects</h2>
  <div class="item">
    <div class="row"><b>Campus water-quality survey</b><span class="when">Spring 2026</span></div>
    <ul>
      <li>Took 120 samples at 8 sites and cleaned the data in a spreadsheet.</li>
      <li>Presented the results to a class of 40 and to two staff members.</li>
    </ul>
  </div>
  <div class="item">
    <div class="row"><b>Reuse shelf</b><span class="when">2024 - 2025</span></div>
    <ul>
      <li>Set up a swap shelf in a dorm lobby with three other students.</li>
      <li>Wrote the one-page poster and the rota for volunteers.</li>
    </ul>
  </div>

  <h2>Experience</h2>
  <div class="item">
    <div class="row"><b>Library desk assistant</b><span class="when">2024 - now</span></div>
    <div class="sub">Northvale University Library, 10 hours a week</div>
    <ul>
      <li>Help about 30 visitors per shift find books and book rooms.</li>
      <li>Trained two new assistants on the booking system.</li>
    </ul>
  </div>

  <h2>Skills</h2>
  <div class="chips"><span>Spreadsheets</span><span>Field sampling</span><span>Report writing</span><span>Portuguese (native)</span><span>English (fluent)</span></div>

  <h2>Links</h2>
  <div class="links"><a href="#projects">Thesis summary</a><a href="#projects">Survey slides</a></div>

  <p class="updated">Updated October 2026</p>
</div>
</body>
</html>
The page is plain on purpose. A reader gets the name, the goal and the evidence in the first screen, and nothing needs to be downloaded.
What goes on a one-page resume site
A student resume is short, so the page can be short too. Put the one line that says what you want at the top, then the parts a reader checks first.
- Header: your name, what you are looking for, and an email address written as text.
- Education: degree, school, expected year, and one line about a thesis or a course that fits the job.
- Projects: two or three, each with what you did and one result you can count.
- Experience: part-time work counts. Say what you did, not only the title.
- Skills: tools and languages you could use tomorrow.
Anyone with the link can open the page, and it has no password. Leave out your home address, your phone number and your date of birth.
Make it with AI
Open the AI chat you already use, such as ChatGPT, Claude or Gemini. Paste the prompt below, then paste your own notes under it.
Make a single-file HTML page that is my one-page resume.
I am a student looking for [internship or job type].
Use only the facts I give below. Do not invent employers,
dates, numbers or skills. If something is missing, leave a
clearly marked placeholder.
Sections in this order: name and one-line goal; Education;
Projects; Experience; Skills. Show my email as plain text.
No home address and no phone number.
One column, 16px or larger text, works on a phone.
No external images, fonts or scripts. Return only the HTML.

My notes:
[paste your roles, dates, projects and skills here]
Check the result before you copy it:
- Every number and date is true. AI can fill gaps with things that sound right, so read each line against your own notes.
- No placeholder text is left, such as a name in square brackets.
- Any link you added opens the right page.
- It reads well in a narrow window, like a phone.
If something is off, say so in the same chat and paste the new version. Writing a good one-page prompt goes deeper on layout.
Send it as a link
Open a NOS document and paste the HTML in. The page renders right there. Look at it, then choose Create share link and copy the address.
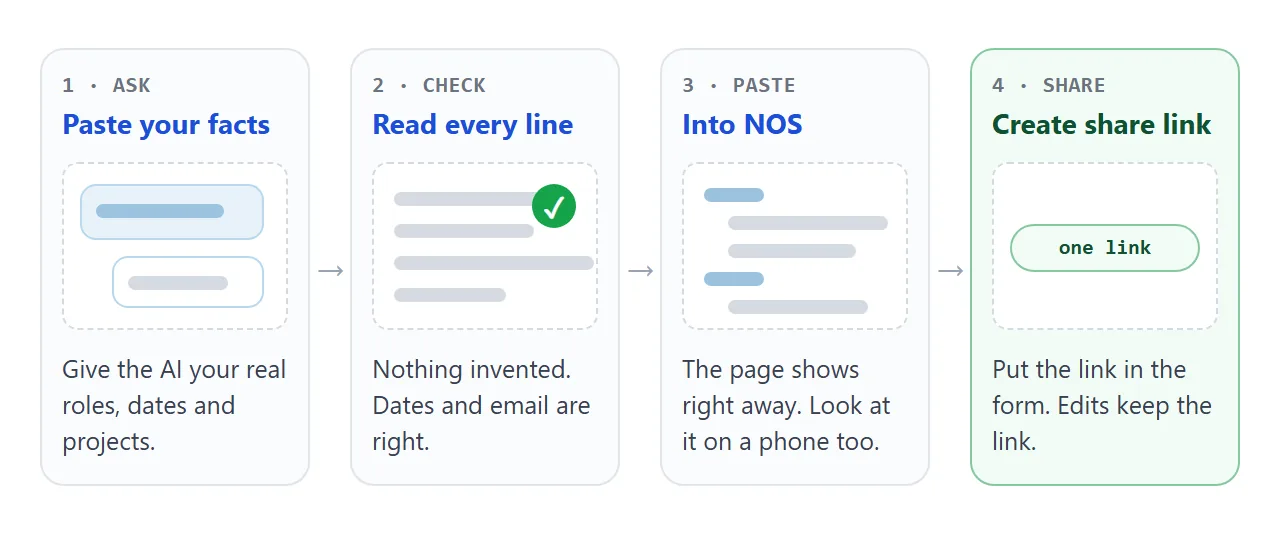
Anyone with the address can open the page in a browser, on a phone too, with no account. They can read it but not edit it.
If you fix a typo or add a project later, the same link shows the new version. HTML to link walks through it.
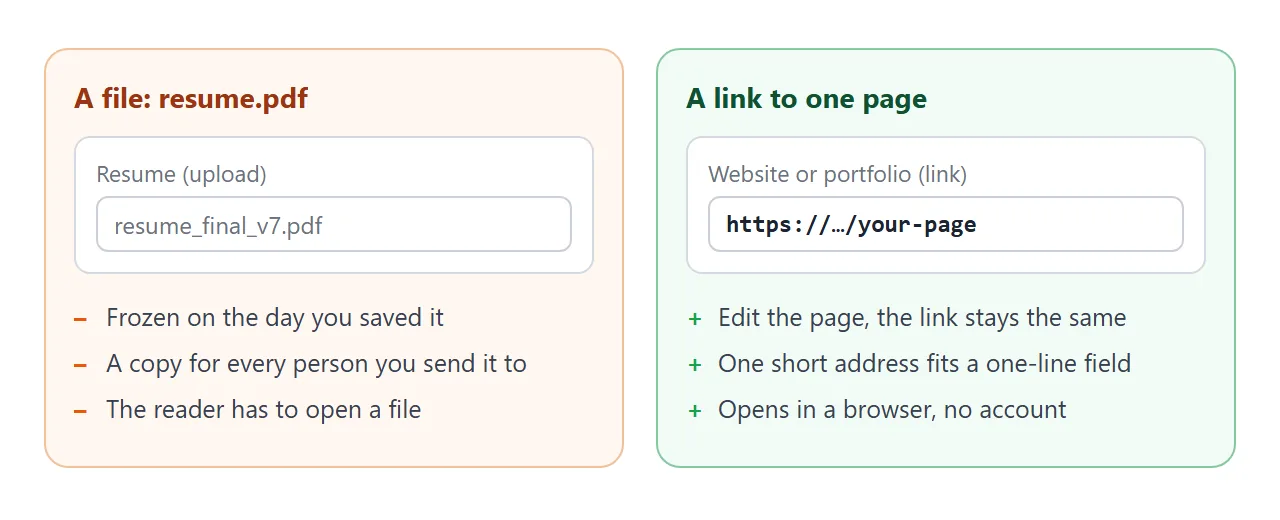
If you want a plain starting layout to compare, see a simple HTML resume. For the wider case against attachments, see sharing a resume as a link.
Where to put the link
The address is only useful once it is somewhere a reader will see it. Use the field the form gives you, and keep a PDF ready for forms that want a file.
| Where | What to do | Source of the steps |
|---|---|---|
| A form with a website or portfolio field | Paste the address | The form itself |
| LinkedIn profile | Contact info, Add website, paste into Website URL | LinkedIn's Add or remove a website page |
| Email signature or message | Paste the address on its own line | Any mail app |
| Paper CV or poster | Turn the address into a printed code | QR code link |
LinkedIn's help page says you can display up to three website links on your profile. Its menus can change, so follow the page as of October 2026.
Free ways to put a resume online
You have more than one free route. They differ in how much you make and how much you control.
| AI page + NOS link | Google Sites | File attachment | |
|---|---|---|---|
| What you make | One page of HTML | A site with pages and menus | A PDF or Word file |
| Who can open it | Anyone with the link, no account | You choose Restricted or Public when you publish | Whoever you send it to |
| After you edit | The same link shows the new version | See Google's help | You send a new file |
Google's Publish your site page says you can set a published site to Restricted or Public, and that restricted sites can be shared with specific people. A builder suits many pages. One page suits a resume.
On the Free plan, NOS's pricing page lists 3 live share links as of October 2026. Published pages on Free carry a NOS badge. Check the page for what applies when you read this.
One link for each kind of job
Applying to marketing and to data work with the same top lines wastes the first screen. You can keep one page and change the first lines for each target. This demo shows three versions of one made-up resume.
<!doctype html>
<html lang="en">
<head>
<meta charset="utf-8">
<meta name="viewport" content="width=device-width, initial-scale=1">
<title>Resume versions</title>
<style>
  * { box-sizing: border-box; }
  body { margin: 0; padding: 16px; background: #f3f4f6; font-family: system-ui, -apple-system, "Segoe UI", sans-serif; color: #1f2937; line-height: 1.5; }
  .card { max-width: 640px; margin: 0 auto; background: #fff; border-radius: 12px; padding: 18px; box-shadow: 0 2px 10px rgba(0, 0, 0, .08); }
  .tabs { display: flex; flex-wrap: wrap; gap: 8px; margin-bottom: 16px; }
  .tabs button { font: inherit; font-size: 14px; padding: 8px 14px; border-radius: 999px; border: 1px solid #cbd5e1; background: #fff; color: #334155; cursor: pointer; }
  .tabs button[aria-pressed="true"] { background: #1d4ed8; border-color: #1d4ed8; color: #fff; }
  h1 { margin: 0; font-size: 24px; }
  #headline { margin: 4px 0 12px; color: #1d4ed8; font-weight: 600; }
  h2 { margin: 16px 0 6px; font-size: 13px; letter-spacing: .08em; text-transform: uppercase; color: #6b7280; }
  ul { margin: 0; padding-left: 20px; }
  li { margin-bottom: 4px; font-size: 15px; }
  .note { margin-top: 14px; font-size: 13px; color: #6b7280; }
  .tag { display: inline-block; padding: 2px 10px; border-radius: 999px; background: #eff6ff; color: #1e40af; font-size: 13px; margin: 0 6px 6px 0; }
</style>
</head>
<body>
<div class="card">
  <div class="tabs" id="tabs">
    <button type="button" data-v="marketing" aria-pressed="true">Marketing internship</button>
    <button type="button" data-v="data" aria-pressed="false">Data analyst</button>
    <button type="button" data-v="general" aria-pressed="false">General</button>
  </div>

  <h1>Jonas Weber</h1>
  <p id="headline"></p>

  <h2>What I bring</h2>
  <ul id="bullets"></ul>

  <h2>Keywords</h2>
  <div id="tags"></div>

  <p class="note">Same person, same projects. Only the order and the first lines change.</p>
</div>

<script>
  // One object per version: headline, three bullets, keywords
  const versions = {
    marketing: {
      headline: 'Business student - social media and event promotion',
      bullets: [
        'Grew the student film club page from 80 to 300 followers in one term.',
        'Wrote and sent a monthly newsletter to 150 members.',
        'Ran a poster and QR-code campaign for a charity quiz night.'
      ],
      tags: ['Copywriting', 'Instagram', 'Newsletters', 'Events']
    },
    data: {
      headline: 'Business student - spreadsheets and survey analysis',
      bullets: [
        'Cleaned and charted a 400-row survey for a statistics course.',
        'Built a budget tracker for the film club in a shared spreadsheet.',
        'Reported club follower counts weekly in a one-page summary.'
      ],
      tags: ['Spreadsheets', 'Charts', 'Surveys', 'Reporting']
    },
    general: {
      headline: 'Business student - open to internships',
      bullets: [
        'Club treasurer and newsletter editor for two years.',
        'Group project lead for a 5-person market research task.',
        'Part-time retail assistant, weekends.'
      ],
      tags: ['Teamwork', 'Writing', 'Spreadsheets', 'German', 'English']
    }
  };

  const tabs = document.getElementById('tabs');
  const headline = document.getElementById('headline');
  const bullets = document.getElementById('bullets');
  const tags = document.getElementById('tags');

  function show(key) {
    const v = versions[key];
    headline.textContent = v.headline;
    bullets.innerHTML = v.bullets.map(function (b) { return '<li>' + b + '</li>'; }).join('');
    tags.innerHTML = v.tags.map(function (t) { return '<span class="tag">' + t + '</span>'; }).join('');
    tabs.querySelectorAll('button').forEach(function (btn) {
      btn.setAttribute('aria-pressed', btn.dataset.v === key ? 'true' : 'false');
    });
  }

  tabs.addEventListener('click', function (e) {
    const btn = e.target.closest('button');
    if (btn) show(btn.dataset.v);
  });

  show('marketing');
</script>
</body>
</html>
In your own document, keep one page per target. You do not need a button. With three share links on the Free plan, you could keep one general page and two tailored ones, and send the right link to the right reader.
When it does not work
| Symptom | Cause | Fix |
|---|---|---|
| The form refuses the address | The field wants a file, or a different kind of link | Upload the PDF instead, and keep the link for the next field or email |
| A number or date on the page is wrong | The AI guessed where your notes had a gap | Compare every line with your notes and fix it before sharing |
| The page looks tiny on a phone | The AI left out the phone settings | Ask for one column and text of 16px or larger |
| A link on the page opens an error | The AI invented the address | Click every link before you share |
| An old version still shows | The old text is still in the document | Edit the document. The same link shows the change |
| A picture is missing | The AI used an outside image, which is blocked | Ask for shapes and colours only |
If the page will not open on a phone at all, opening an HTML file on a phone covers the usual causes.