The <span> tag wraps part of a line so you can style it or reach it from JavaScript. It has no meaning and no default look. Put it around the words, give it a class, and style the class:
<p>Your order ships on <span class="day">Tuesday</span>.</p>

<style>
  .day { color: #b45309; font-weight: 600; }
</style>
Try the difference between a span and a div below. Tick the boxes and watch which one takes the new size.
<!doctype html>
<html lang="en">
<head>
<meta charset="utf-8">
<meta name="viewport" content="width=device-width, initial-scale=1">
<title>span vs div</title>
<style>
body { margin: 0; padding: 14px; font: 15px/1.6 system-ui, sans-serif; background: #f4f5f7; color: #1d2330; }
.controls { display: flex; flex-wrap: wrap; gap: 6px 14px; margin-bottom: 12px; font-size: 13px; }
.controls label { display: flex; align-items: center; gap: 5px; }
.panes { display: grid; grid-template-columns: 1fr 1fr; gap: 12px; }
.pane { background: #fff; border-radius: 10px; padding: 10px 12px; }
.pane h3 { margin: 0 0 6px; font-size: 13px; color: #5b6270; }
.box { background: #fde68a; outline: 2px solid #d97706; }
.size { font: 12px ui-monospace, Consolas, monospace; color: #5b6270; margin-top: 8px; }
/* The toggles add these classes to both boxes */
.w .box { width: 160px; }
.h .box { height: 60px; }
.pad .box { padding: 14px; }
.mar .box { margin: 14px; }
.ib .box { display: inline-block; }
@media (max-width: 480px) { .panes { grid-template-columns: 1fr; } }
</style>
</head>
<body>
<div class="controls" id="controls">
<label><input type="checkbox" value="w"> width: 160px</label>
<label><input type="checkbox" value="h"> height: 60px</label>
<label><input type="checkbox" value="pad"> padding: 14px</label>
<label><input type="checkbox" value="mar"> margin: 14px</label>
<label><input type="checkbox" value="ib"> display: inline-block</label>
</div>
<div class="panes" id="panes">
<div class="pane">
<h3><span> (inline)</h3>
<p>Text before the <span class="box" id="s">span box</span> and text after it, wrapping onto the next line like any word.</p>
<div class="size" id="sSize"></div>
</div>
<div class="pane">
<h3><div> (block)</h3>
<p>Text before the</p>
<div class="box" id="d">div box</div>
<p>and text after it, on its own line.</p>
<div class="size" id="dSize"></div>
</div>
</div>
<script>
const panes = document.getElementById('panes');
// Show the size the browser actually drew
function measure() {
for (const id of ['s', 'd']) {
const r = document.getElementById(id).getBoundingClientRect();
document.getElementById(id + 'Size').textContent =
'drawn: ' + Math.round(r.width) + ' x ' + Math.round(r.height) + ' px';
}
}
document.getElementById('controls').addEventListener('change', (e) => {
panes.classList.toggle(e.target.value, e.target.checked);
measure();
});
window.addEventListener('resize', measure);
measure();
</script>
</body>
</html>
span vs div: inline and block
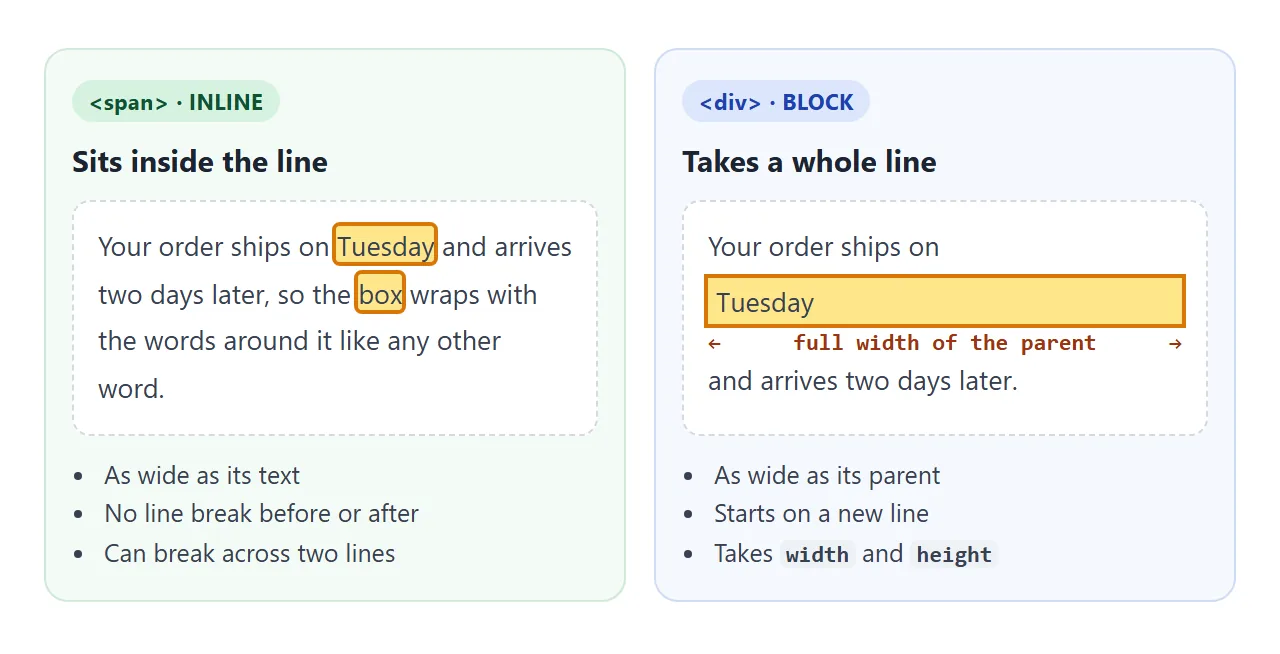
A span and a div are both empty wrappers. The only difference is how they sit on the page.
A span is inline: it flows inside a line of text, and it can wrap onto the next line like any word. A div is block: it starts on a new line and stretches to the full width of its parent.
<span> |
<div> |
|
|---|---|---|
Default display |
inline |
block |
| Width | As wide as its content | As wide as its parent |
| Line breaks | None | Before and after |
Takes width and height |
No | Yes |
| Can contain | Text and inline elements | Almost anything |
| Use it for | Part of a sentence | A section or a box |
The rule of thumb: if it is part of a sentence, reach for a span. If it is a piece of the layout, reach for a div. CSS display covers every display value in depth.
Why width and height do nothing on a span
width and height do not apply to inline elements. The browser sizes a span from its text, so the first demo's span stays the same size when you tick them.
Padding and margin half work. Horizontal padding and margin push the neighbouring words apart. Vertical padding is painted, but the line does not grow to make room, so the background spills over the lines above and below. Vertical margin does nothing visible.
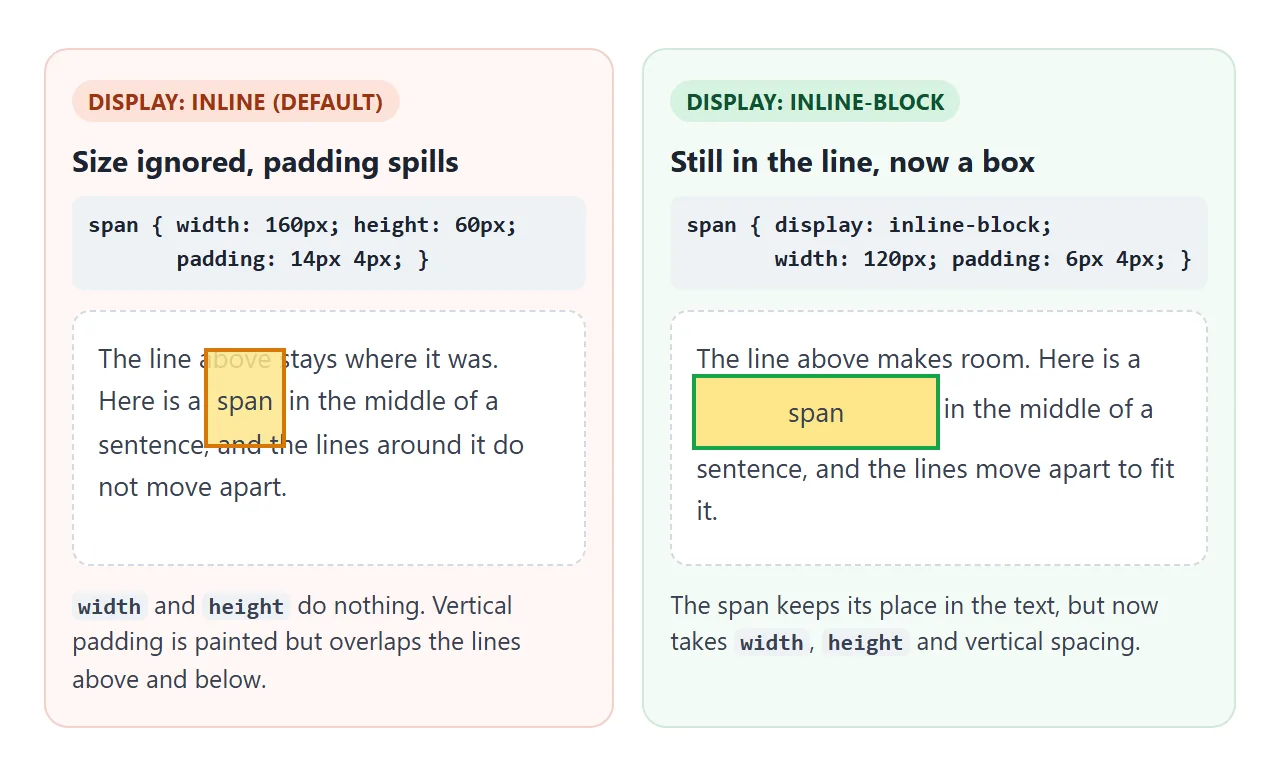
The fix is display: inline-block. The span stays in the line of text, but it now behaves like a small box: width, height and vertical spacing all apply.
The lines move apart to fit it. Badges, pills and small icons inside a sentence are often built this way.
.badge {
  display: inline-block;
  padding: 2px 8px;
  border-radius: 99px;
  background: #dbeafe;
}
Use a meaningful tag when one fits
A span tells the browser nothing about its text. HTML has inline tags that do say something, and they come with a default look. If one of them describes your words, use it instead of a span with a class.
<!doctype html>
<html lang="en">
<head>
<meta charset="utf-8">
<meta name="viewport" content="width=device-width, initial-scale=1">
<title>span vs semantic inline tags</title>
<style id="page-css">
body { margin: 0; padding: 14px; font: 15px/1.6 system-ui, sans-serif; background: #f4f5f7; color: #1d2330; }
.card { background: #fff; border-radius: 10px; padding: 10px 14px; margin-bottom: 10px; }
.card h3 { margin: 0 0 4px; font-size: 13px; color: #5b6270; }
.card p { margin: 0; }
/* Class-based styling for the span version */
.bold { font-weight: 700; }
.italic { font-style: italic; }
.hl { background: #fde68a; }
.mono { font-family: ui-monospace, Consolas, monospace; }
table { border-collapse: collapse; width: 100%; font-size: 13px; background: #fff; border-radius: 10px; }
th, td { text-align: left; padding: 5px 8px; border-bottom: 1px solid #eceef2; vertical-align: top; }
button { font: inherit; font-size: 13px; padding: 6px 12px; border-radius: 8px; border: 1px solid #c9cdd4; background: #fff; cursor: pointer; margin-bottom: 10px; }
</style>
</head>
<body>
<button id="toggle" type="button">Turn off the page CSS</button>
<div class="card">
<h3>With span + classes</h3>
<p id="spanned"><span class="bold">Do not</span> reply <span class="italic">after</span> <span>Friday</span>: the <span class="hl">deadline</span> is <span>12 May</span>. Use code <span class="mono">SPRING</span> in the <span>FAQ</span> form.</p>
</div>
<div class="card">
<h3>With semantic tags</h3>
<p id="semantic"><strong>Do not</strong> reply <em>after</em> Friday: the <mark>deadline</mark> is <time datetime="2027-05-12">12 May</time>. Use code <code>SPRING</code> in the <abbr title="Frequently asked questions">FAQ</abbr> form.</p>
</div>
<table>
<tr><th>Tag</th><th>Means</th><th>Browser default look</th></tr>
<tr><td><strong></td><td>Important</td><td>Bold</td></tr>
<tr><td><em></td><td>Stressed word</td><td>Italic</td></tr>
<tr><td><mark></td><td>Highlighted for reference</td><td>Yellow background</td></tr>
<tr><td><code></td><td>Computer code</td><td>Monospace</td></tr>
<tr><td><time></td><td>A date or time (datetime attribute)</td><td>None</td></tr>
<tr><td><abbr></td><td>Abbreviation (title = full form)</td><td>Dotted underline with a title</td></tr>
<tr><td><span></td><td>Nothing</td><td>None</td></tr>
</table>
<script>
// Removing the page's stylesheet leaves only the browser defaults
const css = document.getElementById('page-css');
const btn = document.getElementById('toggle');
btn.addEventListener('click', () => {
css.disabled = !css.disabled;
btn.textContent = css.disabled ? 'Turn the page CSS back on' : 'Turn off the page CSS';
});
</script>
</body>
</html>
| Tag | Means | Default look |
|---|---|---|
<strong> |
Important | Bold |
<em> |
Stressed, as you would say it | Italic |
<mark> |
Highlighted for reference | Yellow background |
<code> |
A piece of computer code | Monospace |
<time datetime="..."> |
A date or time, in a machine-readable form | None |
<abbr title="..."> |
An abbreviation, with the full form in title |
Dotted underline when it has a title |
<span> |
Nothing | None |
You can restyle all of them. A <mark> does not have to be yellow and <strong> can be a colour instead of bold. The tag carries the meaning; CSS decides the look. Semantic HTML goes through the same idea for whole pages.
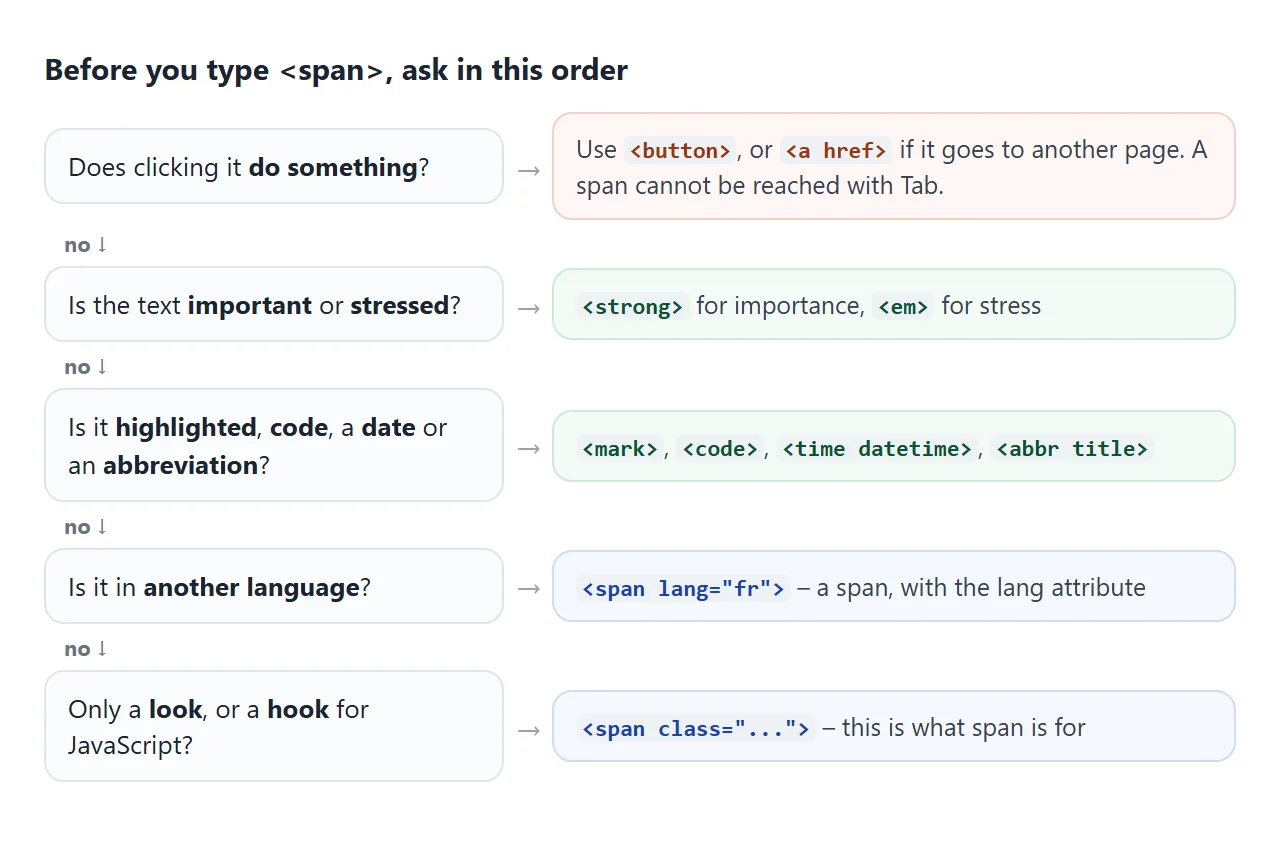
A span is still the right tag in two common cases. The first is pure decoration: a coloured word in a heading, or a price split into a large number and a small currency sign.
The second is a language change, such as <span lang="fr">déjà vu</span>, so browsers and screen readers know which language those words are in.
Styling part of a line
Colouring a single word is a common reason to type <span>. Put a class on the span and write the rule once in your stylesheet. For the colour values themselves, see HTML font color.
<h1>Plans from <span class="price">$9</span> a month</h1>

<style>
  .price { color: #047857; }
</style>
A style attribute on the span also works, and it is fine for a one-off. Once the same look appears twice, a class is easier to change later. Inline CSS covers when each is right.
A span picks up its parent's text styles: font, size, colour and line height. You only need to set what should differ from the text around it.
Spans in JavaScript: counters and wrapped words
Because a span changes nothing on its own, it is a clean place to put text that JavaScript updates. A counter is a span with an id, and the script only changes its textContent:
<p>You have <span id="count">0</span> items in your list.</p>

<script>
  document.getElementById('count').textContent = 3;
</script>
The other pattern is to wrap every word in its own span, so each word can be coloured, counted or animated separately. The finished example below does that, then lets buttons choose a range of words and colour them.
<!doctype html>
<html lang="en">
<head>
<meta charset="utf-8">
<meta name="viewport" content="width=device-width, initial-scale=1">
<title>Text highlighter with span</title>
<style>
body { margin: 0; padding: 14px; font: 15px/1.7 system-ui, sans-serif; background: #f4f5f7; color: #1d2330; }
#text { background: #fff; border-radius: 10px; padding: 12px 14px; margin: 0 0 12px; }
.word { border-radius: 3px; padding: 1px 0; }
.word.sel { outline: 2px solid #2563eb; }
.word[data-color="yellow"] { background: #fde68a; }
.word[data-color="green"] { background: #bbf7d0; }
.word[data-color="pink"] { background: #fbcfe8; }
.row { display: flex; flex-wrap: wrap; align-items: center; gap: 6px; margin-bottom: 8px; font-size: 13px; }
.row b { min-width: 42px; }
button { font: inherit; font-size: 13px; padding: 5px 10px; border-radius: 8px; border: 1px solid #c9cdd4; background: #fff; cursor: pointer; }
button[data-color="yellow"] { background: #fde68a; }
button[data-color="green"] { background: #bbf7d0; }
button[data-color="pink"] { background: #fbcfe8; }
.stats { font-size: 13px; background: #fff; border-radius: 10px; padding: 8px 14px; }
.stats span { font-weight: 700; }
</style>
</head>
<body>
<p id="text">The span element has no meaning of its own. It groups a few words so that CSS can style them and JavaScript can find them. Wrap each word in a span and every word becomes something you can colour, count or move.</p>
<div class="row">
<b>Start</b>
<button type="button" data-move="start" data-by="-1">←</button>
<button type="button" data-move="start" data-by="1">→</button>
<b>End</b>
<button type="button" data-move="end" data-by="-1">←</button>
<button type="button" data-move="end" data-by="1">→</button>
</div>
<div class="row">
<b>Colour</b>
<button type="button" data-color="yellow">Yellow</button>
<button type="button" data-color="green">Green</button>
<button type="button" data-color="pink">Pink</button>
<button type="button" data-color="">Clear</button>
</div>
<div class="stats">
Selected: <span id="selWords">0</span> words, <span id="selChars">0</span> characters<br>
Highlighted: <span id="hlWords">0</span> of <span id="allWords">0</span> words,
<span id="hlChars">0</span> of <span id="allChars">0</span> characters (no spaces)
</div>
<script>
// 1. Wrap every word of the paragraph in its own span
const text = document.getElementById('text');
const words = text.textContent.trim().split(/\s+/).map((w) => {
const s = document.createElement('span');
s.className = 'word';
s.textContent = w; // textContent, so the text is never parsed as HTML
return s;
});
text.replaceChildren(...words.flatMap((s) => [s, ' ']).slice(0, -1));
let start = 0, end = 2;
const $ = (id) => document.getElementById(id);
const chars = (list) => list.reduce((n, w) => n + w.textContent.length, 0);
// 2. Redraw the selection outline and the counters
function update() {
const picked = words.slice(start, end + 1);
const lit = words.filter((w) => w.dataset.color);
words.forEach((w, i) => w.classList.toggle('sel', i >= start && i <= end));
$('selWords').textContent = picked.length;
$('selChars').textContent = chars(picked);
$('hlWords').textContent = lit.length;
$('hlChars').textContent = chars(lit);
$('allWords').textContent = words.length;
$('allChars').textContent = chars(words);
}
// 3. Arrow buttons move the start or end of the range
document.querySelectorAll('[data-move]').forEach((b) => b.addEventListener('click', () => {
const by = Number(b.dataset.by), last = words.length - 1;
if (b.dataset.move === 'start') start = Math.min(Math.max(start + by, 0), end);
else end = Math.max(Math.min(end + by, last), start);
update();
}));
// 4. Colour buttons set data-color on the selected spans; CSS does the rest
document.querySelectorAll('button[data-color]').forEach((b) => b.addEventListener('click', () => {
words.slice(start, end + 1).forEach((w) => {
if (b.dataset.color) w.dataset.color = b.dataset.color;
else delete w.dataset.color;
});
update();
}));
update();
</script>
</body>
</html>
A few details make the code safe to reuse:
- Build spans with
createElementandtextContent. Joining words into aninnerHTMLstring would parse any<in the text as HTML. - Store state in
data-*attributes.data-color="yellow"on the span, and one CSS rule per colour. The script never sets a colour directly. - Find spans with a class.
querySelectorAll('.word')returns them in page order. querySelector covers the selector syntax.
The controls are real <button> elements, not spans. That matters: a span with a click listener cannot be reached with Tab and does not react to Enter or Space.
If clicking it does something, use a button. HTML button not clickable covers the opposite problem.
Do not put block elements inside a span
A span may only contain phrasing content: text and inline elements such as a, strong, em, img and other spans. Putting a <div>, <p> or <ul> inside a span is invalid HTML.
Browsers still show something, which is why the mistake survives.
If the span sits inside a paragraph, the <div> start tag closes the paragraph early, so the div and the text after it end up outside it. Your styles for that paragraph then stop applying halfway through.
If the wrapper needs to hold blocks, make the wrapper a div. If the inner part should stay in the line, make it a span too.
When it does not work
| What you see | Cause | Fix |
|---|---|---|
width or height on the span does nothing |
Inline elements ignore both | display: inline-block or block |
| The span's background overlaps the lines above and below | Vertical padding on an inline element does not grow the line | display: inline-block, or increase line-height on the parent |
| A paragraph's styles stop halfway, or an empty paragraph appears | A block element inside a span inside a p |
Use a div wrapper, or only inline content inside |
| A clickable span cannot be reached with Tab | A span is not focusable or keyboard-operable | Use a <button>, or <a href> for navigation |
| The span's class colour is ignored | A more specific rule wins, such as #intro span over .hl |
Make your selector as specific, for example #intro .hl |
| The styled span spills onto two lines | Inline elements wrap with the text | white-space: nowrap on the span, or make it inline-block |
The specificity case is easy to miss. An id in a selector outweighs any number of classes:
#intro span { color: gray; }  /* id + element: wins */
.hl { color: red; }           /* one class: loses */
#intro .hl { color: red; }    /* id + class: now wins */
Share it as a link
A page of highlighted words, badges and live counters is easier to show than to describe. A screenshot freezes the counters, and an .html attachment may open as plain code on a phone.
To send the working version, paste the page into a NOS document and choose Create share link. HTML to link walks through it.
The page renders as written and its scripts run, so the people you send it to can click the buttons and watch the counters change. If you change the code later, the same link shows the new version.